Data Modeling: Composition
In this guide, you will learn about the Composition relationship in Jmix, a key feature that allows for tightly coupled and lifecycle-managed entity relationships. We will compare Compositions with Associations, highlighting their fundamental differences and when to use each.
The guide explores two main types of Compositions—One-to-Many and One-to-One—through practical examples. By the end, you will understand how to set up and effectively use Compositions in your Jmix applications to ensure data consistency and intuitive workflows.
Requirements
If you want to implement this guide step by step, you will need the following:
-
Get the completed sample project, which includes all the examples used in this guide. This allows you to explore the finished implementation and experiment with the functionality right away.
-
You can download and unzip the source repository
-
Or clone it and switch to the
release_2_7branch:git clone https://github.com/jmix-framework/jmix-data-modeling-composition-sample cd jmix-data-modeling-composition-sample git checkout release_2_7
-
-
Alternatively, you can start with the base Jmix Petclinic project and follow the step-by-step instructions in this guide to implement the features yourself.
What We Are Going to Build
This guide enhances the Jmix Petclinic example with practical use cases for managing compositions in a data model. Through real-world examples, we demonstrate how to model, implement, and interact with various types of compositions to achieve transactional consistency and streamlined user workflows.
The application includes the following scenarios:
-
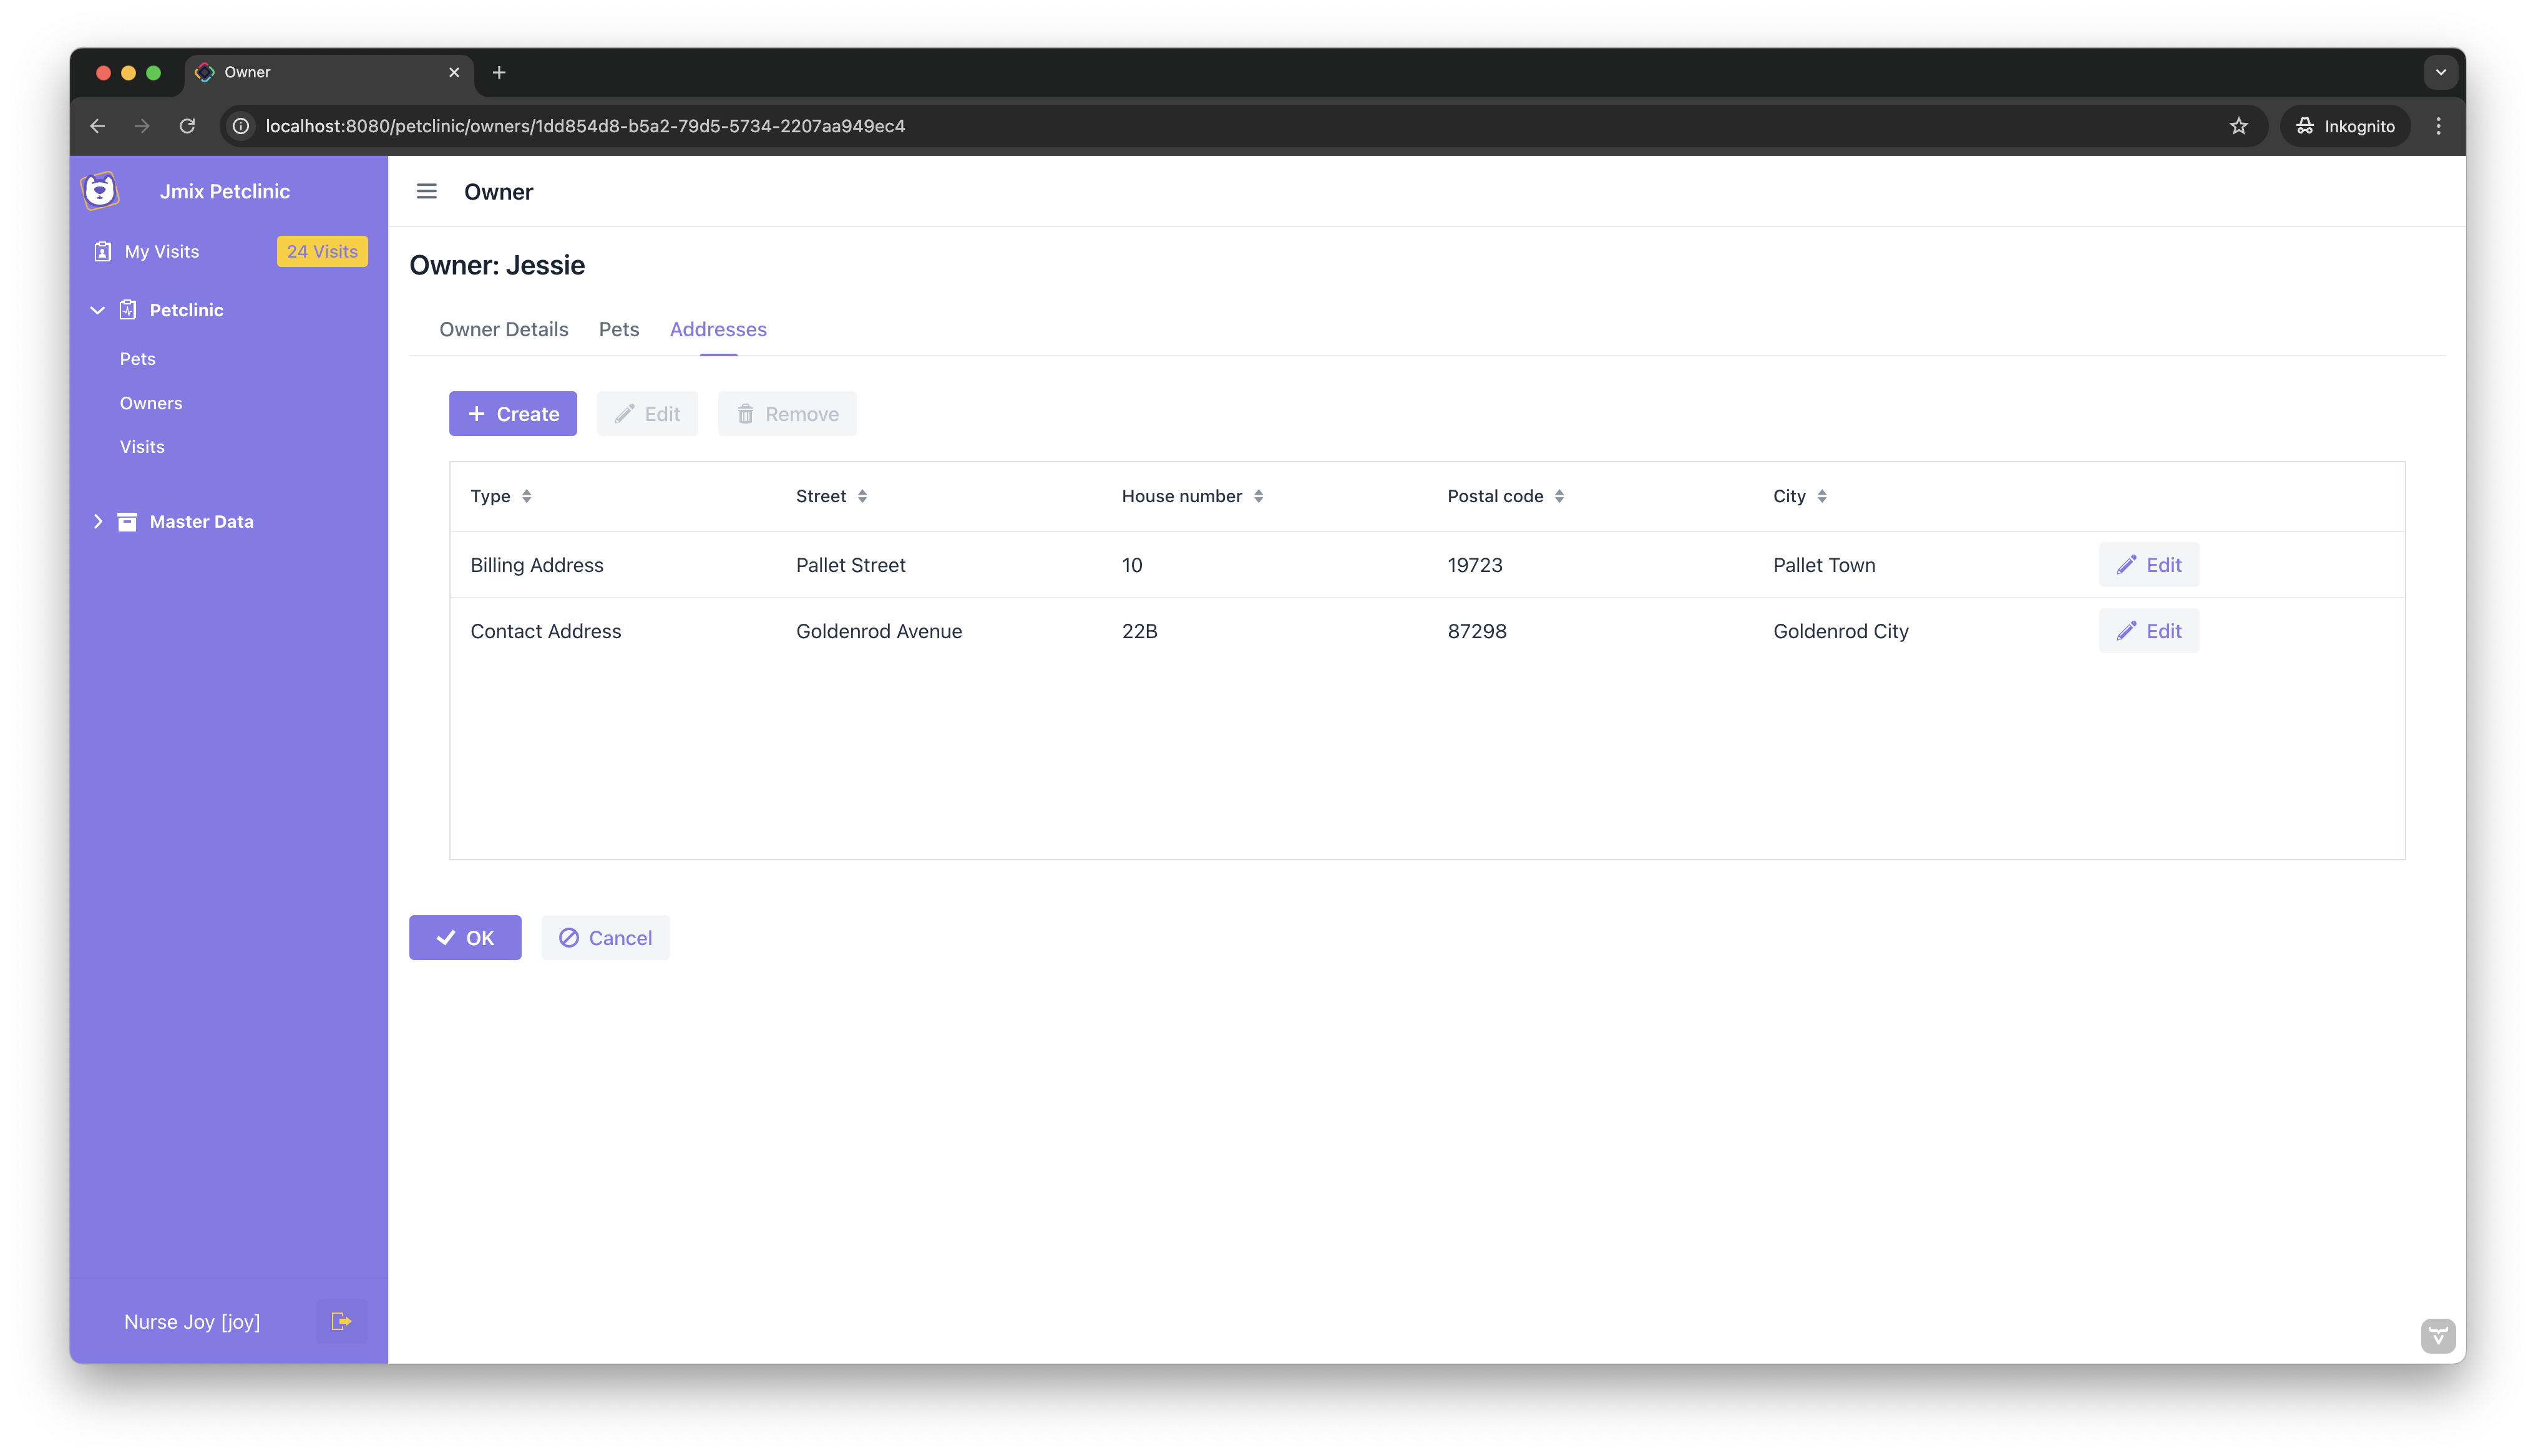
Managing Addresses for Owners: Using inline editing in a
DataGrid, this example demonstrates how to use a One-To-Many composition to manage multipleAddressentities associated with anOwner. -
Tracking Medical Records for Pets: Using dialog-based editing, this example showcases a multi-level composition that links
Owner,Pet, andHealthRecordentities. We will explore two examples using both implicit and explicit Parent Data Context handling. -
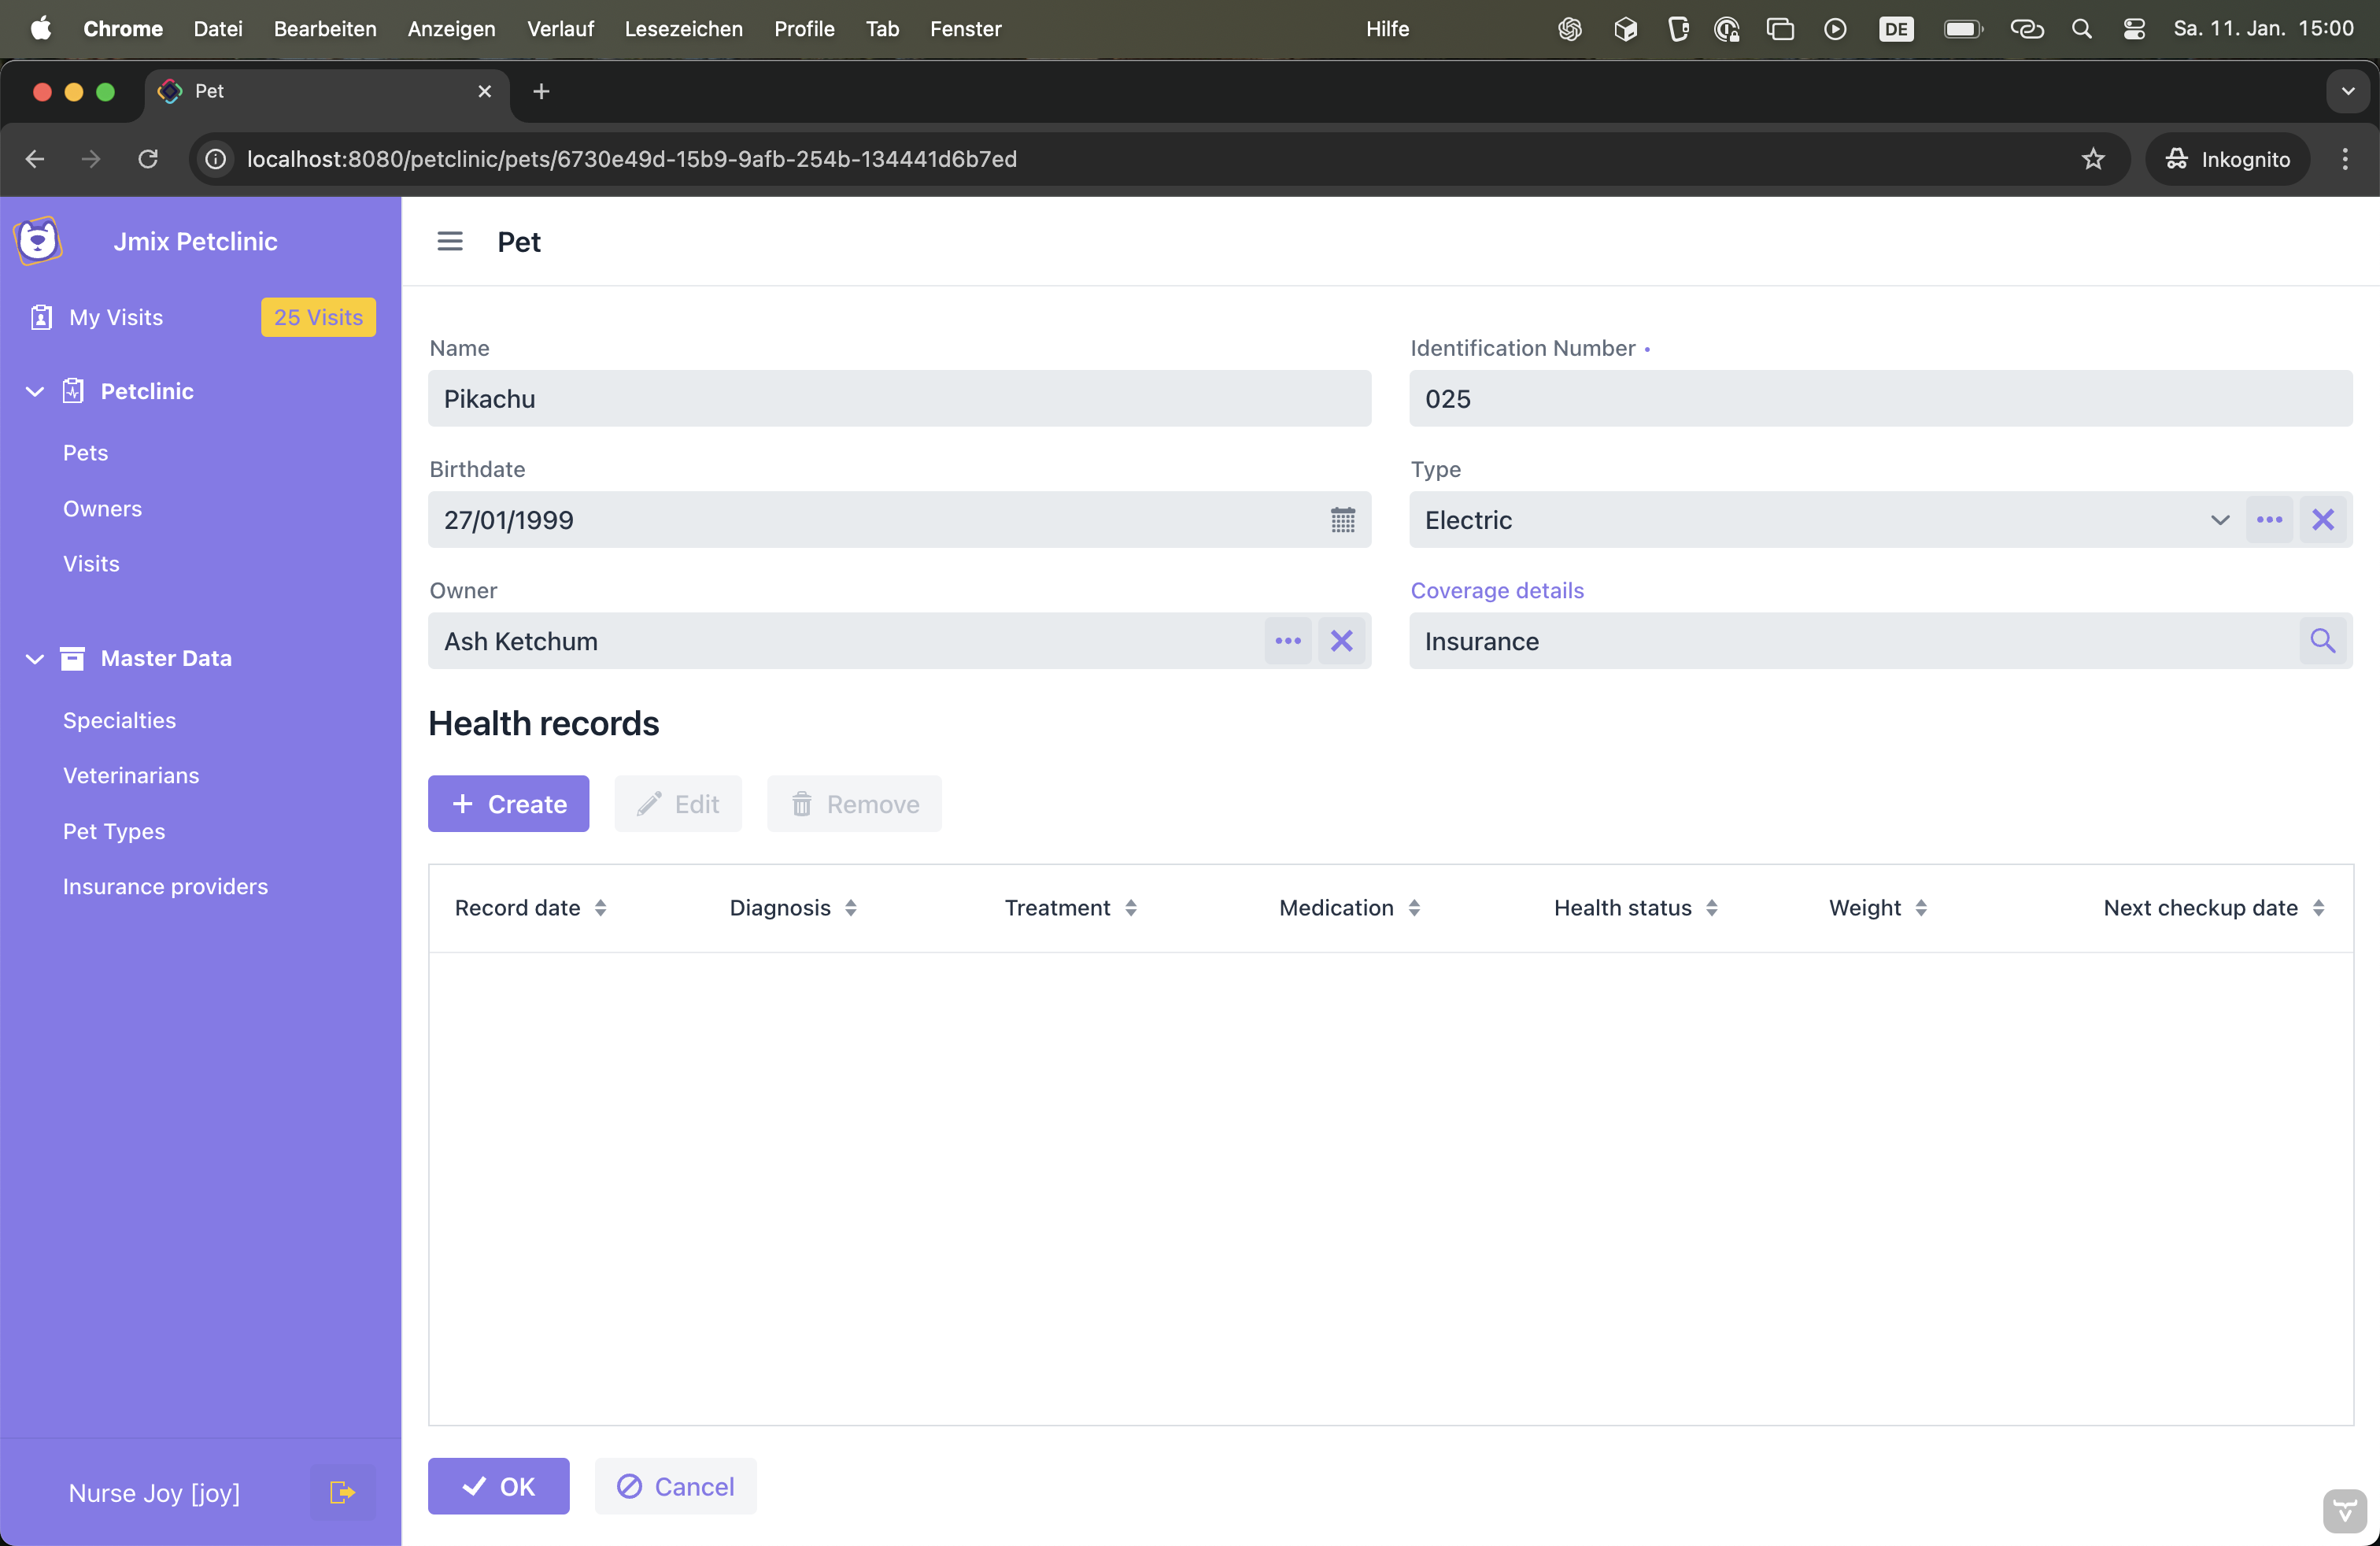
Adding Coverage Details for Pets: Implements a One-To-One composition to associate
CoverageDetailswith aPet. We will explore both dialog-based and inline editing approaches for this example.
Association vs. Composition
In Jmix, relationships between entities can be defined as either Associations or Compositions, depending on the desired level of coupling and lifecycle control.
An Association establishes a flexible link between entities that can exist independently. For example, a Customer and a Product can be associated, but neither depends on the other for its existence.
A Composition, on the other hand, enforces a "master-detail" relationship. Detail entities are tightly coupled to their master, meaning they cannot exist independently. This type of relationship is useful when you want to ensure transactional consistency and lifecycle management across related entities.
|
Although associations and compositions differ semantically, compositions are technically a superset of associations. For example, a One-to-Many composition is essentially a One-to-Many association with additional semantics provided by Jmix. These semantics include lifecycle management and UI behavior enhancements. It is important to note that compositions and associations are not alternative concepts; rather, a composition extends the functionality of an association to introduce master-detail relationships and transactional consistency at the application level. |
In the context of the Jmix Petclinic example, the relationship between an Owner and their Addresses is an example of a composition. An Address that does not belong to an Owner has no meaning within this domain. Changes made to an Owner and their Addresses are managed together and saved as part of a single transaction, ensuring data consistency.
Compositions are closely related to the concept of aggregates, as described in Domain-Driven Design (DDD). Aggregates group related entities into a single, consistent structure with a root entity managing its components. For more details on how Jmix handles editing aggregates, see: Concepts: Editing Aggregates.
|
Unlike JPA association annotations like |
Why and When to Use Composition
Compositions in Jmix provide a robust way to model tightly coupled relationships between entities. Child entities are always managed within the context of their parent, ensuring that their lifecycle is tightly coupled. This means that changes to the parent and its associated children are managed together, allowing for consistent and unified persistence within the same transaction. This simplifies lifecycle management and helps maintain consistent data structures without requiring extra manual handling.
Another key advantage is how compositions enhance the user experience. They allow for cohesive editing of master-detail relationships, often enabling related entities to be handled within the same view. This approach minimizes context switching for users, making the interactions with complex data models more intuitive and aligned with the application’s transactional logic.
At the same time, compositions require users to adapt to a specific behavior: changes to child entities are only persisted when the parent is saved. This behavior, while ensuring transactional consistency, might feel unfamiliar to users accustomed to systems where changes are immediately saved. To avoid confusion, it is important to provide clear visual cues and thoughtful UI design that emphasize the need to confirm changes at the parent level.
By leveraging compositions effectively, you can model domain-specific relationships while reducing the complexity of maintaining consistent and interrelated data structures within your application.
One-to-Many Composition
The first example will be a one-to-many composition using the Owner and Address entities from the Petclinic domain model. The example demonstrates how to configure the data model and UI to enable inline editing of the composition entities in a detail view.
Data Model
The Owner entity contains a one-to-many collection of Address entities, managed as a composition. This is achieved using the @Composition and @OneToMany annotations. Here are the relevant parts of the model:
@JmixEntity
@Table(name = "PETCLINIC_OWNER")
@Entity(name = "petclinic_Owner")
public class Owner extends Person {

    @Composition (1)
    @OnDelete(DeletePolicy.CASCADE)
    @OneToMany(mappedBy = "owner") (2)
    private List<Address> addresses;

    public List<Address> getAddresses() {
        return addresses;
    }

    public void setAddresses(List<Address> addresses) {
        this.addresses = addresses;
    }
}| 1 | The addresses attribute is annotated with @Composition, which ensures that the Address instances are tightly bound to their parent Owner. This means the lifecycle of Address entities is managed together with the Owner. |
| 2 | The @OneToMany annotation specifies the database-level relationship between the Owner and its Address entities, ensuring that multiple Address instances can be linked to a single Owner as part of the One-to-Many association. |
@JmixEntity
@Table(name = "PETCLINIC_ADDRESS", indexes = {
        @Index(name = "IDX_PETCLINIC_ADDRESS_OWNER", columnList = "OWNER_ID")
})
@Entity(name = "petclinic_Address")
public class Address {

    @JmixGeneratedValue
    @Column(name = "ID", nullable = false)
    @Id
    private UUID id;

    @Column(name = "STREET", nullable = false)
    @NotNull
    private String street;

    @Column(name = "HOUSE_NUMBER")
    private String houseNumber;

    @Column(name = "POSTAL_CODE", nullable = false)
    @NotNull
    private String postalCode;

    @Column(name = "CITY", nullable = false)
    @NotNull
    private String city;

    @InstanceName
    @Column(name = "TYPE_", nullable = false)
    @NotNull
    private String type;

    @OnDeleteInverse(DeletePolicy.CASCADE)
    @JoinColumn(name = "OWNER_ID", nullable = false)
    @ManyToOne(fetch = FetchType.LAZY, optional = false)
    private Owner owner; (1)


}| 1 | The Address entity includes a @ManyToOne annotation, which links each Address instance to its owning Owner. |
While the @OneToMany and @ManyToOne associations configure the standard JPA association behaviour, the addition of @Composition on the Owner entity ensures that the Address instances are managed as part of the Owner lifecycle. This distinction introduces additional semantics for lifecycle management and transactional consistency in Jmix.
UI Representation
In the Owner detail view, the user can manage multiple Address entities directly using an inline editable Data Grid. This provides a clear and intuitive overview of all addresses associated with the selected Owner. Users can view, add, edit, or delete addresses within the same view.
In Jmix, there are two main approaches to editing related entities within a composition: dialog-based editing and inline editing. Dialog-based editing opens a separate view as a dialog for editing the detail entity, allowing for more extensive forms with multiple fields. Inline editing, on the other hand, enables users to directly interact with the entity within a DataGrid in the parent entity’s detail view.
Inline Editing
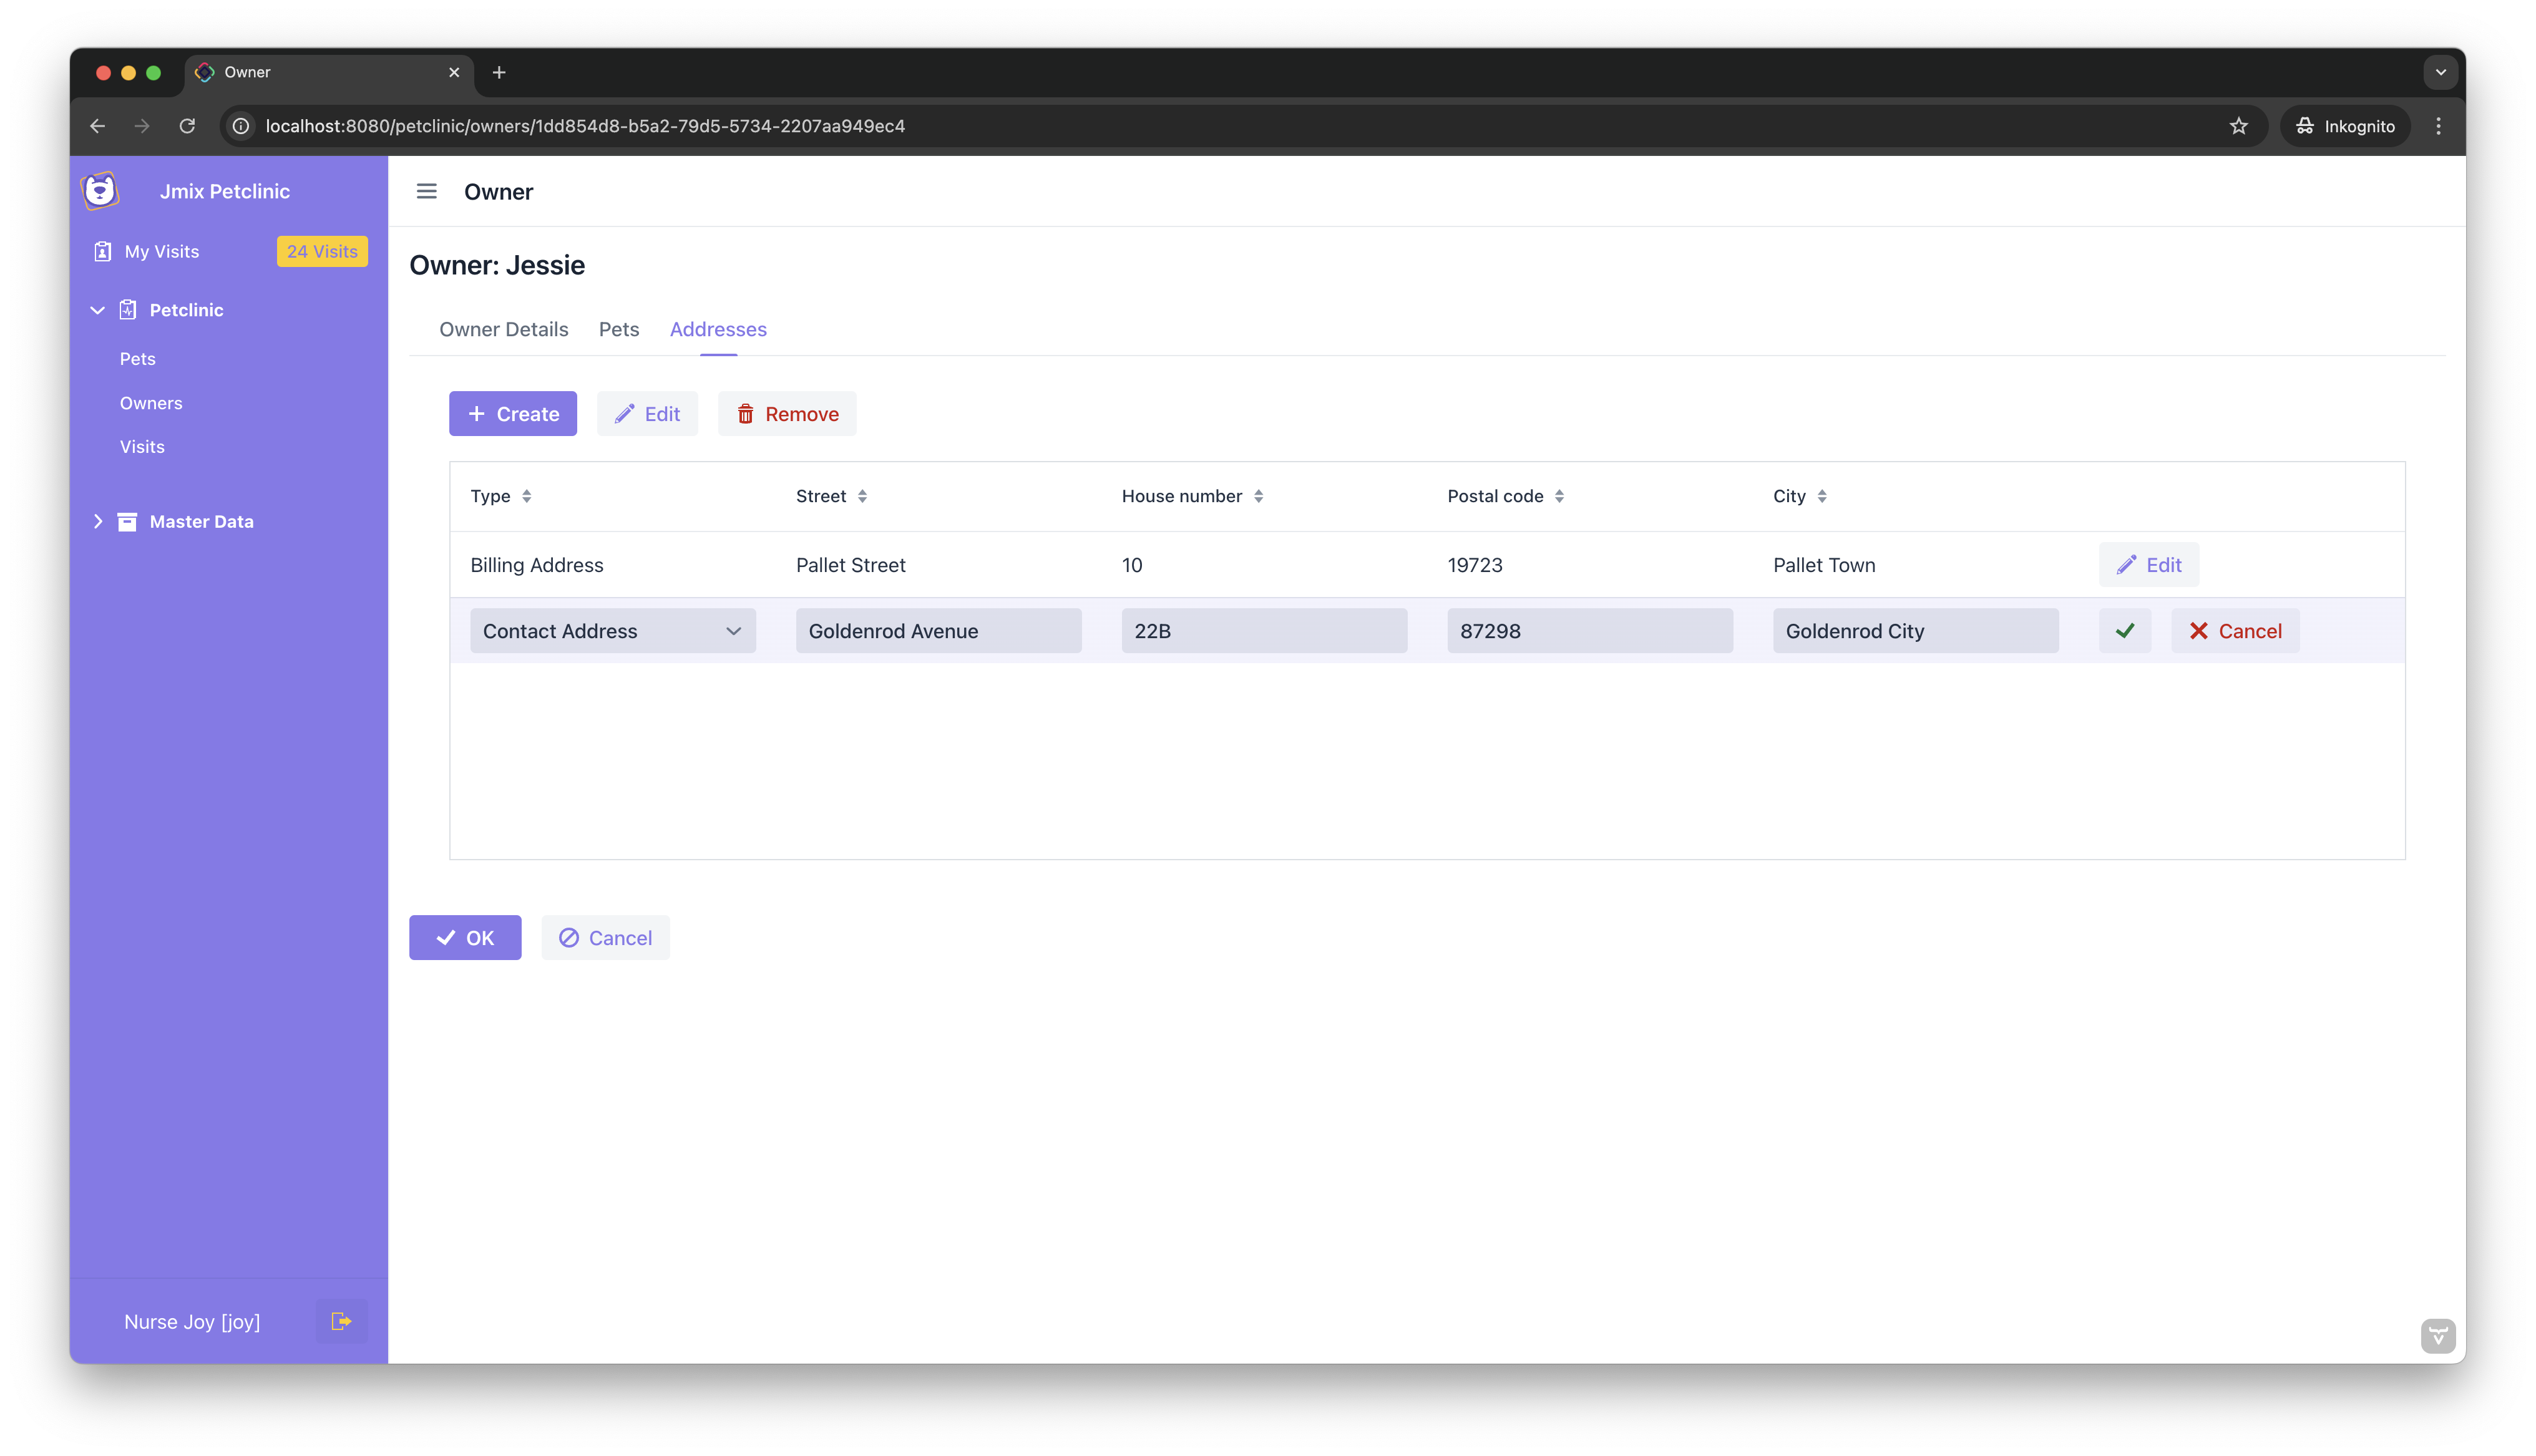
For this example, we are using inline editing to demonstrate how to manage Address entities directly within the Owner detail view. This approach works well when the detail entity has a small number of fields that can be edited easily in a tabular format. It provides an efficient workflow by keeping the user within the same view while editing.
The inline editable data grid allows users to add new addresses, edit existing ones, and delete rows directly. These changes are temporarily stored in the DataContext of the OwnerDetailView and, just like during creation or editing, are only persisted to the database when the user confirms their changes by clicking "OK".
To configure inline editing for the Address entities in the Owner detail view, a DataGrid is used. As a first step, let’s take a look at the owner-detail-view.xml view descriptor, where the dataGrid is defined and configured for inline editing.
<tab id="addressesTab" label="msg://io.jmix.petclinic.entity.owner/Owner.addresses">
    <vbox width="100%">
        <hbox id="addressesButtonsPanel" classNames="buttons-panel">
            <button action="addressesDataGrid.create"/>
            <button action="addressesDataGrid.edit"/>
            <button action="addressesDataGrid.remove"/>
        </hbox>
        <dataGrid id="addressesDataGrid"
                  dataContainer="addressesDc"
                  width="100%"
                  minHeight="20em"
                  editorBuffered="true"
                  allRowsVisible="true"> (1)
            <actions>
                <action id="create" type="list_create"/>
                <action id="edit" type="list_edit"/>
                <action id="remove" type="list_remove"/>
            </actions>
            <columns>
                <column property="type" editable="true"/>  (2)
                <column property="street" editable="true"/>
                <column property="houseNumber" editable="true"/>
                <column property="postalCode" editable="true"/>
                <column property="city" editable="true"/>
                <editorActionsColumn key="bufferedEditorColumn"> (3)
                    <editButton text="Edit" icon="PENCIL"/>
                    <saveButton icon="CHECK" themeNames="success"/>
                    <cancelButton icon="CLOSE" themeNames="error"/>
                </editorActionsColumn>
            </columns>
        </dataGrid>
    </vbox>
</tab>| 1 | The editorBuffered="true" attribute ensures that changes made in the DataGrid editor are not immediately applied to the DataContext but remain in the editor buffer until the user explicitly confirms them. |
| 2 | Columns have to be marked as editable. In our case all columns are set to true as we want to create completely new addresses directly in the data grid. |
| 3 | An editorActionsColumn is added to handle row-specific editing. It includes options to enable editing, save changes, or cancel edits. |
|
The For more details, see the Vaadin Grid documentation on Inline Editing. |
Next, we look at the changes needed in the OwnerDetailView controller. To fully enable inline editing, the controller must handle the creation and editing of records programmatically. For the "Create" action, a new Address entity is created, associated with the current Owner, and immediately opened for editing in the DataGrid.
@Route(value = "owners/:id", layout = MainView.class)
@ViewController("petclinic_Owner.detail")
@ViewDescriptor("owner-detail-view.xml")
@EditedEntityContainer("ownerDc")
public class OwnerDetailView extends StandardDetailView<Owner> {

    @ViewComponent
    private MessageBundle messageBundle;
    @ViewComponent
    private DataGrid<Address> addressesDataGrid;
    @ViewComponent
    private CollectionPropertyContainer<Address> addressesDc;
    @Autowired
    protected Notifications notifications;
    @Subscribe("addressesDataGrid.create")
    protected void onAddressesDataGridCreate(ActionPerformedEvent event) {
        if (addressesDataGrid.getEditor().isOpen()) {
            notifications.create("Close the editor before creating a new entity")
                    .withType(Notifications.Type.WARNING)
                    .withCloseable(false)
                    .show();
            return;
        }

        Address newAddress = dataContext.create(Address.class); (1)

        newAddress.setOwner(getEditedEntity()); (2)
        addressesDc.getMutableItems().add(newAddress); (3)

        addressesDataGrid.select(newAddress);
        addressesDataGrid.getEditor().editItem(newAddress); (4)

    }
    @Subscribe("addressesDataGrid.edit")
    protected void onAddressesDataGridEdit(ActionPerformedEvent event) {
        Address selectedAddress = addressesDataGrid.getSingleSelectedItem();

        if (selectedAddress == null || addressesDataGrid.getEditor().isOpen()) {
            notifications.create(messageBundle.getMessage("editAlreadyOpened"))
                    .withType(Notifications.Type.WARNING)
                    .withCloseable(false)
                    .show();
            return;
        }

        addressesDataGrid.getEditor().editItem(selectedAddress);
    }
}| 1 | Creates a new instance of the Address entity using the DataContext. This ensures the new entity is managed and tracked for persistence. |
| 2 | Associates the newly created Address with the currently edited Owner, establishing the parent-child relationship. |
| 3 | Adds the new Address instance to the addressesDc data container, making it available for display and editing in the DataGrid. |
| 4 | Selects the newly added Address in the DataGrid and opens it in the inline editor for immediate modification. |
Role of the DataContext
The DataContext in Jmix serves as a temporary storage for entities while a view is open. It allows changes made to entities—such as creating, modifying, or deleting them—to be tracked within the scope of the view without immediately persisting them to the database.
In the Owner detail view, for example, any changes to the associated Address entities are held in the DataContext. These changes are only committed to the database when the user confirms them by clicking "OK" to save the Owner detail view. If the user cancels the view, the DataContext discards all pending changes, ensuring that no unintended modifications are persisted.
This approach provides flexibility for editing workflows. Users can experiment with their changes in a safe, isolated context, knowing that nothing is committed until explicitly confirmed. At the same time, the DataContext ensures data consistency by grouping all changes into a single transaction when saved.
For more details about Data Context, see the User Interface Section on Data Components: DataContext.
Multi-Level Composition
After exploring a one-to-many composition with Owner and Address, this section demonstrates a multi-level one-to-many composition. The hierarchy consists of an Owner with multiple Pets, where each Pet can have multiple associated HealthRecord entities. This example illustrates how to model and manage nested compositions in Jmix.
Data Model
The multi-level composition is structured as follows:
-
Owner → Pet:
-
The
Ownerentity has a one-to-many relationship withPet. -
This relationship is managed using the
@Compositionand@OneToManyannotations.
-
-
Pet → HealthRecord:
-
The
Petentity contains a one-to-many relationship withHealthRecord. -
This relationship is also managed with the
@Compositionand@OneToManyannotations, ensuring thatHealthRecordinstances are tightly coupled with their parentPet.
-
Here is the updated data model configuration:
@JmixEntity
@Table(name = "PETCLINIC_OWNER")
@Entity(name = "petclinic_Owner")
public class Owner extends Person {

    @OnDelete(DeletePolicy.CASCADE)
    @Composition
    @OrderBy("identificationNumber")
    @OneToMany(mappedBy = "owner")
    private List<Pet> pets;
}@JmixEntity
@Table(name = "PETCLINIC_PET", indexes = {
@Index(name = "IDX_PETCLINIC_PET_COVERAGE_DETAILS", columnList = "COVERAGE_DETAILS_ID")
})
@Entity(name = "petclinic_Pet")
public class Pet extends NamedEntity {
@JoinColumn(name = "OWNER_ID")
@ManyToOne(fetch = FetchType.LAZY)
private Owner owner;
@OnDelete(DeletePolicy.CASCADE)
@Composition
@OneToMany(mappedBy = "pet")
private List<HealthRecord> healthRecords;
}@JmixEntity
@Table(name = "PETCLINIC_HEALTH_RECORD", indexes = {
@Index(name = "IDX_PETCLINIC_HEALTH_RECORD_PET", columnList = "PET_ID")
})
@Entity(name = "petclinic_HealthRecord")
public class HealthRecord {
@JoinColumn(name = "PET_ID", nullable = false)
@NotNull
@ManyToOne(fetch = FetchType.LAZY, optional = false)
private Pet pet;
}UI Representation
To manage this multi-level hierarchy, we will configure nested compositions as follows:
-
A DataGrid for managing
Petentities in theOwnerDetailView. -
Another DataGrid for managing
HealthRecordentities in thePetDetailView.
<data>
    <instance id="ownerDc"
              class="io.jmix.petclinic.entity.owner.Owner">
        <fetchPlan extends="_base">
            <property name="pets" fetchPlan="_base">
                <property name="type" fetchPlan="_instance_name"/>
            </property>
            <property name="addresses" fetchPlan="_base"/>
        </fetchPlan>
        <loader/>
        <collection id="petsDc" property="pets"/> (1)
        <collection id="addressesDc" property="addresses"/>
    </instance>
</data>

<!-- ... -->

<dataGrid id="petsDataGrid"
          dataContainer="petsDc"
          width="100%"
          minHeight="20em"> (2)
    <actions>
        <action id="create" type="list_create">
            <properties>
                <property name="openMode" value="DIALOG"/> (3)
            </properties>
        </action>
        <action id="edit" type="list_edit">
            <properties>
                <property name="openMode" value="DIALOG"/>
            </properties>
        </action>
        <action id="remove" type="list_remove"/>
    </actions>
    <columns>
        <column property="name"/>
        <column property="identificationNumber"/>
        <column property="birthdate"/>
        <column property="type"/>
    </columns>
</dataGrid>| 1 | The petsDc is a nested CollectionPropertyContainer defined within the OwnerDetailView. It ensures that all Pet entities are automatically loaded when the parent Owner is fetched and also tracks changes made to the Pet entities within the same DataContext as the parent Owner. |
| 2 | The petsDataGrid is configured to display and manage the list of Pet entities associated with the Owner. It is bound to the petsDc container, which links the grid’s data to the parent DataContext. |
| 3 | The create and edit actions for the petsDataGrid are configured with openMode="DIALOG". This ensures that new or edited Pet entities are handled within a dialog window, inheriting the DataContext from the parent view. |
Now, let’s take a look at the PetDetailView. Here, we follow the same approach by using the dialog mode again for editing HealthRecord entities associated with a Pet. This ensures that all changes are consistently linked back to the Owner and maintain the same DataContext hierarchy.
<dataGrid id="healthRecordsDataGrid" dataContainer="healthRecordsDc" width="100%" height="100%">
    <actions>
        <action id="create" type="list_create">
            <properties>
                <property name="openMode" value="DIALOG"/>
            </properties>
        </action>
        <action id="edit" type="list_edit">
            <properties>
                <property name="openMode" value="DIALOG"/>
            </properties>
        </action>
        <action id="nextCheckup" text="msg://nextCheckup" icon="vaadin:calendar" type="list_itemTracking"/>
        <action id="remove" type="list_remove"/>
    </actions>
    <columns>
        <column property="recordDate"/>
        <column property="diagnosis"/>
        <column property="treatment"/>
        <column property="medication"/>
        <column property="healthStatus"/>
        <column property="weight"/>
        <column property="nextCheckupDate"/>
    </columns>
</dataGrid>
The PetDetailView includes a nested DataGrid for managing HealthRecord entities. Using dialog windows ensures that changes to HealthRecord entities are linked to their parent Pet and ultimately to the Owner, with all changes saved together when the Owner is confirmed.
Dialog-Based Editing and Implicit Parent Data Context
When managing nested entities like Pet and HealthRecord, the use of openMode="DIALOG" for editing actions ensures that the parent-child relationship in the DataContext is automatically preserved. This behavior is similar to programmatically setting the parentDataContext, but it happens implicitly through the dialog-based navigation.
By opening child views (e.g., PetDetailView or HealthRecordDetailView) in dialog windows, Jmix automatically links the DataContext of the child view to that of the parent view.
|
Using regular view-based navigation, where the child view replaces the currently visible parent view does not maintain the parent-child relationship in the |
Dialog windows not only maintain the Data Context but also provide users with a clear and intuitive understanding of their position within the hierarchy. This visual continuity enhances the user experience, making it easier to navigate complex aggregates while keeping the application context intact.
For more details on dialog navigation and how it facilitates Data Context inheritance, see: Concepts: Navigation and Dialogs.
Explicit Parent Data Context
In addition to the implicit parent Data Context approach used in dialog-based navigation, there are scenarios where you need to explicitly define and set the parent data context on a dialog based view. This is particularly useful when custom logic is required, such as initializing fields or handling custom workflows.
For this example, we introduce a Record Next Checkup feature in the PetDetailView. This feature allows users to create a new HealthRecord based on an existing record while pre-filling certain fields, like the Next Checkup Date and Diagnosis. Let’s see how it is configured in the controller:
@Subscribe("healthRecordsDataGrid.nextCheckup")
public void onHealthRecordsDataGridNextCheckup(final ActionPerformedEvent event) {
    HealthRecord originalHealthRecord = healthRecordsDataGrid.getSingleSelectedItem();

    dialogWindows.detail(healthRecordsDataGrid) (1)
            .newEntity()
            .withInitializer(healthRecord -> {
                healthRecord.setPet(originalHealthRecord.getPet()); (2)
                healthRecord.setRecordDate(originalHealthRecord.getNextCheckupDate());
                healthRecord.setHealthStatus(originalHealthRecord.getHealthStatus());
                healthRecord.setDiagnosis(originalHealthRecord.getDiagnosis());
                healthRecord.setMedication(originalHealthRecord.getMedication());
            })
            .withParentDataContext(dataContext) (3)
            .open();
}| 1 | The dialogWindows.detail method creates a detail dialog for managing a new HealthRecord entity. Passing the healthRecordsDataGrid ensures that the new entity is added to the grid’s data container after the user confirms their changes. |
| 2 | The setPet method links the new HealthRecord with the currently selected Pet, maintaining the parent-child relationship. |
| 3 | The withParentDataContext ensures that the new HealthRecord shares the same dataContext as the PetDetailView. This means the new record remains in a transient state until saved together with the Pet. |
This implementation allows the system to maintain a clear connection between the Pet and its HealthRecord entities, even during custom workflows. By explicitly setting the parent dataContext, the HealthRecord remains in sync with the parent entity, ensuring transactional consistency.
For more details on managing Data Context hierarchies, see: Data Components: DataContext - Parent Data Context.
One-to-One Composition
In addition to the previously discussed One-to-Many compositions, Jmix also supports One-to-One compositions. This type of composition is useful when the child entity is singular and uniquely tied to its parent. For example, in the context of the Petclinic domain, we introduce the CoverageDetails entity, which represents specific coverage-related information for a pet. Each Pet can have at most one associated CoverageDetails instance.
Data Model
The data model for the One-to-One composition between Pet and CoverageDetails is structured as follows:
@JmixEntity
@Table(name = "PETCLINIC_PET", indexes = {
        @Index(name = "IDX_PETCLINIC_PET_COVERAGE_DETAILS", columnList = "COVERAGE_DETAILS_ID")
})
@Entity(name = "petclinic_Pet")
public class Pet extends NamedEntity {

    @Composition
    @OnDelete(DeletePolicy.CASCADE)
    @JoinColumn(name = "COVERAGE_DETAILS_ID")
    @OneToOne(fetch = FetchType.LAZY)
    private CoverageDetails coverageDetails;

}
The @OneToOne annotation defines a one-to-one relationship between the Pet and CoverageDetails entities, ensuring that each Pet can be associated with a single CoverageDetails instance. The @JoinColumn annotation specifies the foreign key column, COVERAGE_DETAILS_ID, in the Pet table, making the Pet entity the owning side of the relationship.
Combined with @Composition, this setup ensures that the CoverageDetails entity’s lifecycle is tightly bound to the Pet. For example, when a Pet entity is deleted, the associated CoverageDetails is also automatically removed, as dictated by the @OnDelete(DeletePolicy.CASCADE) configuration.
This example uses a unidirectional One-to-One association, meaning that we only have a reference from Pet to CoverageDetails and not the other way around. This is because there is no need to navigate from CoverageDetails to Pet within the scope of this example. However, if such a use case arises, you can easily make the association bidirectional by adding a corresponding back-reference in the CoverageDetails entity. Below is an example of how to define a bidirectional One-to-One association:
@OneToOne(fetch = FetchType.LAZY, mappedBy = "coverageDetails")
private Pet pet;
The mappedBy attribute indicates that the CoverageDetails entity does not own the relationship; instead, it references the ownership on the Pet side.
Adding this back-reference would allow navigation from CoverageDetails to Pet via Java and JPQL queries. For more information about unidirectional and bidirectional associations, as well as other JPA relationship concepts like owning side and inverse side, see the guide on Data Modeling: Many-to-Many Associations.
UI Representation
In this section, we will explore two approaches for managing One-to-One compositions in the user interface: Dialog-Based Editing and Inline Editing. By comparing these variants, you will gain an understanding of how each approach works and when to use them to best suit your application’s requirements.
Dialog-Based Editing
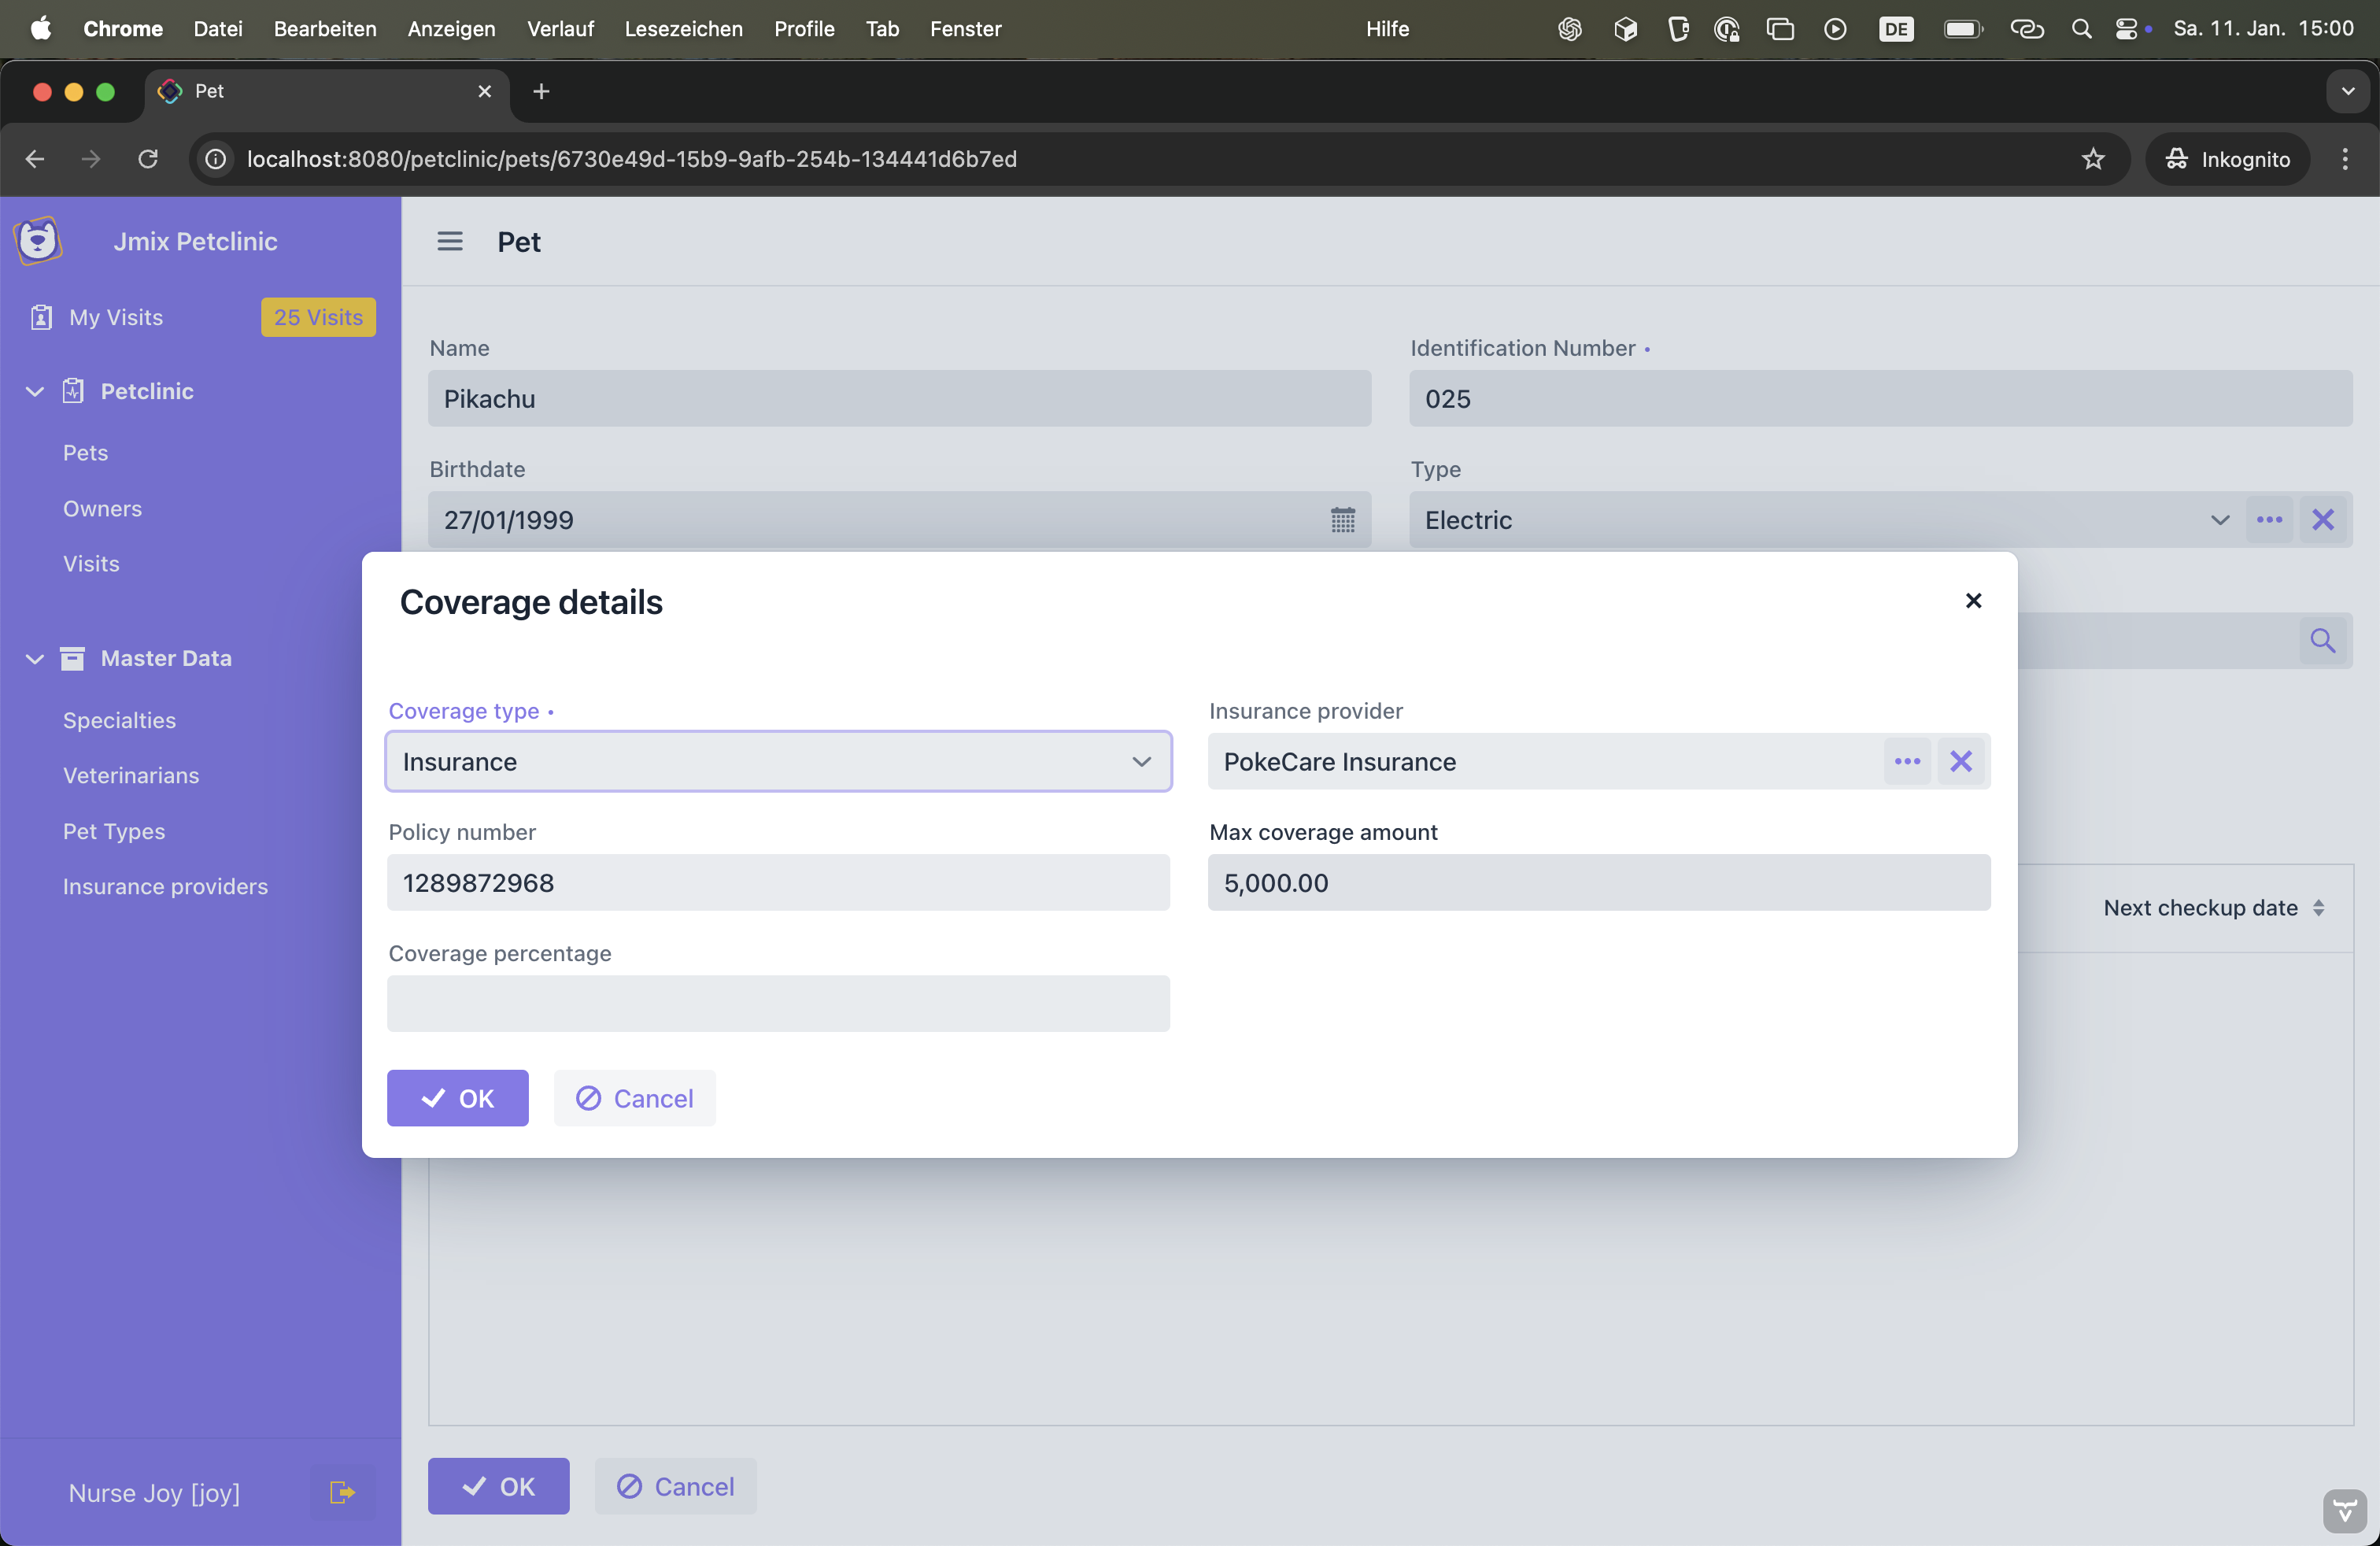
For this first case of dialog based editing, we configure the PetDetailView to manage the CoverageDetails entity using a dialog-based detail view. This approach allows detailed editing of the CoverageDetails while preserving the context of the Pet in the parent view.
In the PetDetailView, the CoverageDetails entity is managed using an EntityPicker component with an entity_openComposition action. This action is specifically designed for One-to-One compositions and simplifies the creation and editing of associated entities.
<entityPicker id="coverageDetailsField" property="coverageDetails">
    <actions>
        <action id="entityOpen" type="entity_openComposition"/>
    </actions>
</entityPicker>
The entity_openComposition action ensures that a new instance of the CoverageDetails entity is created and added to the DataContext if it does not already exist. If the CoverageDetails entity is already linked to the Pet, the action will open the associated CoverageDetails entity in a dialog for editing.
When the user interacts with the entityPicker and invokes this action, the CoverageDetails entity is seamlessly managed within the same transactional context as the Pet. This ensures that changes are held in the DataContext and only persisted to the database when the parent Pet is saved. If the user cancels the editing operation, the DataContext discards all changes, maintaining data integrity.
Let’s now look at an alternative implementation where we use inline editing in the context of a one-to-one composition.
Inline Editing
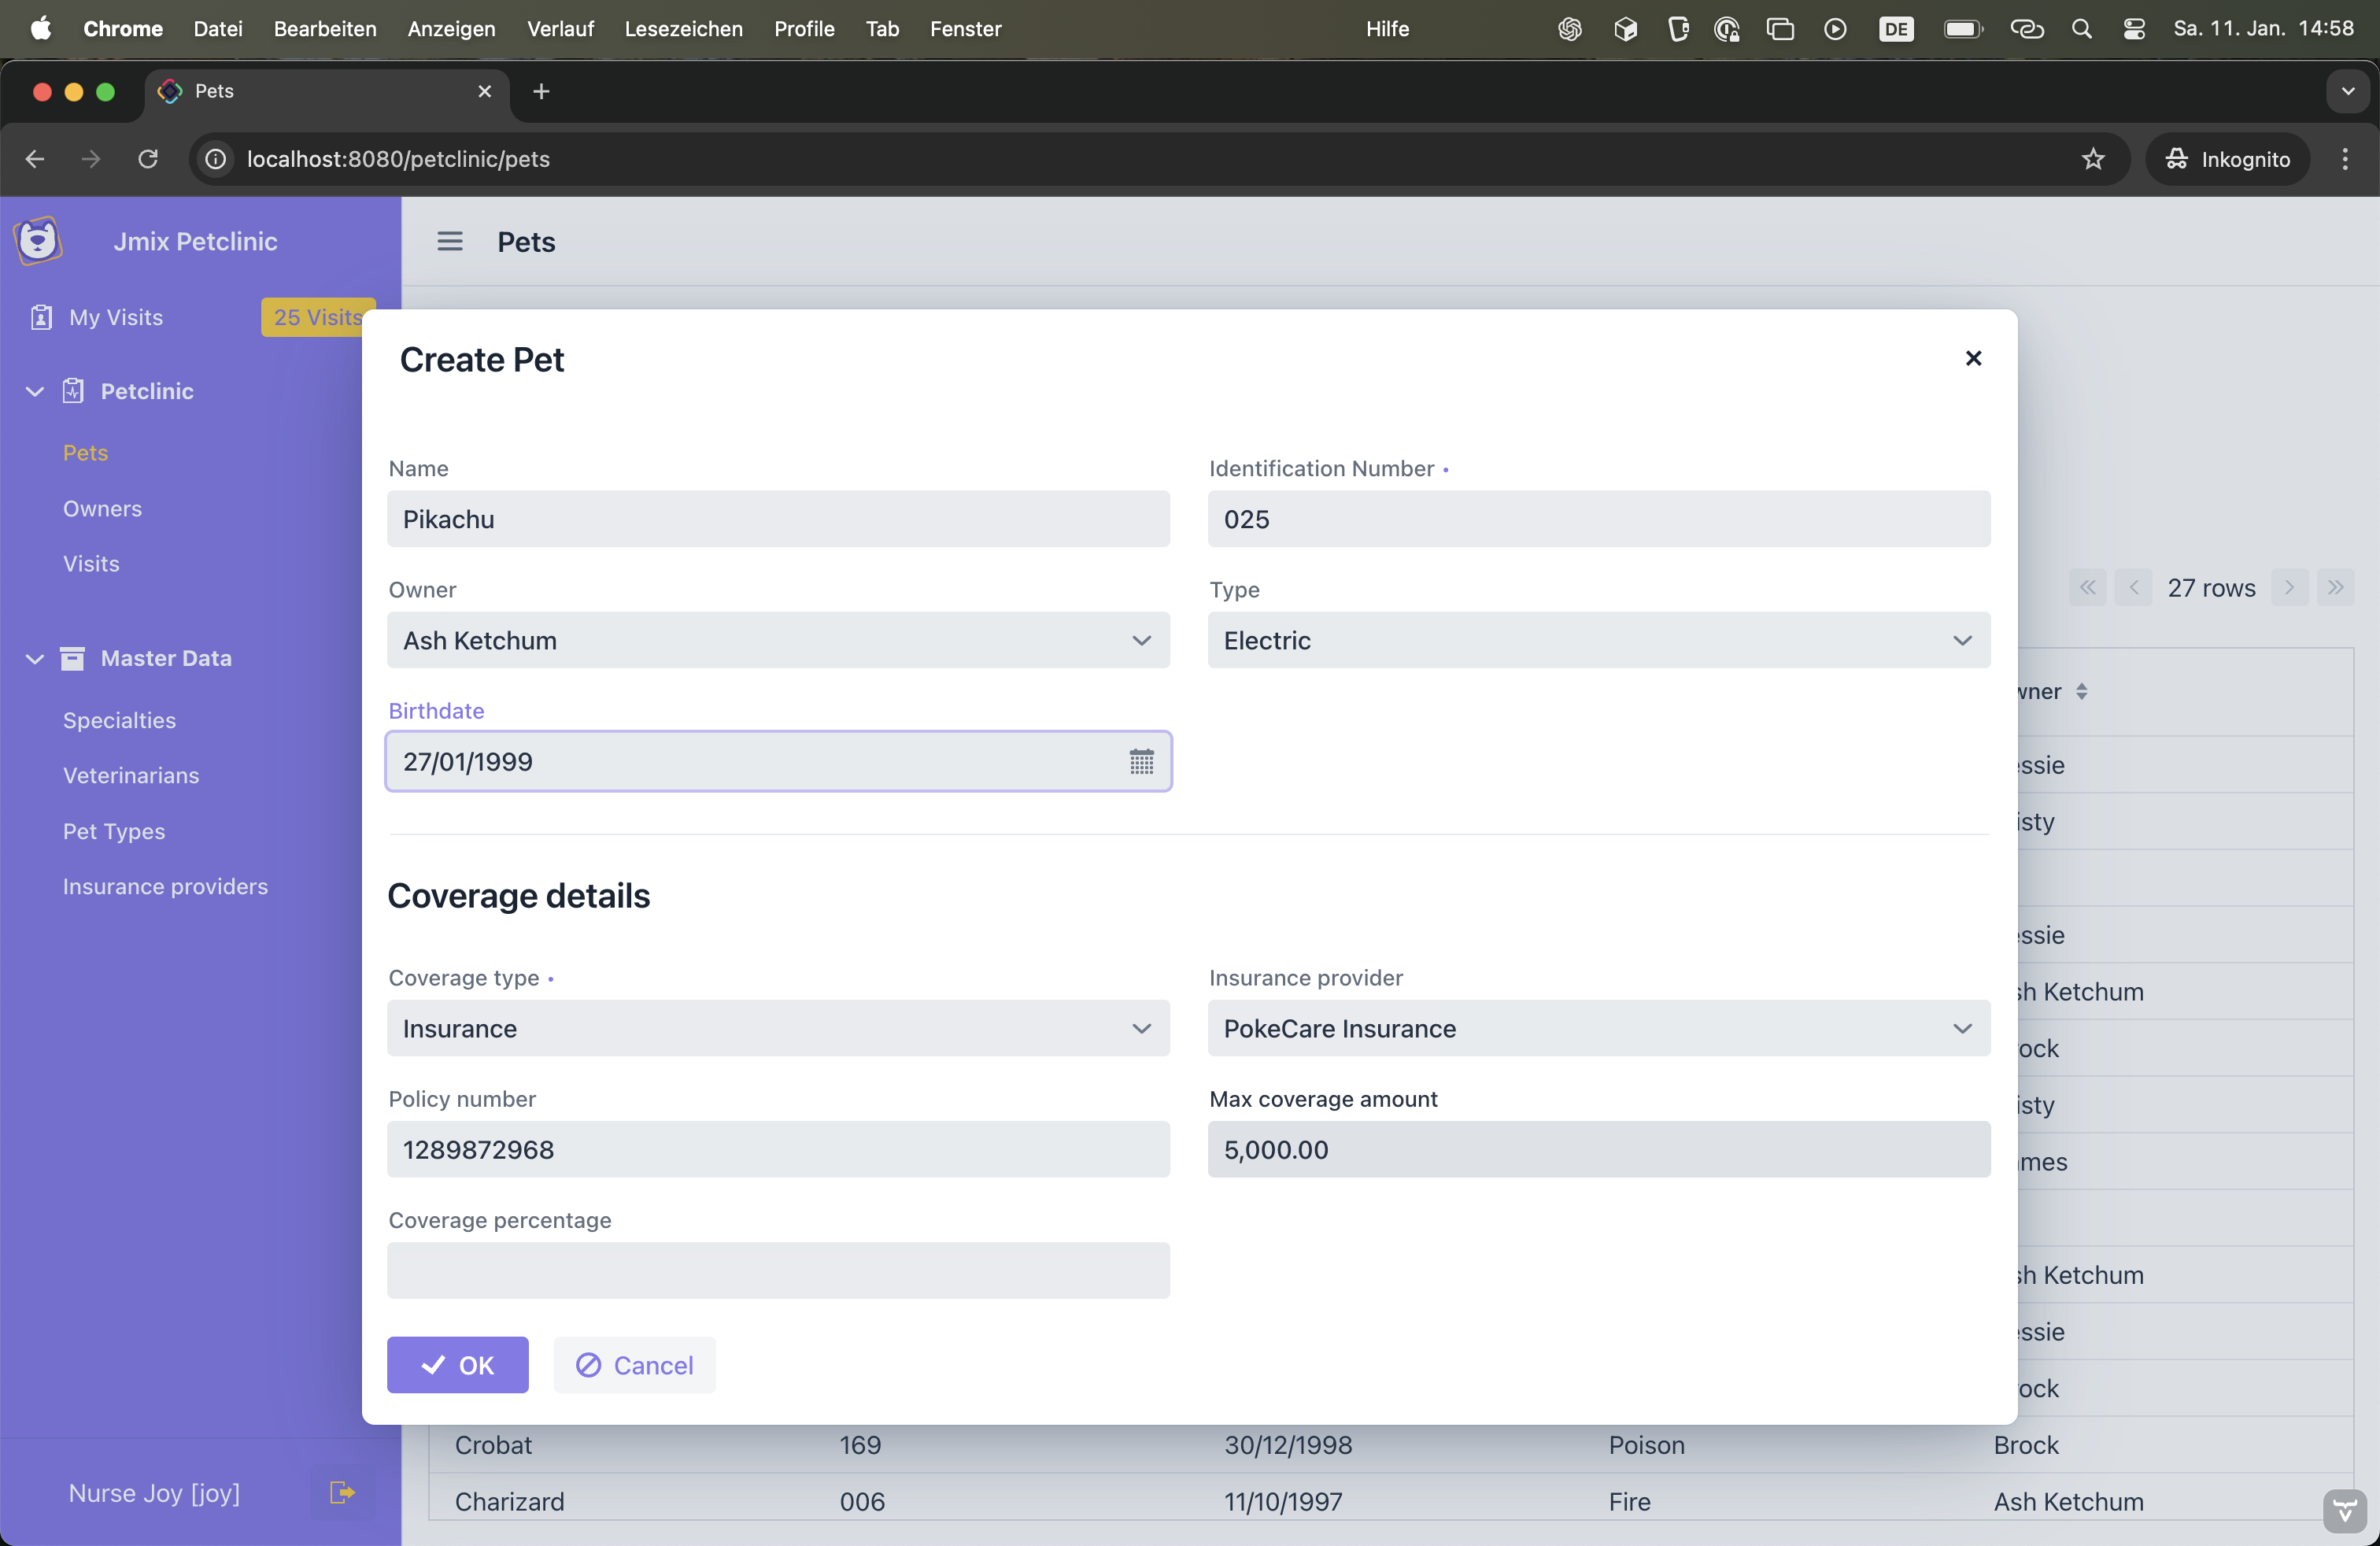
For the second example of inline editing, let’s improve the creation of new Pet entities by introducing a new dedicated CreatePetDetailView for creating pets. This view is designed to simplify the workflow by allowing users to define CoverageDetails at the same time as creating the Pet.
The CreatePetDetailView includes fields for entering the Pet’s basic information, such as name, owner, and type. Additionally, a dedicated section within the same view enables users to fill out the CoverageDetails, such as selecting the coverageType, linking an insuranceProvider, and providing the policyNumber.
<?xml version="1.0" encoding="UTF-8" standalone="no"?>
<view xmlns="http://jmix.io/schema/flowui/view"
      title="msg://createPetDetailView.title"
      focusComponent="form">
    <data>
        <instance id="petDc"
                  class="io.jmix.petclinic.entity.pet.Pet">
            <fetchPlan extends="_base">
                <property name="owner" fetchPlan="_base"/>
                <property name="type" fetchPlan="_base"/>
                <property name="coverageDetails" fetchPlan="_base"/>
            </fetchPlan>
            <loader id="petDl"/>
            <instance id="coverageDetailsDc" property="coverageDetails"/> (1)
        </instance>
        <collection id="insuranceProvidersDc"
                    class="io.jmix.petclinic.entity.coverage.InsuranceProvider">
            <fetchPlan extends="_base"/>
            <loader id="insuranceProvidersDl" readOnly="true">
                <query>
                    <![CDATA[select e from petclinic_InsuranceProvider e]]>
                </query>
            </loader>
        </collection>
        <collection id="ownersDc"
                    class="io.jmix.petclinic.entity.owner.Owner">
            <fetchPlan extends="_base"/>
            <loader id="ownersDl">
                <query>
                    <![CDATA[select e from petclinic_Owner e]]>
                </query>
            </loader>
        </collection>
        <collection id="petTypesDc"
                    class="io.jmix.petclinic.entity.pet.PetType">
            <fetchPlan extends="_base"/>
            <loader id="petTypesDl">
                <query>
                    <![CDATA[select e from petclinic_PetType e]]>
                </query>
            </loader>
        </collection>
    </data>
    <facets>
        <dataLoadCoordinator auto="true"/>
    </facets>
    <actions>
        <action id="saveAction" type="detail_saveClose"/>
        <action id="closeAction" type="detail_close"/>
    </actions>
    <layout>
        <formLayout id="form" dataContainer="petDc">
            <responsiveSteps>
                <responsiveStep minWidth="0" columns="1"/>
                <responsiveStep minWidth="40em" columns="2"/>
            </responsiveSteps>
            <textField id="nameField" property="name"/>
            <textField id="identificationNumberField" property="identificationNumber"/>
            <entityComboBox id="ownerField" property="owner" itemsContainer="ownersDc" />
            <entityComboBox id="typeField" property="type" itemsContainer="petTypesDc" />
            <datePicker id="birthdateField" property="birthdate"/>
        </formLayout>
        <hr />
        <h3 text="msg://io.jmix.petclinic.entity.pet/Pet.coverageDetails" />

        <formLayout id="coverageDetailsForm" dataContainer="coverageDetailsDc"> (2)
            <responsiveSteps>
                <responsiveStep minWidth="0" columns="1"/>
                <responsiveStep minWidth="40em" columns="2"/>
            </responsiveSteps>
            <select id="coverageTypeField" property="coverageType"/>
            <entityComboBox id="insuranceProviderField"
                            property="insuranceProvider"
                            itemsContainer="insuranceProvidersDc"
                            enabled="false"
            />
            <textField id="policyNumberField" property="policyNumber" enabled="false"/>
            <textField id="maxCoverageAmountField" property="maxCoverageAmount" enabled="false"/>
            <textField id="coveragePercentageField" property="coveragePercentage" enabled="false"/>
        </formLayout>
        <hbox id="detailActions">
            <button id="saveAndCloseButton" action="saveAction"/>
            <button id="closeButton" action="closeAction"/>
        </hbox>
    </layout>
</view>| 1 | The coverageDetailsDc is an InstancePropertyContainer bound to the coverageDetails attribute of the Pet. This ensures that the CoverageDetails entity is tightly integrated into the lifecycle of the Pet. |
| 2 | The coverageDetailsForm is directly embedded within the CreatePetDetailView and manages fields for the CoverageDetails entity. This is made possible by binding the form to the coverageDetailsDc container. |
In the controller, the associated CoverageDetails entity is initialized programmatically during the creation of a new Pet. This is achieved using the DataContext to create a new instance of CoverageDetails, which is then linked to the Pet entity.
@Route(value = "pet-create/:id", layout = MainView.class)
@ViewController(id = "petclinic_Pet.create")
@ViewDescriptor(path = "create-pet-detail-view.xml")
@EditedEntityContainer("petDc")
public class CreatePetDetailView extends StandardDetailView<Pet> {
    @ViewComponent
    private DataContext dataContext;

    @Subscribe
    public void onInitEntity(final InitEntityEvent<Pet> event) {  (1)
        CoverageDetails coverageDetails = dataContext.create(CoverageDetails.class);  (2)
        event.getEntity().setCoverageDetails(coverageDetails); (3)
    }

}| 1 | The onInitEntity hook method is used to initialize a new CoverageDetails instance when creating a Pet. |
| 2 | We use DataContext to create a instance of CoverageDetails that is managed within the same transaction as the Pet. |
| 3 | The CoverageDetails is associated with the Pet, establishing the One-to-One composition. |
By embedding the CoverageDetails form directly into the CreatePetDetailView, we enable users to define a CoverageDetails instance while creating a new Pet.
All changes to both the Pet and its CoverageDetails are saved in a single transaction when the user confirms the operation. This ensures data consistency while reducing navigation complexity, as users no longer need to switch between multiple views to manage related entities.
Summary
In this guide, we explored the concept of composition in Jmix, a fundamental approach for modeling tightly coupled entity relationships where the lifecycle of child entities is bound to their parent. Compositions ensure data consistency and simplify transactional workflows by managing entities like Owners and their Addresses or Pets and their Coverage Details as unified structures. This allows for clean, aggregated data models aligned with the principles of domain-driven design.
We examined two primary types of compositions: One-to-Many and One-to-One. One-to-Many compositions, such as between an Owner and multiple Addresses, allow for inline or dialog-based editing, providing flexibility in user interface design and transactional integrity. One-to-One compositions, as demonstrated with Pets and their Coverage Details, highlight the ability to maintain focused, singular relationships while offering robust lifecycle management.
Compositions are a powerful tool in Jmix, enabling you to model master-detail relationships effectively. By choosing the right composition type and UI approach for your use case, you can streamline your application’s data management while maintaining clarity and consistency in your domain model.

