entityPicker
An input field to select an entity instance through a dialog and perform various actions on it. These can be both predefined actions such as updating instance details, as well as custom, configurable actions to perform more specific tasks.
-
XML element:
entityPicker -
Java class:
EntityPicker
Basics
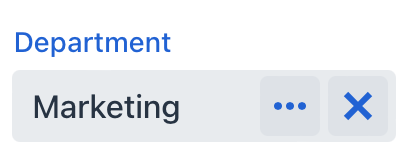
The entityPicker component is commonly used when the field value must represent a reference to an entity. It combines the ability to select a particular entity instance with the ability to perform relevant actions.
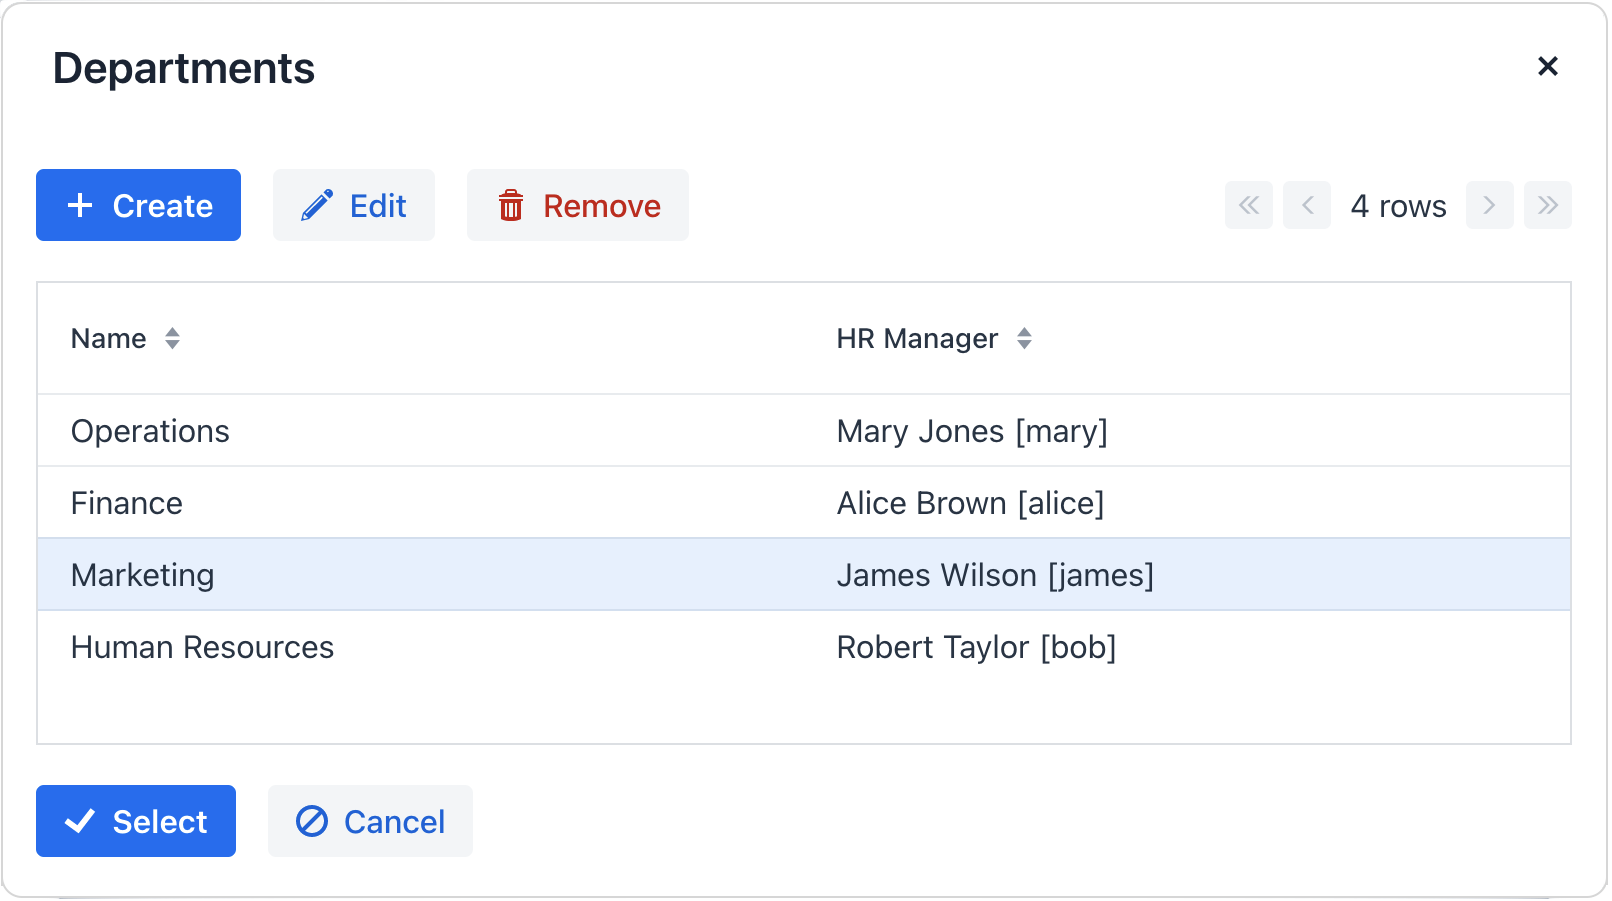
Clicking the lookup button opens a dialog with a list view containing entity instances.
|
|
Like other views in the application, this view is configurable, allowing multiple attributes to help users easily identify the needed instance. It provides more context than the entityComboBox which only shows instance names.
When the number of instances is large, additional instances are loaded dynamically as you navigate the list.
Quick Start
The following example demonstrates how to use the entityPicker component to select the department the user belongs to:
| For the example to work correctly, ensure that you define a list view for the Department entity. |
<data>
    <instance class="com.company.onboarding.entity.User" id="userDc"> (1)
        <fetchPlan extends="_base"> (2)
            <property name="department" fetchPlan="_base"/>
        </fetchPlan>
        <loader id="userDl"/>
    </instance>
</data>
<facets>
    <dataLoadCoordinator auto="true"/> (3)
</facets>
<layout>
    <entityPicker id="entityPicker"
                  dataContainer="userDc"
                  property="department"
                  label="Department"> (4)
        <actions>
            <action id="entityLookup" type="entity_lookup"/> (5)
            <action id="entityClear" type="entity_clear"/> (6)
        </actions>
    </entityPicker>
</layout>| 1 | Data container to hold the User instance which is currently being edited. |
| 2 | Fetch plan extended to retrieve a collection of Department instances that will be available for selection. |
| 3 | Data load coordinator to automatically supply the component with instances to select from. |
| 4 | Binding the component to a data container and property. |
| 5 | Adding a predefined action to open the lookup view. |
| 6 | Adding a predefined action to clear the selection. |
For more interactive example of entityPicker and its variations, see:
Data Binding
Data binding refers to linking a visual component to a data container. Changes in the visual component or corresponding data container can trigger updates to one another. See Using Data Components for more details.
Select an instance
If you simply need a way to select an instance of a specific entity, specify that entity using the metaClass attribute:
<entityPicker metaClass="Department">
    //...
</entityPicker>
Select an instance to update a related attribute
Selecting an instance is often intended to update an attribute within another instance. In the example above, selecting a Department instance updates the User instance by associating it with the chosen department.
In such cases you will need to bind the component to the data container holding the instance and specify the attribute to be updated using the dataContainer and property attributes respectively:
<entityPicker dataContainer="userDc" property="department">
    //...
</entityPicker>
Actions
You can define custom and predefined actions for entityPicker displayed as buttons on the right.
You can do it either in the XML descriptor using the actions nested element or programmatically in the controller using the addAction() method.
|
To add |
Predefined Action
When Studio generates entityPicker in the detail view, it also generates two predefined standard actions: entity_lookup and entity_clear. There are also the entity_open and entity_openComposition actions.
Use the type and id attributes for declaring predefined action in XML.
If you create entityPicker without actions, the XML loader will define only the entity_lookup and entity_clear actions. To add another predefined action, for example, the entity_open, you should specify the actions element as follows:
<entityPicker dataContainer="userDc"
              property="department"
              label="Department" >
    <actions>
        <action id="entityLookup" type="entity_lookup"/>
        <action id="entityClear" type="entity_clear"/>
        <action id="entityOpen" type="entity_open"/>
    </actions>
</entityPicker>
The actions element does not extend but overrides a set of standard actions. You should define the identifiers of all required actions explicitly.
Custom Actions
To define a custom action in XML, use the actions nested element. Specify the id and icon attributes for the action:
<entityPicker id="departmentEntityPicker"
              dataContainer="userWithDeptManagerDc"
              property="department">
    <actions>
        <action id="entityLookup" type="entity_lookup"/>
        <action id="knowManager" icon="QUESTION"
                description="Know HR-manager"/>
    </actions>
</entityPicker>
Then implement custom logic in the view controller by subscribing to ActionPerformedEvent:
@ViewComponent
private EntityPicker<Department> departmentEntityPicker;

@Autowired
private Notifications notifications;

@Subscribe("departmentEntityPicker.knowManager")
public void onKnowManager(ActionPerformedEvent event) {
    Department department = departmentEntityPicker.getValue();
    if (department != null)
        notifications.create(department.getName() + " has "
                + department.getHrManager() + " HR-manager")
                .show();
    else notifications.create("Choose a department").show();
}|
You can generate the |
Adding Actions Programmatically
Use the addAction() method to set actions programmatically.
-
Adding Standard Action
For example, if the component is defined in the XML descriptor without the
actionsnested element, it is sufficient to add missing standard actions:@ViewComponent private EntityPicker<Department> departmentEntityPicker; @Autowired private Actions actions; @Subscribe public void onInit(InitEvent event) { departmentEntityPicker.addAction(actions.create(EntityOpenAction.ID)); } -
Adding Custom Action
An example of creating a custom action:
@ViewComponent
private EntityPicker<Department> departmentEntityPicker;

@Subscribe
public void onInit(InitEvent event) {
    departmentEntityPicker.addAction(new BaseAction("showManager")
            .withIcon(VaadinIcon.QUESTION_CIRCLE.create())
            .withHandler(e -> {
                Department department = departmentEntityPicker.getValue();
                if (department != null)
                    notifications.create(department.getName() + " has "
                                    + department.getHrManager() + " HR-manager")
                            .show();
                else notifications.create("Choose a department").show();
            }));
}
Theme Variants
Use themeNames attribute to set a component theme.
| Variant | Description | Supported By |
|---|---|---|
|
Aligns the field value to the left side. |
Aura, Lumo |
|
Centers the field value. |
Aura, Lumo |
|
Aligns the field value to the right side. |
Aura, Lumo |
|
Aligns the field value to the start side, taking the current text direction into account. |
Aura |
|
Aligns the field value to the end side, taking the current text direction into account. |
Aura |
|
Renders the helper text above the field, below the label. |
Aura, Lumo |
|
Makes the component smaller. |
Aura, Lumo |
Attributes
id - alignSelf - allowCustomValue - ariaLabel - ariaLabelledBy - autofocus - classNames - colspan css - dataContainer - enabled - errorMessage - focusShortcut - height - helperText - label - maxHeight - maxWidth - metaClass - minHeight - minWidth - placeholder - property - readOnly - required - requiredMessage - tabIndex - themeNames - title - visible - width
metaClass
You can use entityPicker without binding to the data container, that is, without setting dataContainer and property. In this case, the metaClass attribute should be used to specify an entity type for entityPicker. For example:
<entityPicker metaClass="Department">
    <actions>
        <action id="entityLookup" type="entity_lookup"/>
        <action id="entityOpen" type="entity_open"/>
    </actions>
</entityPicker>
You can get an instance of a selected entity by injecting the component into a controller and invoking its getValue() method.
Handlers
AttachEvent - BlurEvent - ComponentValueChangeEvent - CustomValueSetEvent - DetachEvent - FocusEvent - formatter - statusChangeHandler - validator
|
To generate a handler stub in Jmix Studio, use the Handlers tab of the Jmix UI inspector panel or the Generate Handler action available in the top panel of the view class and through the Code → Generate menu (Alt+Insert / Cmd+N). |
