Filter
The Filter component is a versatile tool for filtering the data it is bound to.
The component enables quick data filtering by arbitrary conditions, as well as creating configurations for repeated use.
Component’s XML-name: filter.
Basics
Filter should be connected to a data loader of a standalone CollectionContainer or KeyValueCollectionContainer. It generates a Condition object that is set to the loader and later processed by the data store. For a JPA entity, the data store modifies the resulting JPQL query, so the filtering is done on the database level, and only selected data is loaded from the database to the application memory.
By default, Jmix Studio generates the Filter component when creating browser and master-detail screens for an entity.
An example of filter declaration in the XML screen descriptor is shown below:
<data>
    <collection id="customersDc" class="ui.ex1.entity.Customer">
        <fetchPlan extends="_base">
            <property fetchPlan="_base" name="city"/>
            <property name="favouriteBrands" fetchPlan="_base"/>
        </fetchPlan>
        <loader id="customersDl">
            <query>
                <![CDATA[select e from uiex1_Customer e]]>
            </query>
        </loader>
    </collection>
</data>
<layout spacing="true" expand="customersTable">
    <filter dataLoader="customersDl" caption="Simple filter">
        <properties include=".*"/>
    </filter>
    <table id="customersTable"
           width="100%"
           dataContainer="customersDc">
        <columns>
            <column id="level"/>
            <column id="age"/>
            <column id="hobby"/>
            <column id="firstName"/>
            <column id="lastName"/>
            <column id="city"/>
            <column id="rewardPoints"/>
        </columns>
    </table>
</layout>
In the example above, the data container holds the collection of Customer entity instances. The data loader loads the collection using a JPQL query. The filter component is connected to the loader using the dataLoader attribute. Data is displayed using the Table component, which is connected to the data container.
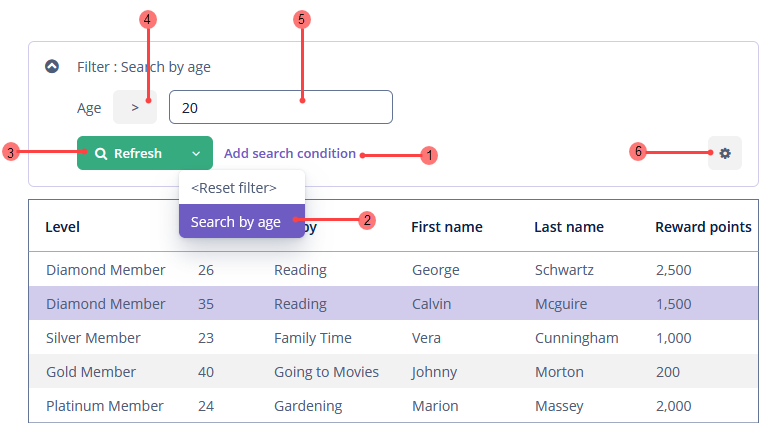
A typical filter is shown below:
-
The Add search condition link (1).
-
The operation selector (4).
-
The condition value field (5).
By default, the component is in quick filter mode. It means that a user can add a set of conditions for a one-off data search. After the screen is closed, the conditions will disappear.
Quick Filter Example
Let’s consider that we have the Customer entity and want to:
-
Create a quick filter with multiple conditions in the Customer browser screen.
-
Save this filter for the future.
Creating a Quick Filter
-
Click the Add search condition link(1).
-
Select the Age property in the Properties list.
-
Select the Hobby property.
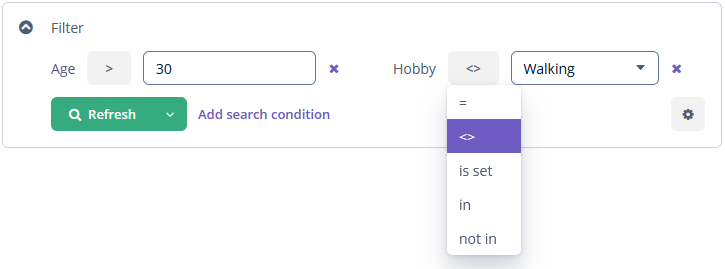
Selected conditions are displayed at the top of the filter panel.
-
Modify the condition value fields and operations:
Saving the Filter
-
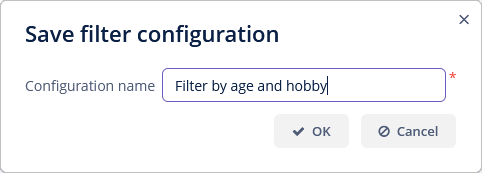
Click the filter settings icon(6), select Save with values.
-
Provide a new filter configuration name in the Save filter configuration dialog:
After that, the filter will be saved and appear in the Refresh button’s drop-down menu(3).
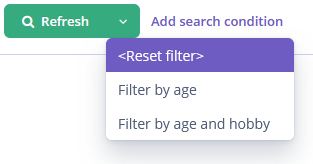
The Reset filter menu lets you reset all currently applied search conditions.
Adding Conditions
To create a quick filter, click the Add search condition link (1). The Add condition screen will be displayed:
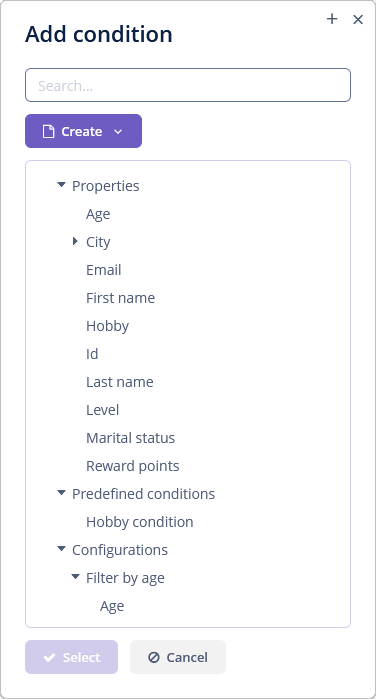
Possible condition types are described below:
-
Properties - attributes of this entity and related entities. The conditions tree displays persistent and dynamic entity attributes. They are displayed according to the rules specified in the properties element.
-
Predefined conditions are conditions specified by the developer in the conditions element in the XML descriptor. Predefined conditions are not initially added to any configurations, but the user can select them in the Add Condition screen and add to the run-time configuration.
-
Configurations can be created at design-time or run-time (via the Configuration editor).
Selected conditions are displayed at the top of the filter panel. The  icon will appear next to each condition field, allowing them to be removed from the set.
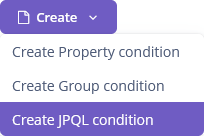
-
PropertyFiltercorresponds to property conditions. -
JpqlFiltercorresponds to JPQL conditions. -
GroupFiltercorresponds to group conditions.
When the Search add-on is added to the project, a new Full-text condition is available for usage.
So the user has the opportunity to create filter conditions in run-time.
Property Conditions
The Property conditions editor allows users to configure the attributes of the PropertyFilter component. PropertyFilter is related to the entity property.
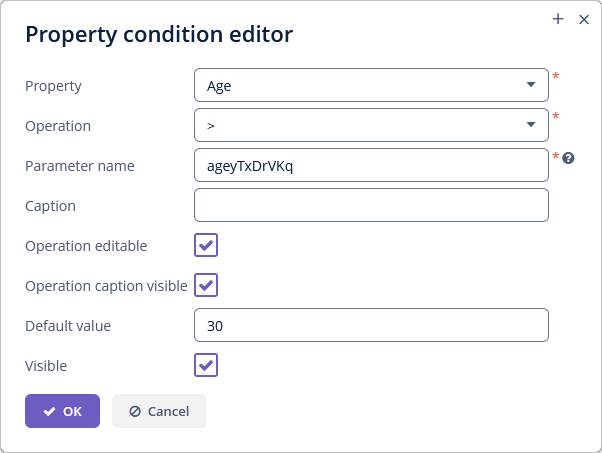
Select the entity attribute in the Property field.
The Operation field enables selecting the condition operator. The list of available operations depends on the attribute type.
Use the Parameter name attribute to set the name of the associated query parameter name. You can use this name to introduce dependencies between filter components in configuration. If not defined, then the parameter name is randomly generated.
You can set the custom caption of the property filter condition in the Caption field.
Use the Operation editable checkbox to set whether an operation selector is visible. If you select this checkbox, the operation field enables selecting the condition operator in run-time.
Use the Operation caption visible checkbox to define the visibility of the operation caption.
You can set the default value for the filter condition in the Default value field.
JPQL Conditions
The JPQL conditions editor allows users to create conditions based on JPQL expressions.
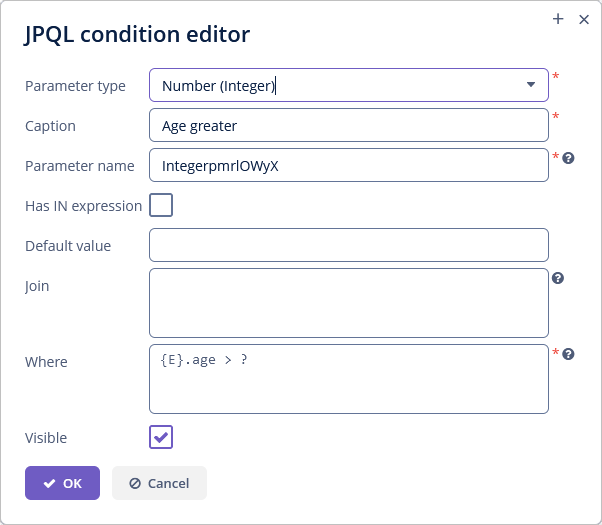
In the Parameter type field, you should select the Java class of the condition parameter. The No parameter value lets you create a condition without parameters. For example:
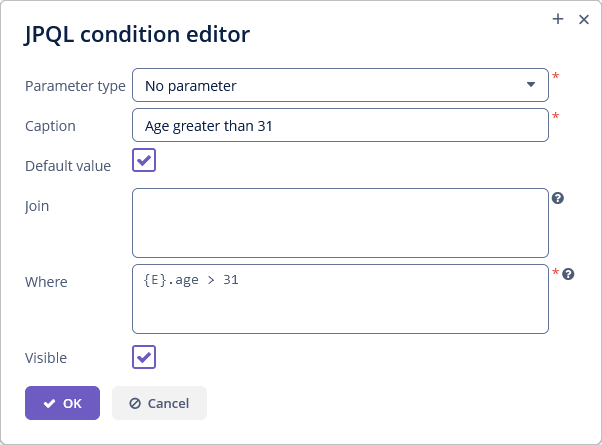
The Caption field is required. You should set the condition name displayed in the filter.
Use the Parameter name attribute to set the name of the associated query parameter. You can use this name to introduce dependencies between filter components in configuration. If not defined, then the parameter name is randomly generated.
Use the Has IN expression checkbox to define whether JPQL expression should contain IN expression. In this case, the application will use the ValuesPicker component for creating the list of condition values.
You can set the default value for the filter condition in the Default value field.
In the Join field, you can specify JPQL expression, which will be added to the from data loader query section. This can be required to create a complex condition based on an attribute of a related collection. The expression should be started with join or left join statements. The {E} placeholder should be used in the expression instead of the alias of the entity being selected.
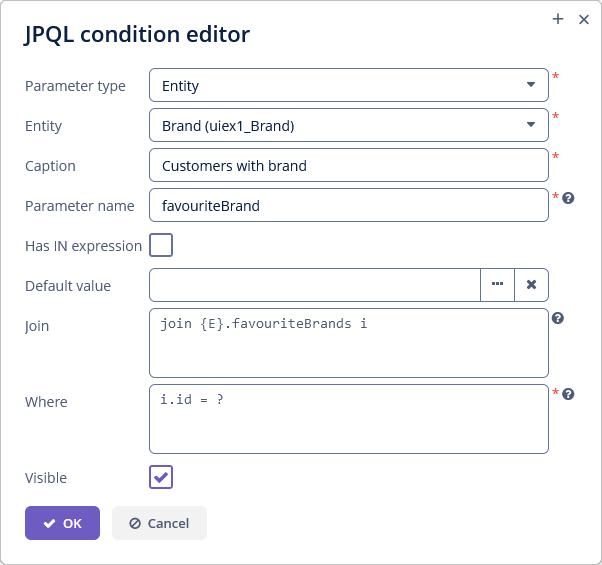
The value in the Where field specifies the JPQL expression, which will be added to the where data loader query section. The {E} placeholder should be used in the expression instead of the alias of the entity being selected. The condition can only have one parameter denoted by ?, if a parameter is defined in the Parameter type field described above. Apart from such a user-entered parameter, you can also use any number of session and user attributes parameters, for example:
{E}.code = ? and {E}.area = :session_areaGroup Conditions
The Group conditions editor allows users to combine several conditions into a logical group.
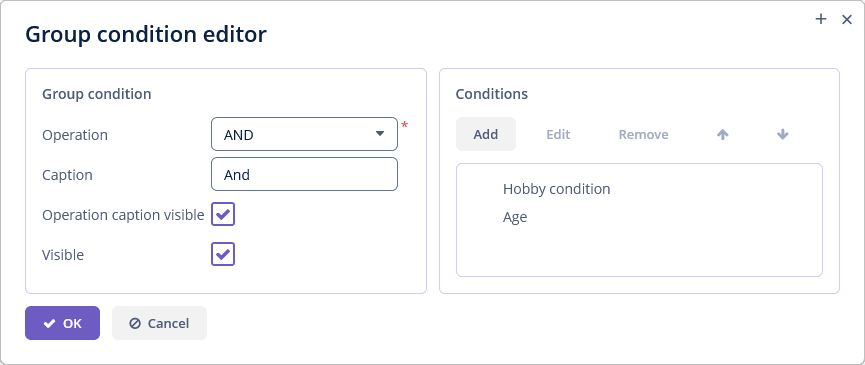
The Operation drop-down allows users to select a logical group operator.
The Caption field is required. You should set the condition name displayed in the filter.
Use the Operation caption visible checkbox to define the visibility of the operation caption.
To add a condition, click the Add button. The Add condition screen will be displayed.
The filter conditions are contained in the tree. Users can determine the order of filter conditions in a filter using the  /
/ buttons and remove and edit conditions using the Remove and Edit buttons.
Configuration
A configuration is a set of filter components.
LogicalFilterComponent is the root element of the configuration.
The configuration does not store a reference to all components but stores a reference only to the root element, from which the rest filter components can be obtained.
Configurations can be created at design-time or run-time (via the Configuration editor screen).
Design-time Configuration
Design-time configuration cannot be changed and saved in run-time. Still, the user can use the Copy action that copies all conditions from the design-time configuration to the run-time configuration.
All design-time configurations are displayed in the drop-down menu(2) with the saved filters and configurations:
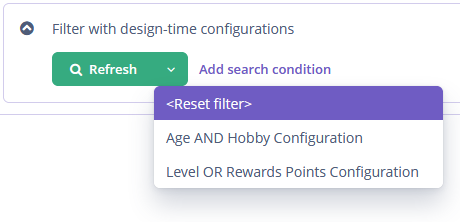
An example of filter with design-time configurations in the XML screen descriptor is shown below:
<filter dataLoader="customersDl"
        id="filterDesignTime"
        caption="Filter with design-time configurations">
    <properties include=".*"/>
    <configurations>
        <configuration id="configuration_age_hobby" operation="AND"
                       name="Age AND Hobby Configuration" default="true">
            <propertyFilter property="age" operation="GREATER"/>
            <propertyFilter property="hobby" operation="IN_LIST"/>
        </configuration>
        <configuration id="configuration_level_rewards_points" operation="OR"
                       name="Level OR Rewards Points Configuration">
            <propertyFilter property="level" operation="EQUAL"/>
            <propertyFilter property="rewardPoints" operation="LESS_OR_EQUAL"/>
        </configuration>
    </configurations>
</filter>
id is a required attribute and must be unique within this filter. If the name attribute is not specified, then id is used as a key in the message bundle.
Use the default XML attribute to set the design-time configuration as default for filter. So it appears right after opening the screen.
|
To add a design-time configuration in Jmix Studio, select the |
Run-time Configuration
To create, edit or remove configurations in run-time, a user should have ui.filter.modifyConfiguration security permission.
To open the Configuration editor screen, use the Edit action in the Settings(6) popup button.
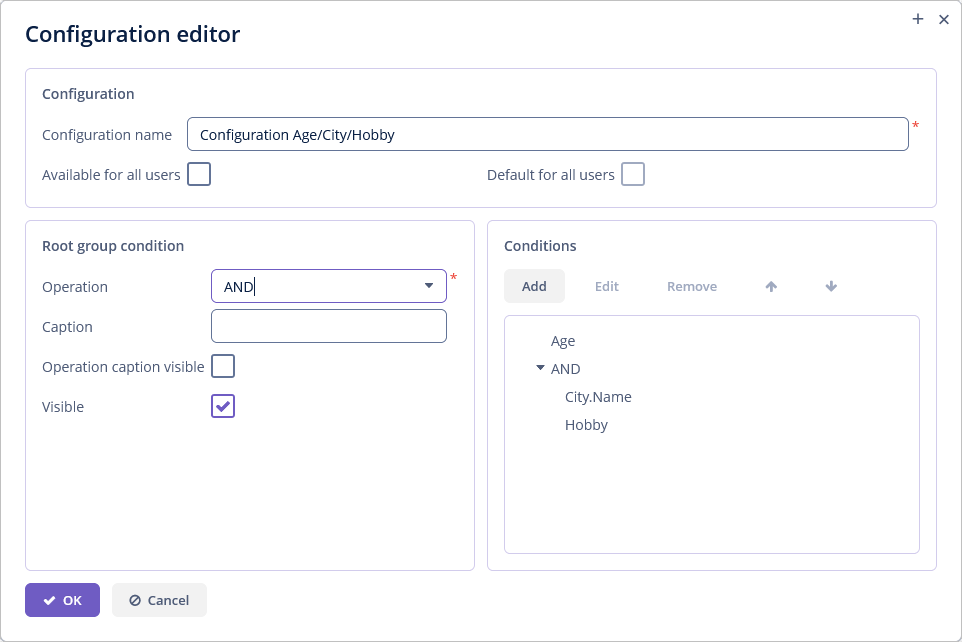
The Configuration name field is required. You should set the configuration name displayed in the drop-down menu(2) with the saved filters and configurations.
You can set filter available to all users using the Available for all users checkbox. This checkbox is only available to users having the specific ui.filter.modifyGlobalConfiguration permission.
Use the Default for all users checkbox to set whether the created configuration will be automatically selected when users open the screen. This checkbox is enabled if the Available for all users checkbox is selected.
The other Configuration editor fields are described in Group Conditions.
Filter Elements
filter defined in the XML descriptor may contain nested elements. They describe conditions available for user selection in the Add Condition dialog:
properties
The properties element allows you to make multiple entity attributes available for selection. This element has the following attributes:
-
includeis a required attribute. It contains a regular expression, which should match an entity attribute name.
-
exclude- contains a regular expression. If an attribute matches the expression, it will be excluded from previously included (usinginclude). -
excludeProperties- contains a comma-separated list of property paths that should be excluded from filtering. As opposed to exclude, it supports traversing the entity graphs, for example,customer.name. -
excludeRecursively- defines if an attribute fromexcludePropertiesshould be excluded recursively for the whole object graph. Iftrue, an attribute and all its nested attributes with the same name will be excluded.
In the example below, we declare a filter component with the properties nested element:
<filter id="filterWithProperties"
        dataLoader="customersDl">
    <properties include=".*"
                exclude="(hobby)|(age)"
                excludeProperties="id"
                excludeRecursively="true"/>
</filter>|
You can exclude or include dynamic attributes, using the attribute’s code with a It is not necessary to have a dynamicAttributes facet on the screen. Pay attention, if the dynamic attribute is an entity, then the entity’s internal attributes will not be available for filtering. |
The following entity attributes are ignored when the properties element is used:
-
Not accessible due to the security permissions.
-
Collections (
@OneToMany,@ManyToMany). -
Non-persistent attributes.
-
Attributes annotated with
@SystemLevel. -
Attributes of type
byte[].
conditions
The conditions element is used to create predefined conditions.
In the example below, we declare a filter component with the conditions nested element:
<filter id="filterWithСonditions"
        dataLoader="customersDl">
    <properties include=".*"/>
    <conditions>
        <propertyFilter property="hobby"
                        operation="NOT_IN_LIST"
                        operationEditable="true"
                        caption="Hobby condition"/>
    </conditions>
</filter>
The conditions element may contain any number of propertyFilter, jpqlFilter or groupFilter.
|
To add conditions in Jmix Studio, select the component in the screen descriptor XML or in the Component Hierarchy panel and click on the Add→Conditions button in the Component Inspector panel. |
configurations
The configurations element is used to create design-time configurations.
actions
actions - an optional element to define the list of actions for filter management.
The framework provides the following default actions in the filter settings popup button(6)  :
:
-
Save - implemented by
FilterSaveAction(type="filter_save"in XML) which saves changes to the current filter configuration.
-
Save with values - implemented by
FilterSaveWithValuesAction(type="filter_saveWithValues"in XML) which saves changes to the current filter using the values in the condition fields(5) as the filter default values.
-
Save as - implemented by
FilterSaveAsAction(type="filter_saveAs"in XML) which saves the filter configuration under a new name.
-
Edit - implemented by
FilterEditAction(type="filter_edit"in XML) which edits the current run-time filter configuration (opens the Configuration editor screen). Disabled for design-time configurations.
-
Remove - implemented by
FilterRemoveAction(type="filter_remove"in XML) which removes the current run-time filter configuration. Disabled for design-time configurations.
-
Make default - implemented by
FilterMakeDefaultAction(type="filter_makeDefault"in XML) which makes the filter configuration default for this screen. The filter will be automatically displayed on the filter panel when the screen is opened. Takes precedence over the default attribute of design-time configuration and the Default for all users checkbox of run-time configuration. It is disabled if noscreenSettingsfacet is added to the screen.
-
Copy - implemented by
FilterCopyAction(type="filter_copy"in XML) which copies all conditions from the design-time configuration to the run-time configuration.
-
Clear values - implemented by
FilterClearValuesAction(type="filter_clearValues"in XML) which clears the filter condition values(5).
-
Add implemented by
FilterAddConditionAction(type="filter_addCondition"in XML) which adds a condition to the current filter configuration.
Users can override default actions using the actions nested element. For example:
<filter id="filterWithActions"
        dataLoader="customersDl">
    <properties include=".*"/>
    <actions>
        <action id="addCondition" type="filter_addCondition"/>
        <action id="clearValues" type="filter_clearValues"/>
    </actions>
</filter>|
To add |
You can configure common action parameters using XML attributes of the action element, see Actions for details.
Filter Attributes
autoApply
The autoApply attribute specifies when the filter is applied. If the attribute value is false, filter will be applied only after the Refresh button is clicked. If the attribute value is true, filter is applied immediately after changing the filter components. The default value is specified in the jmix.ui.component.filter-auto-apply property.
columnsCount
The columnsCount sets the number of columns to be displayed on one row. The default value is specified in the jmix.ui.component.filter-columns-count property.
Permissions
Advanced filter management requires special permissions:
-
To create/change/delete filter configurations, users must have the
ui.filter.modifyConfigurationspecific permission.
-
To create/change/delete global (available for all users) filter configurations, users must have the
ui.filter.modifyGlobalConfigurationspecific permission.
-
To create/change JPQL conditions in run-time, users must have the
ui.filter.modifyJpqlConditionspecific permission.
You can either give users the UI: edit filters predefined resource role, or configure the necessary permissions in your own role.
Application Properties
The following application properties affect the filter behavior:
The jmix.ui.component.entity-field-type and jmix.ui.component.entity-field-actions properties define components for selecting entities in filter conditions.
Creating Filter Programmatically
In the example below, we will create the Filter component with a design-time configuration and add this filter to the tab, defined in the XML descriptor.
To create the Filter component in the controller, use the UiComponents factory.
@Autowired
protected UiComponents uiComponents;

@Autowired
protected CollectionLoader<Customer> customersDl;

@Autowired
protected SingleFilterSupport singleFilterSupport;
@Autowired
protected Filter pfdtcFilter;
@Autowired
protected Filter jfdtcFilter;
@Autowired
protected JpqlFilterSupport jpqlFilterSupport;
@Autowired
protected Filter gfdtcFilter;
@Subscribe
protected void onAfterInit(AfterInitEvent event) {
    Filter filter = uiComponents.create(Filter.NAME); (1)
    filter.setId("programmaticFilter");
    filter.setDataLoader(customersDl);
    filter.loadConfigurationsAndApplyDefault();

    DesignTimeConfiguration javaDefaultConfiguration =
            filter.addConfiguration("javaDefaultConfiguration",
                    "Default configuration"); (2)

    PropertyFilter<Integer> agePropertyFilter =
            uiComponents.create(PropertyFilter.NAME); (3)

    agePropertyFilter.setConditionModificationDelegated(true);
    agePropertyFilter.setDataLoader(customersDl);
    agePropertyFilter.setProperty("age");
    agePropertyFilter.setOperation(PropertyFilter.Operation.LESS_OR_EQUAL);
    agePropertyFilter.setOperationEditable(true);
    agePropertyFilter.setParameterName(PropertyConditionUtils.generateParameterName(
            agePropertyFilter.getProperty()));
    agePropertyFilter.setValueComponent(singleFilterSupport.generateValueComponent(
            customersDl.getContainer().getEntityMetaClass(),
            agePropertyFilter.getProperty(),
            agePropertyFilter.getOperation())); (4)

    javaDefaultConfiguration.getRootLogicalFilterComponent().add(agePropertyFilter); (5)
    filter.setCurrentConfiguration(javaDefaultConfiguration); (6)

    VBoxLayout tab = (VBoxLayout) getWindow()
            .getComponentNN("programmaticFilterTab"); (7)
    tab.add(filter); (8)
}| 1 | Creates Filter and sets its properties. |
| 2 | Adds a design-time configuration with the javaDefaultConfiguration id and the Default configuration name. |
| 3 | Creates PropertyFilter and sets its properties. |
| 4 | Generates the filter value component by the given metaClass, entity property and operation. |
| 5 | Adds the created property filter to the javaDefaultConfiguration configuration. |
| 6 | Sets the javaDefaultConfiguration configuration as current. |
| 7 | Gets the tab by its id. |
| 8 | Adds the created Filter component to the programmaticFilterTab tab. |
Events and Handlers
|
To generate a handler stub in Jmix Studio, select the component in the screen descriptor XML or in the Jmix UI hierarchy panel and use the Handlers tab of the Jmix UI inspector panel. Alternatively, you can use the Generate Handler button in the top panel of the screen controller. |
ConfigurationChangeEvent
ConfigurationChangeEvent is sent when the configuration is changed. Example of subscribing to the event for filter defined in the screen XML with the filter id:
@Subscribe("filter")
public void onFilterConfigurationChange(Filter.ConfigurationChangeEvent event) {
    notifications.create()
            .withCaption("Before: " + event.getPreviousConfiguration().getName() +
                    ". After: " + event.getNewConfiguration().getName())
            .show();
}
To register the event handler programmatically, use the addConfigurationChangeListener() component method.
PropertiesFilterPredicate
@Install(to = "filter", subject = "propertiesFilterPredicate")
private boolean filterPropertiesFilterPredicate(MetaPropertyPath metaPropertyPath) {
    return !metaPropertyPath.getMetaProperty().getName().equals("hobby");
}
This predicate is added to the current properties filter predicate and tests whether a property with the given path should be available for filtering.
To add a predicate programmatically, use the addPropertiesFilterPredicate() component method. The resulting predicate is a composed predicate that represents a short-circuiting logical AND of given predicate and current properties filter predicate.
All XML Attributes
|
You can view and edit attributes applicable to the component using the Jmix UI inspector panel of the Studio’s Screen Designer. |
Filter XML Attributes
align - autoApply - caption - captionAsHtml - captionPosition - collapsable - collapsable - colspan - columnsCount - contextHelpText - contextHelpTextHtmlEnabled - css - description - descriptionAsHtml - enable - box.expandRatio - height - htmlSanitizerEnabled - icon - id - margin - responsive - rowspan - stylename - visible - width
