Separating Application Tiers
Jmix is a full-stack framework enabling developers to build enterprise applications with server-side user interface. However, it also provides the flexibility to develop applications with separate frontend and backend tiers when required for security or scalability reasons.
In this architecture, the frontend application is based on the standard Jmix UI subsystem, but it communicates with the backend application instead of directly with the database.
This guide explores a sample application which can serve as an example for implementing custom solutions with separate tiers using the Jmix REST API and REST DataStore features.
|
It’s essential to carefully evaluate your project’s requirements and constraints before deciding to implement a separated tier architecture, because it comes with trade-offs:
|
Requirements
To effectively use this guide, you will need the following:
-
Setup the development environment.
-
Clone the sample project and switch to
release_2_4branch:git clone https://github.com/jmix-framework/jmix-separate-tiers-sample cd jmix-separate-tiers-sample git checkout release_2_4
Application Overview
The sample project described in this guide illustrates how to partition a Jmix application into distinct frontend and backend components utilizing the REST API and REST DataStore add-ons. The resulting distributed system mirrors the functionality of the Jmix Onboarding project described in Tutorial and comprises two web applications:
-
Backend Application houses JPA entities stored in a dedicated database and exposes the data model through the generic REST API. It also includes essential add-ons like Data Tools and Audit for comprehensive data management.
-
Frontend Application contains Data Transfer Objects (DTOs) that mirror the structure of the backend JPA entities. It performs CRUD operations using the REST DataStore, allowing for user interactions while keeping the backend secure.
Both applications run independently and connect to their respective databases. The frontend stores only user settings, while all application data resides in the backend database.
Both applications have a user interface, but the Backend provides only the user management views, Entity Log and Entity Inspector. The Frontend provides the entire user interface for the Onboarding functionality.
| In a real-world scenario, consider extracting to the frontend only the essential parts of the domain logic and UI that absolutely require separation, while keeping as much functionality as possible in the backend. This will minimize the overall complexity of the system. |
Setup and Running
The applications are configured to run on different ports. In order to avoid clashing of session cookies between the web applications, their hostnames must also be different. Therefore, it is assumed that the applications will be available at the following URLs:
-
Frontend: http://localhost:8080
-
Backend: http://host1:8081
Add the following entry to your hosts file to point host1 to localhost:
127.0.0.1 host1Open the root project in IntelliJ IDEA with the Jmix Studio plugin installed.
Use the run/debug configurations for the Frontend and Backend applications to launch them.
Understanding Application Behavior
The following three use cases demonstrate the application behavior from the perspectives of different users.
-
As a system administrator, create a new user account.
-
Access the Backend application by navigating to http://host1:8081 in your web browser and log in as
adminuser withadminpassword. -
Open Users from the main menu. Create a new user with
johnusername and selectOperationsin the Department field. Save the user and assign theEmployeerole to him.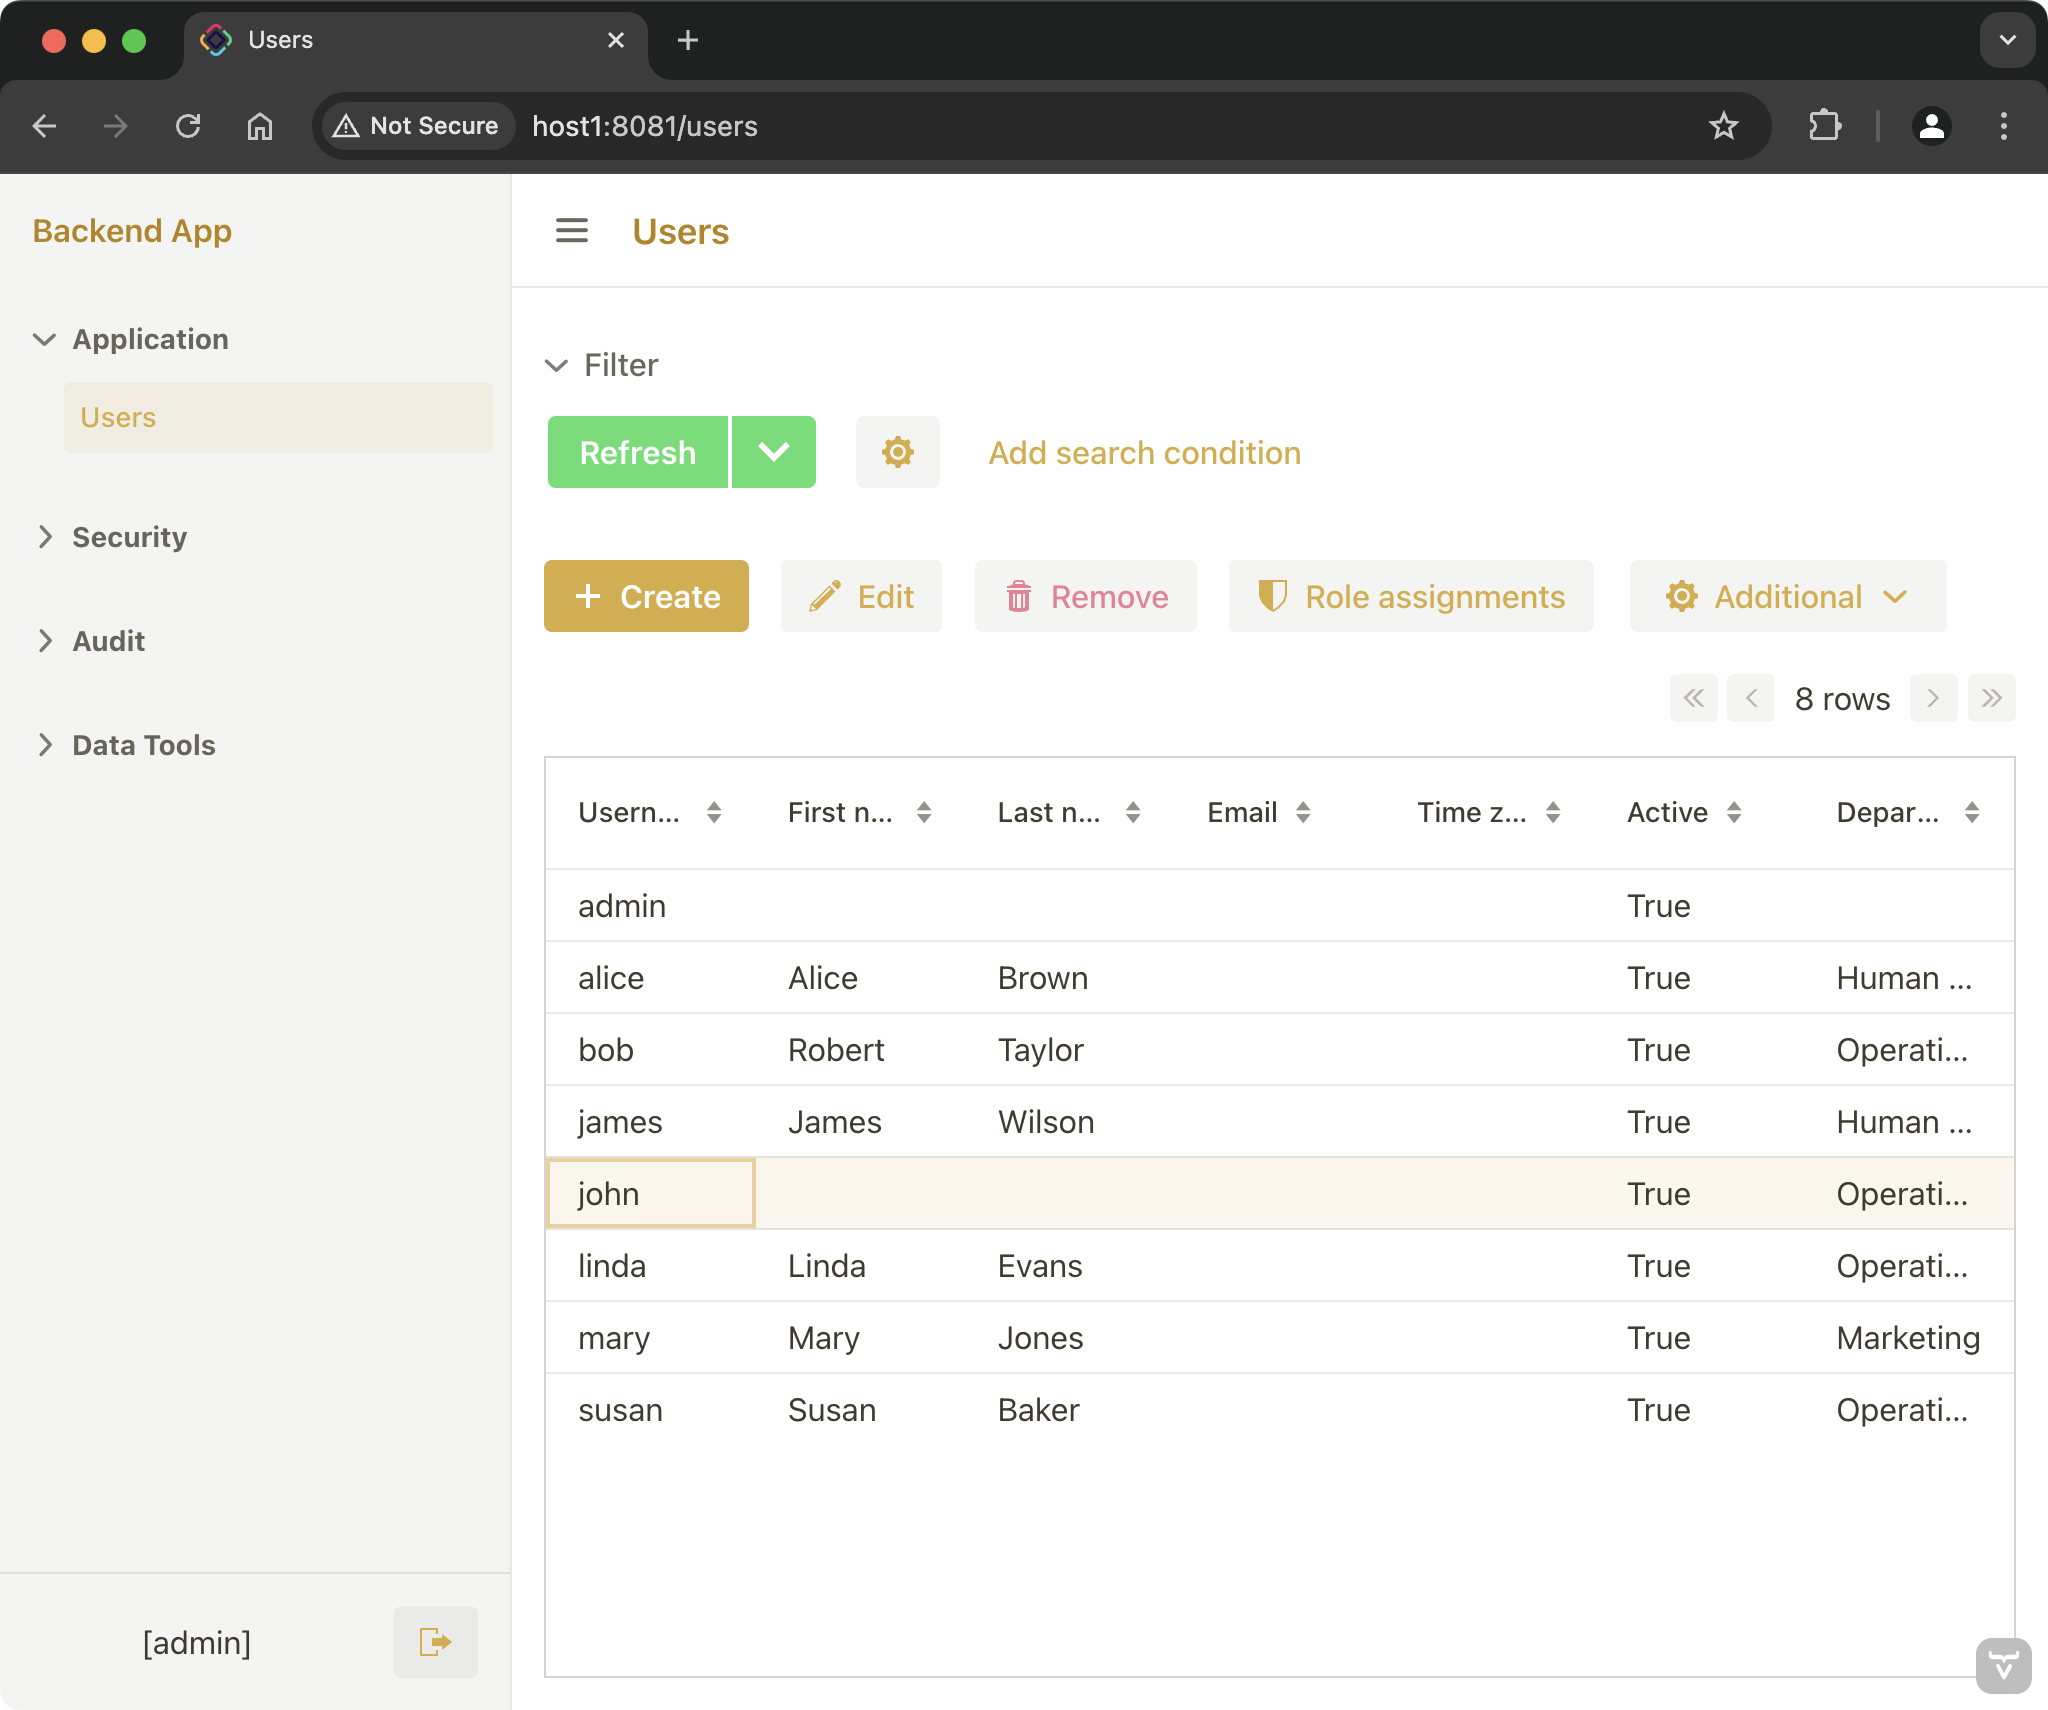 Figure 1. Using Backend app to create a new user
-
-
As an HR Manager, generate onboarding steps for the new user.
-
Access the Frontend application by navigating to http://localhost:8080 in your web browser and log in as
jameswith password1. James has theHR Managerrole, and he can view and manage users of his department. -
Open Users from the main menu and edit the
johnrecord. Set a value to the Joining date field and click Generate. The application will generate onboarding steps for this user.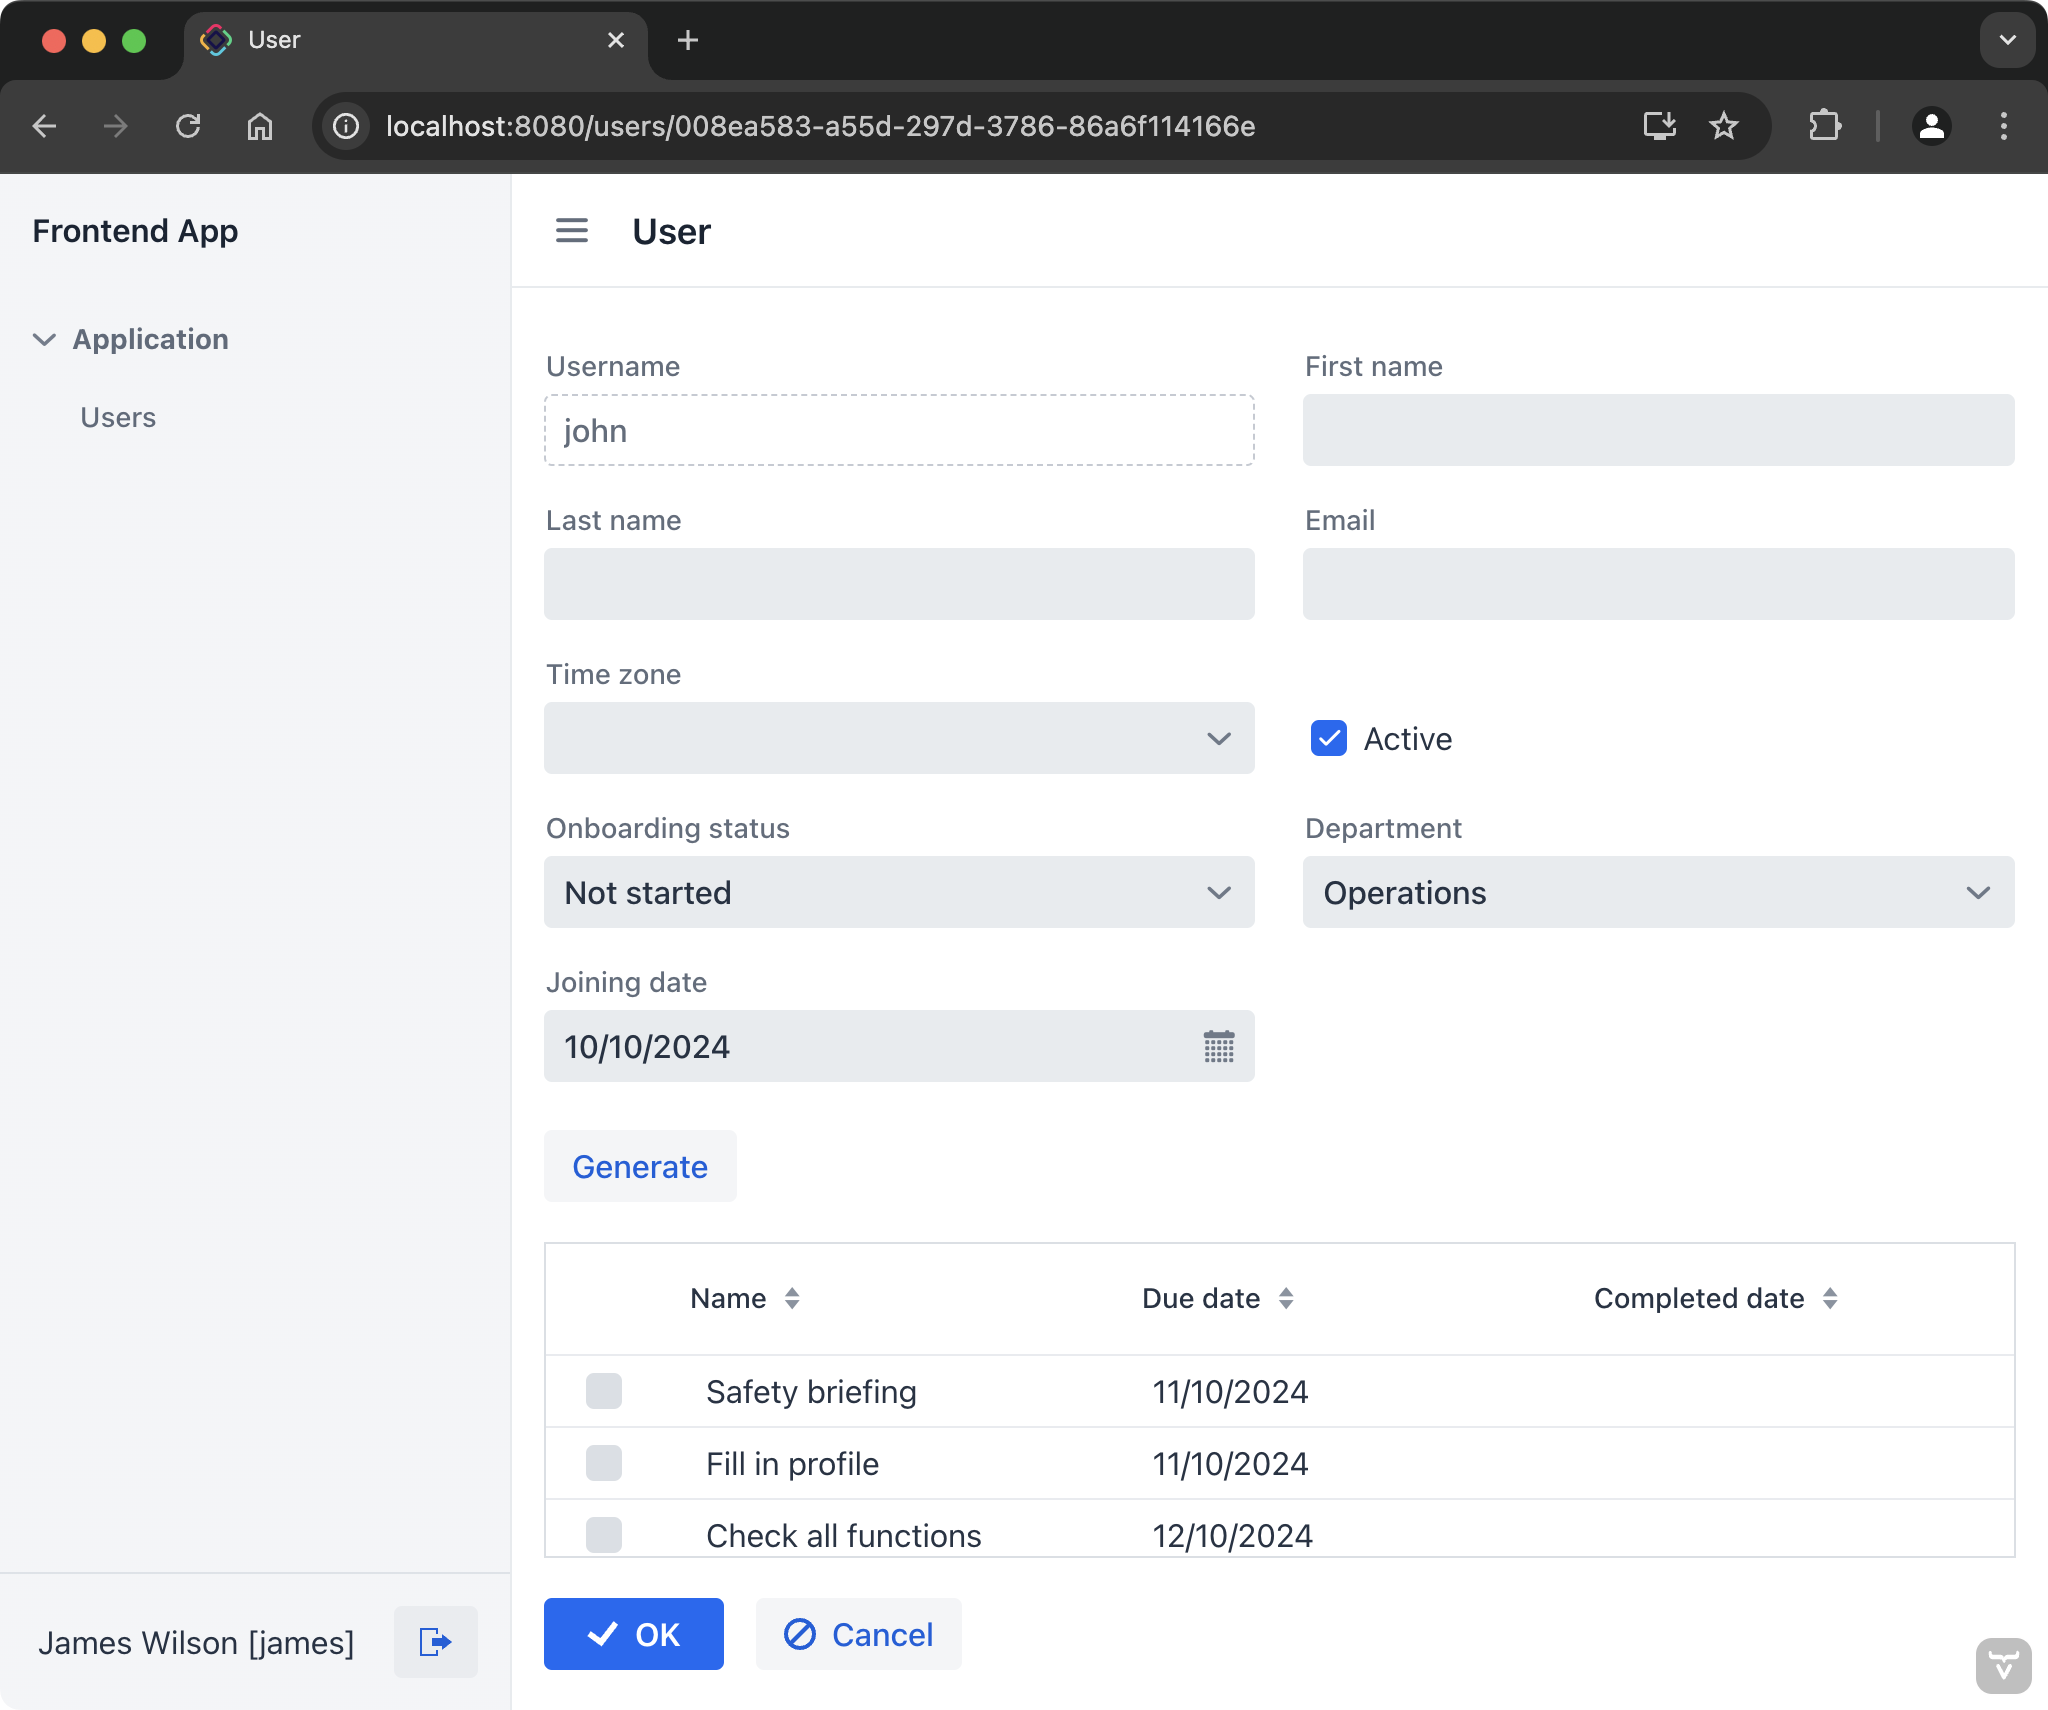 Figure 2. Using Frontend app to generate onboarding steps
 -
Log out from the Frontend application.
-
-
As the new user, complete onboarding steps.
-
Access the Frontend application by navigating to http://localhost:8080 in your web browser and log in as
john. -
Open My onboarding view, mark completed steps and click Save.
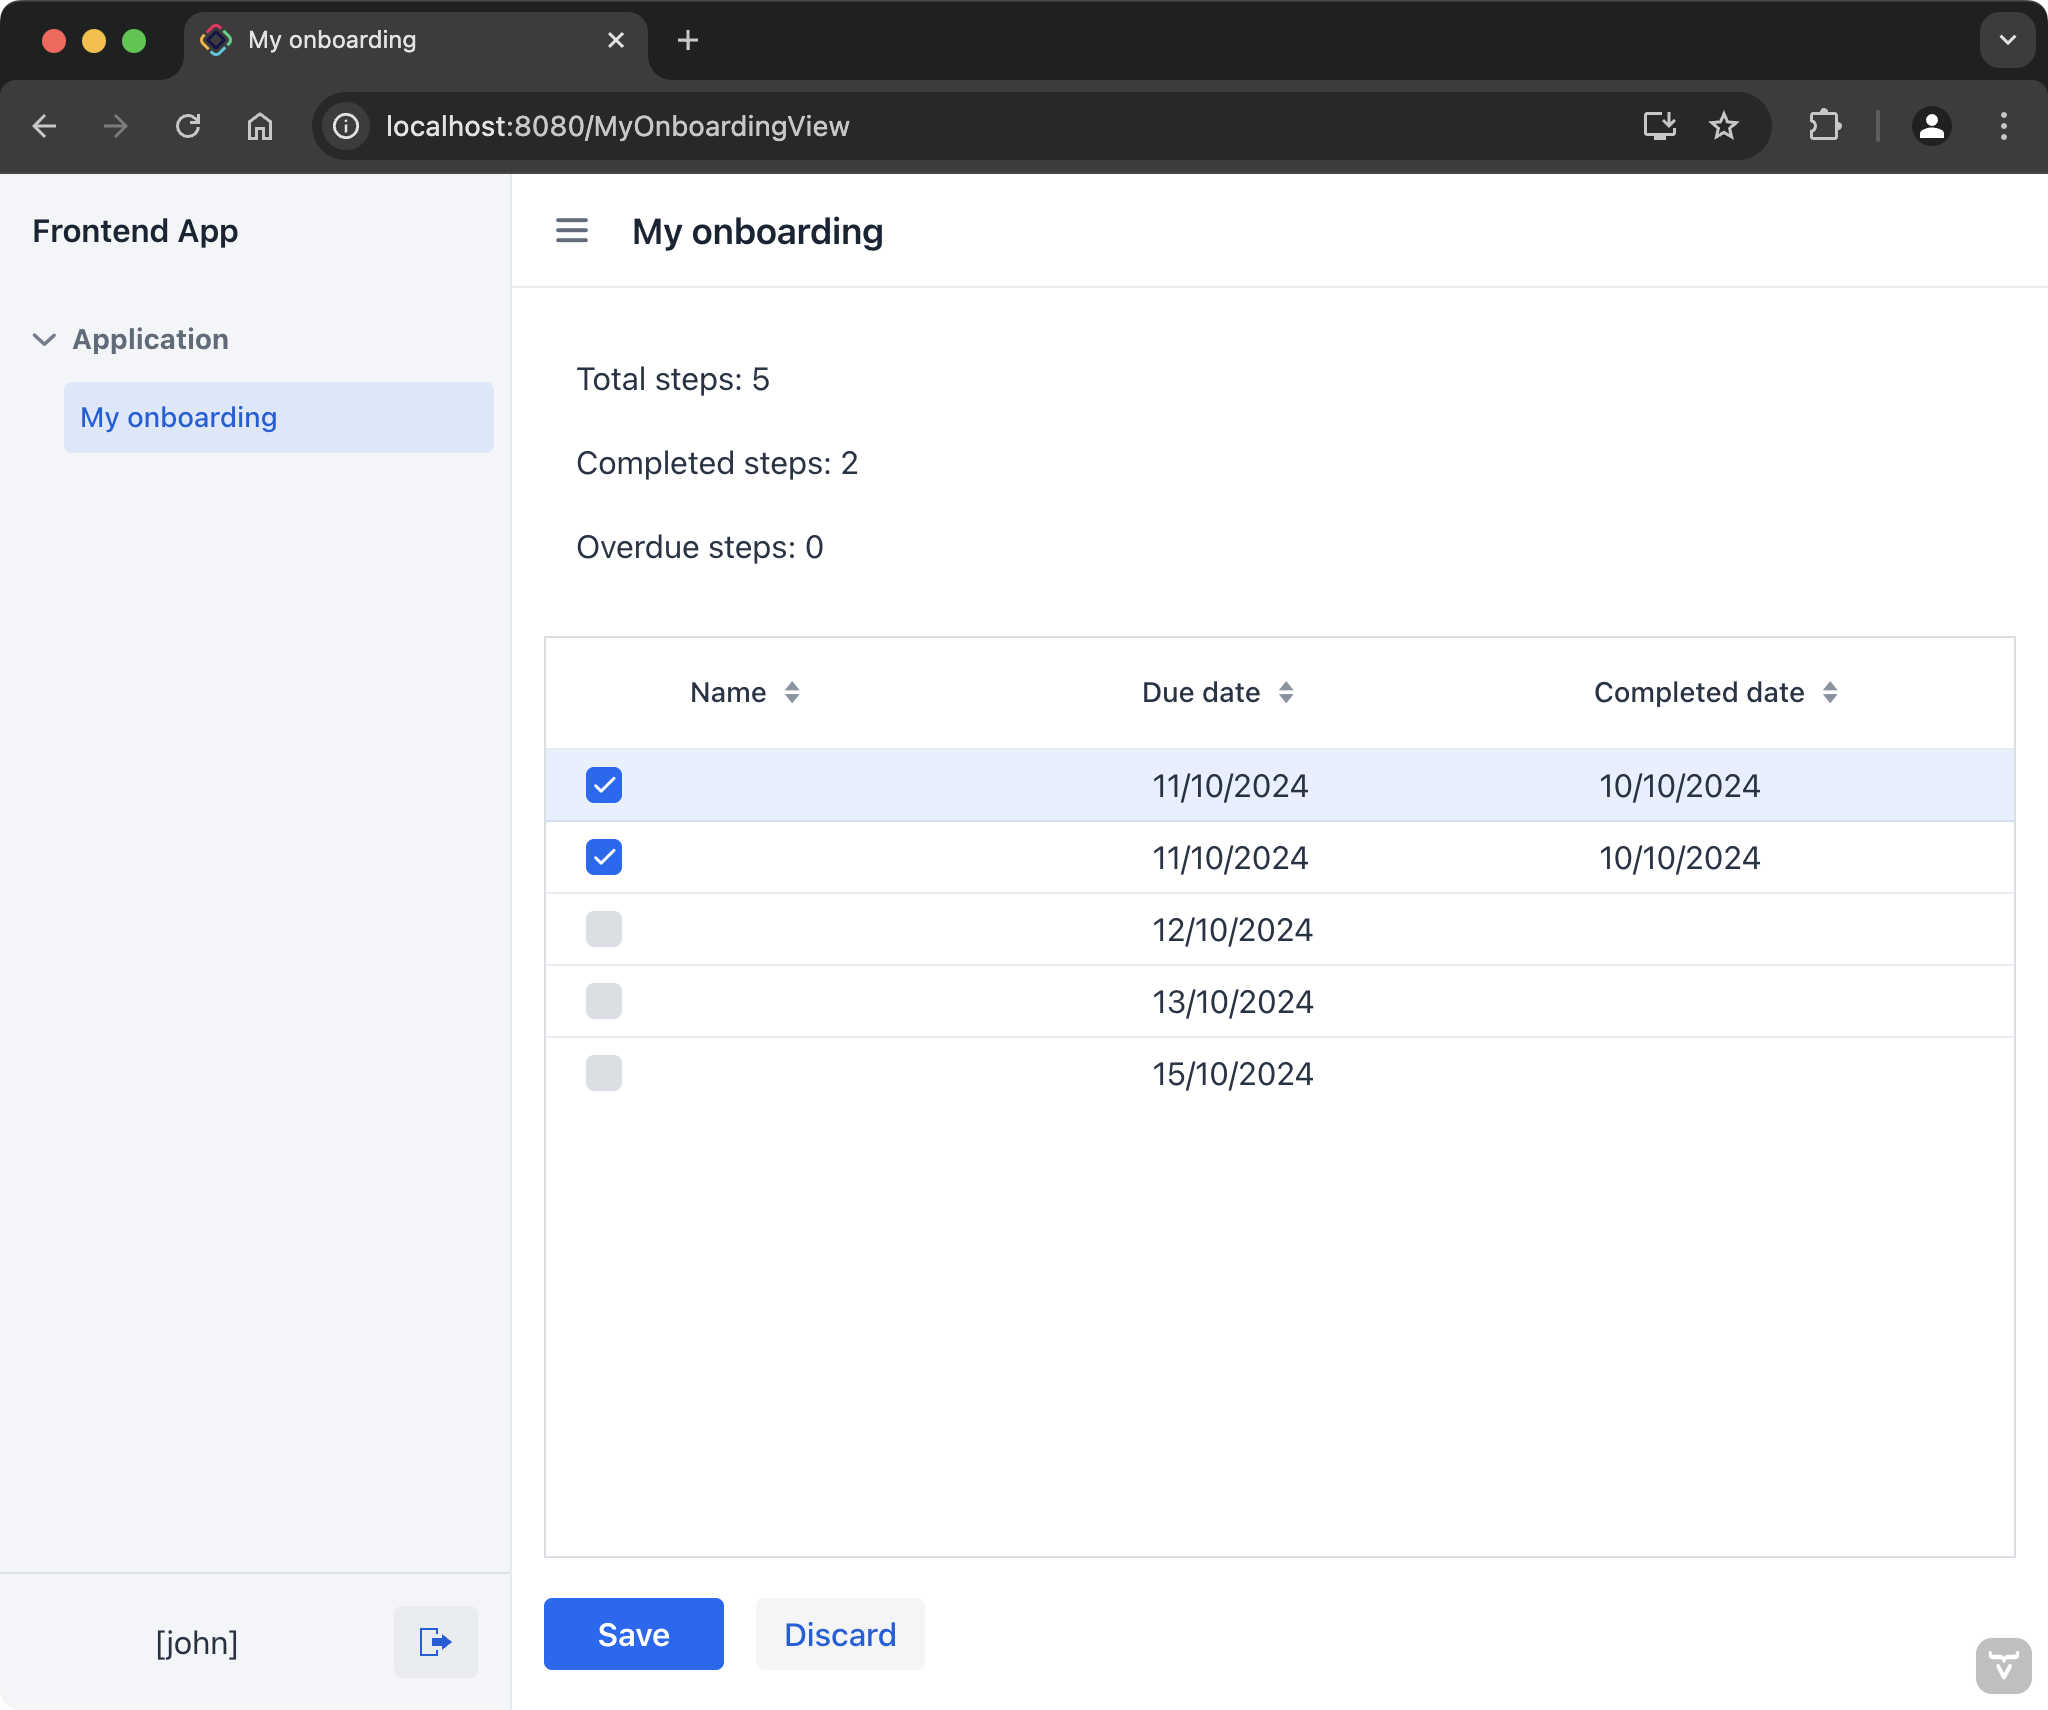 Figure 3. Using Frontend app to complete onboarding steps
-
Implementation Details
Project Configuration
The Backend application includes the REST API and Authorization Server add-ons. It has the following configuration of the Authorization Server allowing the Frontend application to connect using the Resource Owner Password Credentials grant:
# Protect REST API endpoints
jmix.resource-server.authenticated-url-patterns = /rest/**

# Configure Spring Security Authorization Server
spring.security.oauth2.authorizationserver.client.frontend.registration.authorization-grant-types=password,refresh_token
spring.security.oauth2.authorizationserver.client.frontend.registration.client-id=frontend-app
spring.security.oauth2.authorizationserver.client.frontend.registration.client-secret={noop}frontend123
spring.security.oauth2.authorizationserver.client.frontend.registration.client-authentication_methods=client_secret_basic
spring.security.oauth2.authorizationserver.client.frontend.token.access-token-format=reference
spring.security.oauth2.authorizationserver.client.frontend.token.access-token-time-to-live=1h
spring.security.oauth2.authorizationserver.client.frontend.token.refresh-token-time-to-live=24h
The Frontend application includes the REST DataStore add-on for authenticating users through the Backend application and accessing its data. The REST DataStore is configured in the application.properties file of the Frontend application, along with its connection parameters:
jmix.core.additional-stores = backend
jmix.core.store-descriptor-backend = restds_RestDataStoreDescriptor

backend.baseUrl = http://localhost:8081
backend.clientId = frontend-app
backend.clientSecret = frontend123
backend.authenticator = restds_RestPasswordAuthenticator

jmix.restds.authentication-provider-store = backend
The backend.authenticator property specifies the usage of Resource Owner Password Credentials grant instead of the default Client Credentials grant.
The jmix.restds.authentication-provider-store property defines the REST data store that will be used to authenticate users. The Security section below provides more information about this topic.
Entities
The Frontend application contains DTO entities, identical by the structure to the JPA entities of the Backend application. Below is an example of the Department entity in the Backend and Frontend applications.
@JmixEntity
@Table(name = "DEPARTMENT", indexes = {
        @Index(name = "IDX_DEPARTMENT_HR_MANAGER", columnList = "HR_MANAGER_ID")
}, uniqueConstraints = {
        @UniqueConstraint(name = "IDX_DEPARTMENT_UNQ_NAME", columnNames = {"NAME"})
})
@Entity
public class Department {
    @JmixGeneratedValue
    @Column(name = "ID", nullable = false)
    @Id
    private UUID id;

    @Column(name = "VERSION", nullable = false)
    @Version
    private Integer version;

    @InstanceName
    @Column(name = "NAME", nullable = false)
    @NotNull
    private String name;

    @JoinColumn(name = "HR_MANAGER_ID")
    @ManyToOne(fetch = FetchType.LAZY)
    private User hrManager;

// getters and setters@Store(name = "backend")
@JmixEntity
public class Department {
@JmixGeneratedValue
@JmixId
private UUID id;
private Integer version;
@InstanceName
@NotNull
private String name;
private User hrManager;
// getters and settersFetch Plans
The generic REST API currently supports only named fetch plans defined in fetch plans repository. So the Backend and Frontend applications contain identical fetch plans and use their names when loading data.
<fetchPlans xmlns="http://jmix.io/schema/core/fetch-plans">
    <fetchPlan class="com.company.backend.entity.Department" name="department-with-hrManager" extends="_base">
        <property name="hrManager" fetchPlan="_base"/>
    </fetchPlan>
    <fetchPlan class="com.company.backend.entity.User" name="user-with-department" extends="_base">
        <property name="department" fetchPlan="_base"/>
    </fetchPlan>
    <fetchPlan class="com.company.backend.entity.User" name="user-full" extends="_base">
        <property name="department" fetchPlan="_base"/>
        <property name="steps" fetchPlan="_base">
            <property name="step" fetchPlan="_base"/>
        </property>
    </fetchPlan>
</fetchPlans><fetchPlans xmlns="http://jmix.io/schema/core/fetch-plans">
<fetchPlan class="com.company.frontend.entity.Department" name="department-with-hrManager" extends="_base">
<property name="hrManager" fetchPlan="_base"/>
</fetchPlan>
<fetchPlan class="com.company.frontend.entity.User" name="user-with-department" extends="_base">
<property name="department" fetchPlan="_base"/>
</fetchPlan>
<fetchPlan class="com.company.frontend.entity.User" name="user-full" extends="_base">
<property name="department" fetchPlan="_base"/>
<property name="steps" fetchPlan="_base">
<property name="step" fetchPlan="_base"/>
</property>
</fetchPlan>
</fetchPlans>Views
The Frontend views are mostly identical to the views of the basic Onboarding application, with the following differences:
-
Named fetch plans are used instead of inline fetch plans.
-
MyOnboardingViewdefines the query in the JSON format of the REST API instead of JPQL:frontend-app/src/main/resources/com/company/frontend/<data> <collection class="com.company.frontend.entity.UserStep" id="userStepsDc"> <fetchPlan extends="_base"> <property name="step" fetchPlan="_base"/> </fetchPlan> <loader id="userStepsDl"> <query> <![CDATA[ { "property": "user.id", "operator": "=", "parameterName": "userId" } ]]> </query> </loader> </collection> </data>As this query doesn’t support sorting, the sort order is defined additionally in the load delegate:
frontend-app/src/main/java/com/company/frontend/view/myonboarding/MyOnboardingView.java@Install(to = "userStepsDl", target = Target.DATA_LOADER) private List<UserStep> userStepsDlLoadDelegate(final LoadContext<UserStep> loadContext) { loadContext.getQuery().setSort(Sort.by("sortValue")); return dataManager.loadList(loadContext); }
Security
Authentication
The distributed system described in this guide provides end-to-end authentication of users. Both the frontend and backend code works with the security context of the logged-in user. It ensures that standard Jmix mechanisms, such as CurrentAuthentication bean, entity audit traits or Audit add-on will correctly recognize the user in the Backend application.
The RestLoginViewSupport bean in the Frontend application overrides the standard LoginViewSupport and creates a RestAuthenticationToken instead of UsernamePasswordAuthenticationToken:
@Primary
@Component
public class RestLoginViewSupport extends LoginViewSupport {

    @Override
    protected Authentication createAuthenticationToken(String username, String password, Locale locale, TimeZone timeZone) {
        RestAuthenticationToken authenticationToken = new RestAuthenticationToken(username, password);
        // ...
        return authenticationToken;
    }
}
This token is passed to Spring Security AuthenticationManager and further processed by the RestAuthenticationProvider bean which is configured by the REST DataStore add-on because the Frontend application contains this property:
jmix.restds.authentication-provider-store = backendRestAuthenticationProvider authenticates in the Backend’s Authorization Server with the username and password, obtains access and refresh tokens and stores them in the user session.
After that, when invoking the Backend REST API, the REST DataStore gets the access token from the session and passes it with requests. When the access token expires, the REST DataStore obtains a new access token using the stored refresh token. If it fails, InvalidRefreshTokenExceptionHandler logs out the user and redirects them to the login view.
Roles
The Frontend application defines the RestUserRepository bean which extends AbstractRestUserRepository class provided by the REST DataStore add-on. AbstractRestUserRepository assigns to the user all roles defined in the Frontend app that match by name to the user roles in the Backend application.
For example, the user bob has the employee role assignment in the Backend’s database. So when he logs in, both Backend and Frontend applications assign this role to him. However, the EmployeeRole classes in the Frontend and Backend applications are different and define the user permissions in the respective tiers.
The HrManagerRlRole class in the Backend app restricts the list of users for HR Managers - they can see only users of their department.
Exception Handling
The Frontend application contains a RestDataStoreAccessException handler that shows a notification when the Backend application is not available:
@Component
public class RestDataStoreAccessExceptionHandler extends AbstractUiExceptionHandler {

    private static final Logger log = LoggerFactory.getLogger(RestDataStoreAccessExceptionHandler.class);

    private final Notifications notifications;

    public RestDataStoreAccessExceptionHandler(Notifications notifications) {
        super(RestDataStoreAccessException.class.getName());
        this.notifications = notifications;
    }

    @Override
    protected void doHandle(@NonNull String className, @NonNull String message, @Nullable Throwable throwable) {
        log.warn(message);
        if (throwable instanceof RestDataStoreAccessException exception) {
            notifications.create("Connection error",
                            "'" + exception.getDataStoreName() + "' service is unavailable")
                    .withType(Notifications.Type.ERROR)
                    .show();
        }
    }
}
The InvalidRefreshTokenExceptionHandler logs out the user and redirects them to the login view if the attempt to refresh a token fails:
@Component
public class InvalidRefreshTokenExceptionHandler extends AbstractUiExceptionHandler {

    private static final Logger log = LoggerFactory.getLogger(InvalidRefreshTokenExceptionHandler.class);

    @Autowired
    private LogoutSupport logoutSupport;

    public InvalidRefreshTokenExceptionHandler() {
        super(InvalidRefreshTokenException.class.getName());
    }

    @Override
    protected void doHandle(@NonNull String className, @NonNull String message, @Nullable Throwable throwable) {
        log.debug(message);

        logoutSupport.logout();
    }
}
Summary
This guide has described the essential components involved in creating distinct frontend and backend Jmix applications that communicate via REST APIs.
