Integrating Jmix Applications
This guide provides a detailed exploration of an example designed to help you create distributed systems consisting of interconnected web applications. The example leverages the REST API and REST DataStore add-ons for seamless integration.
Key features of the example project:
-
REST API Integration: Enables reliable communication between applications using Jmix’s built-in REST capabilities.
-
REST DataStore: Allows applications to work with entities located in remote Jmix applications as if they were local.
-
Distributed Data Management: Demonstrates how to manage related data across multiple applications while maintaining data integrity.
-
Seamless User Experience: Provides a unified interface for users to interact with entities from different parts of the distributed system.
You will learn how to set up the REST API and configure the REST DataStore, along with implementing essential components for developing a fully functional distributed system using Jmix. By the end, you’ll have a comprehensive understanding of how to leverage these powerful features to build scalable and modular enterprise applications.
Requirements
To effectively use this guide, you will need the following:
-
Setup the development environment.
-
Clone the sample project and switch to
release_2_4branch:git clone https://github.com/jmix-framework/jmix-integrated-apps-sample cd jmix-integrated-apps-sample git checkout release_2_4
Application Overview
The example distributed system described in this guide comprises three distinct Jmix applications, each responsible for a specific domain:
-
Products application handles product catalog and inventory.
-
Customers application manages customer information and relationships.
-
Orders application processes and tracks customer orders.
By utilizing Jmix’s REST API and REST DataStore add-ons, these applications can communicate and share data, creating a cohesive ecosystem for managing various aspects of a business operation.
The Orders application depends on Customers and Products applications:

Each application uses its own database. The Orders application obtains data from Customers and Products applications through their REST API.
Data Models
Below are the data models of the applications (JPA entities are in grey, DTO entities are in blue).


Integration Approaches
The Orders application demonstrates two approaches to the integration:
-
Replicating data from an external application
The Orders application contains the
SimpleCustomerJPA entity that represents the customers in the bounded context of orders. TheOrderentity has a reference toSimpleCustomerand doesn’t directly depend on the external application. Customers' data is aggregated and stored inSimpleCustomerupon request.This approach provides loose coupling between applications: users can create orders for existing customers even if the Customers application is unavailable.
-
Using cross-datastore references
The
OrderLineJPA entity has a reference to theProductDTO entity which is directly loaded from the Products application using the REST DataStore.This approach leads to tighter coupling between the applications, but it is simpler as it doesn’t require any special integration code.
In the replication scenario, the sample also demonstrates a possible approach to selecting and returning external data by redirecting users between applications.
Setup and Running
All three applications are configured to run on different ports. In order to avoid clashing of session cookies between the web applications, their hostnames must also be different. Therefore, it is assumed that the applications will be available at the following URLs:
-
Orders: http://localhost:8080
-
Customers: http://host1:8081
-
Products: http://host2:8082
Add the following entries to your hosts file to point host1 and host2 to localhost:
127.0.0.1       host1
127.0.0.1       host2
Open the root project in IntelliJ IDEA with the Jmix Studio plugin installed.
Use the run/debug configurations for the Customers, Products, and Orders applications to launch them.
Understanding Application Behavior
Access the Orders application by navigating to http://localhost:8080 in your web browser and logging in as admin user with admin password.
Managing External Data
The Orders application demonstrates how to manage external data using DTO entities and REST DataStore. The Products application itself has no UI, so users can work with it only through the views of the Orders application.
You can open the Product categories (DTO) and Products (DTO) views from the main menu. The DTO suffix here indicates that the view works with DTO entities mapped to external data.
The list views provide filtering, paging and sorting of entities. The detail views allow you to create and modify entities.
If you stop the Products application, the product management views will show an error notification "Connection error. 'products' service is unavailable".
Linking External and Local Entities
-
Open the Orders view from the main menu and click Create.
-
Fill in the Number and Date fields of the new order and leave the Customer field empty (we will deal with it later).
-
Click Create button to create a new order line. The Order line dialog will appear.
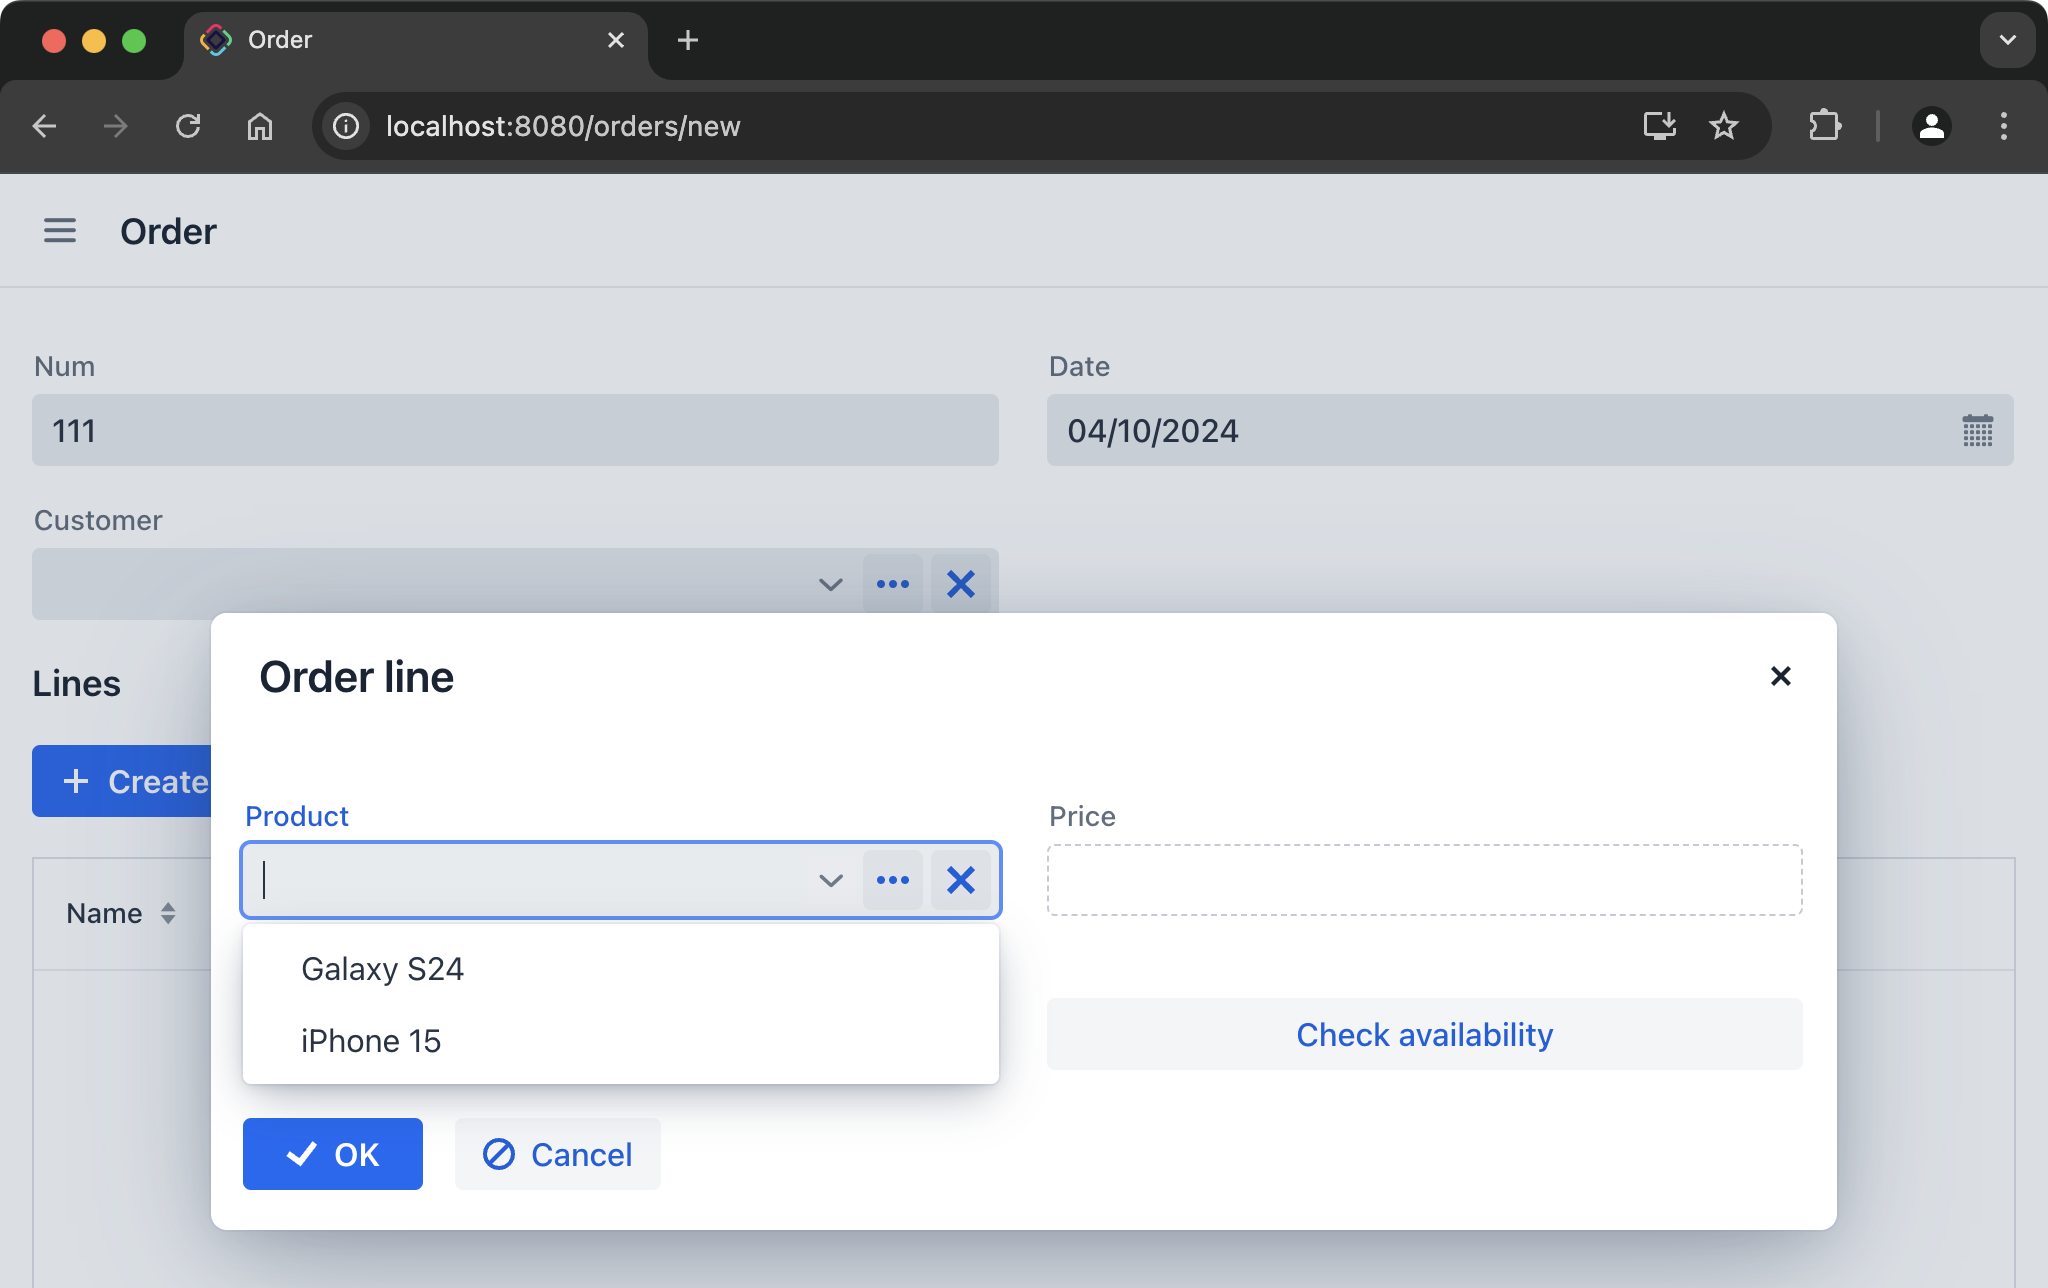 Figure 5. Creating OrderLine with linked Product
 -
The dropdown list of the Product field will display products provided by the Products application through the REST API. If the Products application is unavailable, you will see an error notification.
-
Select a product from the list. At this moment the reference to the
ProductDTO entity will be set to theOrderLineJPA entity. The JPA entity will be saved to the Orders database when you click OK in the Order line and Order detail views. It will include the identifier of the linked product. -
If you open the saved order for editing, the linked product will be loaded from the Products application and shown in the data grid:
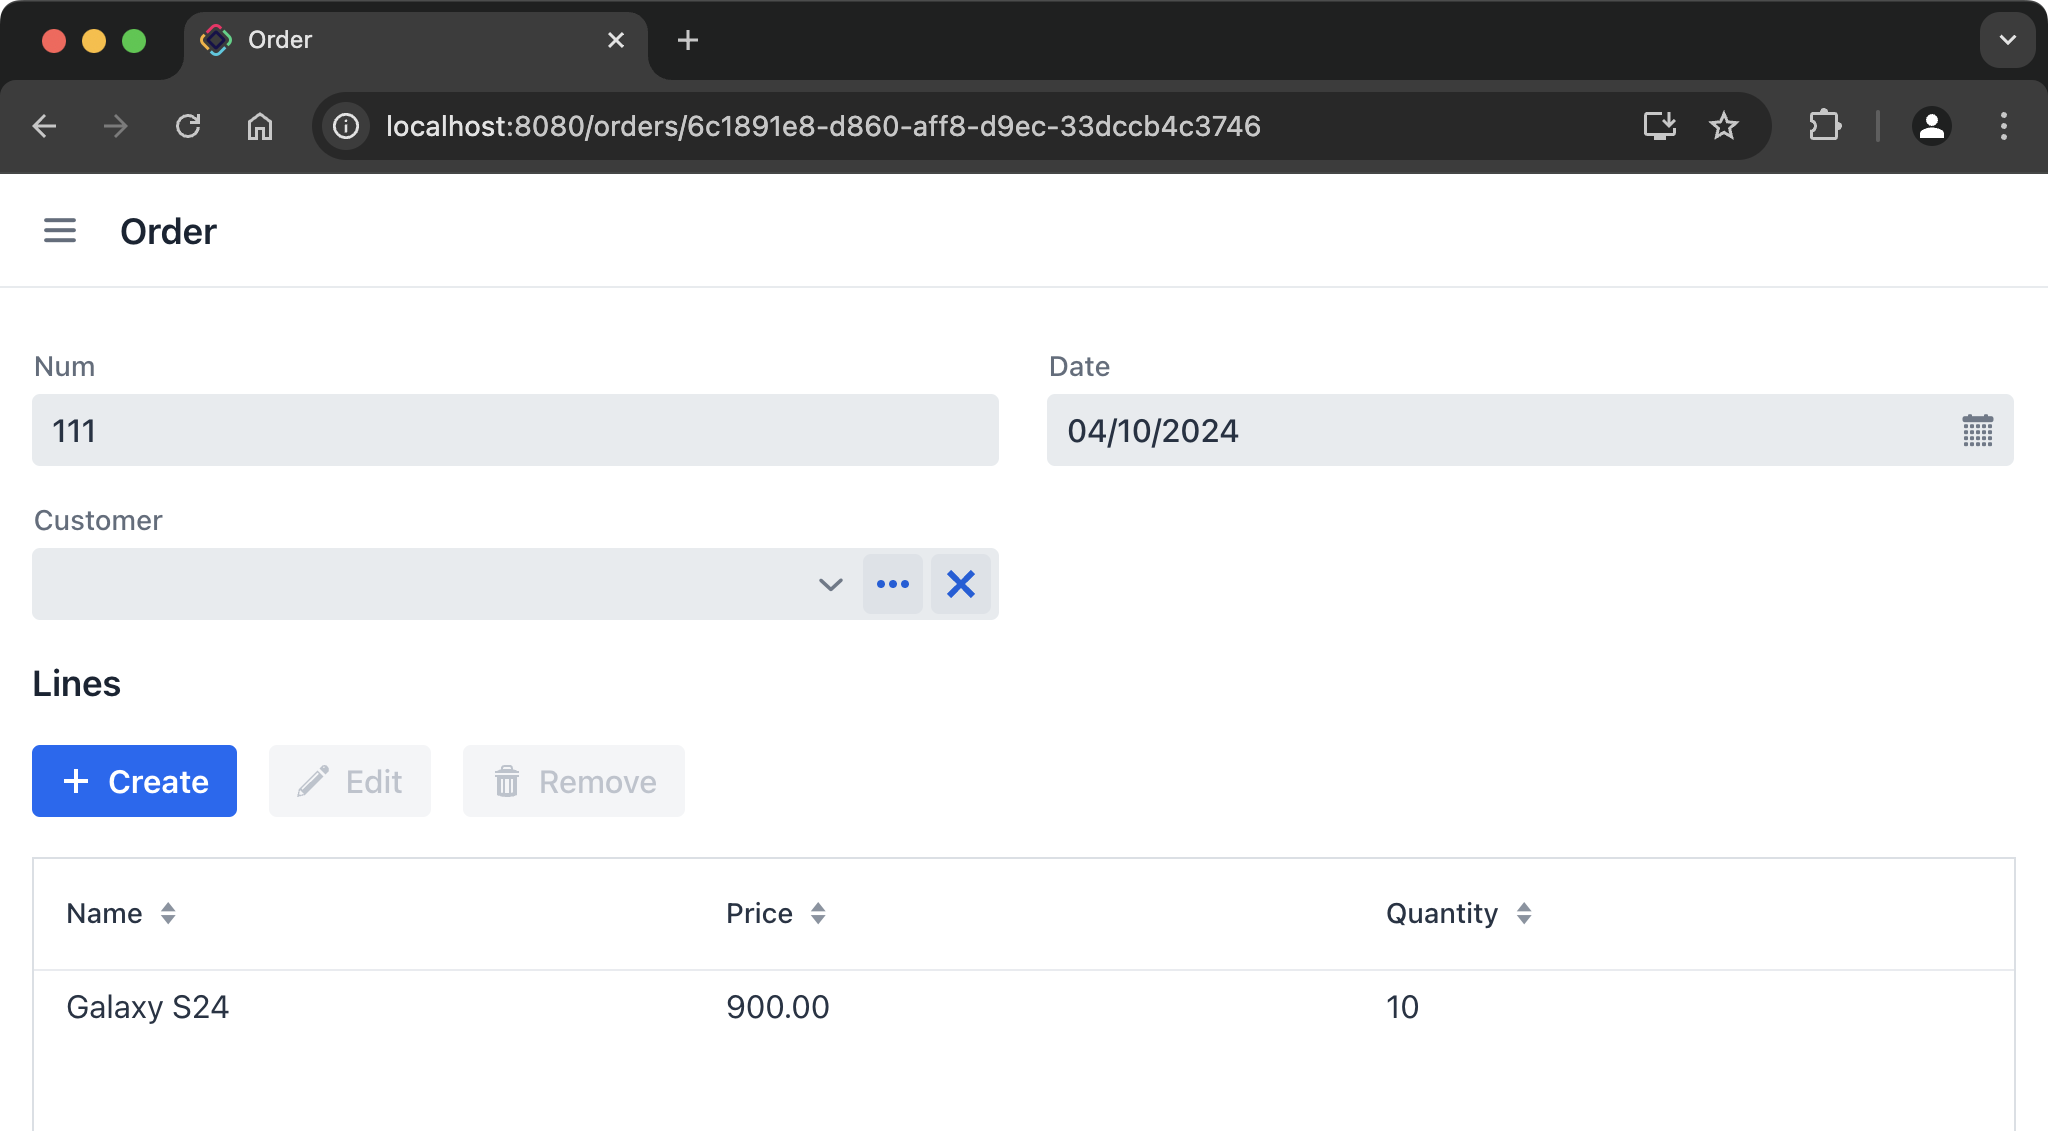 Figure 6. Order with OrderLines and linked Products
This scenario demonstrates the use of cross-datastore references for linking data between applications. This approach simplifies implementation but increases dependency between the applications, as users can see order lines with products only when the external Products application is up and running.
Replicating External Data
In this section, we’ll explore another approach to integration based on replicating data between applications.
In the Orders application, the Order entity has a reference to the SimpleCustomer JPA entity located in the same database. SimpleCustomer stores a subset of customer data sufficient for creating orders. These data are imported from the Customers application upon user request.
Below we’ll describe two possible ways to organize the import process.
-
Create a new order or edit the one created before.
-
Try to select a value in the Customer field. Initially, the dropdown is empty because the Orders database doesn’t contain any
SimpleCustomerinstances. -
Click the ellipsis button to open the Simple customers lookup view. The table is also empty, so you need to click Import Customers… and select one of the options:
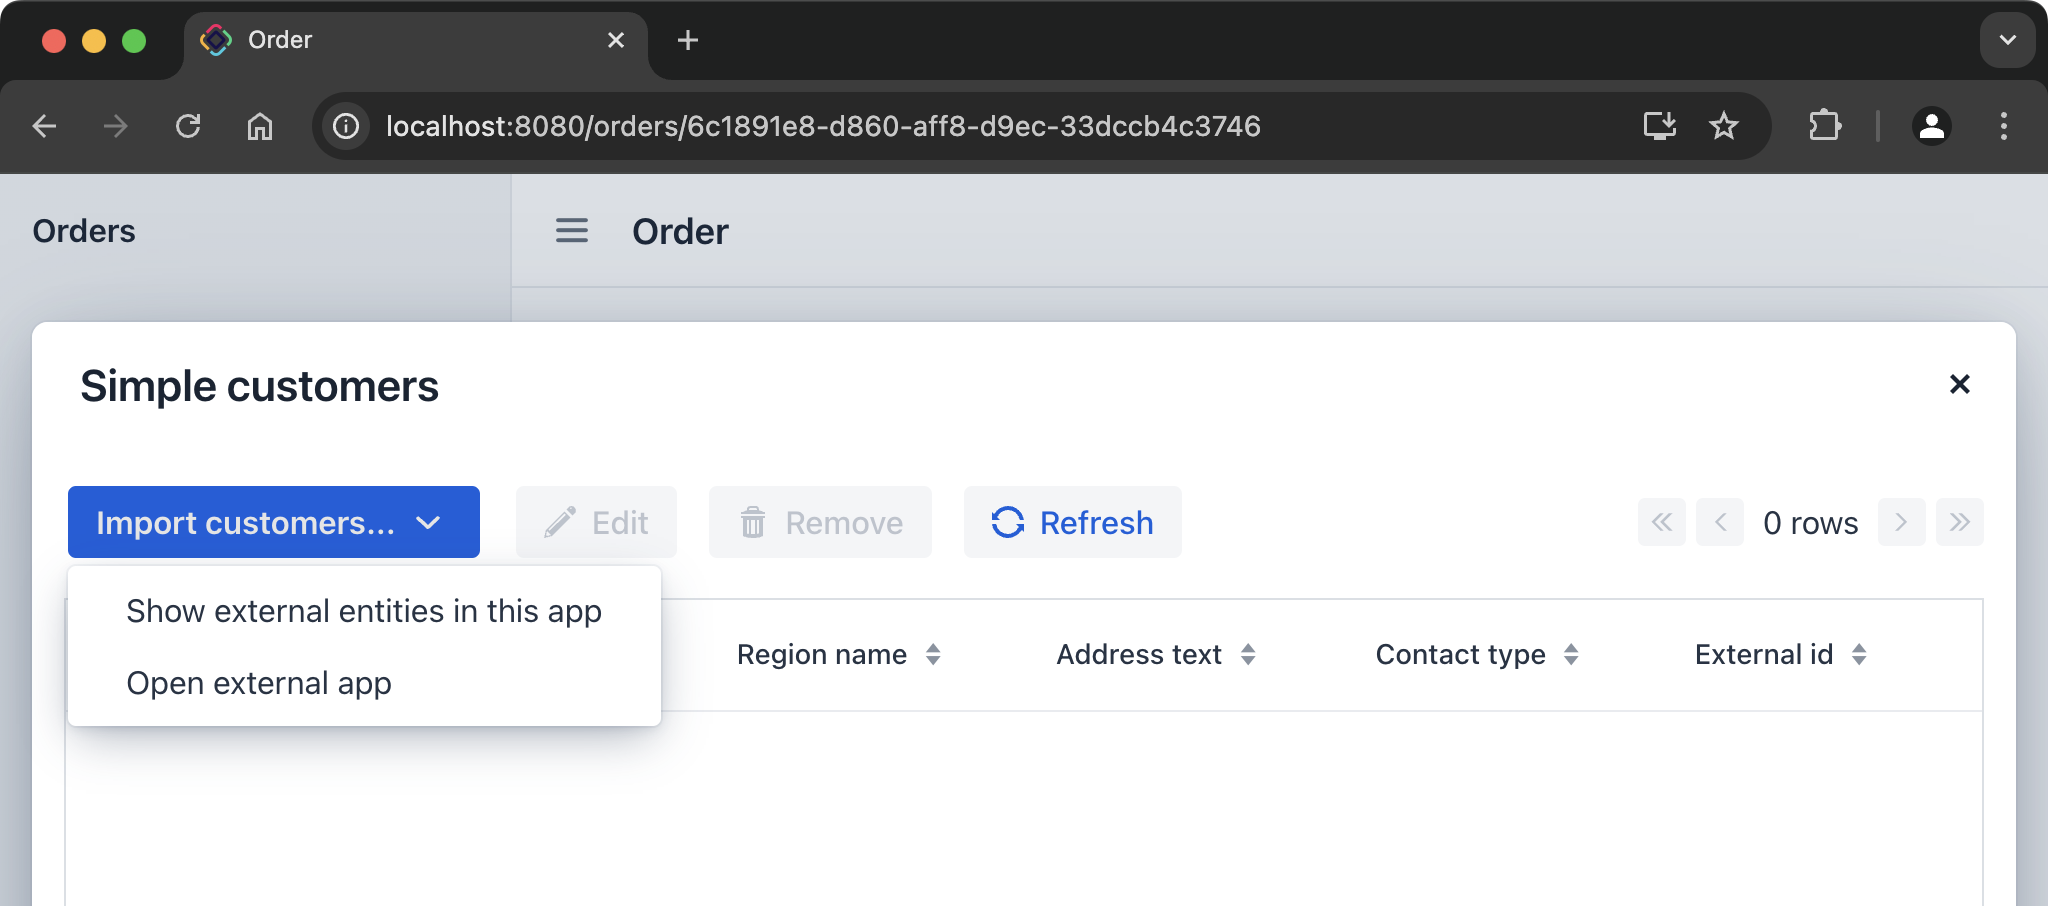 Figure 7. Options for managing and importing customers
-
Show external entities in this app
The Orders application will open its views for DTO entities mapped to the data of the Customers application. You can use these views to manage customers as you would in the Customers application.
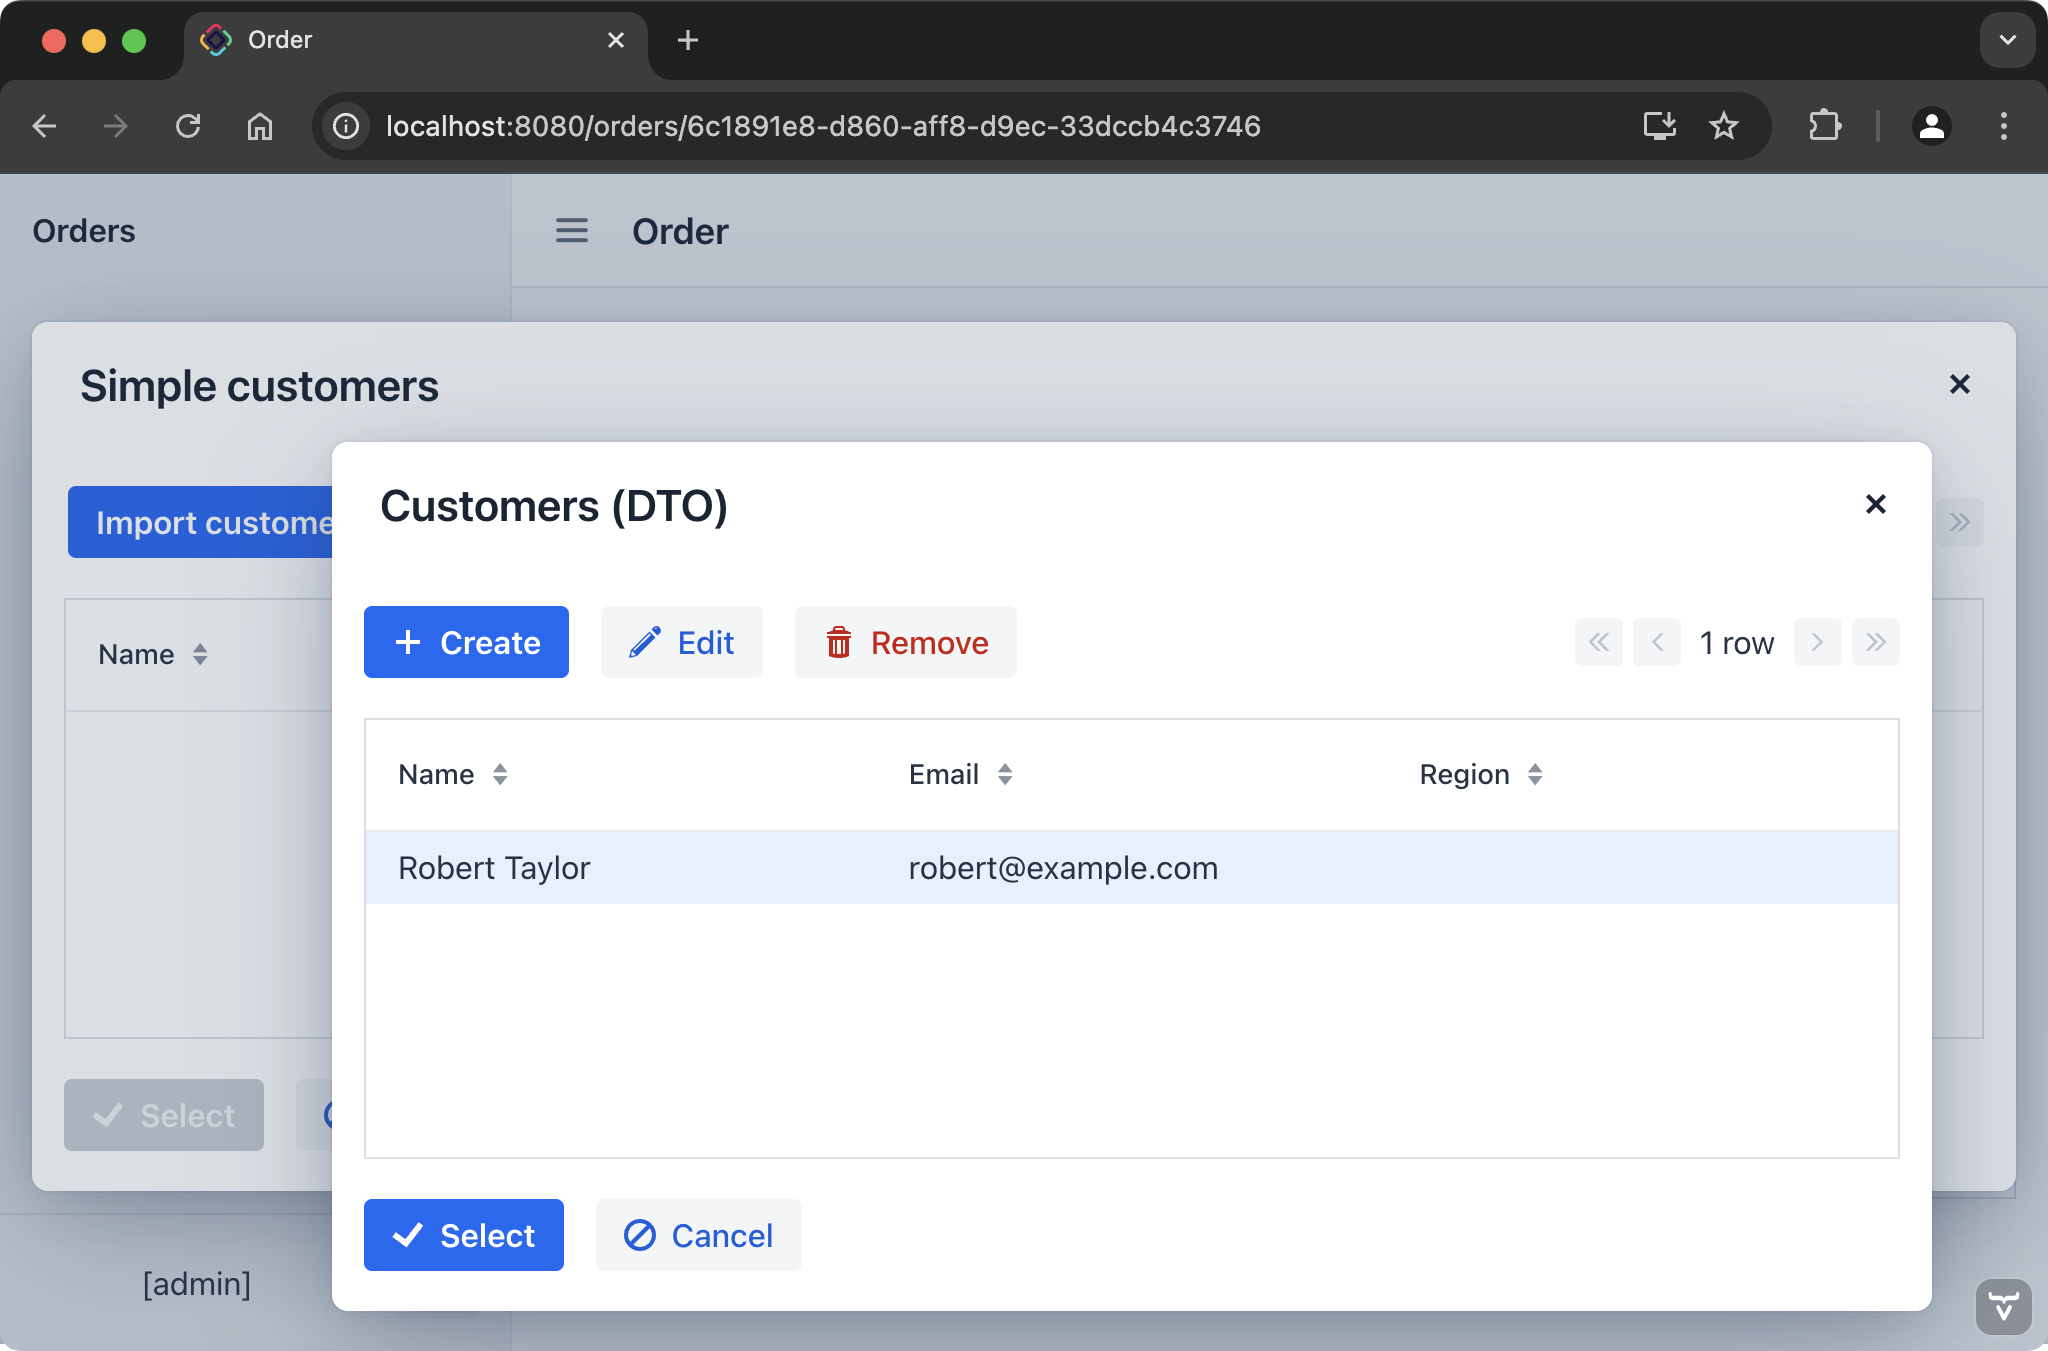 Figure 8. Managing customers using DTO views in Orders application
The Customers (DTO) view allows you to select a customer and its data will be imported as a new
SimpleCustomerinstance.The implementation of this import scenario is described in the Import Using DTO Views section.
-
Open external app
This option opens the Customers application in a new browser tab. Log in as
admin. The application will show the detail view for creating a new customer: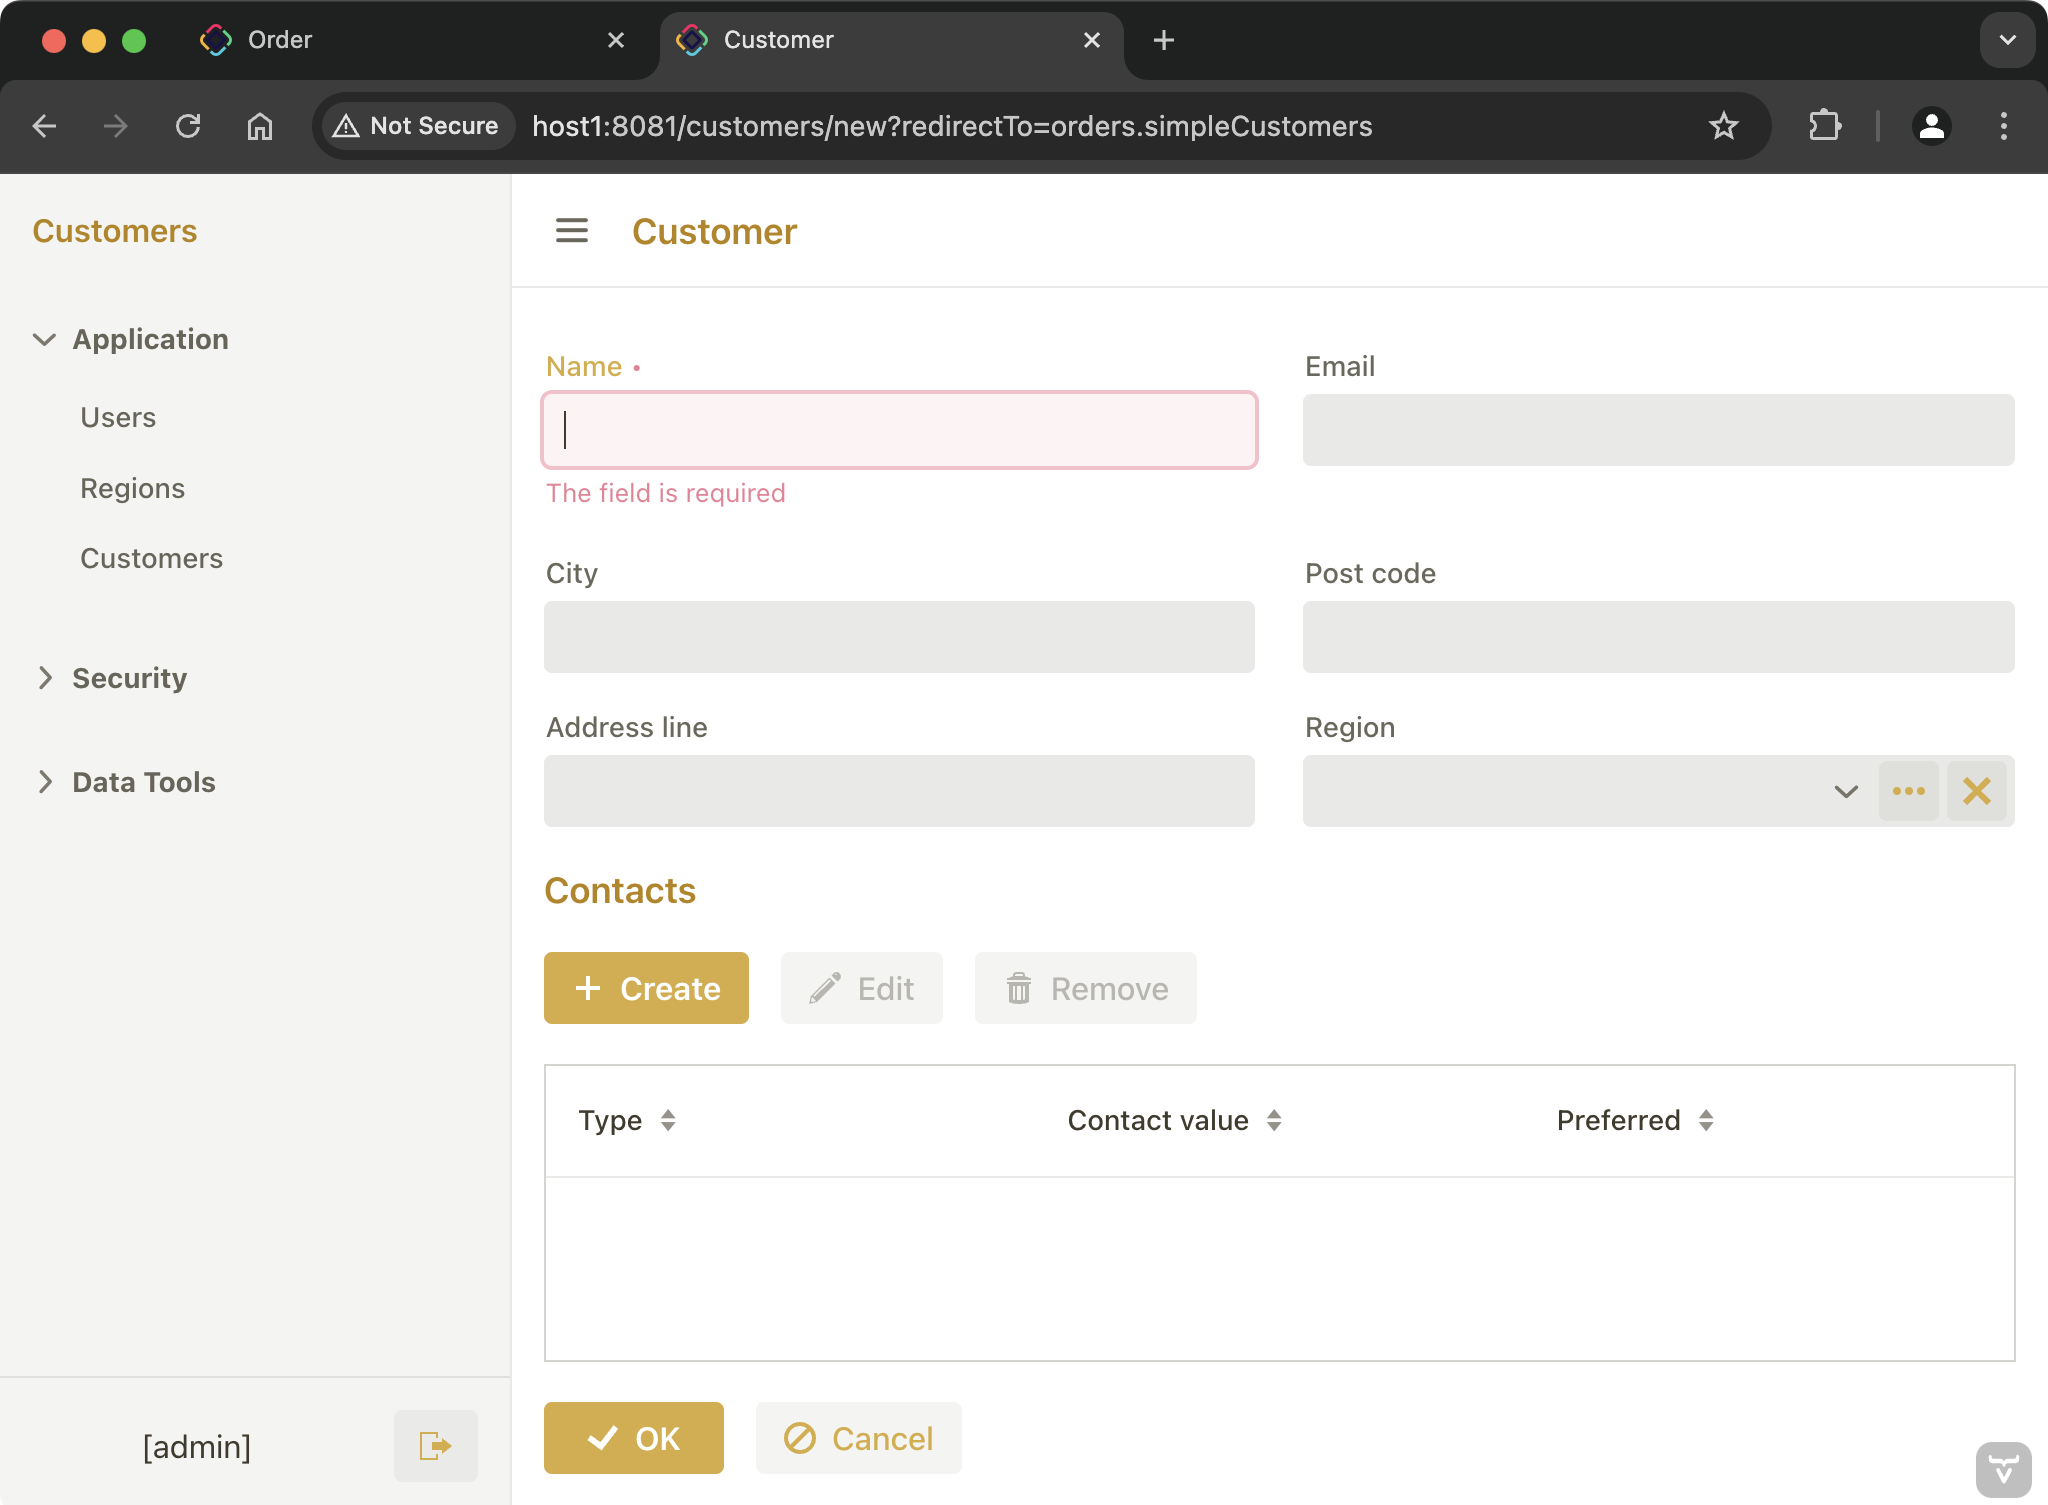 Figure 9. Creating new customer in Customers application
After entering data into fields and clicking OK, you will be redirected back to the Simple customers view of the Orders application and a dialog will appear notifying you about successful import:
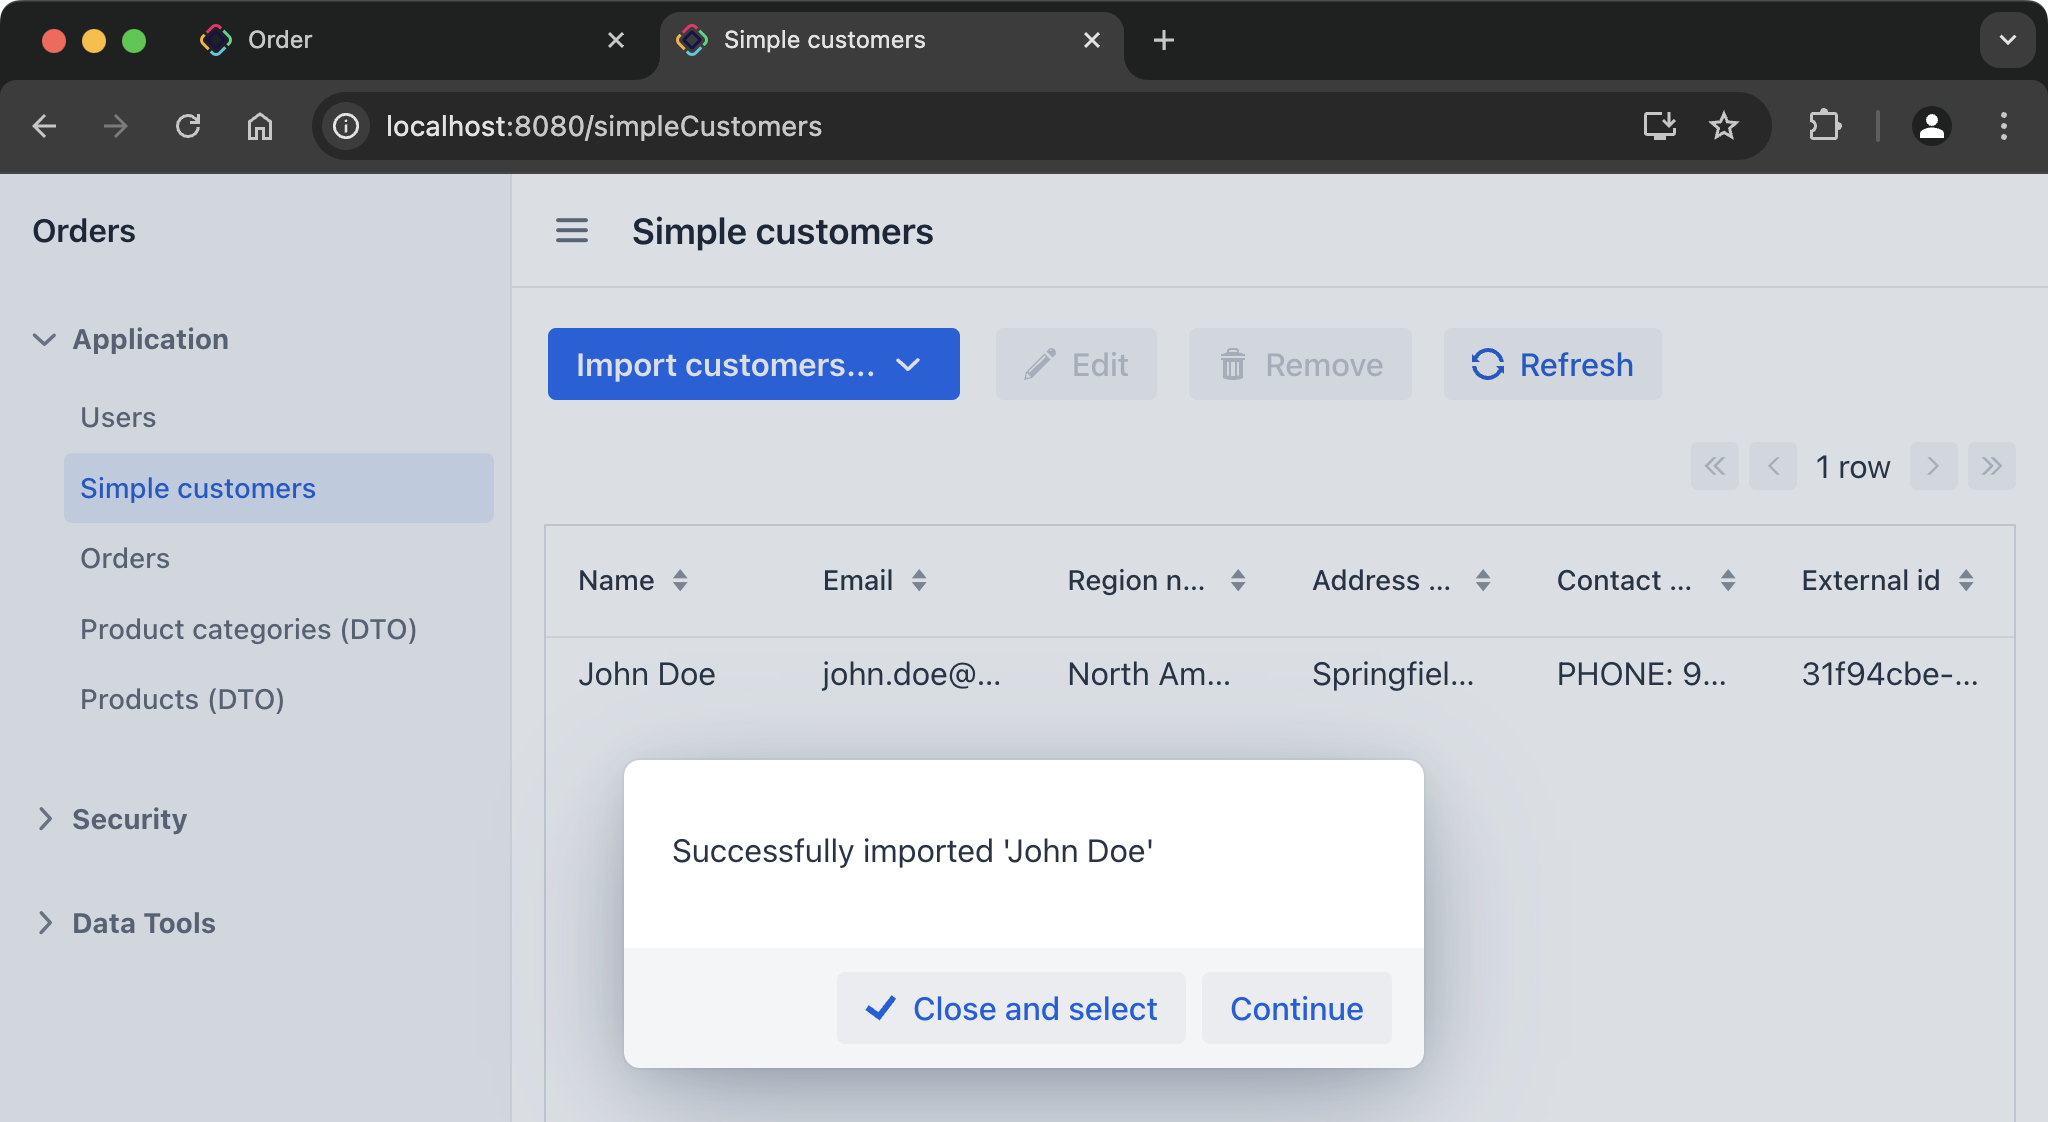
If you click Close and select button in the dialog, the current tab will close and the imported customer will be selected in the order displayed in the previous tab:
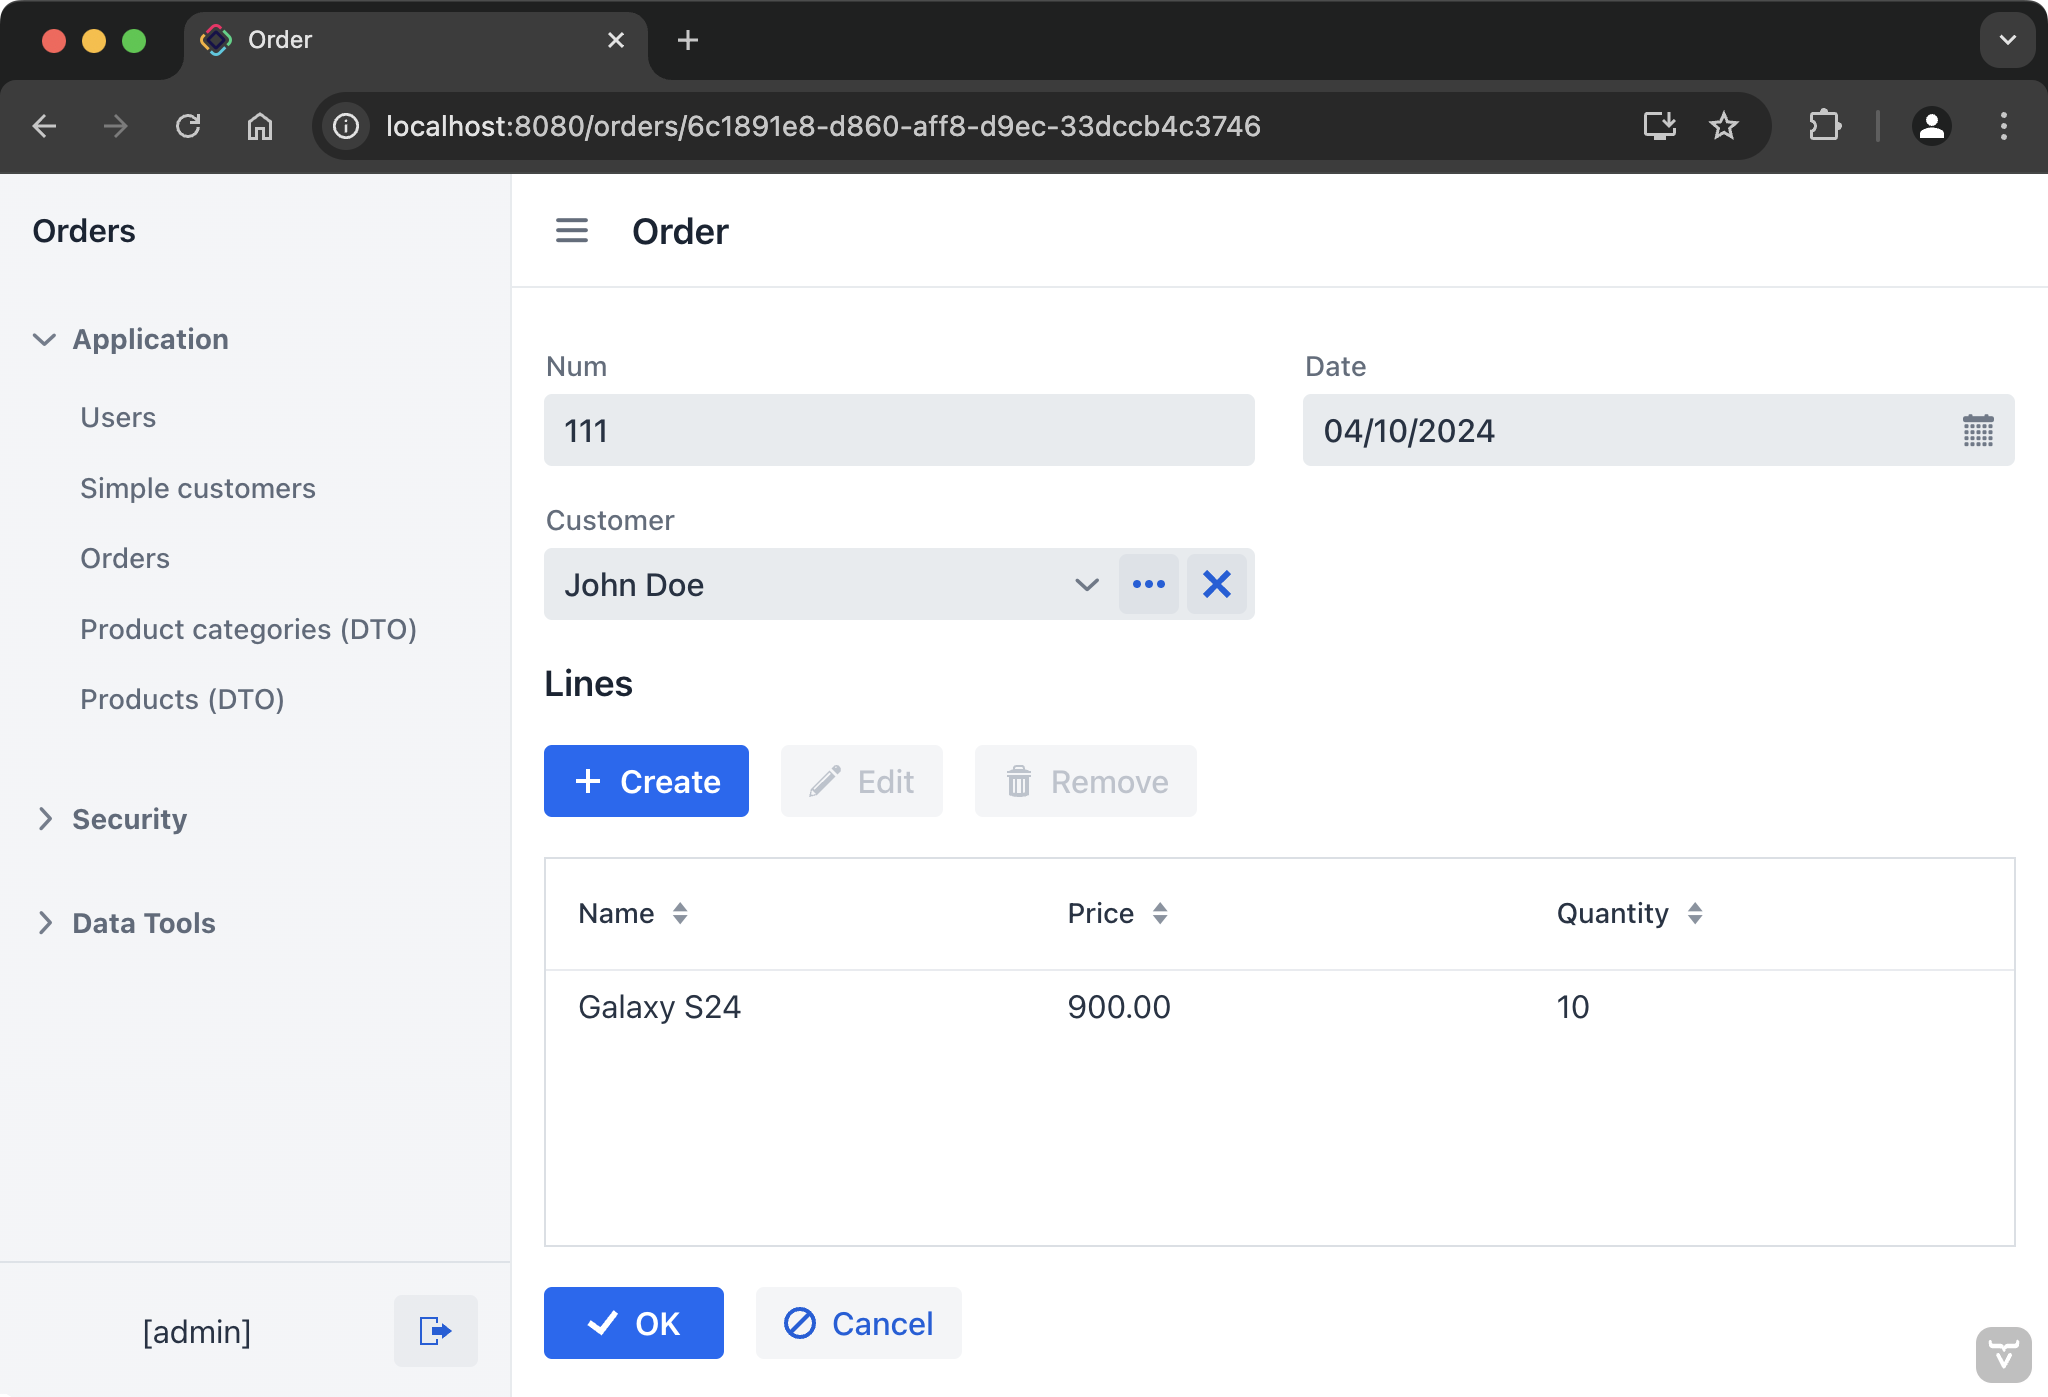 Figure 10. Imported customer is selected in order
The implementation of this import scenario is described in the Import Using Redirects section.
-
The first approach that uses DTO views of the Orders application for managing and selecting customers can be more convenient to users, as they stay inside the UI of a single application.
The second approach, which redirects users between applications, doesn’t require the implementation of customer management views in the Orders application.
Implementation Details
Project Configuration
The Customers and Products applications include the REST API and Authorization Server add-ons. The Customers application has a UI, while the Products application is a headless service.
Both applications have an identical configuration of the Authorization Server allowing the Orders application to connect using the Client Credentials grant:
# Protect REST API endpoints
jmix.resource-server.authenticated-url-patterns = /rest/**

# Configure Spring Security Authorization Server
spring.security.oauth2.authorizationserver.client.orders.registration.client-id=orders-app
spring.security.oauth2.authorizationserver.client.orders.registration.client-secret={noop}orders123
spring.security.oauth2.authorizationserver.client.orders.registration.authorization-grant-types=client_credentials
spring.security.oauth2.authorizationserver.client.orders.registration.client-authentication_methods=client_secret_basic
spring.security.oauth2.authorizationserver.client.orders.token.access-token-format=reference
spring.security.oauth2.authorizationserver.client.orders.token.access-token-time-to-live=24h

# Assign security roles to the client
jmix.authserver.client.orders.client-id=orders-app
jmix.authserver.client.orders.resource-roles=system-full-access
The system-full-access role is assigned to the orders-app client for simplicity. In a real-world application it should have minimal permissions sufficient for working with entities needed for integration.
The Orders application includes the REST DataStore add-on for accessing data of Customers and Orders applications.
There are two additional REST data stores configured in the application.properties file of the Orders application: customers and products, along with their connection parameters:
jmix.core.additional-stores = customers,products
jmix.core.store-descriptor-customers = restds_RestDataStoreDescriptor
jmix.core.store-descriptor-products = restds_RestDataStoreDescriptor

customers.baseUrl = http://host1:8081
customers.clientId = orders-app
customers.clientSecret = orders123

products.baseUrl = http://host2:8082
products.clientId = orders-app
products.clientSecret = orders123
Entities
The Orders application contains DTO entities, identical by the structure to the JPA entities of the Products and Customers applications. Below is an example of the Customer entity in the Customers and Orders application.
@JmixEntity
@Table(name = "CUSTOMER", indexes = {
        @Index(name = "IDX_CUSTOMER_REGION", columnList = "REGION_ID")
})
@Entity
public class Customer {
    @JmixGeneratedValue
    @Column(name = "ID", nullable = false)
    @Id
    private UUID id;

    @Column(name = "VERSION", nullable = false)
    @Version
    private Integer version;

    @InstanceName
    @Column(name = "NAME", nullable = false)
    @NotNull
    private String name;

    @Email
    @Column(name = "EMAIL")
    private String email;

    @EmbeddedParameters(nullAllowed = false)
    @Embedded
    @AttributeOverrides({
            @AttributeOverride(name = "city", column = @Column(name = "ADDRESS_CITY")),
            @AttributeOverride(name = "postCode", column = @Column(name = "ADDRESS_POST_CODE")),
            @AttributeOverride(name = "addressLine", column = @Column(name = "ADDRESS_ADDRESS_LINE"))
    })
    private Address address;

    @JoinColumn(name = "REGION_ID")
    @ManyToOne(fetch = FetchType.LAZY)
    private Region region;

    @Composition
    @OneToMany(mappedBy = "customer")
    private Set<Contact> contacts;

// getters and setters@Store(name = "customers") (1)
@JmixEntity
public class Customer {
@JmixGeneratedValue
@JmixId
private UUID id;
private Integer version;
@InstanceName
@NotNull
private String name;
@Email
private String email;
@JmixEmbedded (2)
@EmbeddedParameters(nullAllowed = false)
private Address address;
private Region region;
@Composition(inverse = "customer") (3)
private Set<Contact> contacts;
// getters and setters| 1 | The @Store annotation points to the appropriate REST data store. |
| 2 | The @JmixEmbedded annotation is used in DTO entities instead of the JPA’s @Embedded. |
| 3 | The @Composition annotation in a DTO entity should contain the inverse parameter to specify the inverse property instead of the JPA’s @OneToMany(mappedBy). |
In the Orders application, the OrderLine JPA entity contains a cross-datastore reference to the Product DTO entity:
@JmixEntity
@Table(name = "ORDER_LINE", indexes = {
        @Index(name = "IDX_ORDER_LINE_ORDER", columnList = "ORDER_ID")
})
@Entity
public class OrderLine {
    @JmixGeneratedValue
    @Column(name = "ID", nullable = false)
    @Id
    private UUID id;

    @Column(name = "QUANTITY")
    private Double quantity;

    @Column(name = "PRODUCT_ID")
    private UUID productId; (1)

    @JmixProperty
    @Transient
    @DependsOnProperties("productId")
    private Product product; (2)

// ...| 1 | productId persistent attribute stores a product ID in the Orders database. |
| 2 | DataManager automatically calls the products REST data store to populate the product transient attribute when loading OrderLine. |
Fetch Plans
The generic REST API currently supports only named fetch plans defined in fetch plans repository. So the integrated applications contain the same named fetch plans and use these names when loading data.
The Customers and Products applications define fetch plans for their JPA entities:
<fetchPlans xmlns="http://jmix.io/schema/core/fetch-plans">
    <fetchPlan entity="Customer" name="customer-full" extends="_base">
        <property name="region" fetchPlan="_base"/>
        <property name="contacts" fetchPlan="_base"/>
    </fetchPlan>
</fetchPlans><fetchPlans xmlns="http://jmix.io/schema/core/fetch-plans">
<fetchPlan entity="Product" name="product-full" extends="_base">
<property name="category" fetchPlan="_base"/>
</fetchPlan>
</fetchPlans>The Orders application defines fetch plans with the same names for its DTO entities:
<fetchPlans xmlns="http://jmix.io/schema/core/fetch-plans">
    <fetchPlan entity="Customer" name="customer-full" extends="_base">
        <property name="region" fetchPlan="_base"/>
        <property name="contacts" fetchPlan="_base"/>
    </fetchPlan>
    <fetchPlan entity="Product" name="product-full" extends="_base">
        <property name="category" fetchPlan="_base"/>
    </fetchPlan>
    <fetchPlan entity="OrderLine" name="orderLine-with-product" extends="_base">
        <property name="product" fetchPlan="_base"/> (1)
    </fetchPlan>
</fetchPlans>| 1 | Fetch plans can contain references to entities from a different data store. |
Views
The Orders application contains views for managing data of external applications using DTO entities:
-
Customer.list,Customer.detail,Contact.detail -
ProductCategory.list,ProductCategory.detail,Product.list,Product.detail
These views were created using the DTO entity list view and DTO entity detail view templates provided by Studio. The views don’t have delegate methods (usual for DTO views), as they are unnecessary when the entity is associated with a data store. The standard Jmix CRUD functionality operates through the DataManager for these entities.
Data loaders do not have the query element, so they load all instances according to the pagination and filtering components, if they are used in the view. For example:
<data>
    <collection id="customersDc"
                class="com.company.orders.entity.customers.Customer">
        <loader id="customersDl" readOnly="true"/>
    </collection>
</data>
However, data loaders of DTO entities support JSON queries as explained in the REST DataStore documentation. You can find an example of a JSON query in Customer.detail view descriptor. It is used to filter dropdown list items when the user selects a reference to the Region entity:
<entityComboBox id="regionField" property="region">
    <itemsQuery class="com.company.orders.entity.customers.Region"
                searchStringFormat="${inputString}">
        <fetchPlan extends="_base"/>
        <query>
            <![CDATA[
            {
              "property": "name",
              "operator": "contains",
              "parameterName": "searchString"
            }
            ]]>
        </query>
    </itemsQuery>
    <actions>
        <action id="entityClear" type="entity_clear"/>
    </actions>
</entityComboBox>
Import Using DTO Views
When you import customers in the Simple customers view using the Show external entities in this app, the process is straightforward:
-
The
CustomerDTO list view is shown in lookup mode using theDialogWindowsbean:orders/src/main/java/com/company/orders/view/simplecustomer/SimpleCustomerListView.java@Autowired private CustomerImporter customerImporter; @Autowired private DialogWindows dialogWindows; @Subscribe("importButton.showExternalEntitiesItem") public void onImportButtonShowExternalEntitiesItemClick(final DropdownButtonItem.ClickEvent event) { // Show Customer DTO list view for looking up a customer and importing it dialogWindows.lookup(this, Customer.class) .withSelectHandler(this::importCustomers) .open(); } private void importCustomers(Collection<Customer> customers) { for (Customer customer : customers) { importCustomer(Id.of(customer)); } simpleCustomersDl.load(); notifications.create("Imported successfully").show(); } private SimpleCustomer importCustomer(Id<Customer> customerId) { // Delegate to the CustomerImporter bean to import the customer return customerImporter.importCustomer(customerId); } -
The
CustomerImporterbean loadsCustomerDTO entity from the Customers application usingDataManagerand creates or updates aSimpleCustomerJPA entity with data required for the Orders application:orders/src/main/java/com/company/orders/view/simplecustomer/CustomerImporter.java@Component public class CustomerImporter { private final DataManager dataManager; public CustomerImporter(DataManager dataManager) { this.dataManager = dataManager; } public SimpleCustomer importCustomer(Id<Customer> customerId) { Customer fullCustomer = dataManager.load(customerId) .fetchPlan("customer-full") .one(); SimpleCustomer simpleCustomer = dataManager.load(SimpleCustomer.class) .query("e.externalId = ?1", customerId.getValue()) .optional() .orElseGet(() -> { SimpleCustomer sc = dataManager.create(SimpleCustomer.class); sc.setExternalId(fullCustomer.getId()); return sc; }); simpleCustomer.setName(fullCustomer.getName()); simpleCustomer.setEmail(fullCustomer.getEmail()); simpleCustomer.setRegionName(fullCustomer.getRegion() == null ? null : fullCustomer.getRegion().getName()); simpleCustomer.setAddressText(formatAddressText(fullCustomer.getAddress())); simpleCustomer.setPreferredContact(formatPreferredContact(fullCustomer.getContacts())); SimpleCustomer importedCustomer = dataManager.save(simpleCustomer); return importedCustomer; } private String formatAddressText(Address address) { return address.getCity() + ", " + address.getPostCode() + ", " + address.getAddressLine(); } private String formatPreferredContact(Set<Contact> contacts) { return contacts.stream() .filter(contact -> Boolean.TRUE.equals(contact.getPreferred())) .findFirst() .map(contact -> contact.getContactType() + ": " + contact.getContactValue()) .orElse(""); } }
Import Using Redirects
When choosing Open external app option for importing customers in the Simple customers view, the process is as follows:
-
The Orders application opens the Customers application in a new browser tab with the path to create a new customer and with additional query parameter
redirectTo=orders.simpleCustomers. The Customers application base URL is taken from the REST DataStore connection properties:orders/src/main/java/com/company/orders/view/simplecustomer/SimpleCustomerListView.java@Value("${customers.baseUrl}") private String customersBaseUrl; @Subscribe("importButton.openExternalAppItem") public void onImportButtonOpenExternalAppItemClick(final DropdownButtonItem.ClickEvent event) { // Open the Customers application with the customers list in a new tab and // provide a URL parameter to redirect back to this view String url = customersBaseUrl + "/customers/new?redirectTo=orders.simpleCustomers"; UI.getCurrent().getPage().executeJs("window.open('" + url + "', '_blank');"); } -
In this example, users need to log in to the Customers application by entering a username and password. In a real-world distributed system, the Orders and Customers applications could have a Single-Sign-On based on an external Identity Provider (for example Keycloak) and the OpenID Connect add-on.
-
The
Customer.detailview of the Customers application remembers theredirectToparameter on opening and use it to redirect back to the Orders application after saving the new customer:customers/src/main/java/com/company/customers/view/customer/CustomerDetailView.javaprivate String redirectTo; @Autowired private Environment environment; @Subscribe public void onQueryParametersChange(final QueryParametersChangeEvent event) { // When the URL contains the "redirectTo" parameter, save it to redirect after save event.getQueryParameters().getSingleParameter("redirectTo").ifPresent(param -> { redirectTo = param; }); } @Subscribe public void onAfterSave(final AfterSaveEvent event) { if (redirectTo != null) { // Get full URL and redirect to it String baseUrl = environment.getProperty(redirectTo + ".url"); UI.getCurrent().getPage().setLocation(baseUrl + "?importCustomer=" + getEditedEntity().getId()); } }The redirect URL is defined by the
orders.simpleCustomers.urlproperty:customers/src/main/resources/application.propertiesorders.simpleCustomers.url = http://localhost:8080/simpleCustomers -
The Orders application opens in the same browser tab instead of the Customers with the URL pointing to the
SimpleCustomers.listview and theimportCustomerquery parameter containing the created customer’s ID:http://localhost:8080/simpleCustomers?importCustomer=59eef946-20f8-47a3-a37b-653f37e18619 -
The
SimpleCustomers.listview handles the URL query parameter, imports the customer by ID using theCustomerImporterbean and shows a dialog offering to close this browser tab and select the imported customer. If the user clicks Close and select in the dialog, theSimpleCustomers.listview sends theSelectCustomerEventwith the importedSimpleCustomerinstance and closes this browser tab:orders/src/main/java/com/company/orders/view/simplecustomer/SimpleCustomerListView.java@Autowired private CustomerImporter customerImporter; @Autowired private UiEventPublisher uiEventPublisher; @Subscribe public void onQueryParametersChange(final QueryParametersChangeEvent event) { // When redirecting from the Customers app back, the URL contains the "importCustomer" // parameter with the ID of the customer to import event.getQueryParameters().getSingleParameter("importCustomer").ifPresent(param -> { Id<Customer> customerId = Id.of(UUID.fromString(param), Customer.class); SimpleCustomer importedCustomer = importCustomer(customerId); String thisUrl = RouteConfiguration.forSessionScope().getUrl(this.getClass()); UI.getCurrent().getPage().getHistory().replaceState(null, thisUrl); // Show a success notification and close the browser window dialogs.createOptionDialog() .withText("Successfully imported '" + importedCustomer.getName() + "'") .withActions( new DialogAction(DialogAction.Type.OK) .withText("Close and select") .withHandler(actionPerformedEvent -> closeBrowserWindowAndNotify(importedCustomer)), new BaseAction("continue") .withText("Continue") ) .open(); }); } private SimpleCustomer importCustomer(Id<Customer> customerId) { // Delegate to the CustomerImporter bean to import the customer return customerImporter.importCustomer(customerId); } private void closeBrowserWindowAndNotify(SimpleCustomer importedCustomer) { // Close the browser window and notify the UI about the imported customer UI.getCurrent().getPage().executeJs("window.close();"); uiEventPublisher.publishEvent(new SelectCustomerEvent(this, importedCustomer)); } -
The
SimpleCustomers.listview of the first browser tab which initiated redirects listens toSelectCustomerEvent. If it was open in the lookup mode to select a customer, it executes theselectActionto automatically select the imported instance:orders/src/main/java/com/company/orders/view/simplecustomer/SimpleCustomerListView.java@ViewComponent private DataGrid<SimpleCustomer> simpleCustomersDataGrid; @EventListener private void onSelectImportedCustomer(final SelectCustomerEvent event) { // If a customer was imported by another instance of this view, // select it and return to the calling view getSelectAction().ifPresent(action -> { simpleCustomersDataGrid.select(event.getCustomer()); action.actionPerform(this); }); }
Business Logic
The Products application includes a business service accessible via the generic REST API, which returns the stock quantity for a specific product:
@RestService("InventoryService")
public class InventoryService {

    @RestMethod
    public Double getAvailableInStock(Product product) {
        return (double) Math.round(Math.random() * 100);
    }
}
The Orders application invokes this service in the OrderLine.detail view to show the available quantity to the user.
The invocation is encapsulated in the InventoryService bean. It uses the RestDataStoreUtils bean of the REST DataStore add-on which provides access to the Spring’s RestClient to call the REST endpoint using connection and authentication parameters configured for the REST data store:
@Component
public class InventoryService {

    @Autowired
    private RestDataStoreUtils restDataStoreUtils;
    @Autowired
    private EntitySerialization entitySerialization;

    public Double getAvailableInStock(Product product) {
        RestClient restClient = restDataStoreUtils.getRestClient("products");

        String productJson = entitySerialization.toJson(product);

        String result = restClient.post()
                .uri("/rest/services/InventoryService/getAvailableInStock")
                .body("""
                        {
                            "product": %s
                        }
                        """.formatted(productJson))
                .retrieve()
                .body(String.class);

        return Double.valueOf(result);
    }
}
Exception Handling
The Orders application contains a RestDataStoreAccessException handler that shows a notification when the Customers or Products applications are not available during an integration request:
@Component
public class RestDataStoreAccessExceptionHandler extends AbstractUiExceptionHandler {

    private static final Logger log = LoggerFactory.getLogger(RestDataStoreAccessExceptionHandler.class);

    private final Notifications notifications;

    public RestDataStoreAccessExceptionHandler(Notifications notifications) {
        super(RestDataStoreAccessException.class.getName());
        this.notifications = notifications;
    }

    @Override
    protected void doHandle(@NonNull String className, @NonNull String message, @Nullable Throwable throwable) {
        log.warn(message);

        if (throwable instanceof RestDataStoreAccessException exception) {
            notifications.create("Connection error",
                            "'" + exception.getDataStoreName() + "' service is unavailable")
                    .withType(Notifications.Type.ERROR)
                    .show();
        }
    }
}
Summary
This guide has equipped you with the essential knowledge and practical steps to integrate Jmix applications into a distributed system. By utilizing the REST API and REST DataStore add-ons, you can create a cohesive environment where multiple applications communicate effectively, ensuring seamless data management across various domains.
You explored both data replication and cross-datastore references, each offering its own benefits for application interconnectivity.
The guide has also demonstrated two approaches to selecting and returning external data: using DTO views for managing external entities and redirecting users between applications.
