Integrating Applications Using OpenAPI
OpenAPI is a standard specification for defining RESTful APIs. It helps in integrating systems by providing a clear, machine-readable format for API definitions, making it easier for different applications to understand and interact with each other.
This guide features a hands-on example of integrating a Jmix application with an external REST service, using an OpenAPI schema. It provides step-by-step instructions that leverage both Jmix Studio features and manual coding to facilitate the implementation process. By the end, you will be prepared to implement OpenAPI-based integrations in your own projects.
Requirements
To effectively use this guide, you will need the following:
-
Setup the development environment.
-
Clone the fork of the spring-petclinic-rest sample project:
git clone https://github.com/jmix-framework/spring-petclinic-rest.gitWe recommend using the fork instead of the original project to ensure reproducibility of the guide. We periodically update the fork to keep it in sync with the original.
-
You can follow the guide step-by-step, or get the completed sample project to explore the finished implementation and experiment with the functionality.
-
Either download and unzip the source repository
-
Or clone it and switch to the
release_2_4branch:git clone https://github.com/jmix-framework/jmix-openapi-integration-sample cd jmix-openapi-integration-sample git checkout release_2_4
-
What We Are Going to Build
The Spring PetClinic REST sample application used in this guide is a variation of the well-known Spring PetClinic sample. Unlike the original project, it provides a REST API without any user interface. The Spring PetClinic domain model includes Pets, Owners, Vets, Specialties and other entities.
You will create a sample Jmix application to manage information about advanced training for veterinarians. It will be integrated with Spring PetClinic REST application and provide the following features:
-
CRUD user interface for managing
SpecialtyandVetentities of Spring PetClinic through its REST API. -
Trainingentity that manages information about training sessions and contains links toSpecialtyandVetfrom Spring PetClinic.
The Veterinary Training application will mirror a part of the PetClinic data model that is involved in the integration: Specialty and Vet entities. They will be represented by Jmix DTO entities and used in the Training JPA entity:
Preparation
Start Spring PetClinic REST
Open terminal in the spring-petclinic-rest directory and execute:
./mvnw spring-boot:runWhen the application is ready to accept requests, you will see the following message in the console:
INFO PetClinicApplication - Started PetClinicApplication in 3.086 seconds (process running for 3.327)Open http://localhost:9966/petclinic/api/specialties in your web browser. You should see the JSON array representing Specialty instances.
By default, the Spring PetClinic REST application does not require authentication. Later in this guide we’ll turn the authentication on and make relevant changes in the integration code.
Open http://localhost:9966/petclinic/v3/api-docs. You should see the Spring PetClinic OpenAPI schema in JSON format.
Generating API Client
The first step in the integration process is to generate Java client classes from the OpenAPI schema of the PetClinic application.
-
In the Jmix tool window, select New → Advanced → OpenAPI Client. The Create OpenAPI Client wizard will open.
-
On the first General step, select the
petclinic-openapi.ymlfile in the Schema file field and enterpetclinicin the Client name field.Make sure that both Package for generated sources and Package for Spring configuration fields have the
com.company.vettraining.petclinicvalue. -
On the next Generator Options step, keep the suggested suffixes:
Modelfor model class names andApifor API class names. -
On the last Summary step, review the information about project changes and click Create.
Studio adds the OpenAPI generator task to build.gradle:
import org.openapitools.generator.gradle.plugin.tasks.GenerateTask

plugins {
    // ...
    id 'org.openapi.generator' version '7.8.0'
}
// ...
dependencies {
    // ...
    implementation 'org.openapitools:jackson-databind-nullable:0.2.6'
    implementation 'org.mapstruct:mapstruct:1.6.1'
    annotationProcessor 'org.mapstruct:mapstruct-processor:1.6.1'
}

sourceSets {
    main.java.srcDirs += "$buildDir/generated/openapi/petclinic/src/main/java"
}
// ...
tasks.register('openApiGeneratePetclinic', GenerateTask) {
    inputSpec = "$rootDir/src/main/resources/petclinic-openapi.yml"
    outputDir = "$buildDir/generated/openapi/petclinic/"
    generatorName = "java"
    library = "restclient"
    packageName = "com.company.vettraining.petclinic"
    modelPackage = "com.company.vettraining.petclinic.model"
    apiPackage = "com.company.vettraining.petclinic.api"
    modelNameSuffix = "Model"
    generateApiTests = false
    generateModelTests = false
    skipValidateSpec = true
    configOptions.set([
            useRuntimeException: "true",
            useJakartaEe       : "true"
    ])
}
compileJava.dependsOn tasks.named("openApiGeneratePetclinic")
And runs the openApiGeneratePetclinic task to create API client sources in the build/generated/openapi/petclinic directory.
The task will be executed each time the project is built.
Apart from the client sources in build/generated, Studio creates a Spring configuration class that exposes API client as a set of beans:
@Configuration
public class PetclinicClientConfiguration {

    @Bean("petclinicApiClient")
    public ApiClient apiClient() {
        return new ApiClient();
    }

    @Bean("petclinicFailingApi")
    public FailingApi failingApi(ApiClient apiClient) {
        return new FailingApi(apiClient);
    }

    @Bean("petclinicOwnerApi")
    public OwnerApi ownerApi(ApiClient apiClient) {
        return new OwnerApi(apiClient);
    }

    // ...
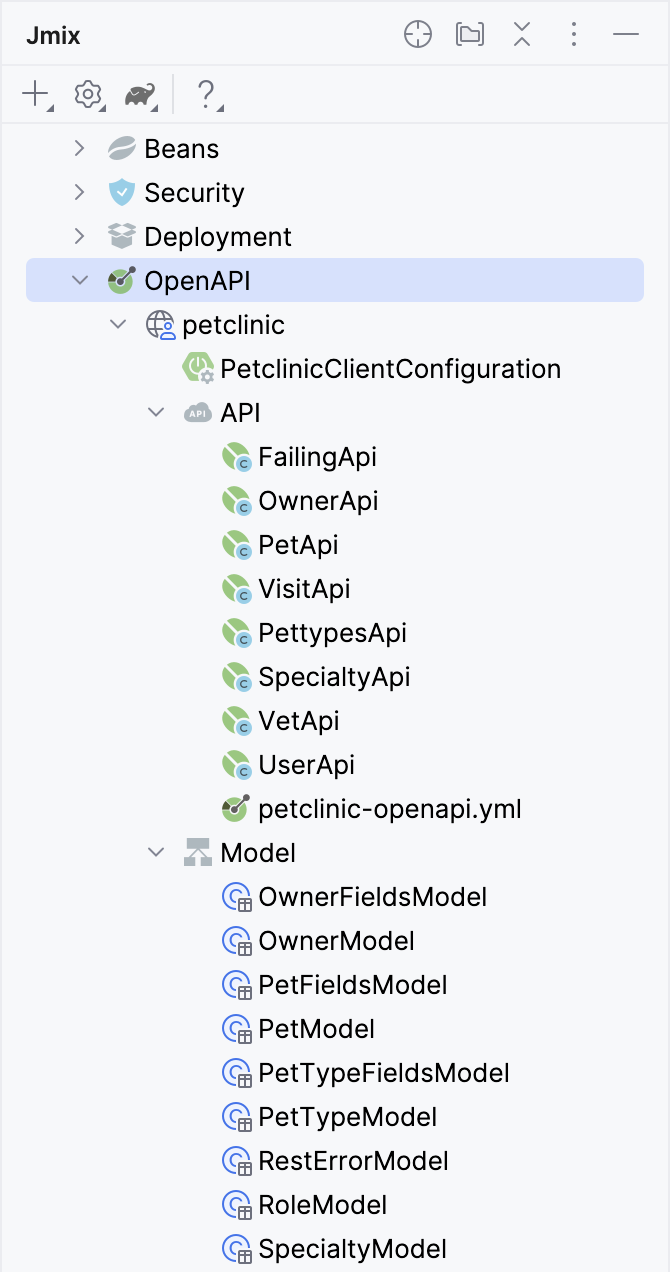
The Jmix tool window will show the generated client API and model classes in the OpenAPI node:
Creating Entities and Mappers
External data should be represented by Jmix entities in order to be incorporated into the application data model and shown in Jmix UI. Instead of directly using API model objects in the UI and business logic, it is recommended to create an additional layer of DTO entities and mappers corresponding to API model classes.
A separate layer of Jmix entities and mappers offers several benefits compared to directly using API model classes.
First, it provides a clear separation between the external data model and the internal application logic, allowing you to adapt the external data to fit the specific needs of your application. This enhances maintainability by isolating external API changes from core business logic, reducing the risk of breaking changes.
API model classes are designed to represent data as defined by the external service, which may not always align well with the needs of your application. There can be potential issues with data types and associations that are used in API model classes, making them unsuitable for direct use. By creating a mapping layer, you have the flexibility to transform and adapt the data to suit your application’s specific requirements.
Additionally, using a dedicated Jmix entity layer allows you to fully integrate external data into the Jmix ecosystem. You can add Jmix-specific annotations, such as @InstanceName or @Composition, to enhance the application’s functionality. This is not possible with API model classes directly, as they are re-generated on each project build, causing any custom changes to be lost.
Jmix Studio provides sophisticated tooling for automatic creation of DTO entities and mappers for API model classes.
In this section, you will create DTO entities and mappers for the SpecialtyModel and VetModel API classes.
Model Mapping Wizard
-
Select OpenAPI → petclinic → Model node in the Jmix tool window and click Model Mapping in its context menu:
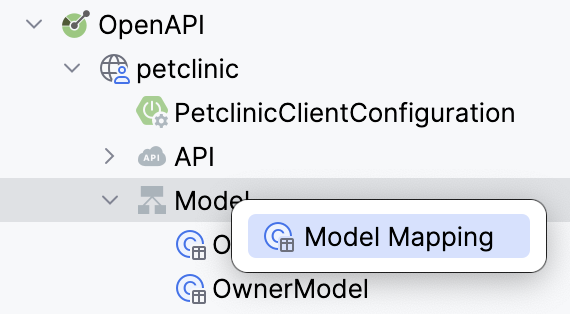 Figure 4. Model Mapping command
The Model Mapping wizard will start.
-
On the first step of the wizard, select
SpecialtyModelandVetModelclasses in the list: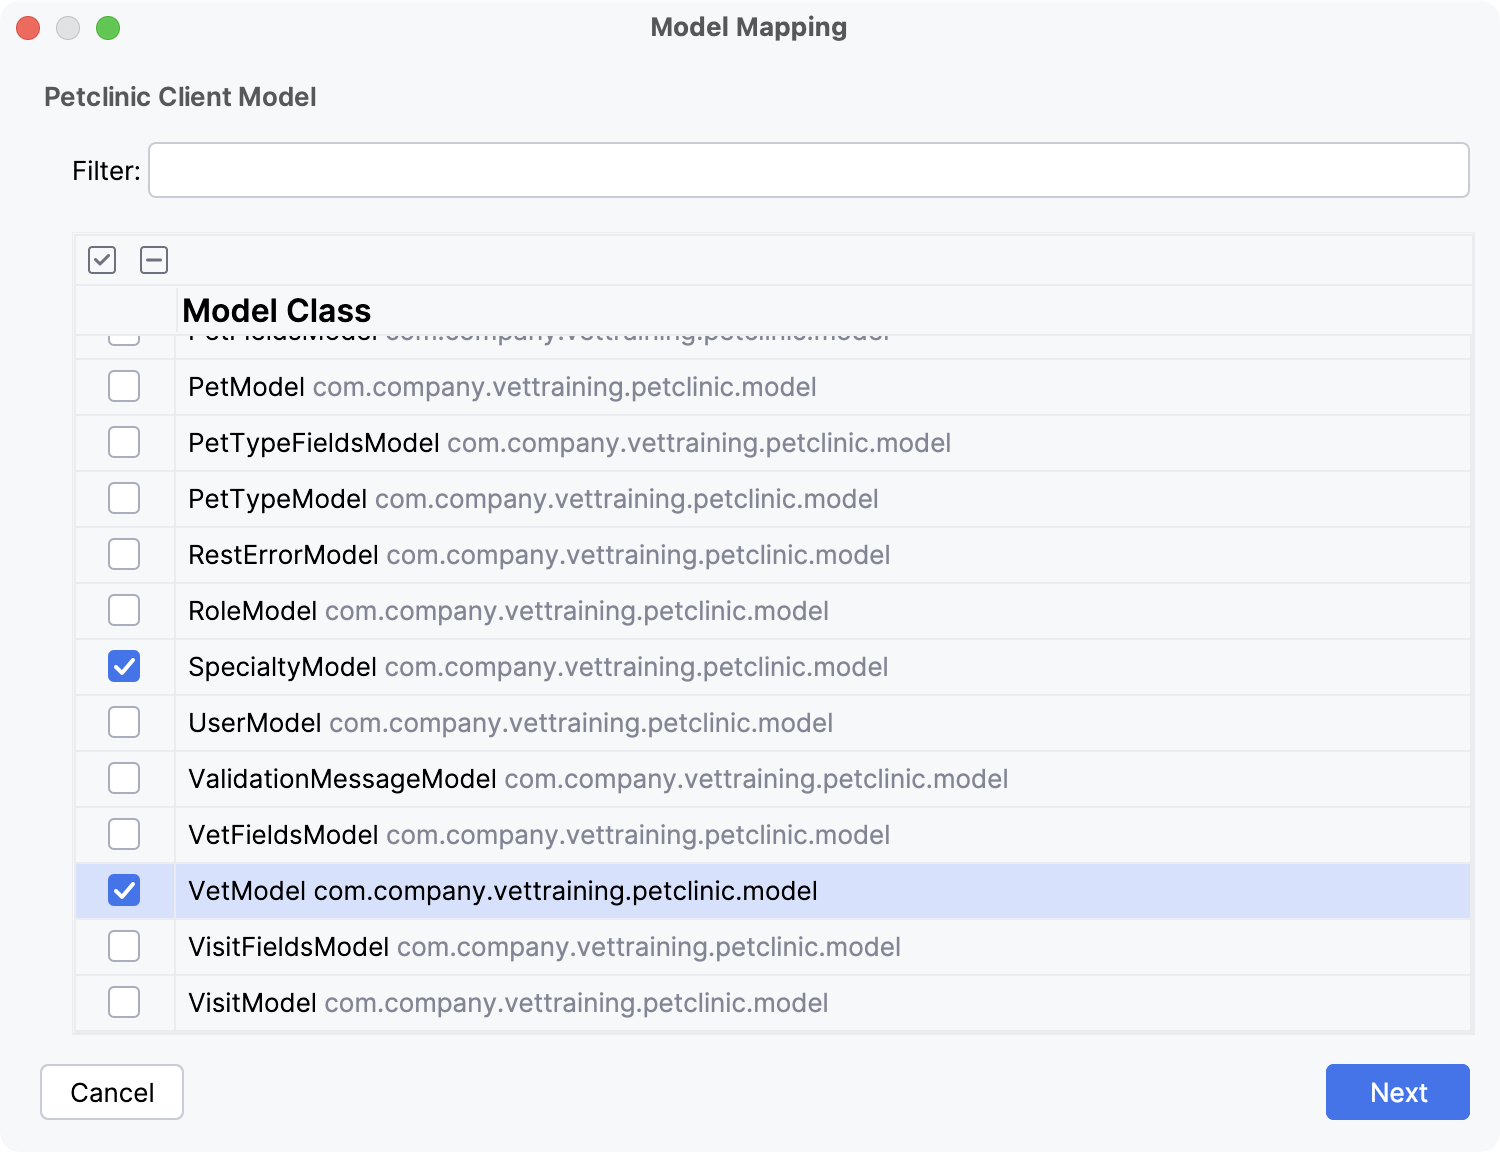 Figure 5. Selecting model classes to map
 -
On the second step, click Create All button to create entities and mappers for the selected model classes automatically. You will see the names of created mappers in the second column:
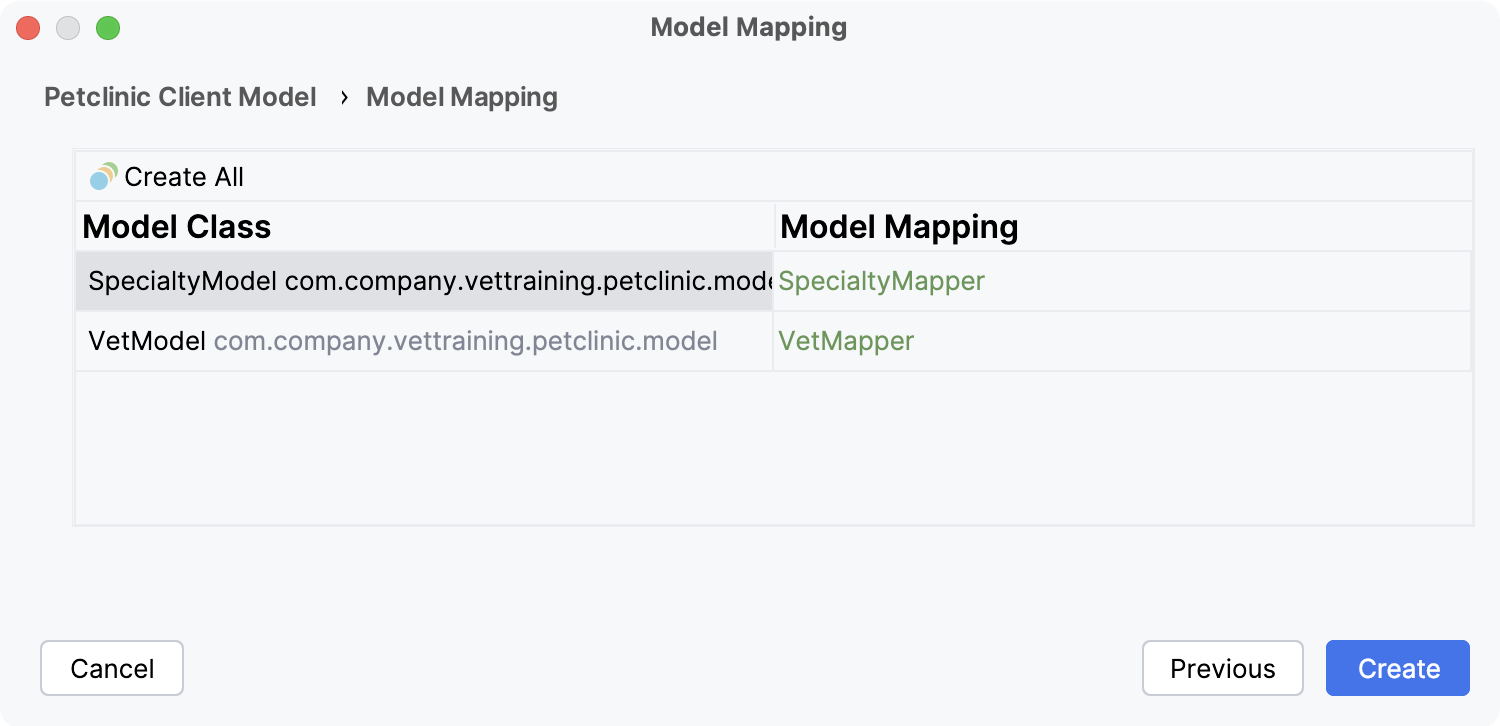 Figure 6. Creating entities and mappers automatically
 -
Click on SpecialtyMapper. The New MapStruct Mapper window will open:
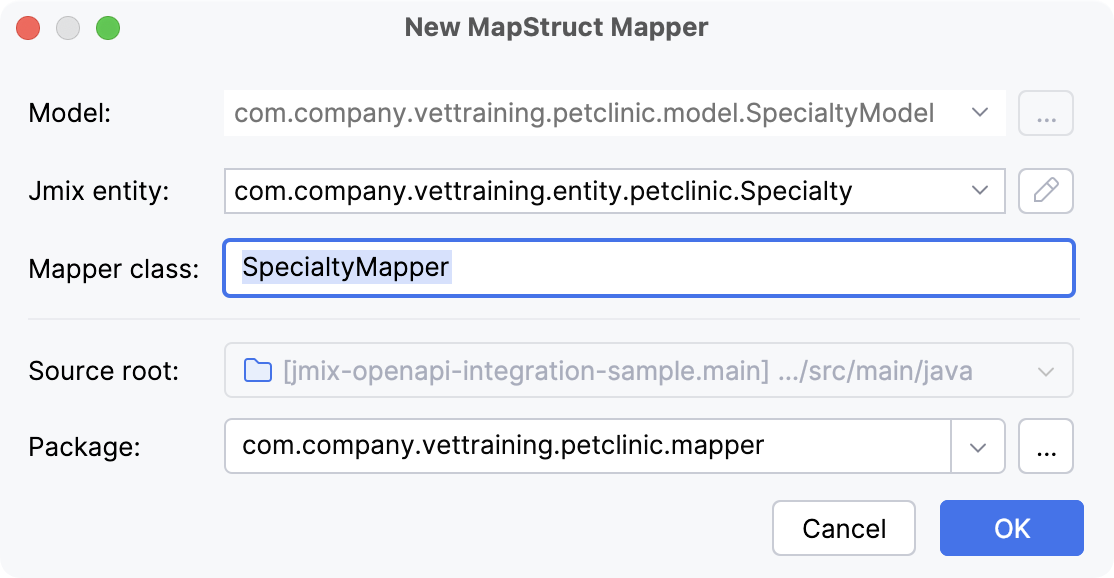 Figure 7. Mapper for SpecialtyModel
The window shows the fully-qualified name of the corresponding entity and the mapper class name.
-
You need to check and adjust parameters of the created entity. Click the edit button next to the Jmix entity field. The New Jmix Entity window will open. Select the
idattribute as an identifier: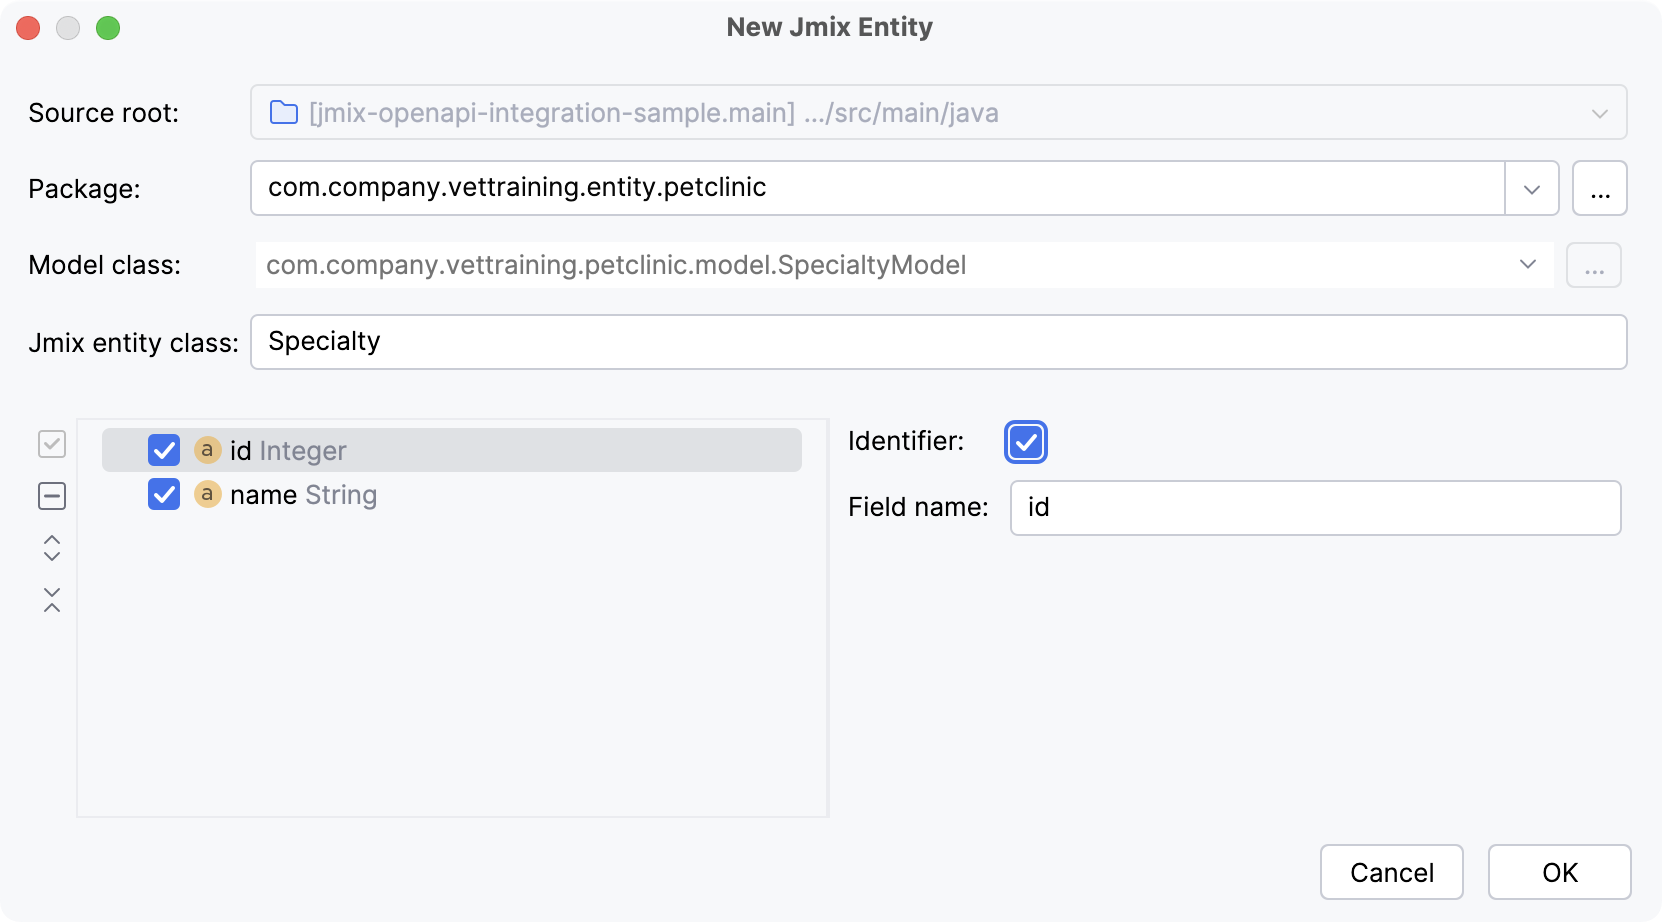 Figure 8. Specialty entity parameters
 -
Click on VetMapper in the Model Mapping window, then edit the
Vetentity. Select theidattribute as an identifier. Check that thespecialtiesattribute is mapped as a list ofSpecialtyentity: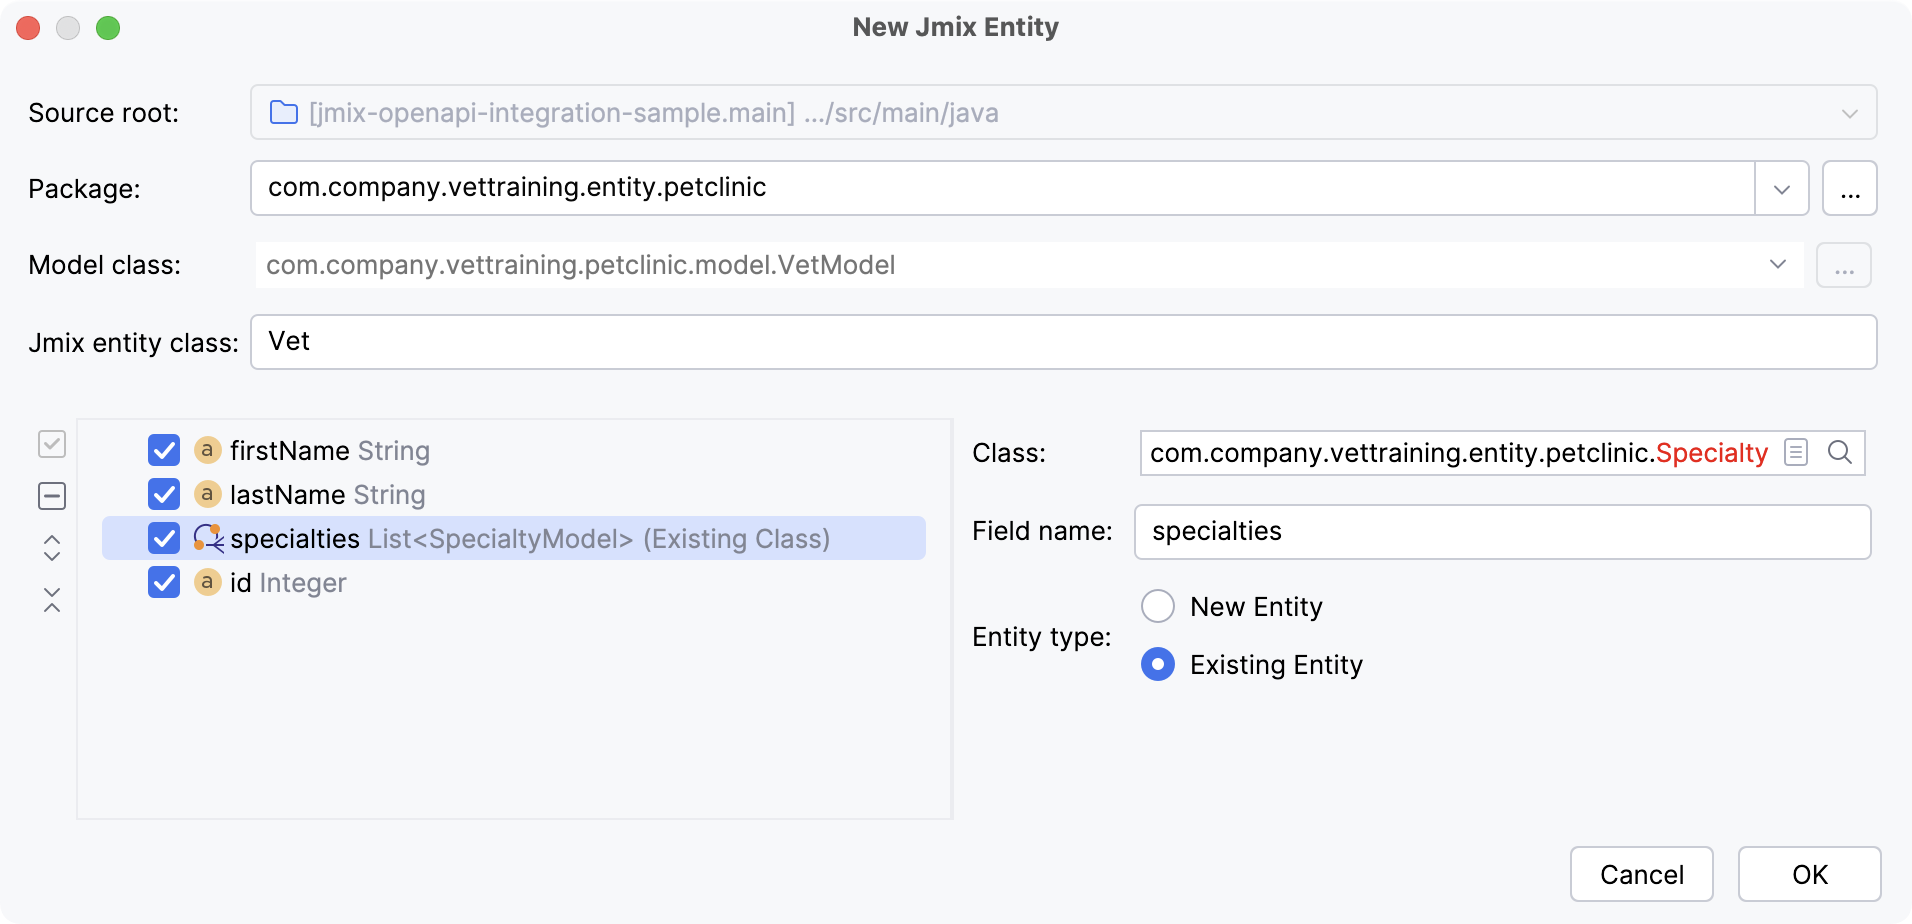 Figure 9. Vet entity parameters
 -
When you click the Create button in the Model Mapping window, Studio will create
SpecialtyandVetDTO entities, as well asSpecialtyMapperandVetMapperclasses.The OpenAPI → petclinic → Model nodes of the Jmix tool window will display related entities and mappers:
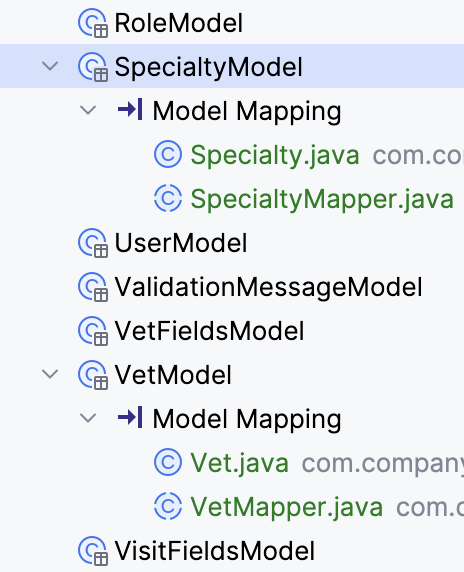 Figure 10. Model nodes with mappings
Defining Instance Names
Since the Specialty and Vet entities will be displayed in UI, it is necessary to define their instance names. Instance names provide a human-readable representation of entity instances, which is crucial for displaying references to entities in the UI. You can define instance names manually in the entity source code or by using the entity designer.
@JmixEntity
public class Specialty {
    @JmixId
    private Integer id;

    @InstanceName // add this
    private String name;

// getters and setters@JmixEntity
public class Vet {
@JmixId
private Integer id;
private String firstName;
private String lastName;
private List<Specialty> specialties;
// add this
@InstanceName
@DependsOnProperties({"firstName", "lastName"})
public String getInstanceName() {
return String.format("%s %s", firstName, lastName);
}
// getters and settersExploring Mappers
Mappers created by Studio use the MapStruct library. MapStruct is an annotation-based code generator that integrates with the Java compiler to create efficient mapping code at compile-time using plain method invocations. This approach ensures high performance and reduces boilerplate code, making it easier to maintain mappings while providing flexibility in adapting the data model.
The mappers between API models and DTO entities look as follows:
package com.company.vettraining.petclinic.mapper;

import com.company.vettraining.entity.petclinic.Vet;
import com.company.vettraining.petclinic.model.VetModel;
import io.jmix.core.EntityStates;
import org.mapstruct.*;
import org.springframework.beans.factory.annotation.Autowired;

@Mapper(
        unmappedTargetPolicy = ReportingPolicy.IGNORE,
        componentModel = MappingConstants.ComponentModel.SPRING,
        uses = {SpecialtyMapper.class}
)
public abstract class VetMapper {

    @Autowired
    protected EntityStates entityStates;

    public abstract VetModel toModel(Vet vet); (1)

    public abstract Vet toEntity(VetModel vetModel); (2)

    @AfterMapping
    protected void resetNew(@MappingTarget Vet entity) { (3)
        entityStates.setNew(entity, false);
    }
}| 1 | toModel() method maps Jmix DTO entity to API model object |
| 2 | toEntity() method maps API model object to Jmix DTO entity |
| 3 | This method is invoked by MapStruct automatically after mapping from model to entity. It resets the "new" state of the created instance. |
Jmix UI relies on the internal "new" flag of entities to differentiate between instances created in memory and those loaded from external storage. The mapper sets this flag to false after creating an entity instance from a model object.
Creating Services
The OpenAPI generator creates a set of classes representing the API endpoints, such as VetApi, PetApi, etc. Methods of these classes correspond to the OpenAPI schema paths and operate with API model classes.
Using these classes directly in application logic has several disadvantages:
-
The classes expose more public methods than needed for the application.
-
The methods use API model types for parameters and results, while business logic and UI operate with Jmix entities.
To address these issues, it is recommended to create intermediary services that convert data between entities and API model classes and delegate to API endpoint classes. These services provide a clear and concise API for accessing external data, improving maintainability and reducing the risk of errors.
Jmix Studio includes a wizard that helps create such beans automatically by selecting required methods from API endpoint classes.
In this section, you will create intermediate services for the SpecialtyApi and VetApi classes.
Service Creation Wizard
-
Select OpenAPI → petclinic → API → SpecialtyApi node in the Jmix tool window and click Model Mapping in its context menu:
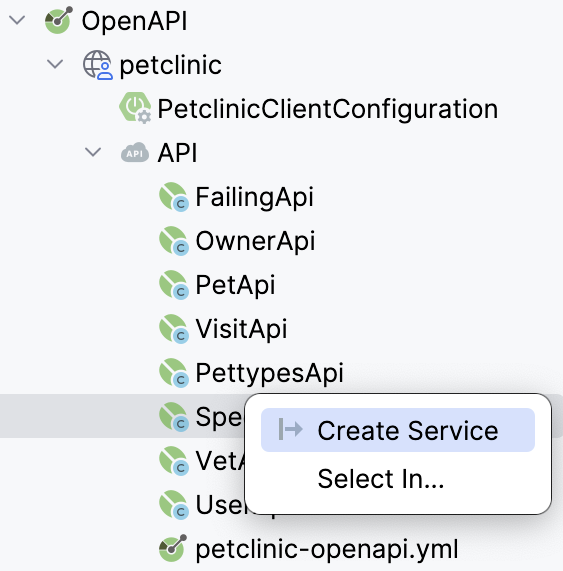 Figure 11. Create Service command
 -
Accept suggested package and class name in the New Service dialog:
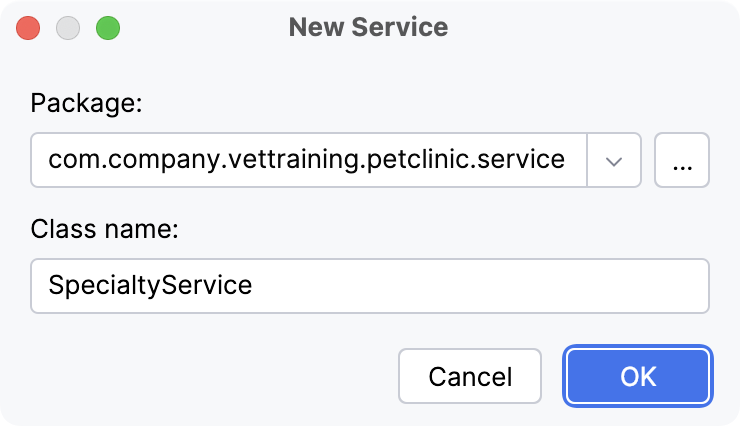 Figure 12. New Service dialog
 -
In the Delegate Methods dialog, select CRUD methods for
SpecialtyModel:-
addSpecialty() -
deleteSpecialty() -
getSpecialty() -
listSpecialties() -
updateSpecialty()
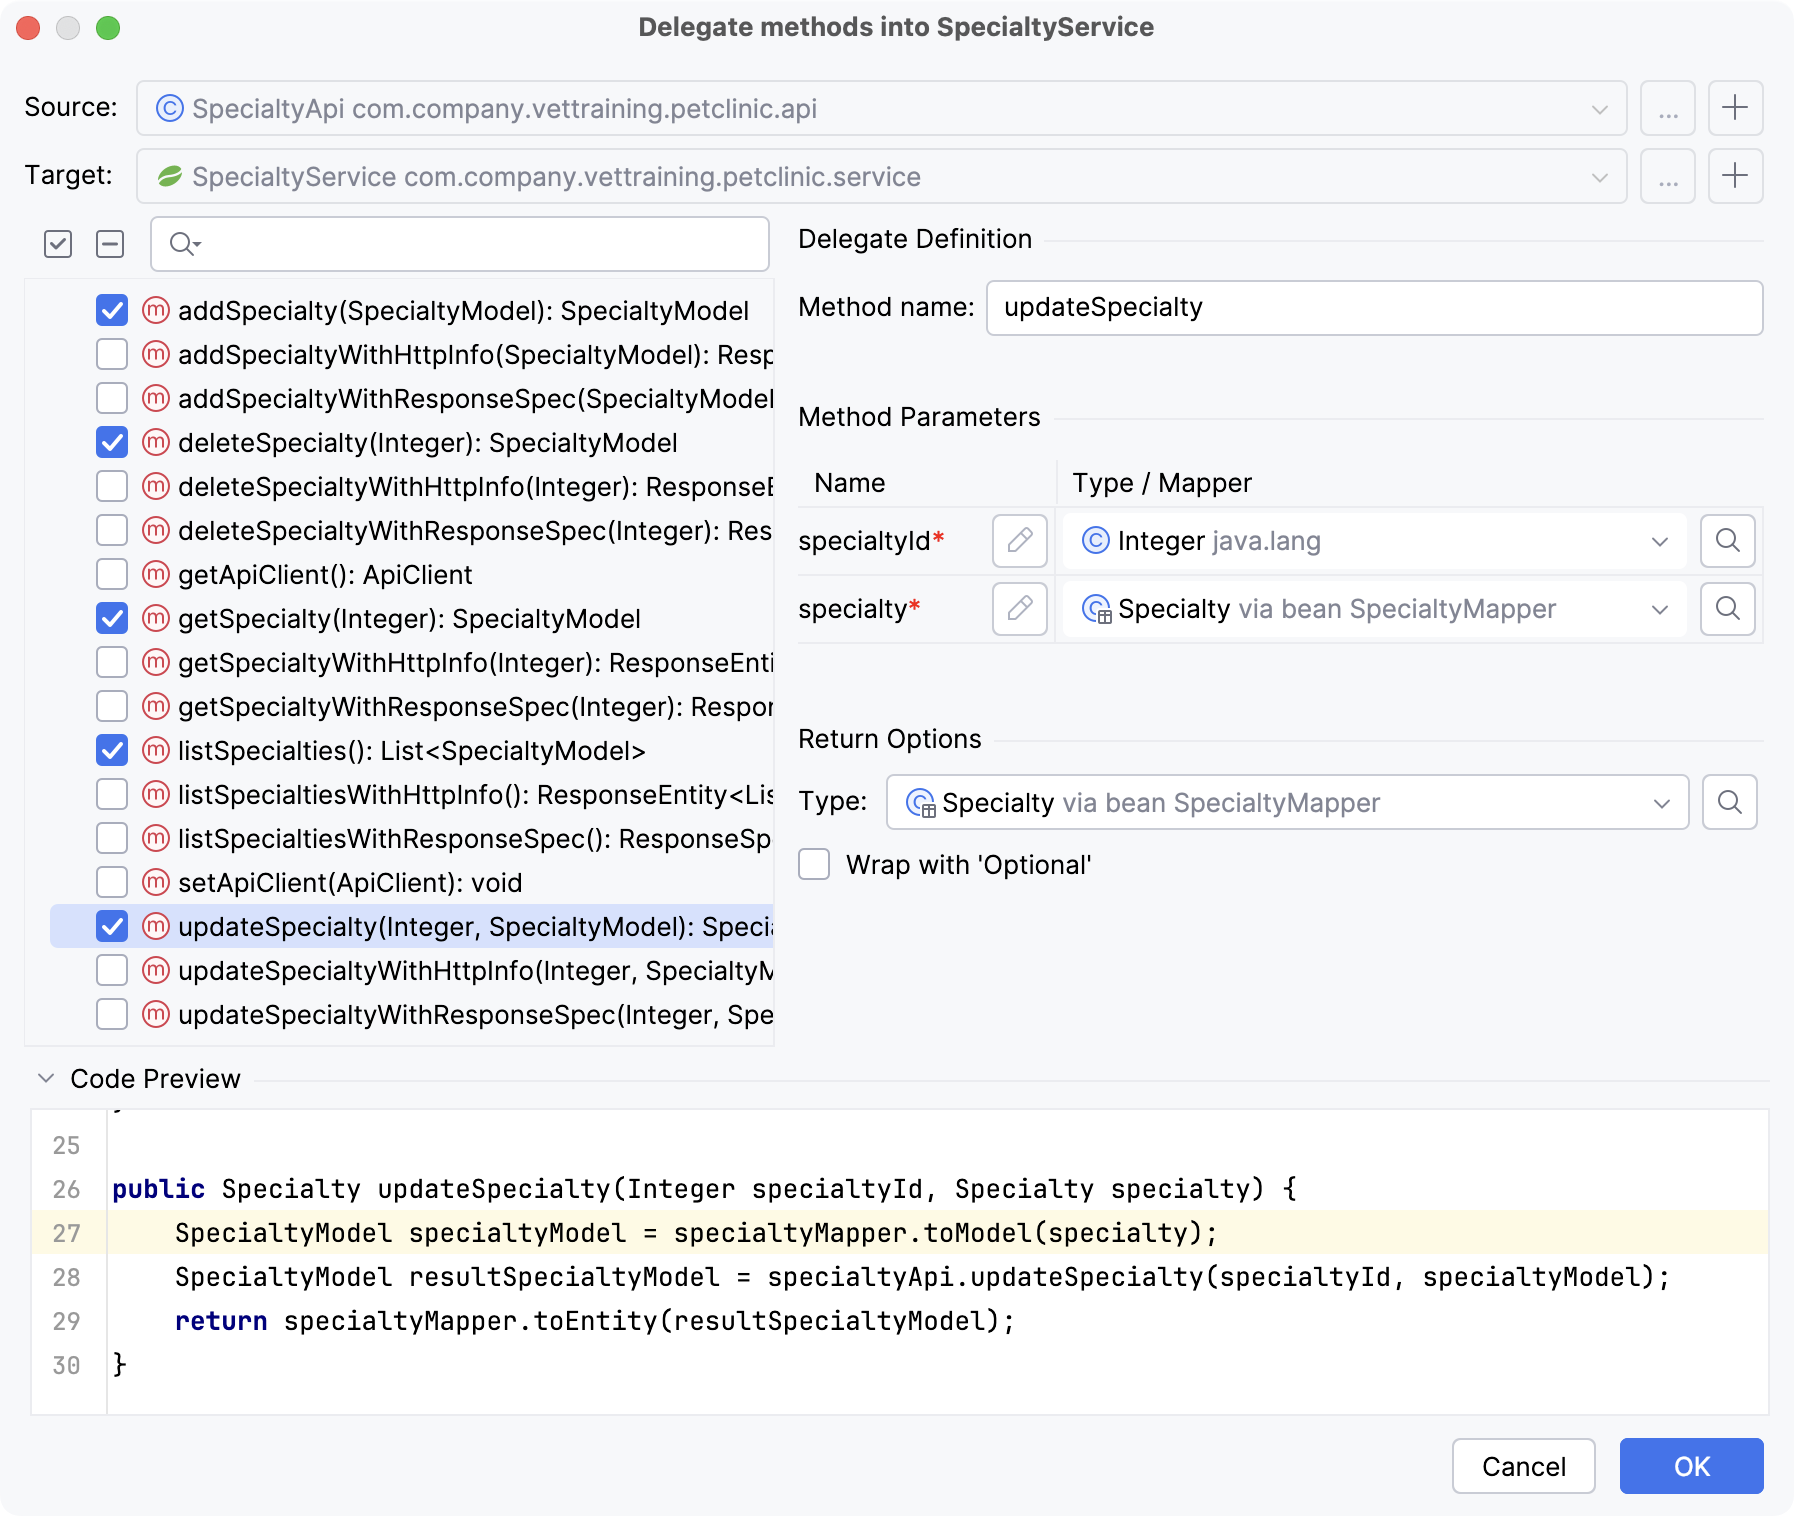 Figure 13. Delegate Methods dialog
For each selected method of the API endpoint class, the wizard will create a service method which will use a Jmix entity instead of an API model class.
-
The resulting service will look as follows:
@Component
public class SpecialtyService {
    private final SpecialtyApi specialtyApi;
    private final SpecialtyMapper specialtyMapper;

    public SpecialtyService(SpecialtyApi specialtyApi, SpecialtyMapper specialtyMapper) {
        this.specialtyApi = specialtyApi;
        this.specialtyMapper = specialtyMapper;
    }

    public Specialty addSpecialty(Specialty specialty) {
        SpecialtyModel specialtyModel = specialtyMapper.toModel(specialty);
        SpecialtyModel resultSpecialtyModel = specialtyApi.addSpecialty(specialtyModel);
        return specialtyMapper.toEntity(resultSpecialtyModel);
    }

    public Specialty deleteSpecialty(Integer specialtyId) {
        SpecialtyModel specialtyModel = specialtyApi.deleteSpecialty(specialtyId);
        return specialtyMapper.toEntity(specialtyModel);
    }

    public Specialty getSpecialty(Integer specialtyId) {
        SpecialtyModel specialtyModel = specialtyApi.getSpecialty(specialtyId);
        return specialtyMapper.toEntity(specialtyModel);
    }

    public List<Specialty> listSpecialties() {
        List<SpecialtyModel> specialtyModels = specialtyApi.listSpecialties();
        List<Specialty> specialties = specialtyModels.stream()
                .map(specialtyMapper::toEntity)
                .collect(Collectors.toList());
        return specialties;
    }

    // ...
As you can see, Studio has generated code that converts data between Jmix entities and API models using mappers and delegates to the API endpoint class. The service method parameters and results are of the entity type and can be easily used in the application logic and UI.
After creating SpecialtyService for SpecialtyApi, create VetService for VetApi by using the same wizard and select addVet(), deleteVet(), getVet(), listVets(), updateVet() methods.
Adjusting Services
In some cases, the automatically generated conversion and delegation code may be insufficient. For example, the PetClinic API returns null from the updateSpecialty() method, despite declaring it returns an updated instance. You will need to manually adjust the updateSpecialty() service method to handle this inconsistency:
public Specialty updateSpecialty(Integer specialtyId, Specialty specialty) {
    SpecialtyModel specialtyModel = specialtyMapper.toModel(specialty);
    SpecialtyModel resultSpecialtyModel = specialtyApi.updateSpecialty(specialtyId, specialtyModel);
    return resultSpecialtyModel != null ?
            specialtyMapper.toEntity(resultSpecialtyModel) :
            getSpecialty(specialtyId); (1)
}| 1 | If the API returns null instead of the updated model, reload it by ID. |
Make the same modification in the VetService class:
public Vet updateVet(Integer vetId, Vet vet) {
    VetModel vetModel = vetMapper.toModel(vet);
    VetModel resultVetModel = vetApi.updateVet(vetId, vetModel);
    return resultVetModel != null ?
            vetMapper.toEntity(resultVetModel) :
            getVet(vetId);
}
Creating Views
One of the key objectives of this integration is to manage Specialty and Vet entities from the PetClinic application through the Veterinary Training application’s UI. In this section, you will create CRUD views that use the services developed earlier for data loading and saving.
Specialty Views
Select the Specialty entity in the Jmix tool window and click New → View in its context menu. Select DTO entity list and detail views template and accept all parameters on the next steps of the view creation wizard.
Open SpecialtyListView class and add code that invokes SpecialtyService methods in the delegate handlers:
@Route(value = "specialties", layout = MainView.class)
@ViewController(id = "Specialty.list")
@ViewDescriptor(path = "specialty-list-view.xml")
@LookupComponent("specialtiesDataGrid")
@DialogMode(width = "50em")
public class SpecialtyListView extends StandardListView<Specialty> {

    @Autowired
    private SpecialtyService specialtyService;

    @Install(to = "specialtiesDl", target = Target.DATA_LOADER)
    protected List<Specialty> specialtiesDlLoadDelegate(LoadContext<Specialty> loadContext) {
        return specialtyService.listSpecialties();
    }

    @Install(to = "specialtiesDataGrid.remove", subject = "delegate")
    private void specialtiesDataGridRemoveDelegate(final Collection<Specialty> collection) {
        for (Specialty entity : collection) {
            specialtyService.deleteSpecialty(entity.getId());
        }
    }
}
Open SpecialtyDetailView and do the same for its delegate handlers:
@Route(value = "specialties/:id", layout = MainView.class)
@ViewController(id = "Specialty.detail")
@ViewDescriptor(path = "specialty-detail-view.xml")
@EditedEntityContainer("specialtyDc")
public class SpecialtyDetailView extends StandardDetailView<Specialty> {

    @Autowired
    private SpecialtyService specialtyService;
    @Autowired
    private EntityStates entityStates;

    @Install(to = "specialtyDl", target = Target.DATA_LOADER)
    private Specialty customerDlLoadDelegate(final LoadContext<Specialty> loadContext) {
        Object id = loadContext.getId();
        return specialtyService.getSpecialty((Integer) id);
    }

    @Install(target = Target.DATA_CONTEXT)
    private Set<Object> saveDelegate(final SaveContext saveContext) {
        Specialty entity = getEditedEntity();
        Specialty saved = entityStates.isNew(entity) ?
                specialtyService.addSpecialty(entity) :
                specialtyService.updateSpecialty(entity.getId(), entity);
        return Set.of(saved);
    }
}
In the specialty-detail-view.xml, either remove the text field for the id attribute or disable it, as it should not be entered by the user.
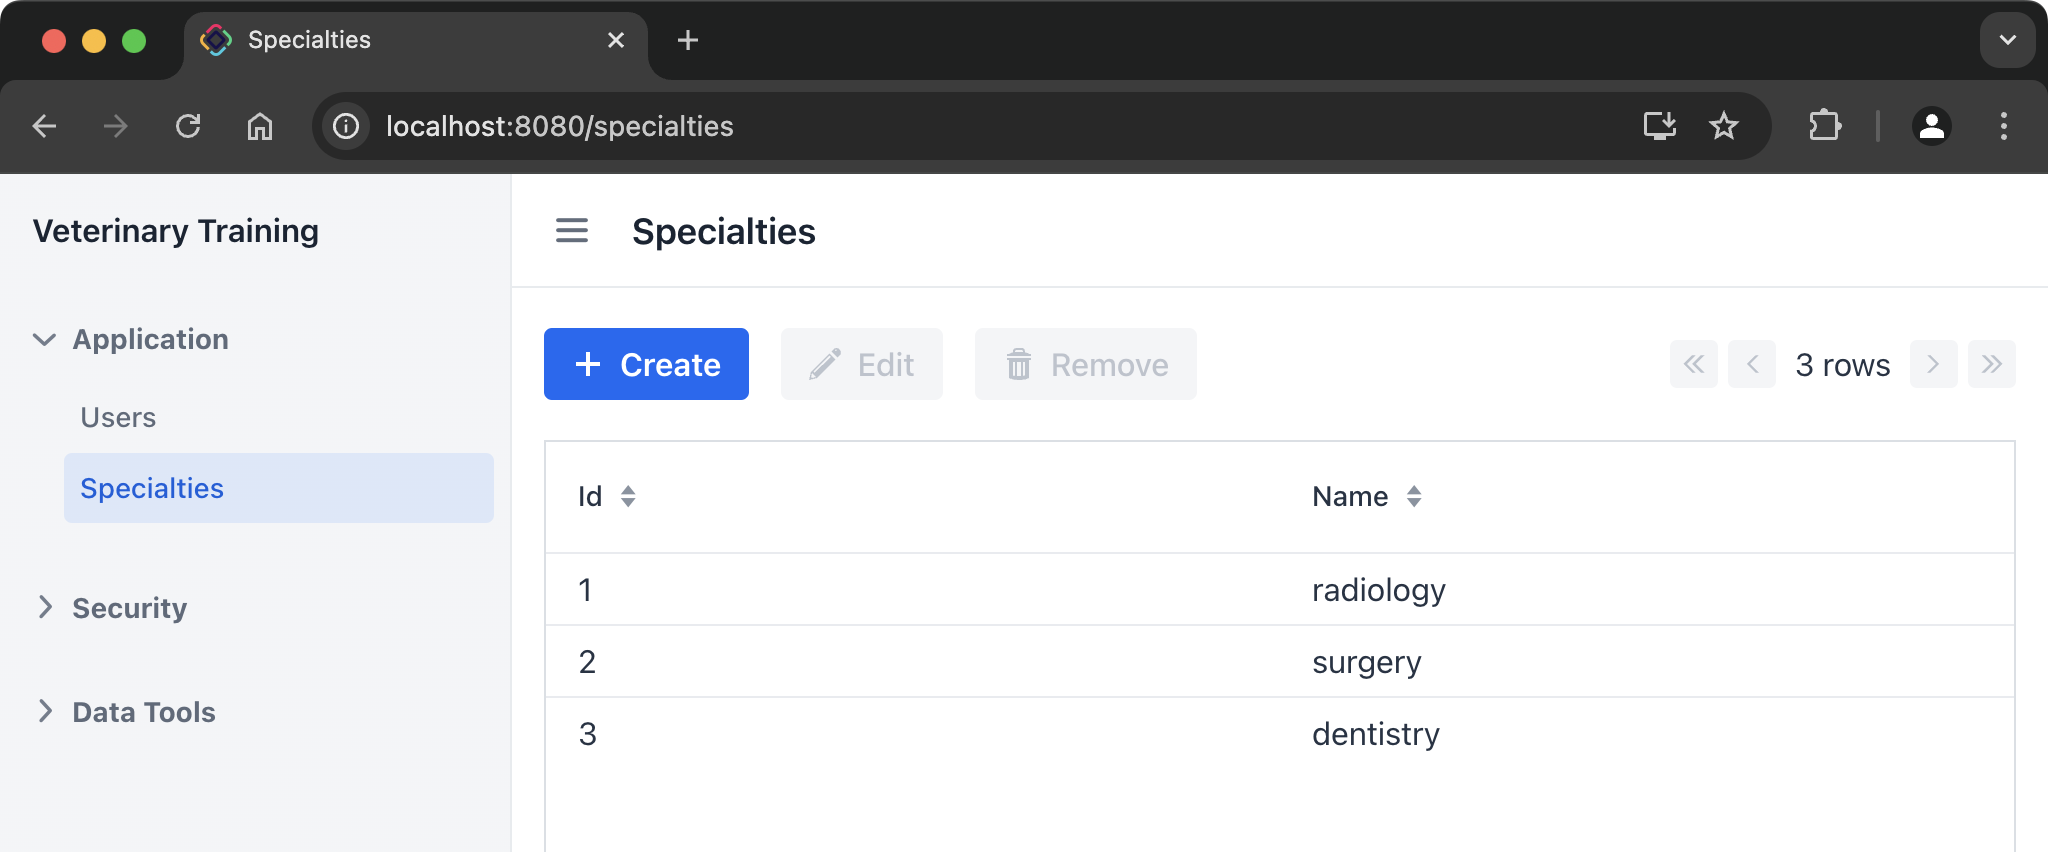
Now you can run the application and test the Specialty views:
Vet Views
Create DTO list and detail views for the Vet entity in the same way as for Specialty above and use VetService in delegate handlers. Remove or disable the text field for the id attribute in vet-detail-view.xml.
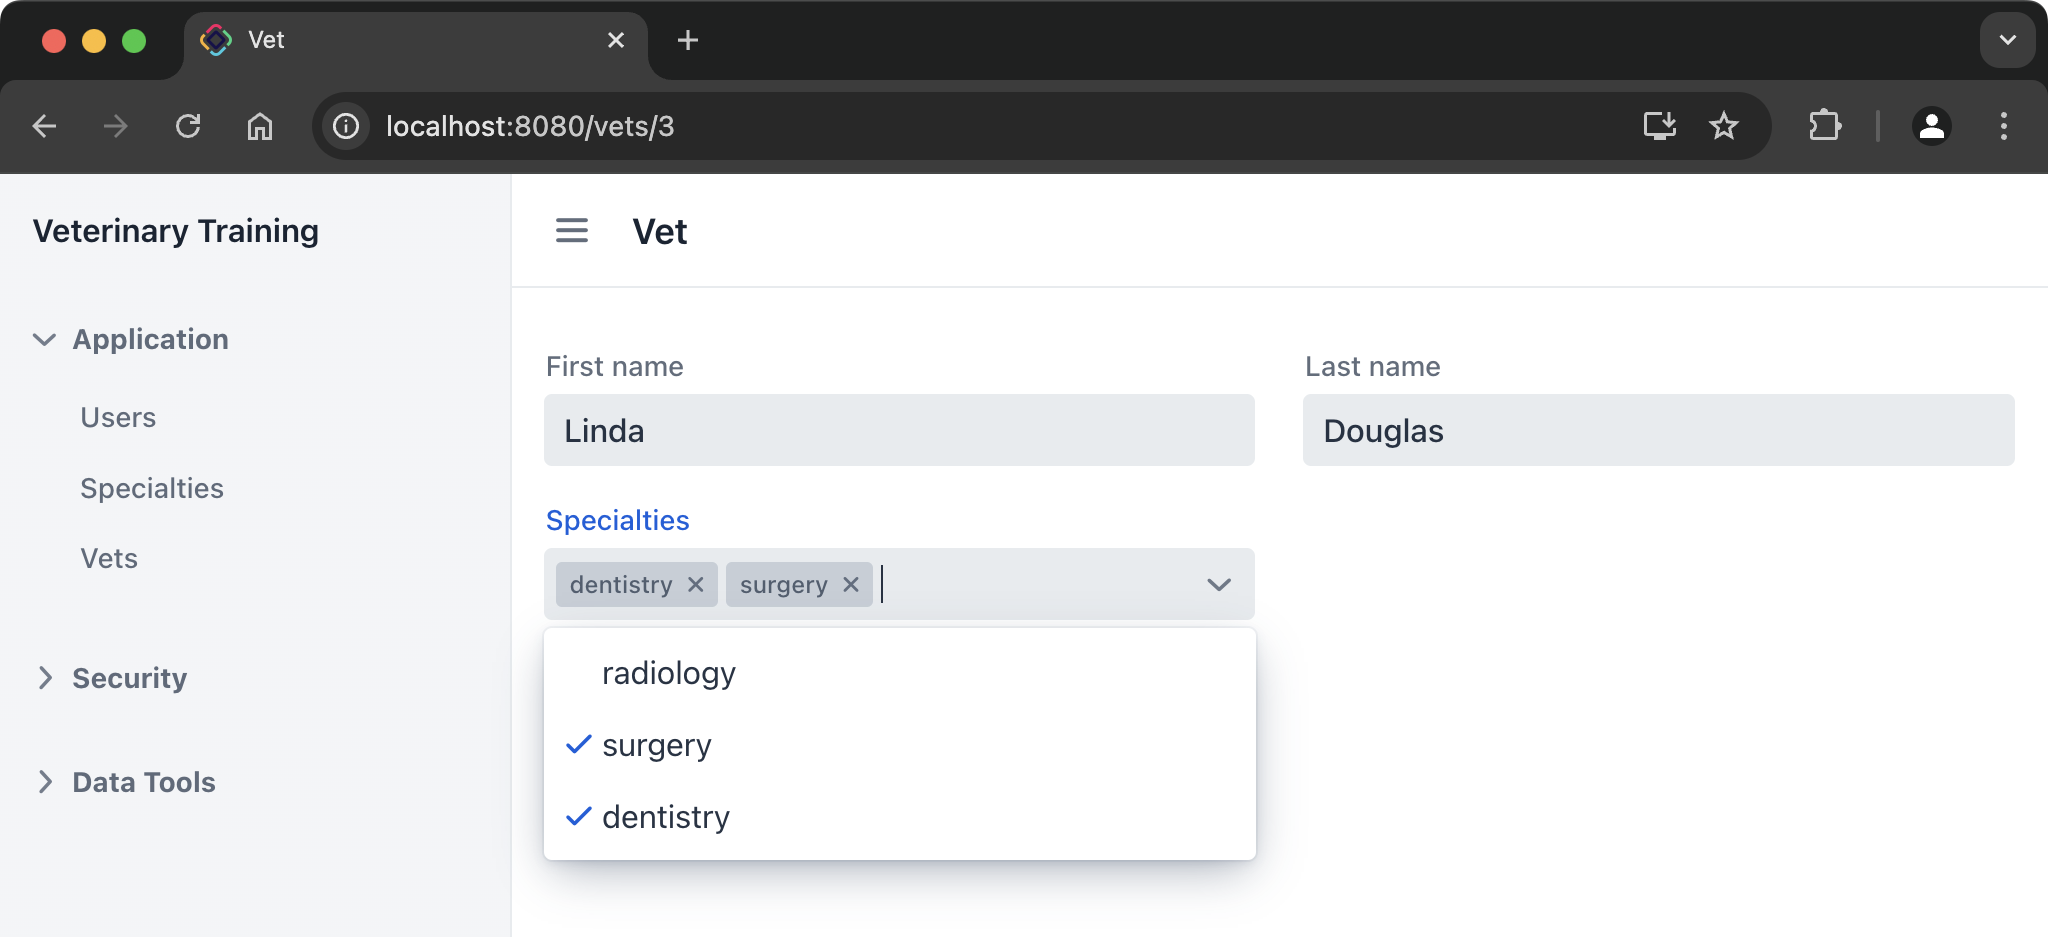
In the PetClinic API, VetModel includes a list of SpecialtyModel, representing the specialties of the veterinarian. The API loads specialties along with a vet and updates them when the vet is updated.
The Vet Jmix entity has a collection of the Specialty entity in the specialties attribute, aligning with the API model. To manage this relationship, add a multiSelectComboBox component to the Vet detail view layout:
<textField id="firstNameField" property="firstName"/>
<textField id="lastNameField" property="lastName"/>
<!-- add this -->
<multiSelectComboBox id="specialtiesComboBox"
                     dataContainer="vetDc" property="specialties"/>
The new field will be bound to the specialties attribute of the Vet entity located in the vetDc data container.
In order to provide the list of available options to the multiSelectComboBox component, define its itemsFetchCallback handler as follows:
@Autowired
private SpecialtyService specialtyService;

@Install(to = "specialtiesComboBox", subject = "itemsFetchCallback")
private Stream<Specialty> specialtiesComboBoxItemsFetchCallback(final Query<Specialty, String> query) {
    String filter = query.getFilter().orElse("");
    return specialtyService.listSpecialties().stream() (1)
            .filter(specialty ->
                    specialty.getName().toLowerCase().contains(filter.toLowerCase()))
            .skip(query.getOffset())
            .limit(query.getLimit());
}| 1 | Get the list of specialties from SpecialtyService and filter it according to the user input. |
This allows users to select specialties when editing a veterinarian:
Linking JPA and DTO Entities
The main objective of the Veterinary Training application is to manage trainings using the information about specialties and vets from Spring PetClinic.
In this section, you will create the Training JPA entity, which will be stored in the Veterinary Training database and will include links to the Specialty and Vet DTO entities. Users will be able to manage training sessions in the UI as though all the information were stored in a single database.
Training Entity
Create a new JPA entity called Training and add the following attributes:
| Name | Type |
|---|---|
date |
LocalDate |
description |
String |
specialtyId |
Integer |
vetId |
Integer |
The specialtyId and vetId attributes will store specialty and vet IDs in the database.
Now create transient attributes referencing the Specialty and Vet DTO entities. When creating the attribute, select ASSOCIATION in Attribute type, then click Transient checkbox and select DTO entity in the Type dropdown:
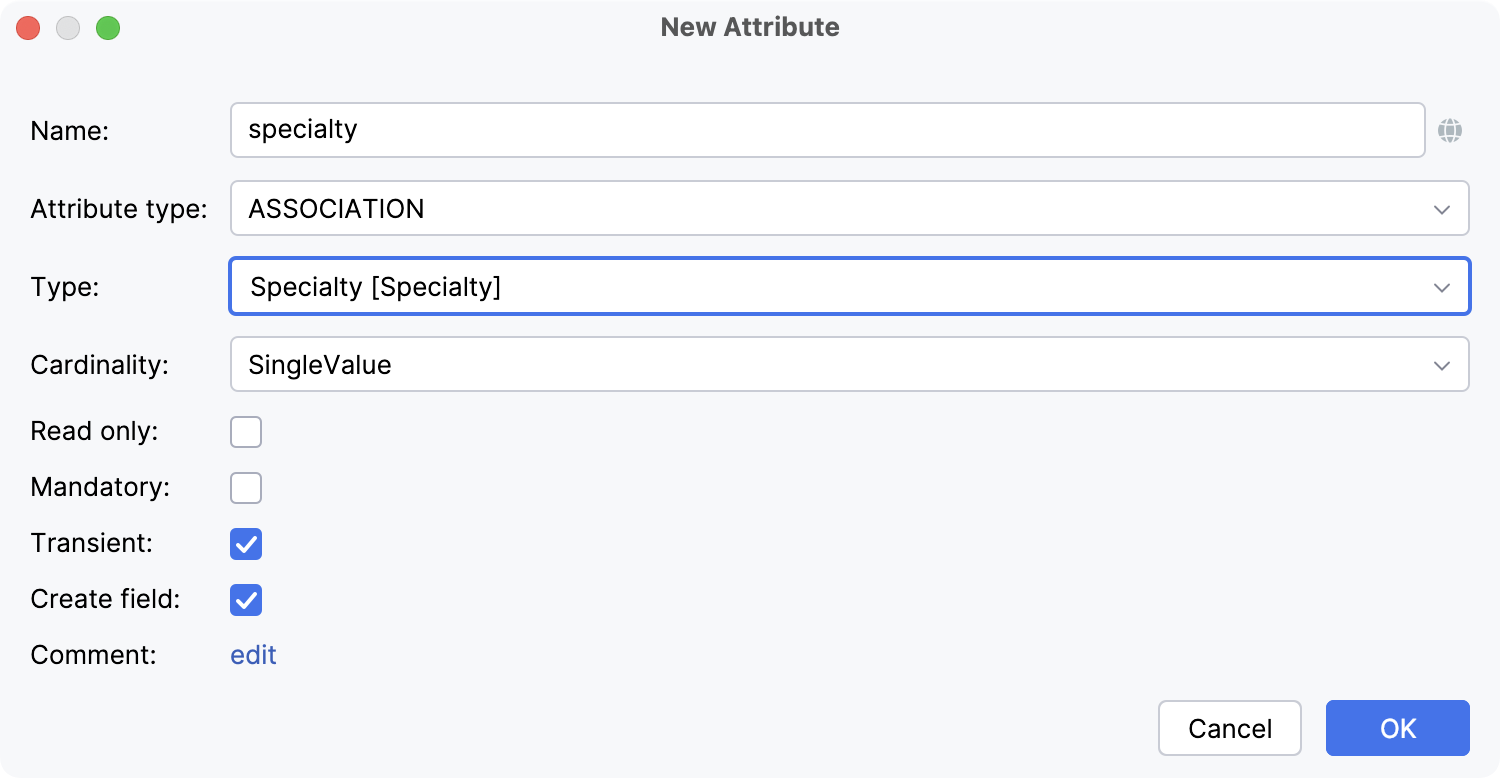
Do the same to create the vet attribute.
The Training entity source code should look as follows:
@JmixEntity
@Table(name = "TRAINING")
@Entity
public class Training {
    @JmixGeneratedValue
    @Column(name = "ID", nullable = false)
    @Id
    private UUID id;

    @Column(name = "DATE_")
    private LocalDate date;

    @InstanceName
    @Column(name = "DESCRIPTION")
    private String description;

    @Column(name = "SPECIALTY_ID")
    private Integer specialtyId;

    @Column(name = "VET_ID")
    private Integer vetId;

    @JmixProperty
    @Transient
    private Specialty specialty;

    @JmixProperty
    @Transient
    private Vet vet;

    // getters and setters
Handling Transient Attributes
When the Training entity is loaded from the database, the specialty and vet transient attributes are initially empty and must be populated with DTO entities. Upon saving the Training entity, the specialtyId and vetId persistent attributes should be updated with the IDs of the selected Vet and Specialty entities.
This can be done using the EntityLoadingEvent and EntitySavingEvent listeners.
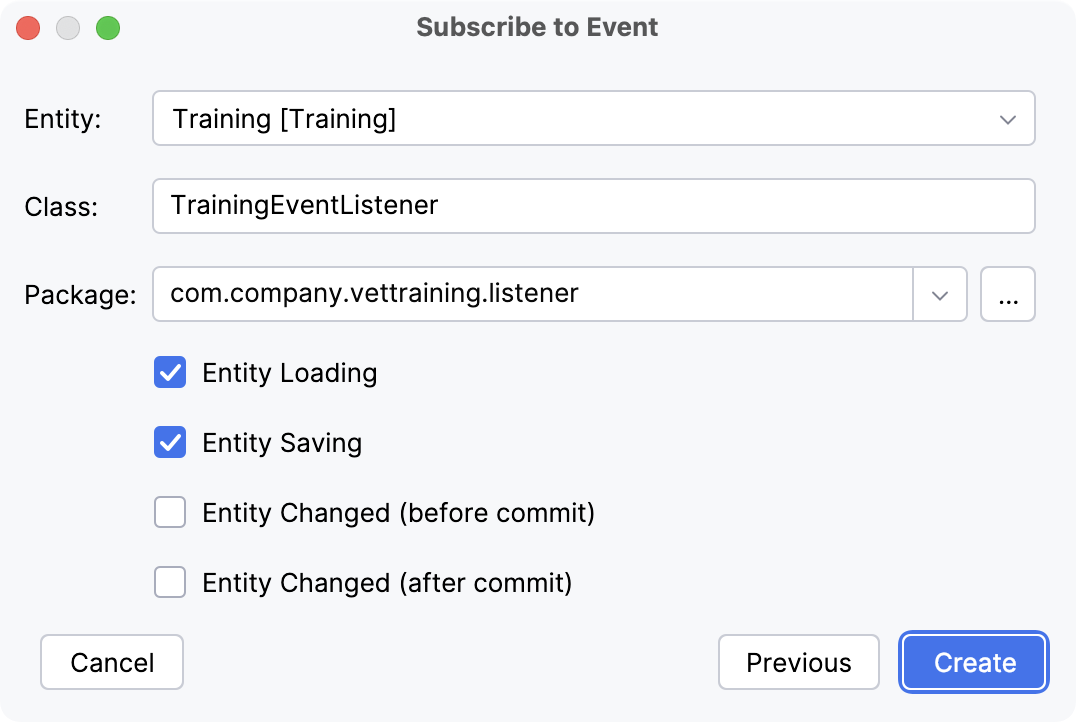
Click New → Event Listener in the Jmix tool window, select Entity Event on the first step of the Subscribe to Event wizard and click Next.
On the second step of the wizard, select the Training entity and Entity Loading and Entity Saving checkboxes:
Inject SpecialtyService and VetService to the created bean and implement the listener methods as follows:
@Component
public class TrainingEventListener {

    private final SpecialtyService specialtyService;
    private final VetService vetService;

    public TrainingEventListener(SpecialtyService specialtyService, VetService vetService) {
        this.specialtyService = specialtyService;
        this.vetService = vetService;
    }

    @EventListener
    public void onTrainingLoading(final EntityLoadingEvent<Training> event) {
        Training training = event.getEntity();
        if (training.getSpecialtyId() != null) {
            training.setSpecialty(specialtyService.getSpecialty(training.getSpecialtyId()));
        }
        if (training.getVetId() != null) {
            training.setVet(vetService.getVet(training.getVetId()));
        }
    }

    @EventListener
    public void onTrainingSaving(final EntitySavingEvent<Training> event) {
        Training training = event.getEntity();
        training.setSpecialtyId(training.getSpecialty() == null ? null : training.getSpecialty().getId());
        training.setVetId(training.getVet() == null ? null : training.getVet().getId());
    }
}
Upon loading the Training entity, the onTrainingLoading() method will invoke the services to load Specialty and Vet entities from the PetClinic application.
Training Views
Select the Training entity in Jmix tool window and click New → View in its context menu. Select the Entity list and detail views template and accept all parameters on the next steps of the view creation wizard. Select specialty and vet attributes in the fetch plans for both list and detail views:
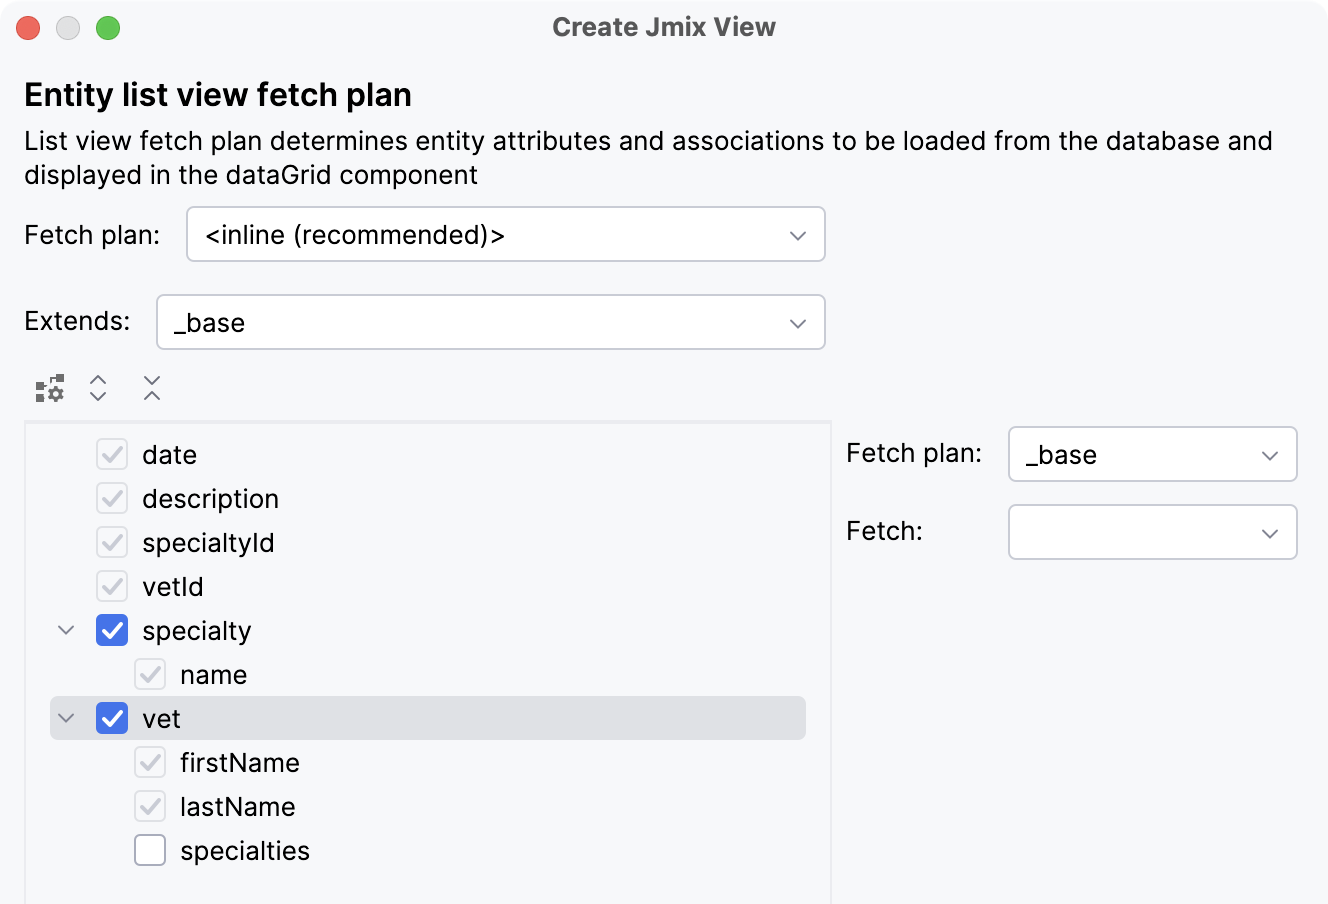
These attributes are transient, so including them in the fetch plan does not affect data loading but allows Studio to add corresponding data grid columns and form fields to the view layouts.
After generating views from templates, further customization is required to correctly handle references to Specialty and Vet.
In the list view, the only required change is to remove the columns containing IDs. Open training-list-view.xml and remove the specialtyId and vetId columns from trainingsDataGrid.
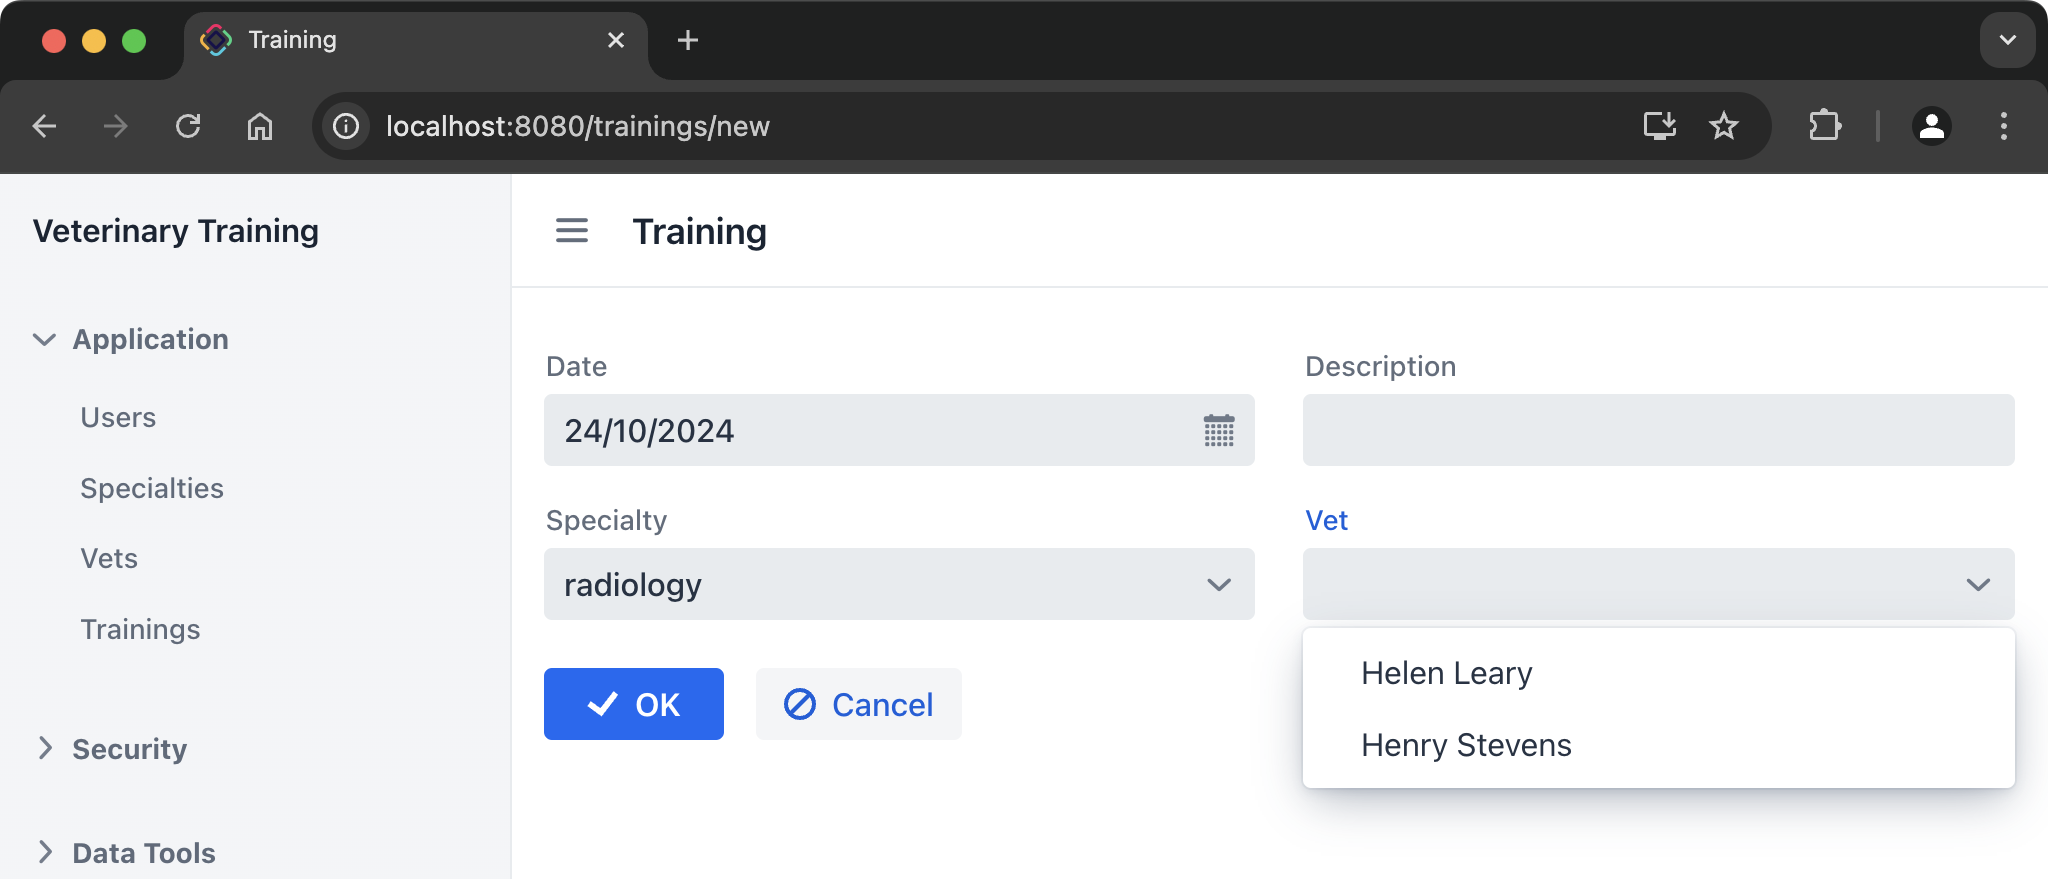
In the detail view, you need to add combo-boxes to select related Specialty and Vet entities. The Vet combo-box options should depend on the selected Specialty and display only veterinarians with that specialty.
Open training-detail-view.xml, remove specialtyIdField and vetIdField, and then add the vetsDc collection container along with the specialtyField and vetField components as shown below:
<?xml version="1.0" encoding="UTF-8" standalone="no"?>
<view xmlns="http://jmix.io/schema/flowui/view"
      title="msg://trainingDetailView.title"
      focusComponent="form">
    <data>
        <instance id="trainingDc"
                  class="com.company.vettraining.entity.Training">
            <fetchPlan extends="_base"/>
            <loader id="trainingDl"/>
        </instance>
        <!-- add this -->
        <collection id="vetsDc" class="com.company.vettraining.entity.petclinic.Vet">
            <loader id="vetsDl" readOnly="true"/>
            <fetchPlan extends="_base"/>
        </collection>
    </data>
    <facets>
        <dataLoadCoordinator auto="true"/>
    </facets>
    <actions>
        <action id="saveAction" type="detail_saveClose"/>
        <action id="closeAction" type="detail_close"/>
    </actions>
    <layout>
        <formLayout id="form" dataContainer="trainingDc">
            <responsiveSteps>
                <responsiveStep minWidth="0" columns="1"/>
                <responsiveStep minWidth="40em" columns="2"/>
            </responsiveSteps>
            <datePicker id="dateField" property="date"/>
            <textField id="descriptionField" property="description"/>
            <!-- add this -->
            <entityComboBox id="specialtyField" property="specialty"/>
            <entityComboBox id="vetField" property="vet" itemsContainer="vetsDc"/>
        </formLayout>
        <hbox id="detailActions">
            <button id="saveAndCloseButton" action="saveAction"/>
            <button id="closeButton" action="closeAction"/>
        </hbox>
    </layout>
</view>
The vetField combo-box will obtain its options from the vetsDc collection container. To load Vet DTO entities into this container, generate a load delegate for the vetsDl data loader and implement it as follows:
@Autowired
private VetService vetService;

@ViewComponent
private EntityComboBox<Specialty> specialtyField;

@Install(to = "vetsDl", target = Target.DATA_LOADER)
private List<Vet> vetsDlLoadDelegate(final LoadContext<Vet> loadContext) {
    return vetService.listVets().stream()
            .filter(vet ->
                    specialtyField.getValue() != null &&
                            vet.getSpecialties().contains(specialtyField.getValue())
            )
            .toList();
}
Options for specialtyField can be loaded similarly into a dedicated collection data container, or more efficiently by using an items fetch callback method. Use the latter approach:
@Autowired
private SpecialtyService specialtyService;

@Install(to = "specialtyField", subject = "itemsFetchCallback")
private Stream<Specialty> specialtyFieldItemsFetchCallback(final Query<Specialty, String> query) {
    String filter = query.getFilter().orElse("");
    return specialtyService.listSpecialties().stream()
            .filter(specialty ->
                    specialty.getName().toLowerCase().contains(filter.toLowerCase()))
            .skip(query.getOffset())
            .limit(query.getLimit());
}
The final step is to ensure that the list of veterinarians is refreshed each time the user selects a different specialty. You can achieve this by creating a handler for the ItemPropertyChangeEvent of the trainingDc data container:
@ViewComponent
private CollectionLoader<Vet> vetsDl;

@ViewComponent
private EntityComboBox<Vet> vetField;

@Subscribe(id = "trainingDc", target = Target.DATA_CONTAINER)
public void onTrainingDcItemPropertyChange(final InstanceContainer.ItemPropertyChangeEvent<Training> event) {
    if (event.getProperty().equals("specialty")) {
        vetsDl.load();
        vetField.clear();
    }
}
Now you can start the application and test the creation of training sessions:
Handling Authentication
In the final step of this guide, we will enable authentication in the PetClinic REST application, update the OpenAPI schema, and address it in the client code.
-
Stop the PetClinic application and start it again using the following command:
Linux and macOS./mvnw spring-boot:run -Dspring-boot.run.arguments="--petclinic.security.enable=true"Windowsmvnw spring-boot:run "-Dspring-boot.run.arguments=--petclinic.security.enable=true"The PetClinic REST endpoints now require HTTP Basic authentication. The application has a single user with the username
adminand the passwordadmin. -
Make sure that when you open http://localhost:9966/petclinic/api/specialties in your web browser, it prompts you for your username and password. Enter
adminfor both. -
In the
petclinic-openapi.yamlfile, addsecuritySchemessection tocomponentsandsecuritysection to the root:src/main/resources/petclinic-openapi.yml# ... components: schemas: # ... securitySchemes: basic: description: Basic HTTP Authentication type: http scheme: Basic security: - basic: []This will indicate that all OpenAPI paths use the HTTP Basic authentication.
-
In
PetclinicClientConfiguration, supply the credentials to theApiClientobject:src/main/java/com/company/vettraining/petclinic/PetclinicClientConfiguration.java@Bean("petclinicApiClient") public ApiClient apiClient() { ApiClient apiClient = new ApiClient(); apiClient.setUsername("admin"); apiClient.setPassword("admin"); return apiClient; }
After restarting the Veterinary Training application, the OpenAPI generator Gradle task will update the client sources according to the schema changes and use the provided credentials when invoking the PetClinic REST API.
Summary
In this guide, you learned how to integrate a Jmix application with an external REST service using OpenAPI.
We created an additional layer of Jmix entities and mappers to effectively manage external data, and intermediate services for better integration and maintainability.
All of these tasks were accomplished with the assistance of Jmix Studio, which provided sophisticated tooling for generating DTO entities, mappers, and services, significantly reducing manual work.
Finally, we built CRUD views for managing external data, linked JPA and DTO entities to implement a unified data model, and refined the UI to handle entity relationships effectively.
By following this guide, you are now equipped to implement similar OpenAPI-based integrations in your own projects.
