genericFilter
genericFilter component is a versatile tool to dynamically filter data.
The component enables quick data filtering with a set of temporary conditions, as well as creating configurations for repeated use.
-
XML element:
genericFilter -
Java class:
GenericFilter
Basics
The genericFilter component is added by default on some standard views, such as a list view of an entity. A typical filter is shown below:
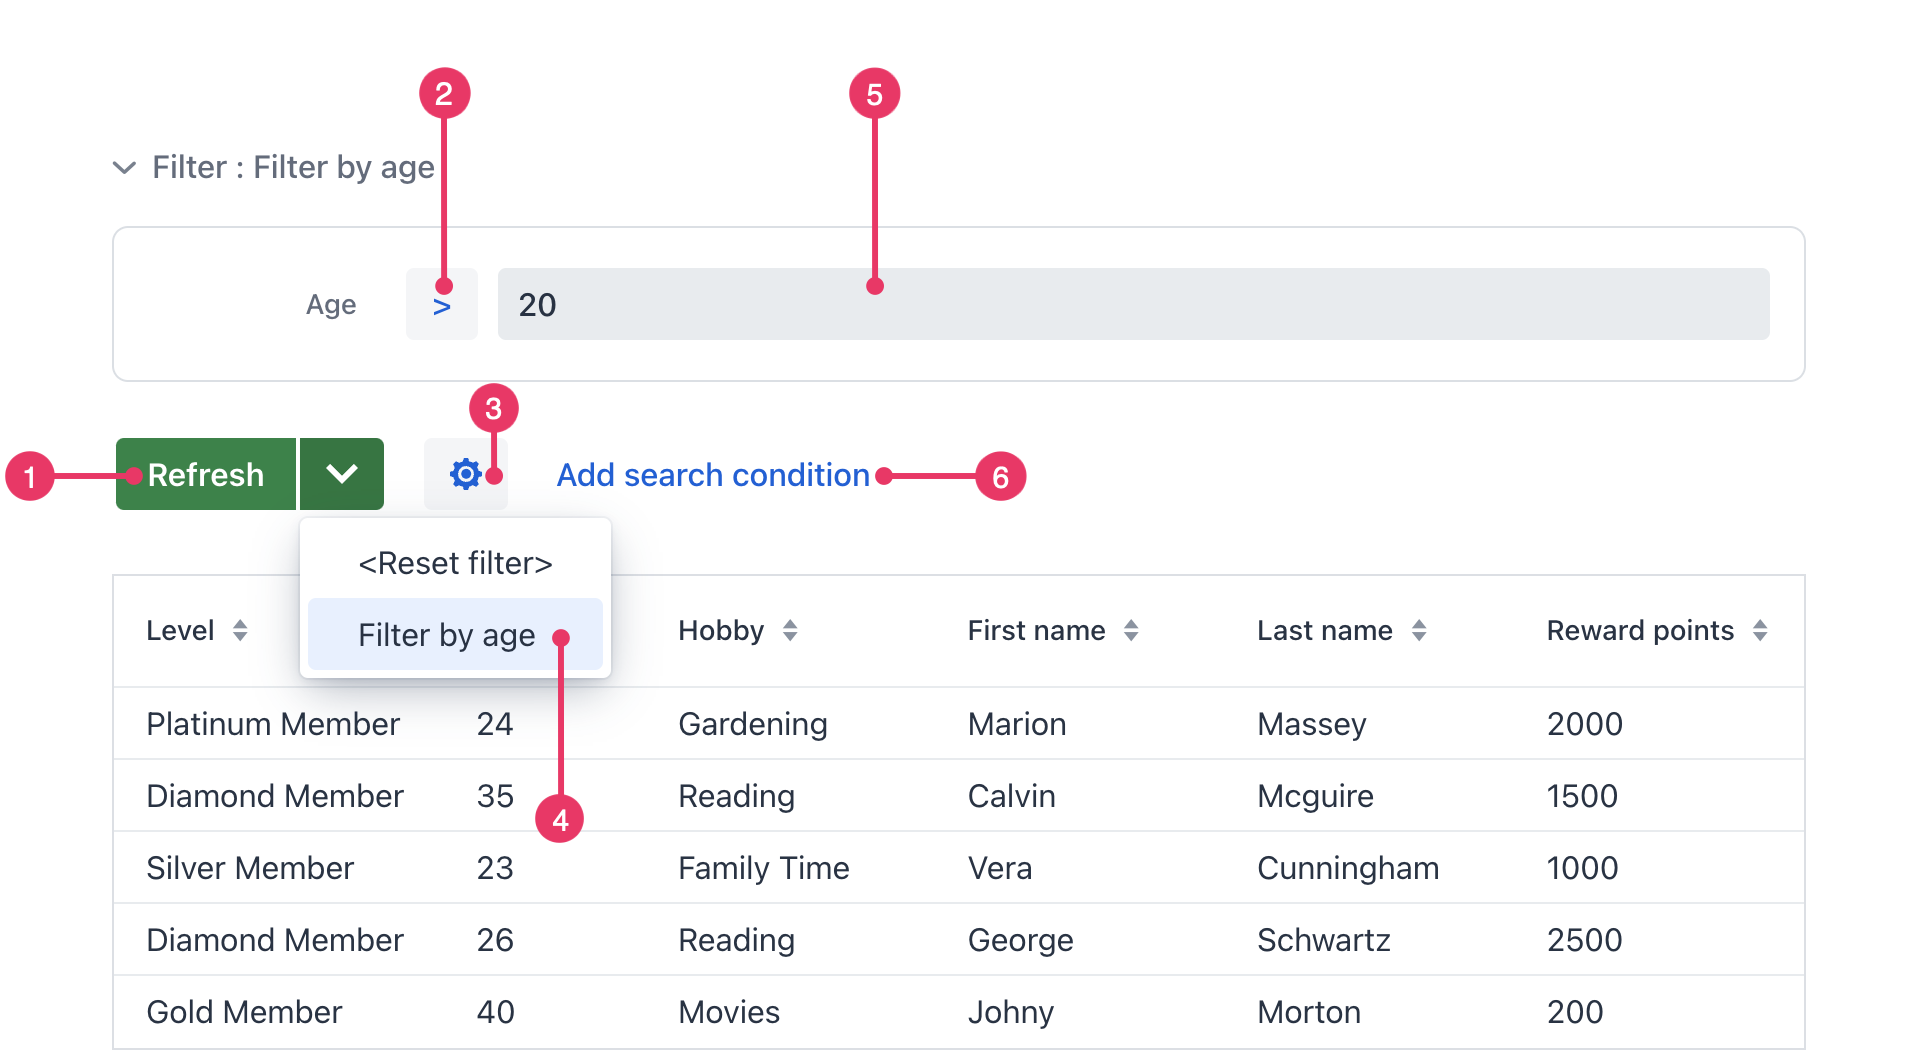
To operate, genericFilter should be connected to a data loader of a standalone CollectionContainer or keyValueCollectionContainer. It generates a Condition object that is set to the loader and later processed by the data store. For a JPA entity, the data store translates the resulting JPQL query, so that filtering is done on the database level, and then only the result is loaded from the database to the application memory.
The following example demonstrates basic genericFilter and some related components:
<data>
    <collection id="customerDc" class="com.company.onboarding.entity.Customer">  (1)
        <fetchPlan extends="_base">
        </fetchPlan>
        <loader id="customerDl">
            <query>
                <![CDATA[select c from Customer c]]> (2)
            </query>
        </loader>
    </collection>
</data>
<layout>
    <genericFilter id="genericFilter" dataLoader="customerDl"> (3)
        <properties include=".*"/>
    </genericFilter>
    <dataGrid id="customersTable"
              width="100%"
              dataContainer="customerDc"> (4)
        <columns>
            <column property="level"/>
            <column property="age"/>
            <column property="hobby"/>
            <column property="firstName"/>
            <column property="lastName"/>
            <column property="rewardPoints"/>
        </columns>
    </dataGrid>
</layout>| 1 | The data container holds the collections of Customer entity instances. |
| 2 | The loader component declares a JPQL query to load all instances of Customer. |
| 3 | The genericFilter component is bound to the loader through its dataLoader attribute. |
| 4 | dataGrid displaying the data from the data container. The list of records will change as they are filtered. |
Quick Filter Example
By default, the component is in quick filter mode. It means that a user can add a temporary set of conditions that only remains in effect for the duration of the current page session. After the page is closed, the conditions will disappear.
Let’s assume that we have the Customer entity and want to:
-
Create a quick filter with multiple conditions on the Customer list view.
-
Save this filter for future use.
Creating a Quick Filter
-
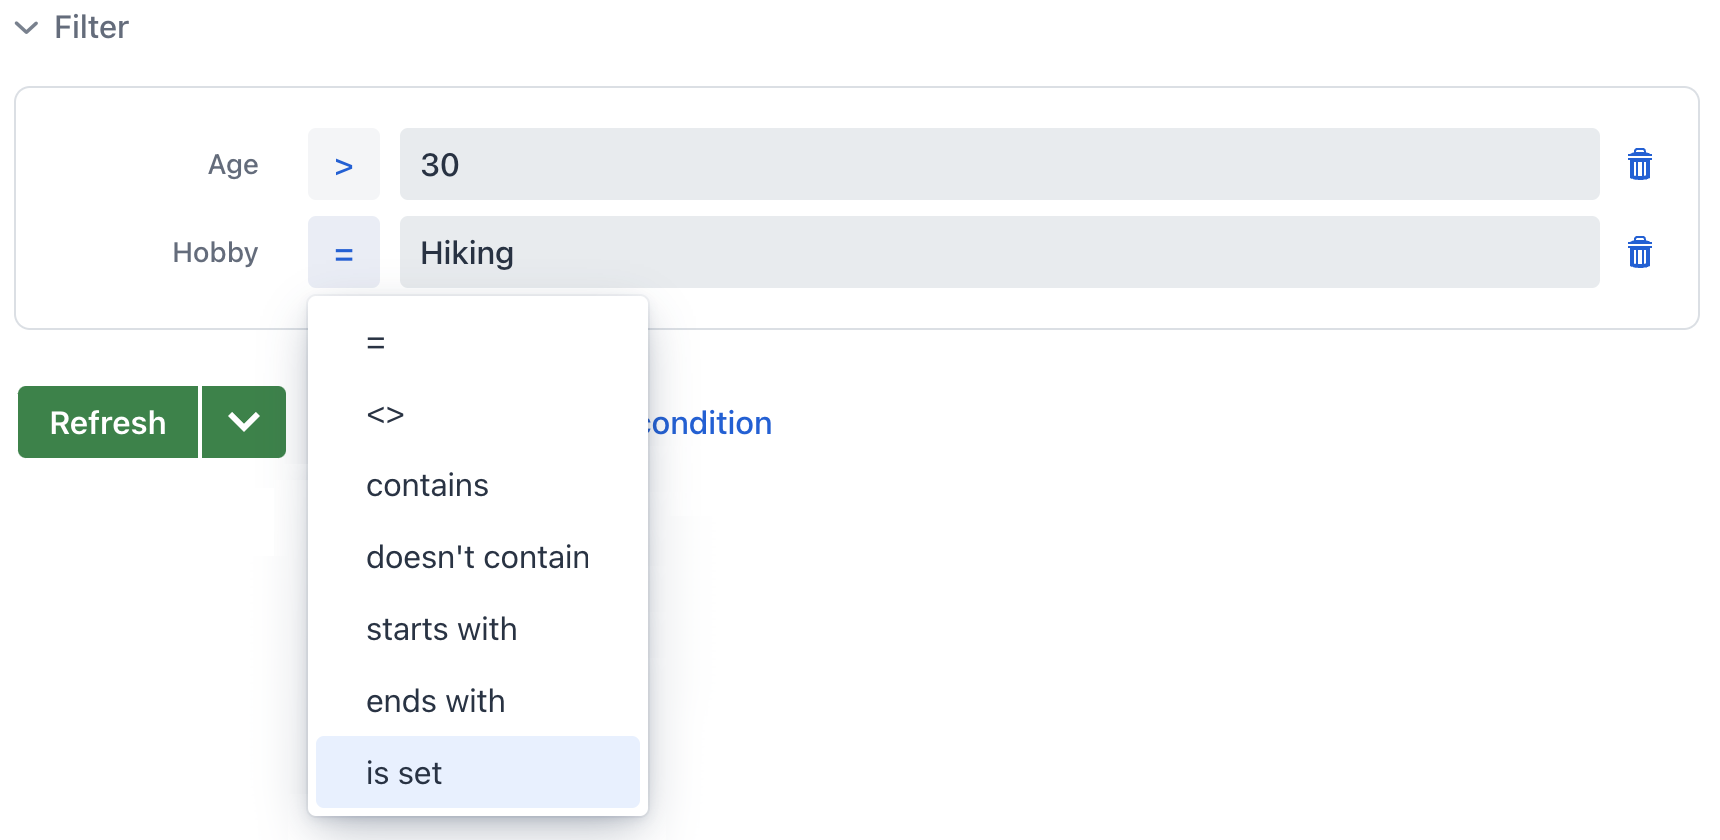
Click Add search condition.
-
Select the properties to filter by. For example: Age and Hobby.
-
Select an operator and enter a value for each property.
Adding Conditions
Click the Add search condition link [6] to open the Add condition dialog:
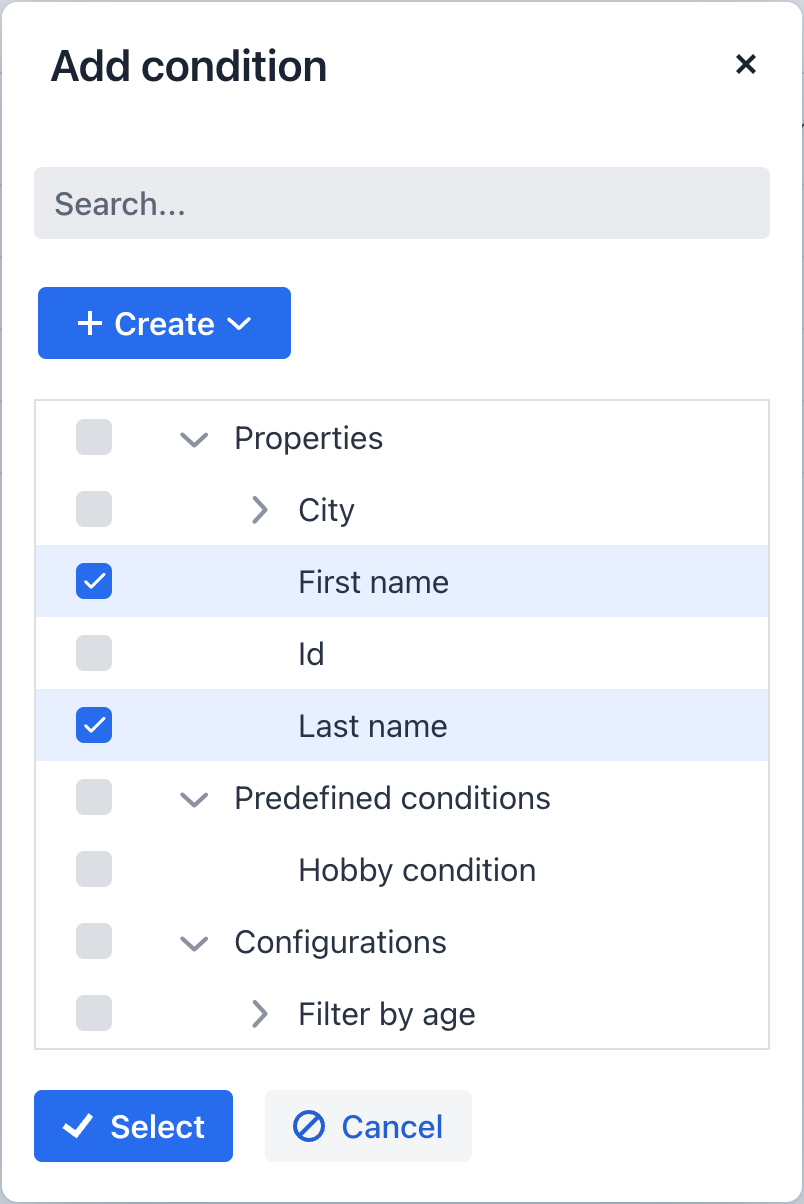
Possible condition types are as follows:
-
Properties — attributes of this and related entities that can be used as filter properties. They are displayed according to the rules specified in the properties element and may include both persistent and dynamic attributes.
-
Predefined conditions — conditions specified at design-time by the developer in the conditions element.
-
Configurations — existing filter configurations. They can be created either at design-time by the developer, or by the user at run-time.
Once a condition is added, it appears in the conditions panel. When a condition is no longer needed, it can be removed by clicking ![]() next to it.
next to it.
Creating Conditions
If there is no suitable condition yet, you can proceed to create it from the same dialog. The drop-down actions of the Create button correspond to the registered filter components.
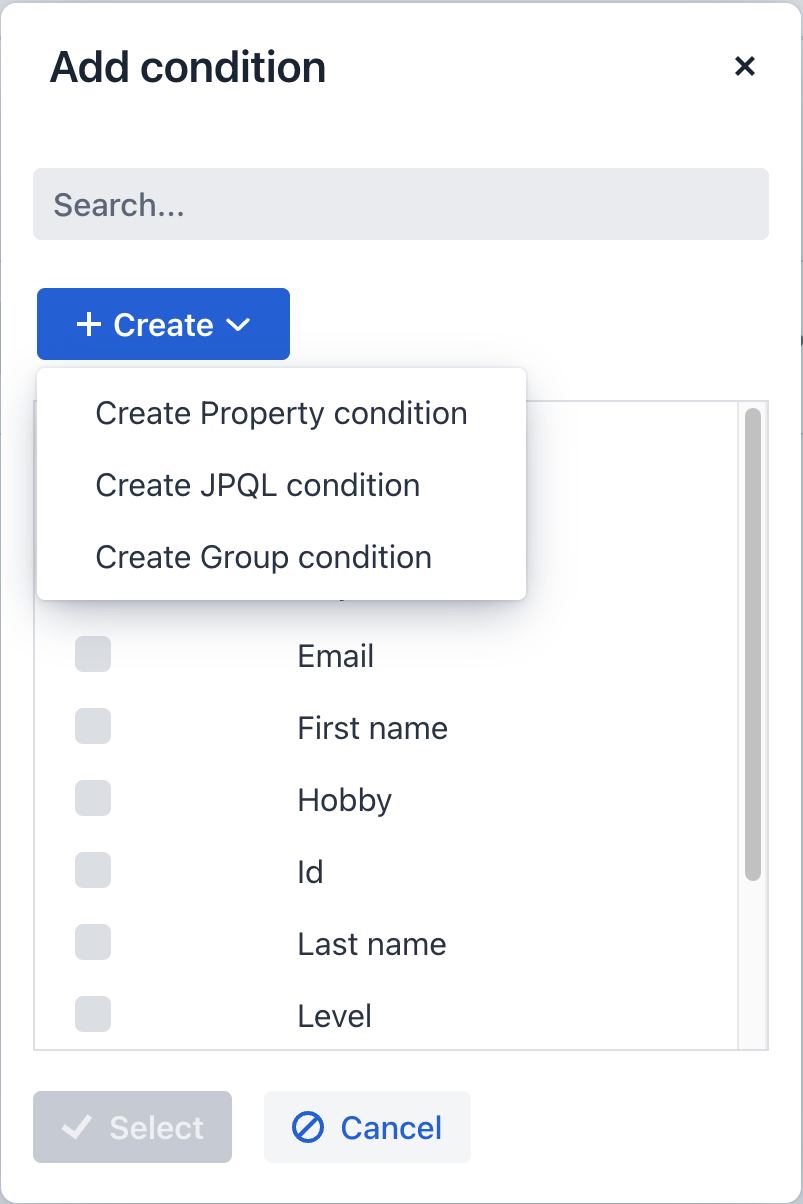
Three such components are available by default: propertyFilter, jpqlFilter, and groupFilter.
Clicking an action opens a corresponding condition editor:
-
Property conditions editor
-
JPQL conditions editor
-
Group conditions editor
| Advanced Full-text search condition is available as a part the Search add-on. |
Property Conditions
The Property condition editor allows users to set an entity attribute as a filter parameter and perform filtering against it. Use Add search condition → + Create → Create Property condition to open the editor.
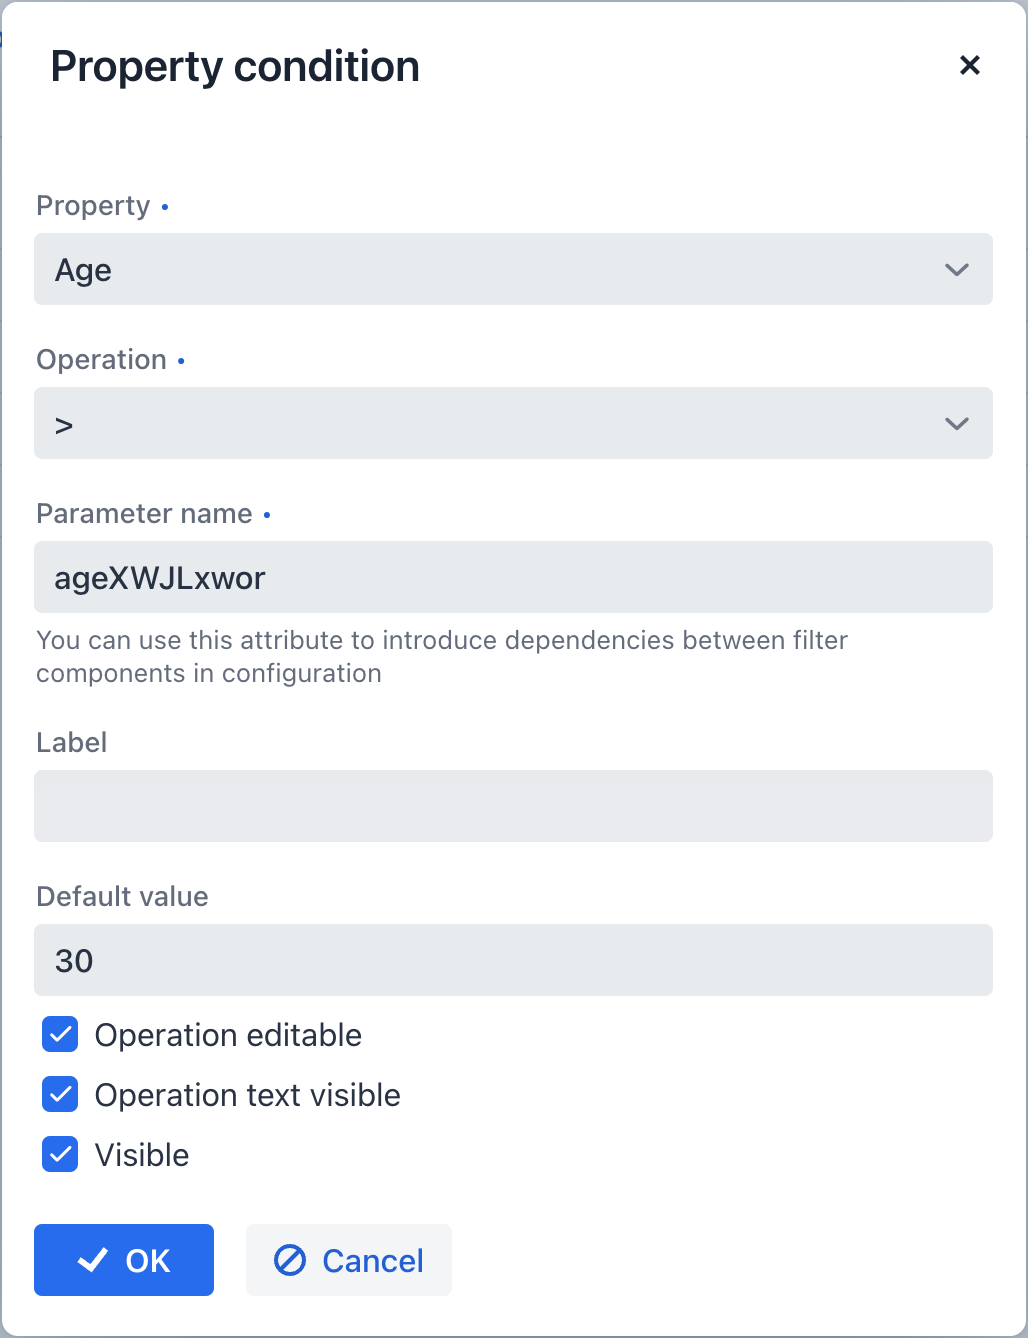
The editor has the following controls and fields:
-
Property — accepts an entity attribute.
-
Operation — sets a comparison operator. The list displays only those operators that are compatible with the current property.
-
Parameter name — sets the name of the associated query parameter. Use this name to introduce dependencies between conditions of the same configuration. If not set, then parameter name is randomly generated.
-
Label — sets a custom label for this condition as it appears in the panel and editors.
-
Default value — sets a default value.
-
Operation editable — allows selecting a comparison operation type.
-
Operation text visible — sets whether the operation label is shown.
-
Visible — determines whether this condition is shown in the condition panel.
JPQL Conditions
The JPQL condition editor allows users to create condition based on JPQL expressions. Use Add search condition → + Create → Create JPQL condition to open the editor.
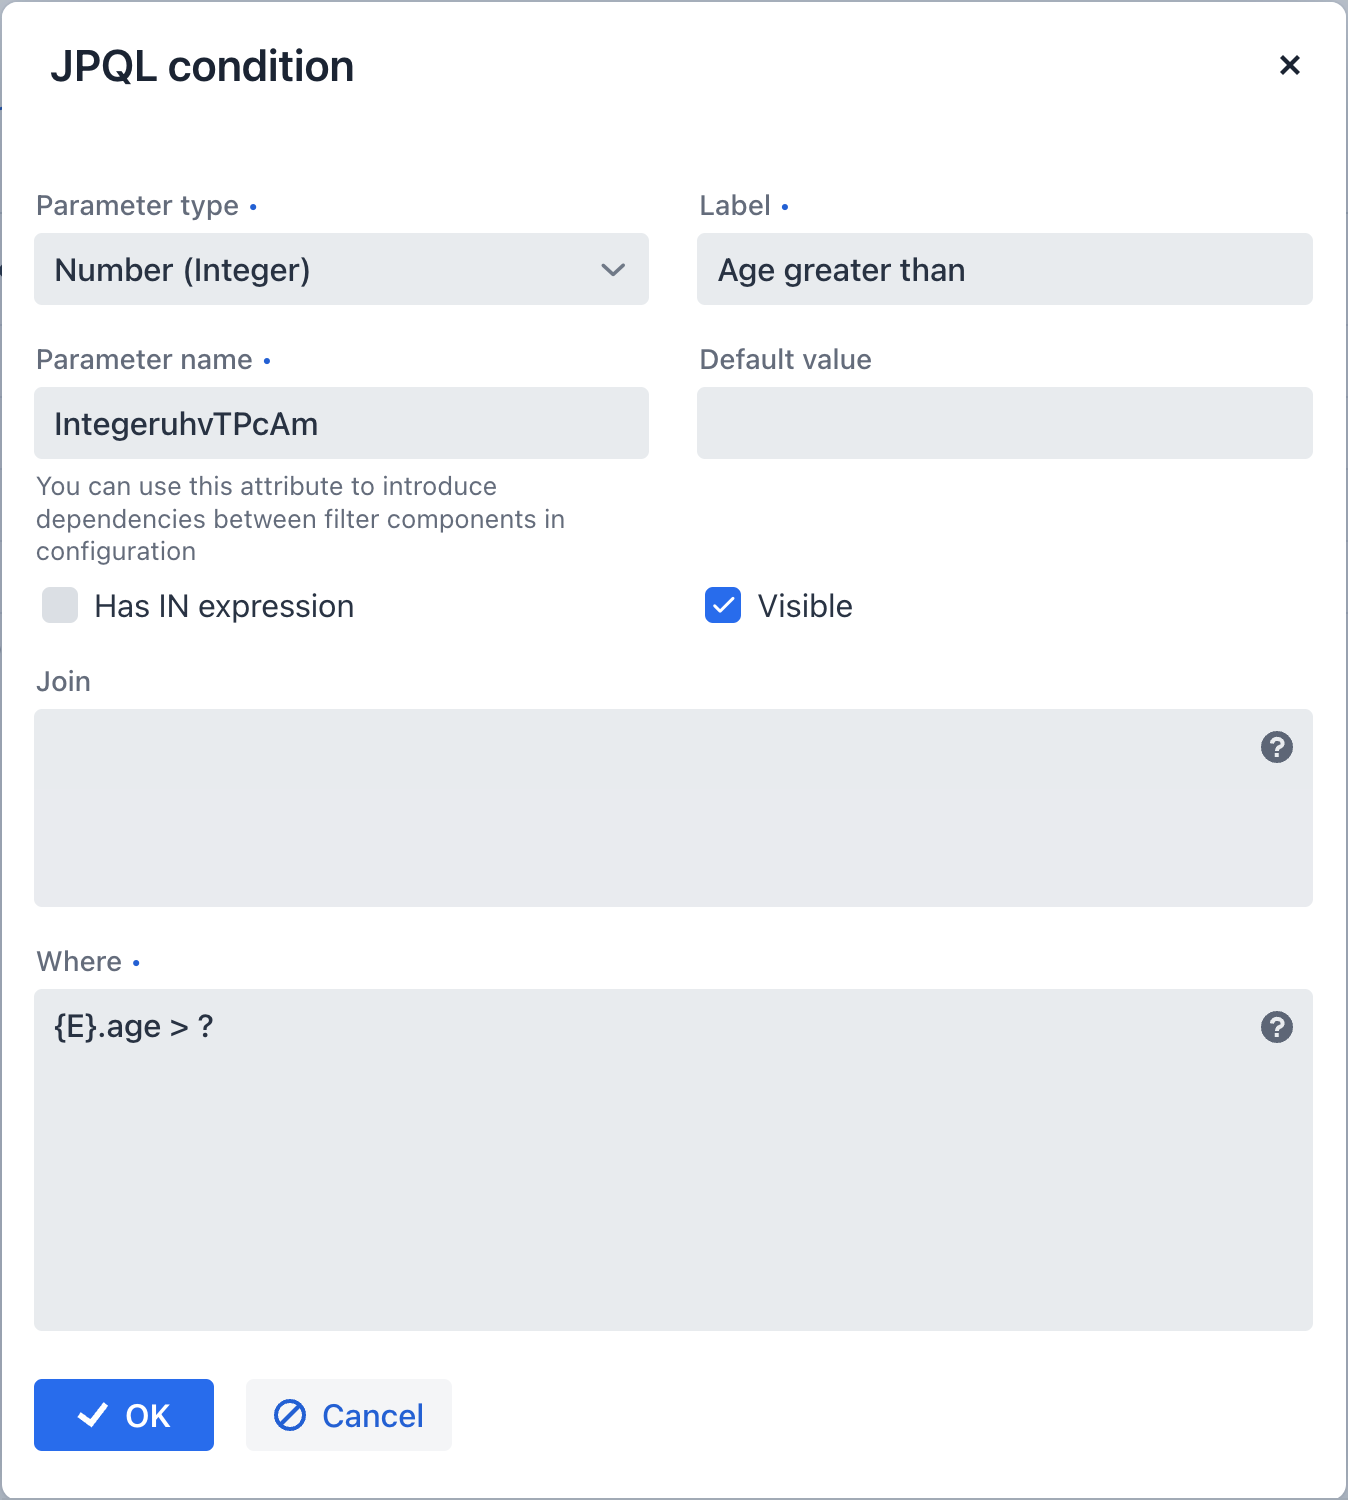
Field descriptions are provided below:
-
Parameter type — accepts a Java class representing the desired parameter type. You can also choose the
No parameteroption to create a condition without parameter.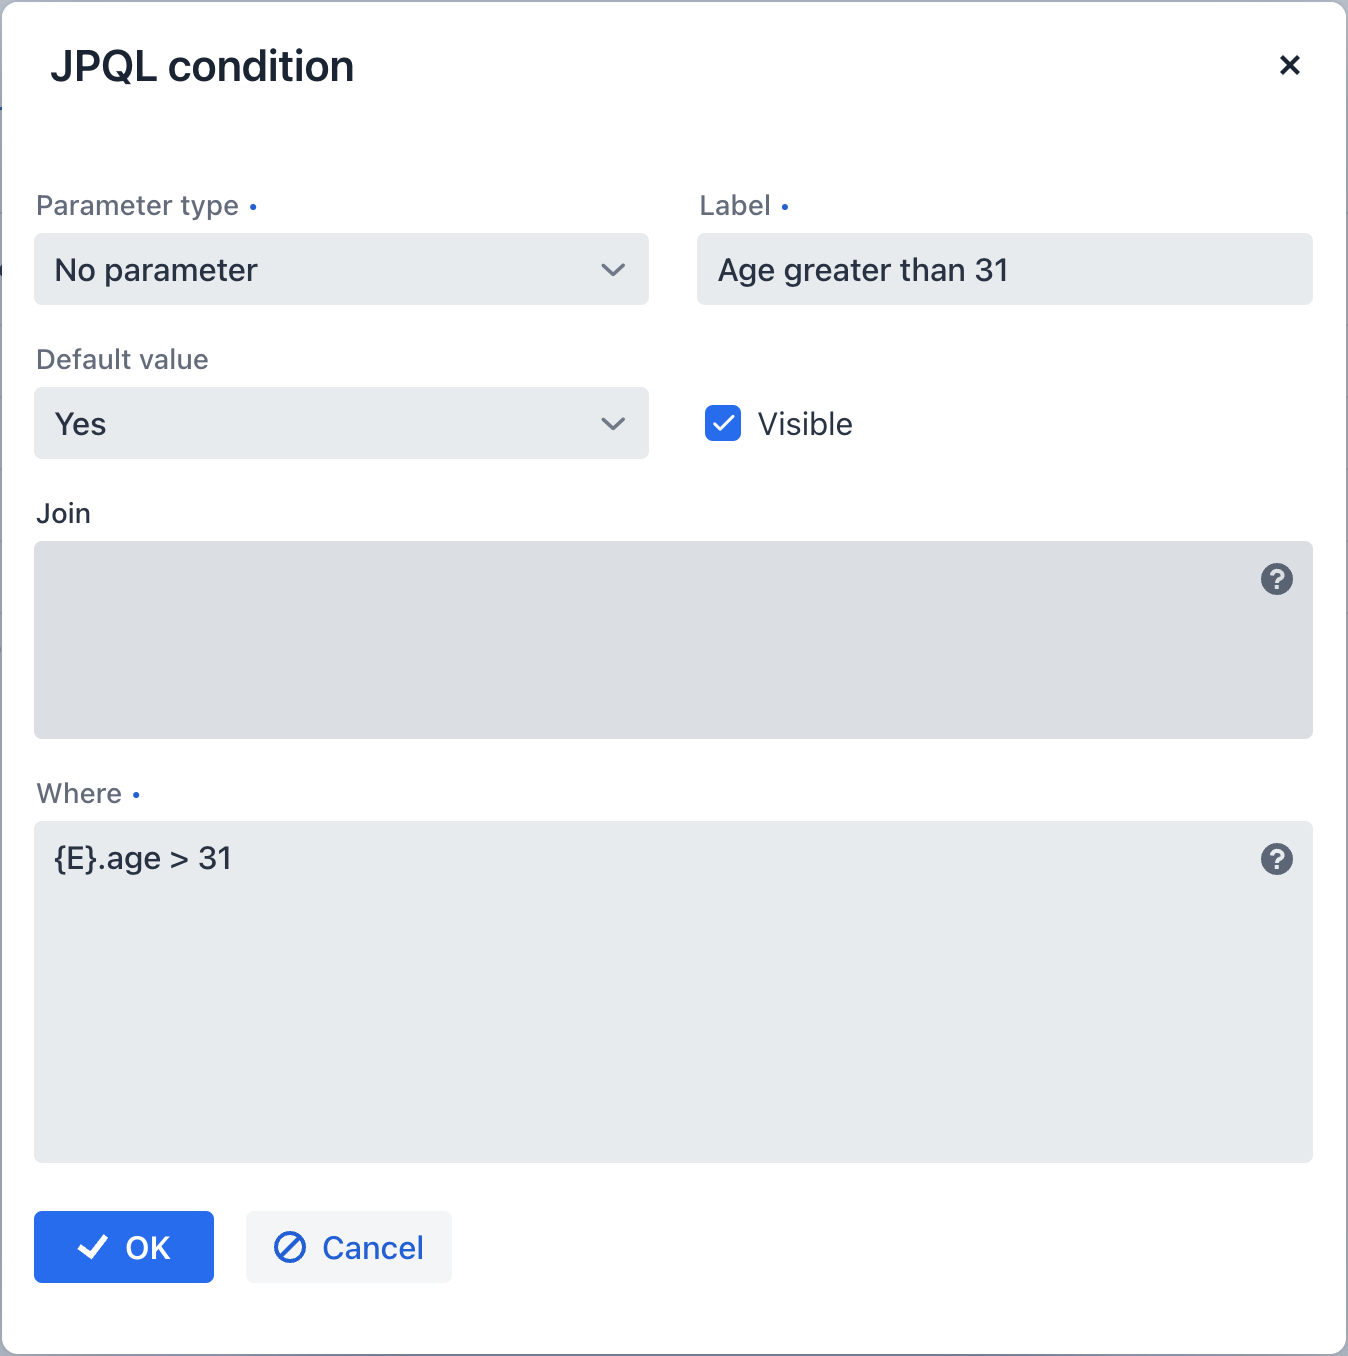
A condition with
No parameteracts somewhat similar to a tag — it filters out data based on a predefined, constant criterion. -
Label — sets the label for this condition as it appears in the panel and editors.
-
Parameter name — sets the name of the associated query parameter. Use this name to introduce dependencies between conditions of the same configuration. If not set, then parameter name is randomly generated.
-
Default value — sets the default value for this condition. This field will be represented by the component compatible with the current value in Parameter type.
-
Has IN expression — determines whether the condition can parse a collection and put it inside the
INclause. -
Visible — determines whether this condition is shown in the filter panel.
-
Join — specifies an optional
joinclause to be included to thefromclause of the data loader. This can be used to create a conditions based on an attribute of a related collection.When writing this clause:
-
Start with
joinorleft joinkeywords. -
Use the
{E}placeholder instead of the entity alias.For example:
join {E}.city c
-
-
Where — specifies the
whereclause to be added to theselectquery of the data loader.When writing this clause:
-
Use the placeholder
{E}instead of the entity alias. -
Set
?as the parameter’s value to indicate it is to be passed by the user. There can be only one such parameter in a condition. Besides, there can be any number of session and user attributes parameters.For example:
{E}.code = ? and {E}.area = :session_area
-
Group Conditions
The Group condition editor allows users to combine conditions into a logical group. Use Add search condition → + Create → Create Property condition to open the editor.
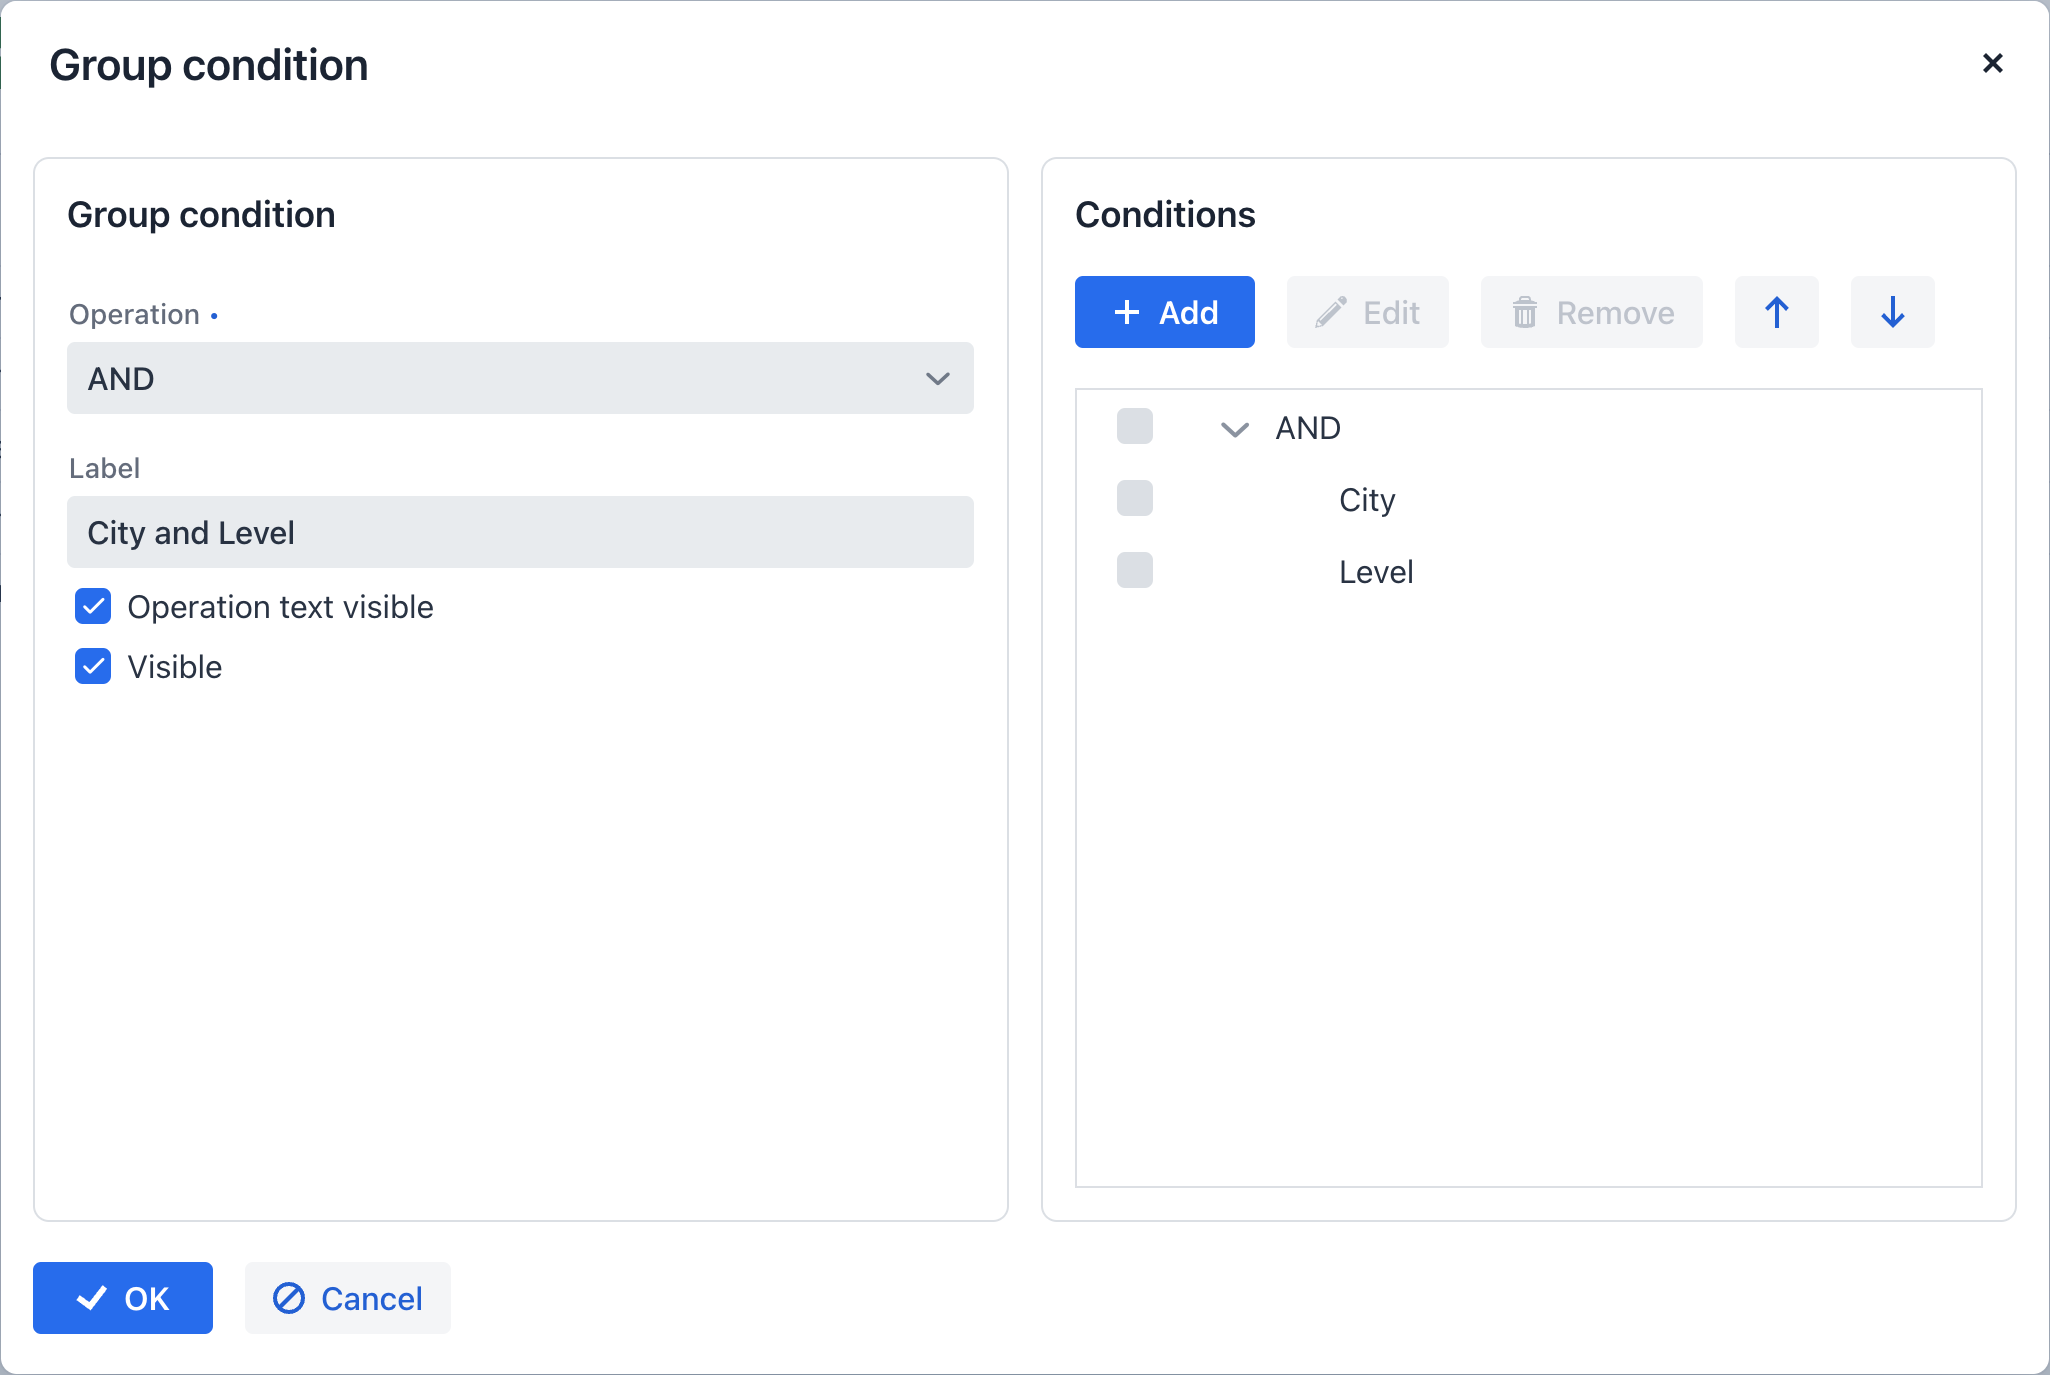
This editor has two areas — one to configure group basic properties, and the other to add and show conditions currently in the group. The description of the fields in each area is given below.
Group condition
-
Operation — logical operator used to join conditions in a group. Group has two logical operators: AND or OR.
-
Label — sets the label for this condition as it appears in the conditions panel and editors. If not set, the name of the operation (AND or OR) is displayed instead.
-
Operation text visible — determines whether the name of the operation is displayed.
-
Visible — determines whether this group is shown in the filter panel.
Conditions
Conditions of the group are shown in the tree view. Use the following actions to manage them.
-
Add — opens the Add condition dialog letting you pick necessary ones.
-
Edit — opens an appropriate editor for a condition selected in the tree view.
-
Remove — removes all conditions that are currently selected in the tree view.
-
 /
/ — buttons to change the order in which the conditions of the group appear.
Configuration
Configuration is a set of conditions saved for later use. It can include conditions of any type as well as another configuration.
Configurations can be created either at design-time by the developer, or by the user at run-time.
Design-time Configuration
A design-time configuration is a set of nested elements of genericFilter in the XML view descriptor.
The following example declares genericFilter with two design-time configurations:
<genericFilter id="filterWithConfigs" dataLoader="customerDl">
    <properties include=".*"/>
    <configurations>
        <configuration id="configuration_age_hobby" operation="AND"
                       name="Age AND Hobby Configuration"> (1)
            <propertyFilter property="age" operation="GREATER"/>
            <propertyFilter property="hobby" operation="CONTAINS"/>
        </configuration>
        <configuration id="configuration_level_rewards_points" operation="OR"
                       name="Level OR Reward Points Configuration" default="true"> (2)
            <propertyFilter property="level" operation="EQUAL"/>
            <propertyFilter property="rewardPoints" operation="LESS_OR_EQUAL"/>
        </configuration>
    </configurations>
</genericFilter>| 1 | Ensure that each configuration specifies an id attribute and its value is unique within this genericFilter. If the name attribute is not specified, id is treated as a key in the message bundle. |
| 2 | The default configuration can be set the default attribute. |
To add a design-time configuration in Jmix Studio, select the genericFilter component in the view descriptor or in the Jmix UI structure panel, then use Add → Configurations → Design-time configuration menu item of the Component Inspector panel.
|
A design-time configuration does not allow any user customizations at runtime and cannot be removed by the user. However, users can create an identical run-time configuration based on the design-time configuration and modify its parameters. This can be done with the ![]() → Copy menu action.
→ Copy menu action.
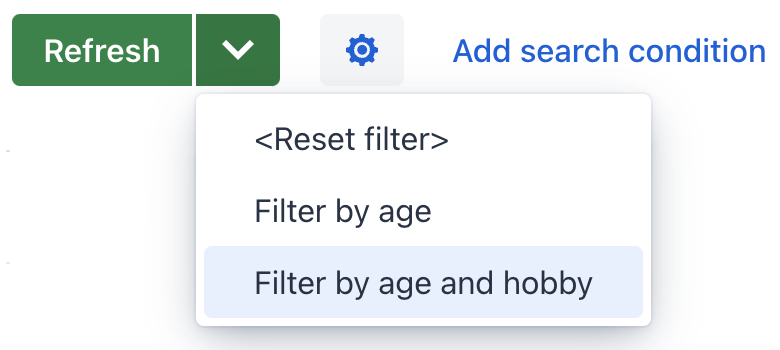
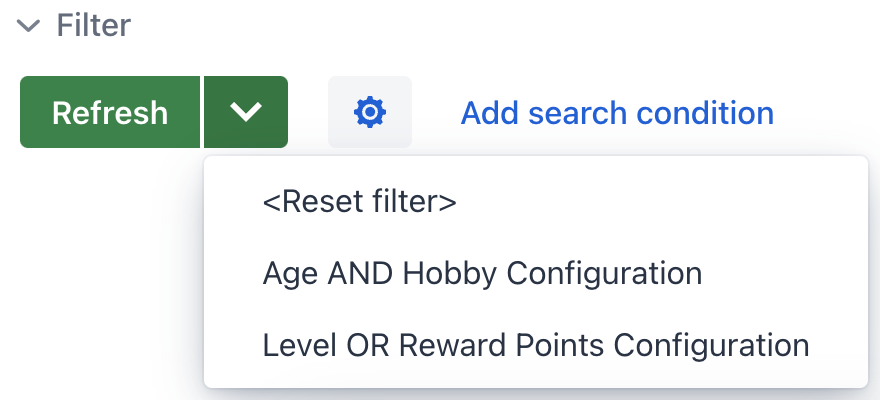
When the application is running, design-time configurations are displayed in the drop-down menu [4] among other configurations.
Run-time Configuration
Configurations can be created at runtime in the Configuration editor. To open the editor, use ![]() → Edit menu item.
→ Edit menu item.
To create, edit, or remove a run-time configuration, the user needs to be granted with ui.genericfilter.modifyConfiguration security permission.
|
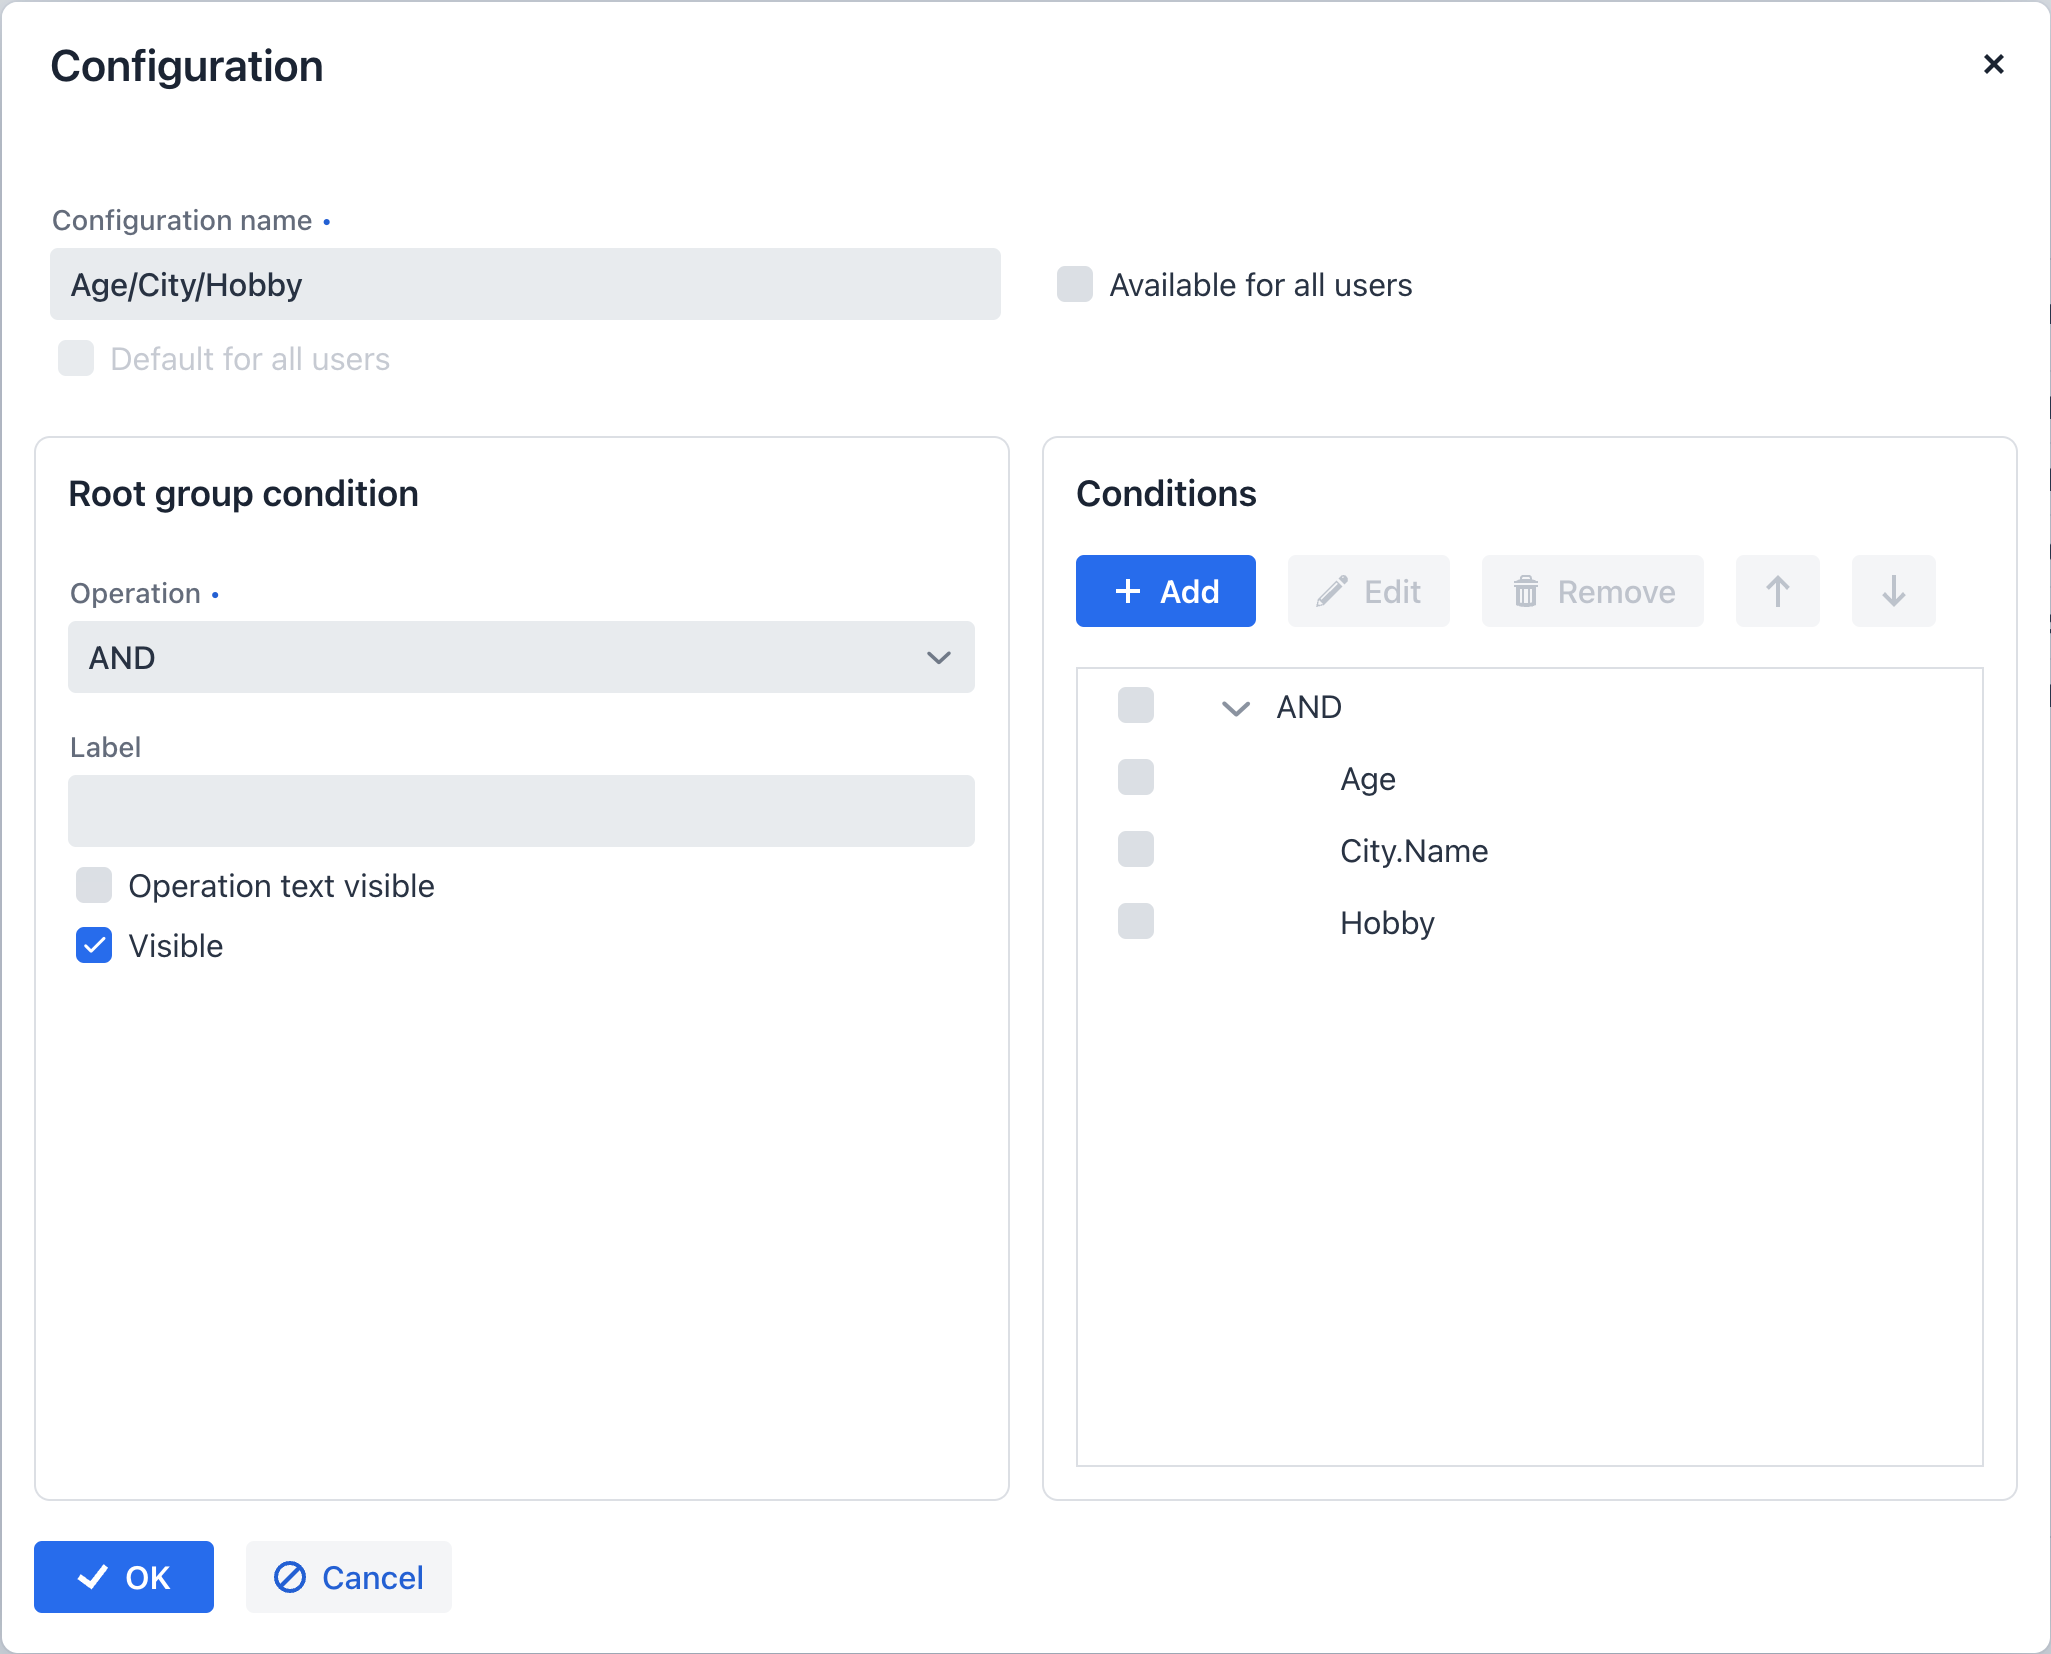
To create a run-time configuration:
-
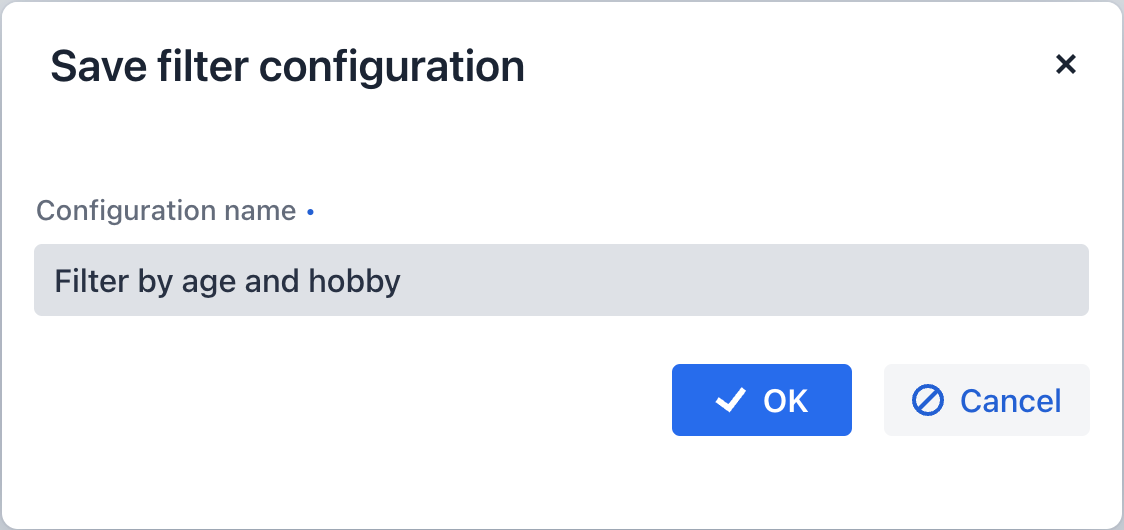
Specify a configuration name. This name is displayed in the drop-down menu [4] and configuration editors.
-
Select the Available for all users checkbox to let anyone use the configuration. This checkbox is only available to users granted with [ui.filter.modifyGlobalConfiguration] permission.
-
Select the Default for all users checkbox to automatically apply this configuration when users open the view. This checkbox is enabled if the Available for all users is selected.
-
Configure the group operation and add conditions to the group. See the Group Conditions section for fields descriptions.
Permissions
Advanced filter management requires the following permissions:
-
To create/edit/delete genericFilter’s configurations, the user must be granted
ui.genericfilter.modifyConfigurationsecurity permission. -
To create/edit/delete global (available for all users) configurations, users must be granted
ui.genericfilter.modifyGlobalConfigurationsecurity permission. -
To create/change JPQL conditions in runtime, users must be granted
ui.genericfilter.modifyJpqlConditionsecurity permission.
Creating Filter Programmatically
This section provides an example of genericFilter configuration created programmatically.
@Autowired
private UiComponents uiComponents;

@ViewComponent
private VerticalLayout programmaticFilterBox;

@ViewComponent
private CollectionLoader<Customer> customerDl;

@Autowired
private SingleFilterSupport singleFilterSupport;

@Subscribe
public void onInit(final InitEvent event) {
    GenericFilter genericFilter = uiComponents.create(GenericFilter.class); (1)
    genericFilter.setId("programmaticFilter");
    genericFilter.setDataLoader(customerDl);
    genericFilter.loadConfigurationsAndApplyDefault();

    DesignTimeConfiguration javaDefaultConfiguration =
            genericFilter.addConfiguration("javaDefaultConfiguration",
                    "Default configuration"); (2)

    PropertyFilter<Integer> agePropertyFilter =
            uiComponents.create(PropertyFilter.class); (3)

    agePropertyFilter.setConditionModificationDelegated(true);
    agePropertyFilter.setDataLoader(customerDl);
    agePropertyFilter.setProperty("age");
    agePropertyFilter.setOperation(PropertyFilter.Operation.LESS_OR_EQUAL);
    agePropertyFilter.setOperationEditable(true);
    agePropertyFilter.setParameterName(PropertyConditionUtils
            .generateParameterName(agePropertyFilter.getProperty()));
    agePropertyFilter.setValueComponent(singleFilterSupport.generateValueComponent(
            customerDl.getContainer().getEntityMetaClass(),
            agePropertyFilter.getProperty(),
            agePropertyFilter.getOperation())); (4)

    javaDefaultConfiguration.getRootLogicalFilterComponent().add(agePropertyFilter); (5)

    programmaticFilterBox.add(genericFilter); (6)

    genericFilter.setCurrentConfiguration(javaDefaultConfiguration); (7)
}| 1 | Creates genericFilter using the uiComponents factory. |
| 2 | Adds a design-time configuration. The method takes two parameters: configuration id and configuration name. |
| 3 | Creates a PropertyFilter instance and set its properties. |
| 4 | Generates a component for this filter based on metaClass, property, and operation. |
| 5 | Adds the filter to configuration. LogicalFilterComponent is the root element of the configuration. |
| 6 | Puts genericFilter on the view inside the vbox layout. That layout is declared in the view descriptor and injected to the controller. |
| 7 | Sets a current configuration. |
Attributes
id - alignSelf - applyShortcut - autoApply - classNames - colspan - css - dataLoader - enabled - height - maxHeight - maxWidth - minHeight - minWidth - opened - propertyHierarchyDepth - summaryText - themeNames - visible - width
applyShortcut
Defines the keyboard shortcut that can be used to apply a filtering condition. This shortcut is only relevant when the filtering conditions are not set to be automatically applied.
The default value is specified by the jmix.ui.component.filter-apply-shortcut property.
autoApply
Specifies whether the filter is applied automatically.
-
If set to
true, filter is applied immediately after updating a filtering condition or any time it loses focus. -
If set to
false, filter will be applied only after the button [1] is clicked or applyShortcut is used. Note that setting the value tofalseupdates the button text to Apply.
The default value is specified by the jmix.ui.component.filter-auto-apply property.
dataLoader
Sets a data loader that will load data based on the filtering condition.
propertyHierarchyDepth
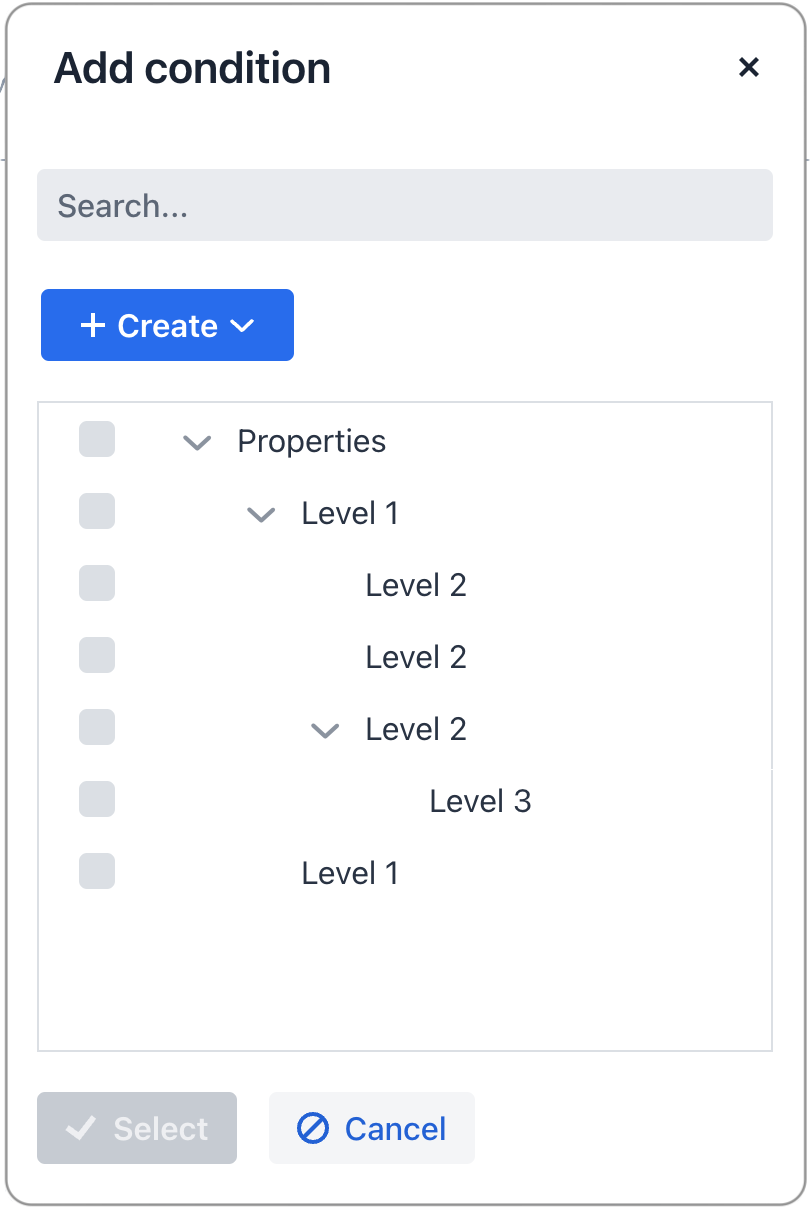
Sets the number of nested levels at which the filter is applied. Any reasonable, non-zero number of levels can be specified. The default is 2.
-
propertyHierarchyDepth = "1"– filters through immediate properties of the entity. -
propertyHierarchyDepth = "2"– filters through properties of the entity as well as the properties of any child entities. -
propertyHierarchyDepth = "3"– filters through immediate properties of the entity and up to the third nested level of properties.
This value can be specified globally for all filter components by setting the jmix.ui.component.filter-properties-hierarchy-depth property.
Handlers
AttachEvent - ConfigurationChangeEvent - ConfigurationRefreshEvent - DetachEvent - OpenedChangeEvent - propertyFiltersPredicate
ConfigurationChangeEvent
ConfigurationChangeEvent is sent whenever one filter configuration is switched for another. This includes switching to a configuration when no configuration is set, or resetting the configuration.
ConfigurationRefreshEvent
ConfigurationRefreshEvent is sent every time the filter configuration is edited.
OpenedChangeEvent
OpenedChangeEvent is sent every time the opened attribute of the component changes.
propertyFiltersPredicate
This predicate allows to programmatically include or exclude attributes available for user selection.
For example, to exclude hobby from user selection use the following code:
@Install(to = "genericFilter", subject = "propertyFiltersPredicate")
private boolean genericFilterPropertyFiltersPredicate(final MetaPropertyPath metaPropertyPath) {
    return !metaPropertyPath.getMetaProperty().getName().equals("hobby");
}
Elements
actions
Defines the list of actions for filter management. The framework provides the following default actions available in the Filter Settings ![]() menu:
menu:
-
Save — saves changes to current configuration. Implemented by
FilterSaveAction(type="genericFilter_save"in XML). -
Save with values — saves changes to current configuration along with the values in the condition fields [5] as their default values.
-
Save as — saves current configuration under a different name. Implemented by
FilterSaveAsAction(type="genericFilter_saveAs"in XML). -
Edit — opens editor for current run-time configuration. Disable for design-time configurations. Implemented by
FilterEditAction(`type="genericFilter_edit" in XML). -
Remove — removes current run-time configuration. Disabled for design-time configurations. Implemented by
FilterRemoveAction(`type="genericFilter_remove" in XML). -
Copy — creates a run-time copy for the current configuration. Implemented by
FilterCopyAction(`type="genericFilter_copy" in XML). -
Clear values — clears the values in the condition fields [5]. Implemented by
FilterClearValuesAction(`type="genericFilter_clearValues" in XML). -
Add — adds a condition to the current configuration. Implemented by
FilterAddConditionAction(`type="genericFilter_addCondition" in XML). -
Reset — resets Implemented by
FilterResetAction(`type="genericFilter_reset" in XML).
Developers can override the list of actions in the ![]() menu:
menu:
<genericFilter id="filterWithActions" dataLoader="customerDl">
    <properties include=".*"/>
    <actions>
        <action id="addCondition" type="genericFilter_addCondition"/>
        <action id="clearValues" type="genericFilter_reset"/>
    </actions>
</genericFilter>
The example above creates a filter with two menu actions:
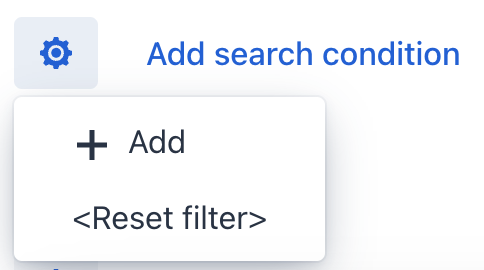
conditions
Holds a declaration of predefined conditions.
See the following example for illustration:
<genericFilter id="filterWithCondition" dataLoader="customerDl">
    <properties include=".*"/>
    <conditions>
        <propertyFilter property="hobby" enabled="true" operation="STARTS_WITH"/>
    </conditions>
</genericFilter>
configurations
Holds a declaration of design-time configurations.
properties
Determines which entity attributes can be added to condition. This element has the following attributes:
-
include— specifies a regular expression. Entity attributes that match this expression are included. -
exclude— specifies a regular expression. Entity attributes that match this expression are excluded. -
excludeProperties— specifies a comma-separated list of property names or property paths that should be excluded. For example:customer.name. -
excludeRecursively— determines whether the attribute inexcludePropertiesmust be recursively excluded for the whole object graph. That is, if 'true', any children attributes of the excluded attribute are excluded as well.
See the following example for illustration:
<genericFilter id="filterWithProperties" dataLoader="customerDl">
    <properties include=".*"
                exclude="(hobby)|(age)"
                excludeProperties="id"
                excludeRecursively="true"/>
</genericFilter>|
You can include and exclude collection ( |
|
You can include and exclude dynamic attributes as a filtering condition. This doesn’t require the dynamicAttributes facet on that view. Specify the attribute’s code with a + prefix: Note that if such attribute is an entity, rather than a simple value, you cannot use the attributes of that entity as part of a filtering condition. |
The following entity attributes are ignored:
-
Not accessible due to security permissions
-
Non-persistent attributes
-
Attributes annotated with
@SystemLevel -
Attributes of
byte[]type
responsiveSteps
Determines the number of columns to display search conditions based on the available space. By default, search conditions are arranged in two columns and adjust to a single column when the layout width is smaller.
The following filter overrides the default behaviour to adjust the layout to one, two, or three columns with labels positioned on top:

<layout>
    <genericFilter dataLoader="customerDl">
        <responsiveSteps>
            <responsiveStep minWidth="0" columns="1"/>
            <responsiveStep minWidth="30em" columns="2"/>
            <responsiveStep minWidth="50em" columns="3" labelsPosition="TOP"/>
        </responsiveSteps>
    </genericFilter>
</layout>
