Part 1. Beginner
In this chapter, you will create:
-
The
WebdavDocumentWrapperentity with theWebdavDocumentattribute type. -
CRUD views including UI component for uploading the WebDAV document.
You will make the necessary adjustments to enable the opening and editing of uploaded WebDAV files in desktop office applications (Word, Excel, LibreOffice, etc.).
Creating WebdavDocumentWrapper Entity
Let’s create the WebdavDocumentWrapper entity.
| You can find detailed instructions for creating entities in the Simple CRUD section of the Tutorial. |
In the Jmix tool window, click New ( ) → JPA Entity. Enter
 WebdavDocumentWrapper into the Class field.
The WebdavDocumentWrapper entity has the following attributes:
-
descriptionwithStringtype. -
lastModifiedBywithStringtype. -
lastModifiedDatewithOffsetDateTimetype. -
webdavDocumentwithWebdavDocumenttype:
Create CRUD Views
Let’s generate CRUD views for the WebdavDocumentWrapper entity.
Click Views → Create view in the actions panel at the top of the entity designer.
On the first step of the view creation wizard, select the Entity list and detail views template. Click Next.
Accept the suggested values on the first two steps of the wizard.
On the Entity list view fetch plan step, add the webdavDocument attribute to the selection:
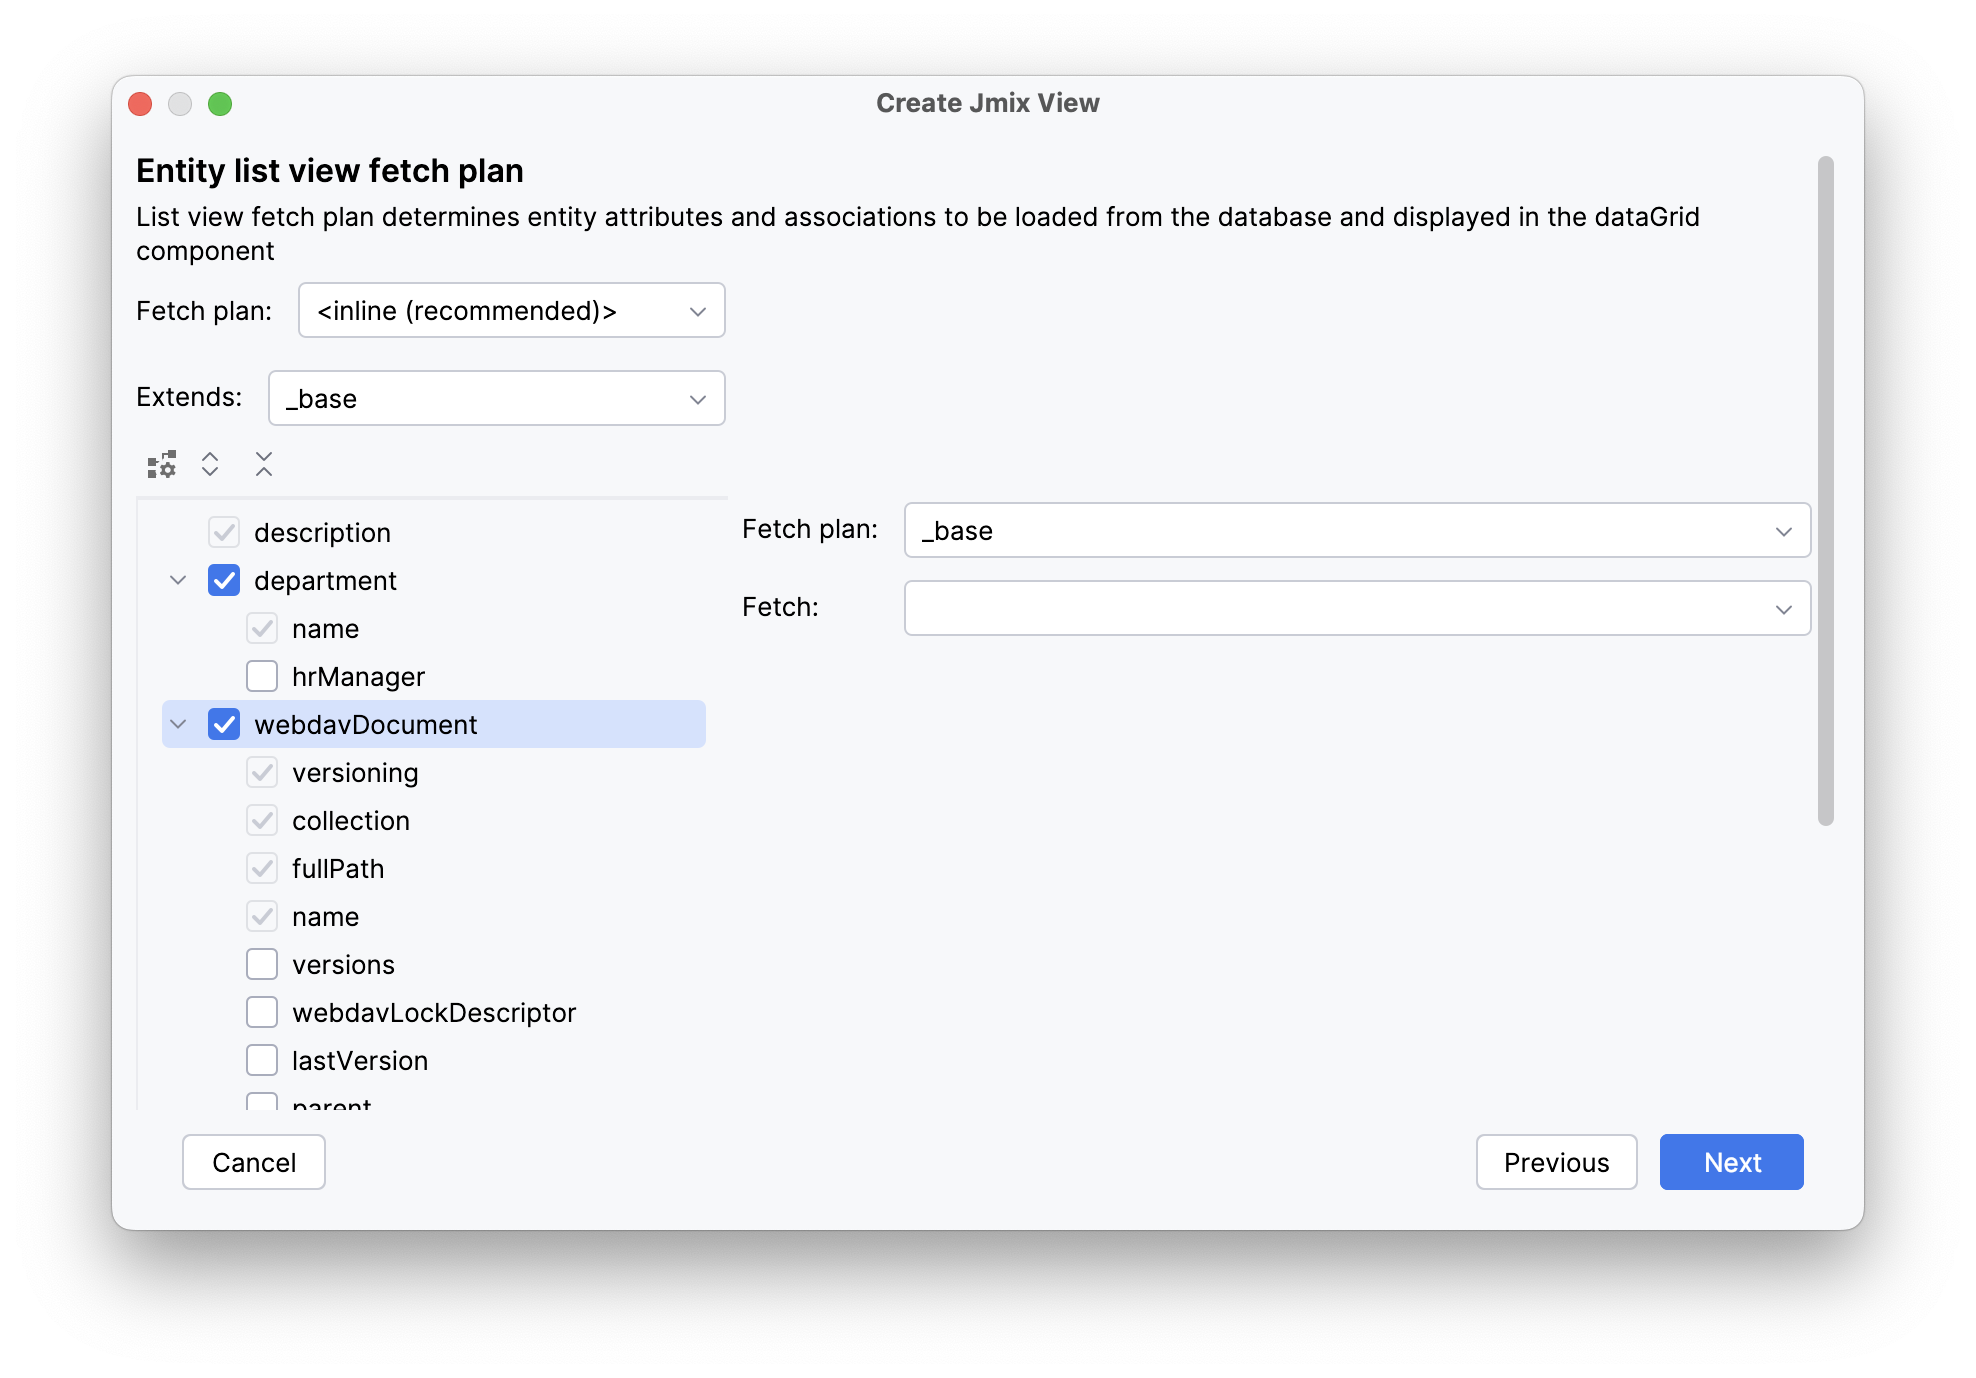
Now you can be sure that the referenced WebdavDocument entity will be loaded together with the root WebdavDocumentWrapper entity and displayed in the list view.
| If an attribute is not present in the fetch plan, Studio doesn’t create a visual component for it in the generated views. |
Click Next.
On the Entity detail view fetch plan step, delete the lastModifiedBy and lastModifiedDate attributes from the selection. These attributes will be filled in automatically, so displaying them on the detail view would be redundant.
Click Next.
Studio will automatically generate two views: WebdavDocumentWrapper.list and WebdavDocumentWrapper.detail, and open their corresponding source code.
Add WebdavDocumentUploadField on View
Locate webdav-document-wrapper-detail-view.xml in the Jmix tool window and double-click it. The view designer will appear:
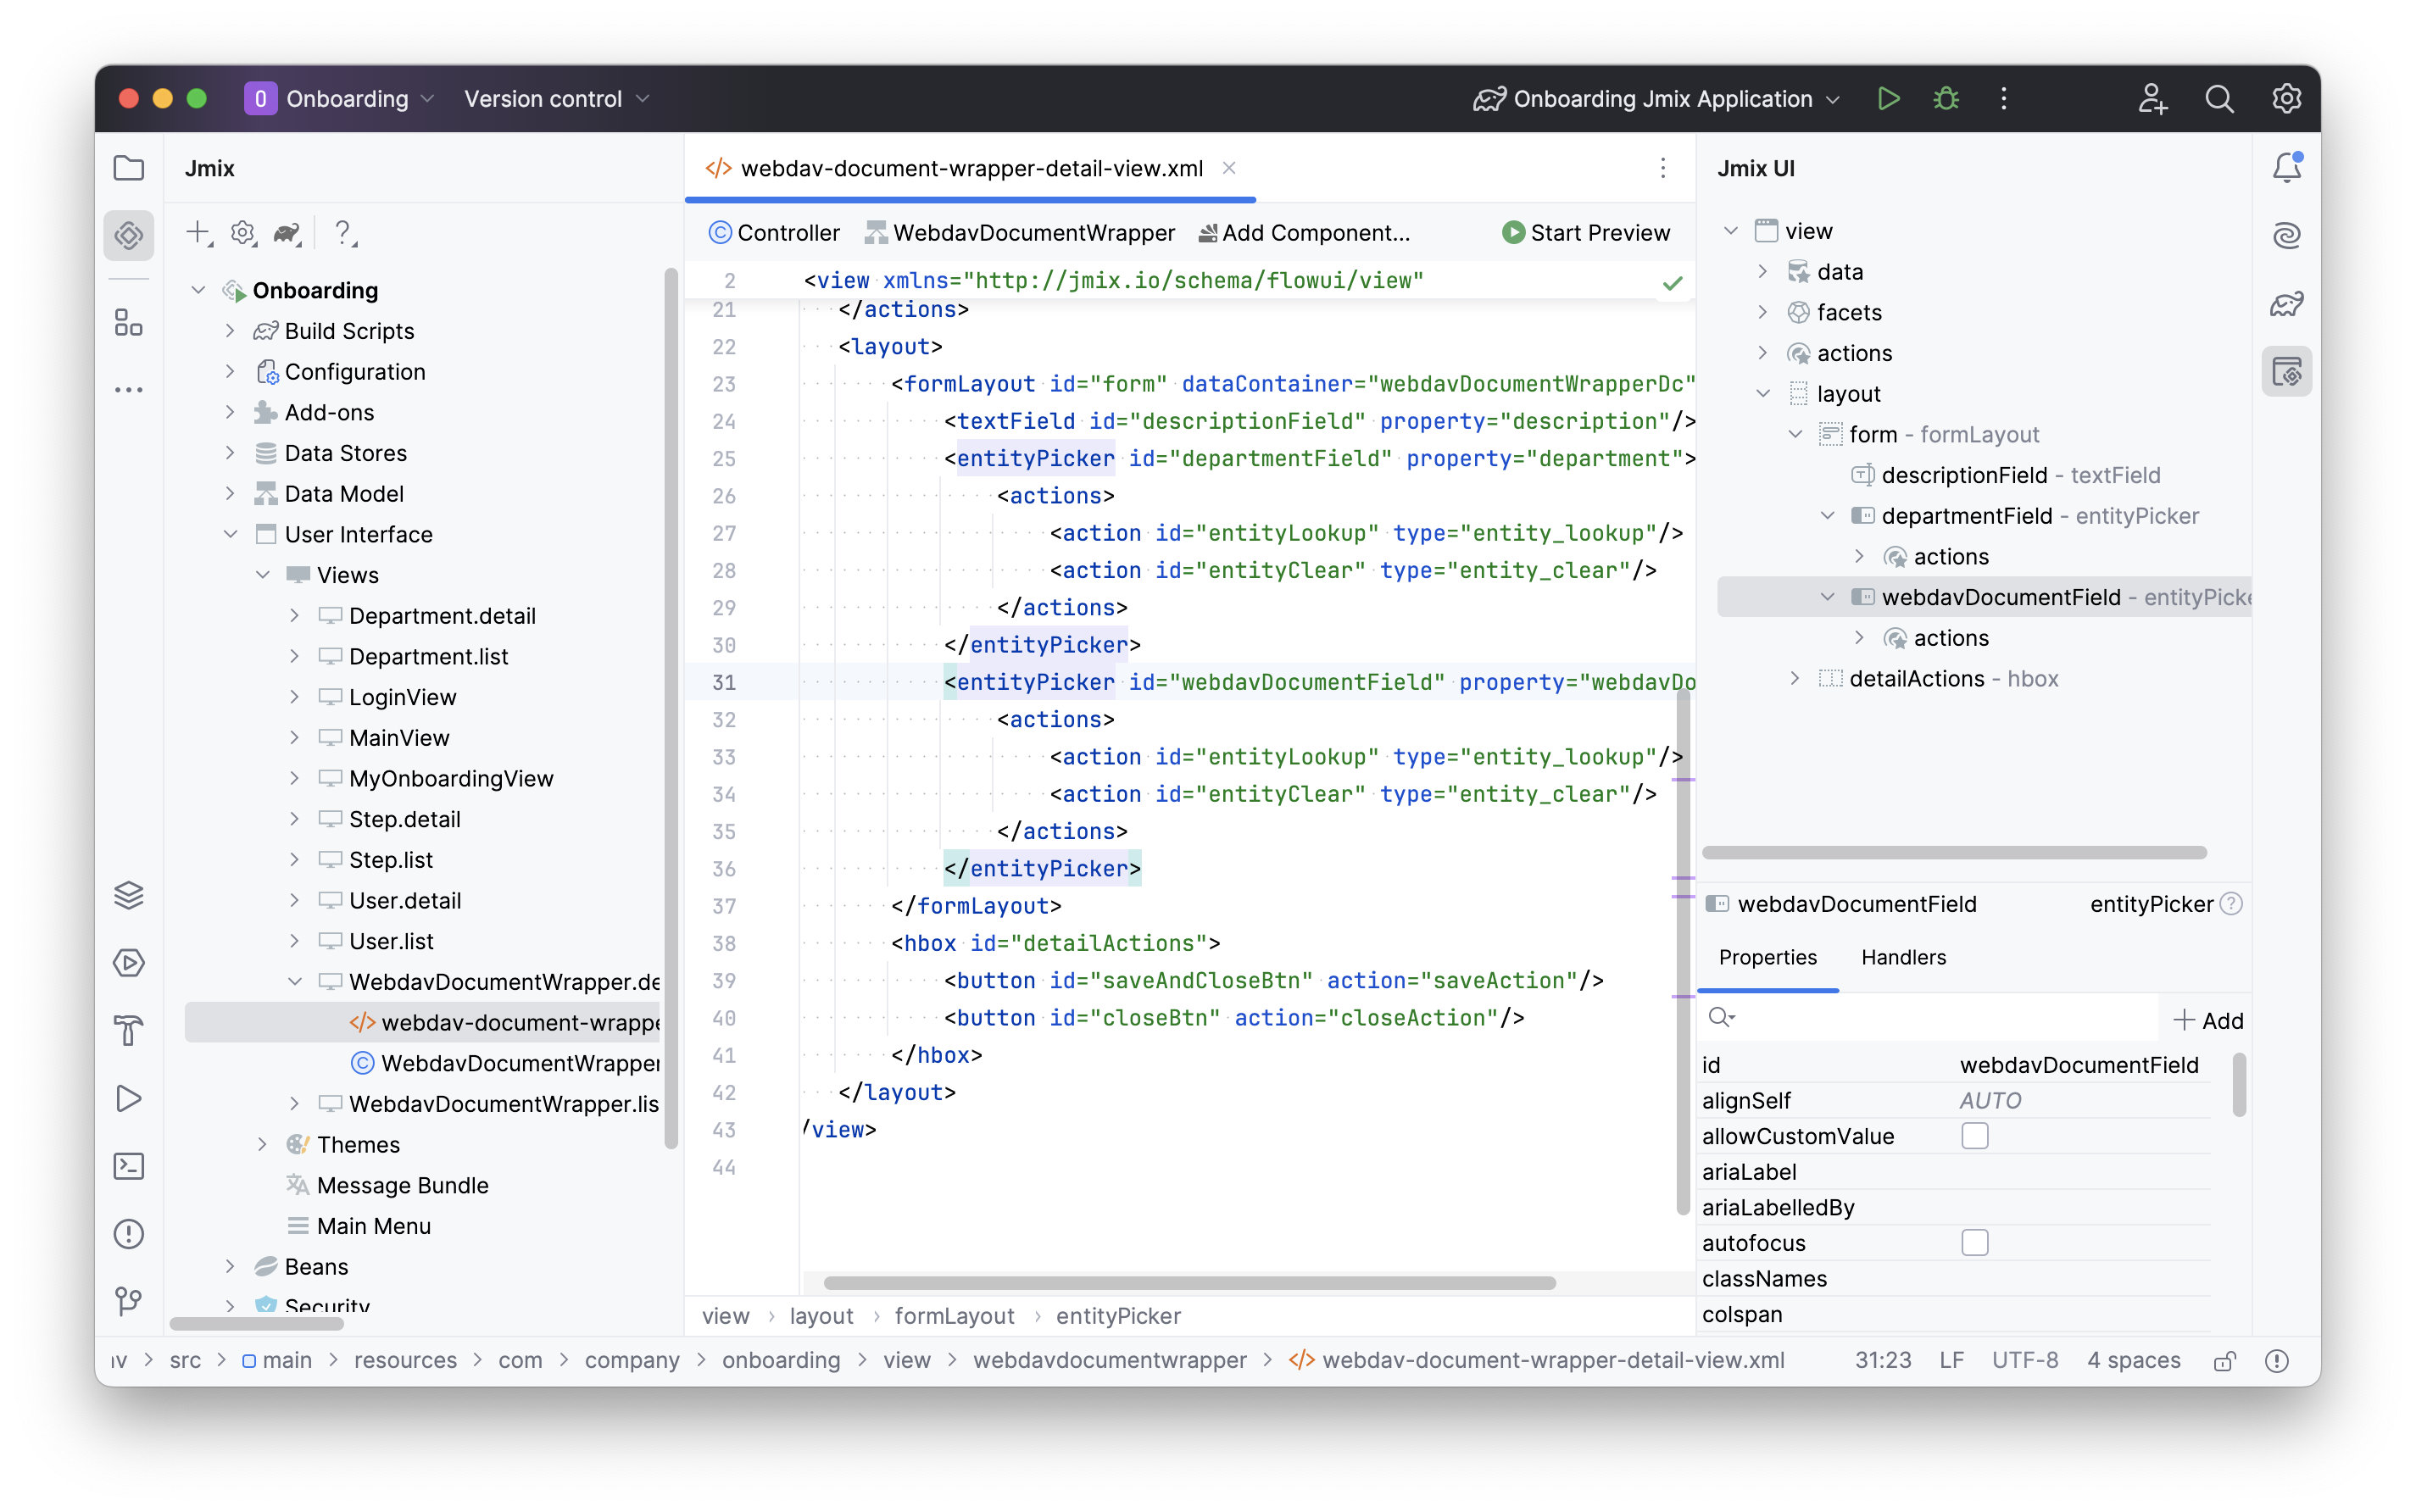
You’ll notice that the entityPicker component is being used to show the webdavDocument attribute.
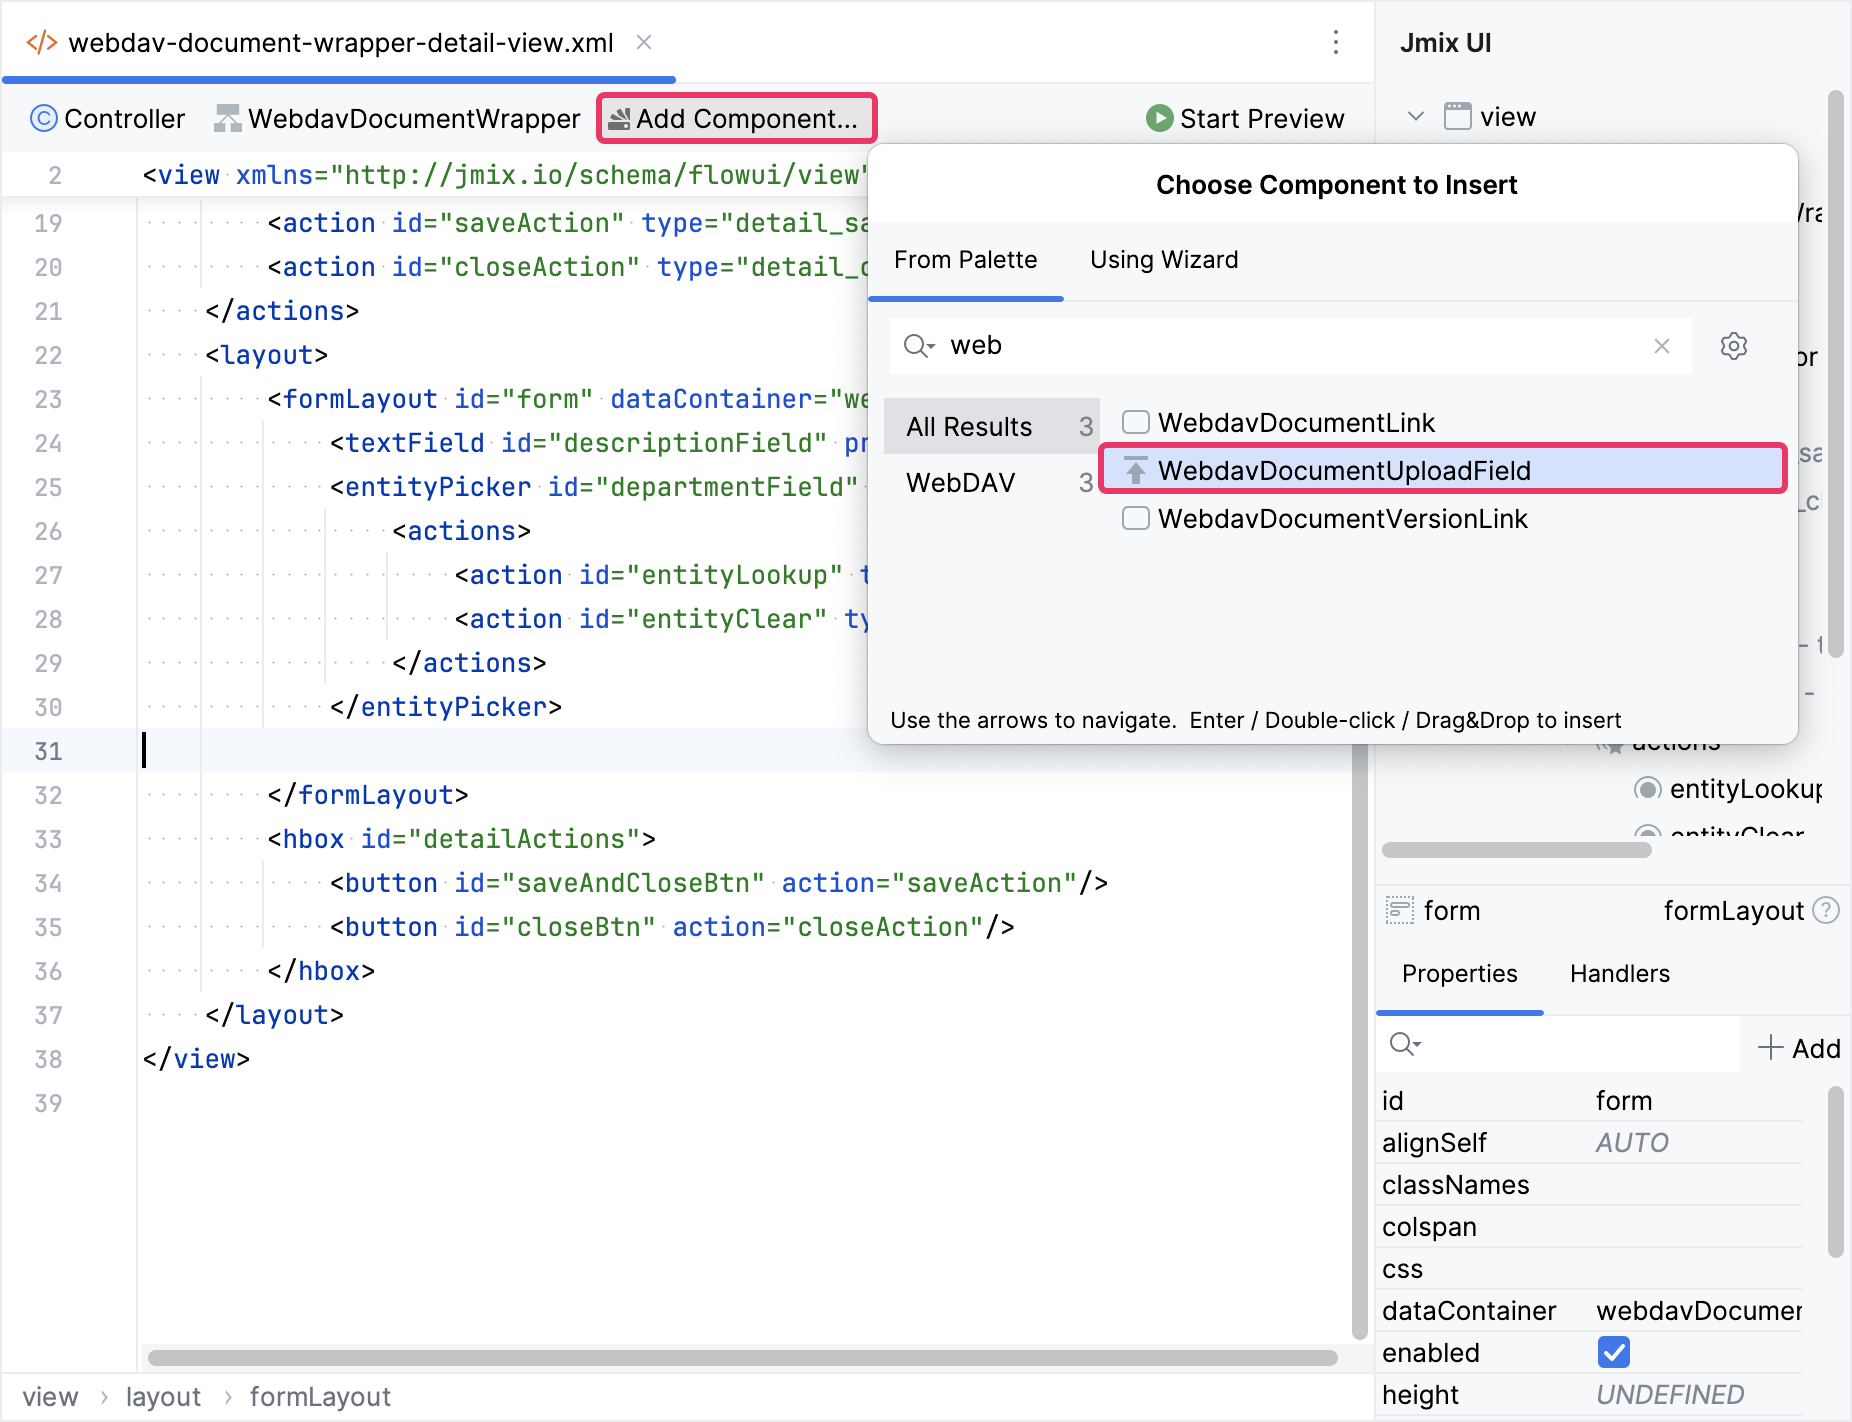
If you want to display the special component designed to work with documents, you should include the webdavDocumentUploadField UI component in the XML descriptor.
Remove the entityPicker component description from the XML descriptor and place the cursor after the textField component. Next, click Add Component in the actions panel, then find the WebdavDocumentUploadField item and double-click it.
The new webdavDocumentUpload element will be added beneath the formLayout element in both the Jmix UI structure panel and in the XML. Configure the id, colspan, and property attributes as shown below.
<textField id="descriptionField"
           property="description"
           colspan="2"/>
<webdav:webdavDocumentUpload id="webdavDocumentField"
                             property="webdavDocument"
                             colspan="2"/>
Running the Application
After creating the entity and CRUD views for it, you can run the application to see the new feature in action.
Click the Debug button ( ) in the main toolbar.
Prior to launching the application, Studio compares the project data model with the database schema. When you’ve created a new entity, Studio automatically generates a Liquibase changelog to reflect the relevant database modifications (such as creating the WEBDAV_DOCUMENT_WRAPPER table):
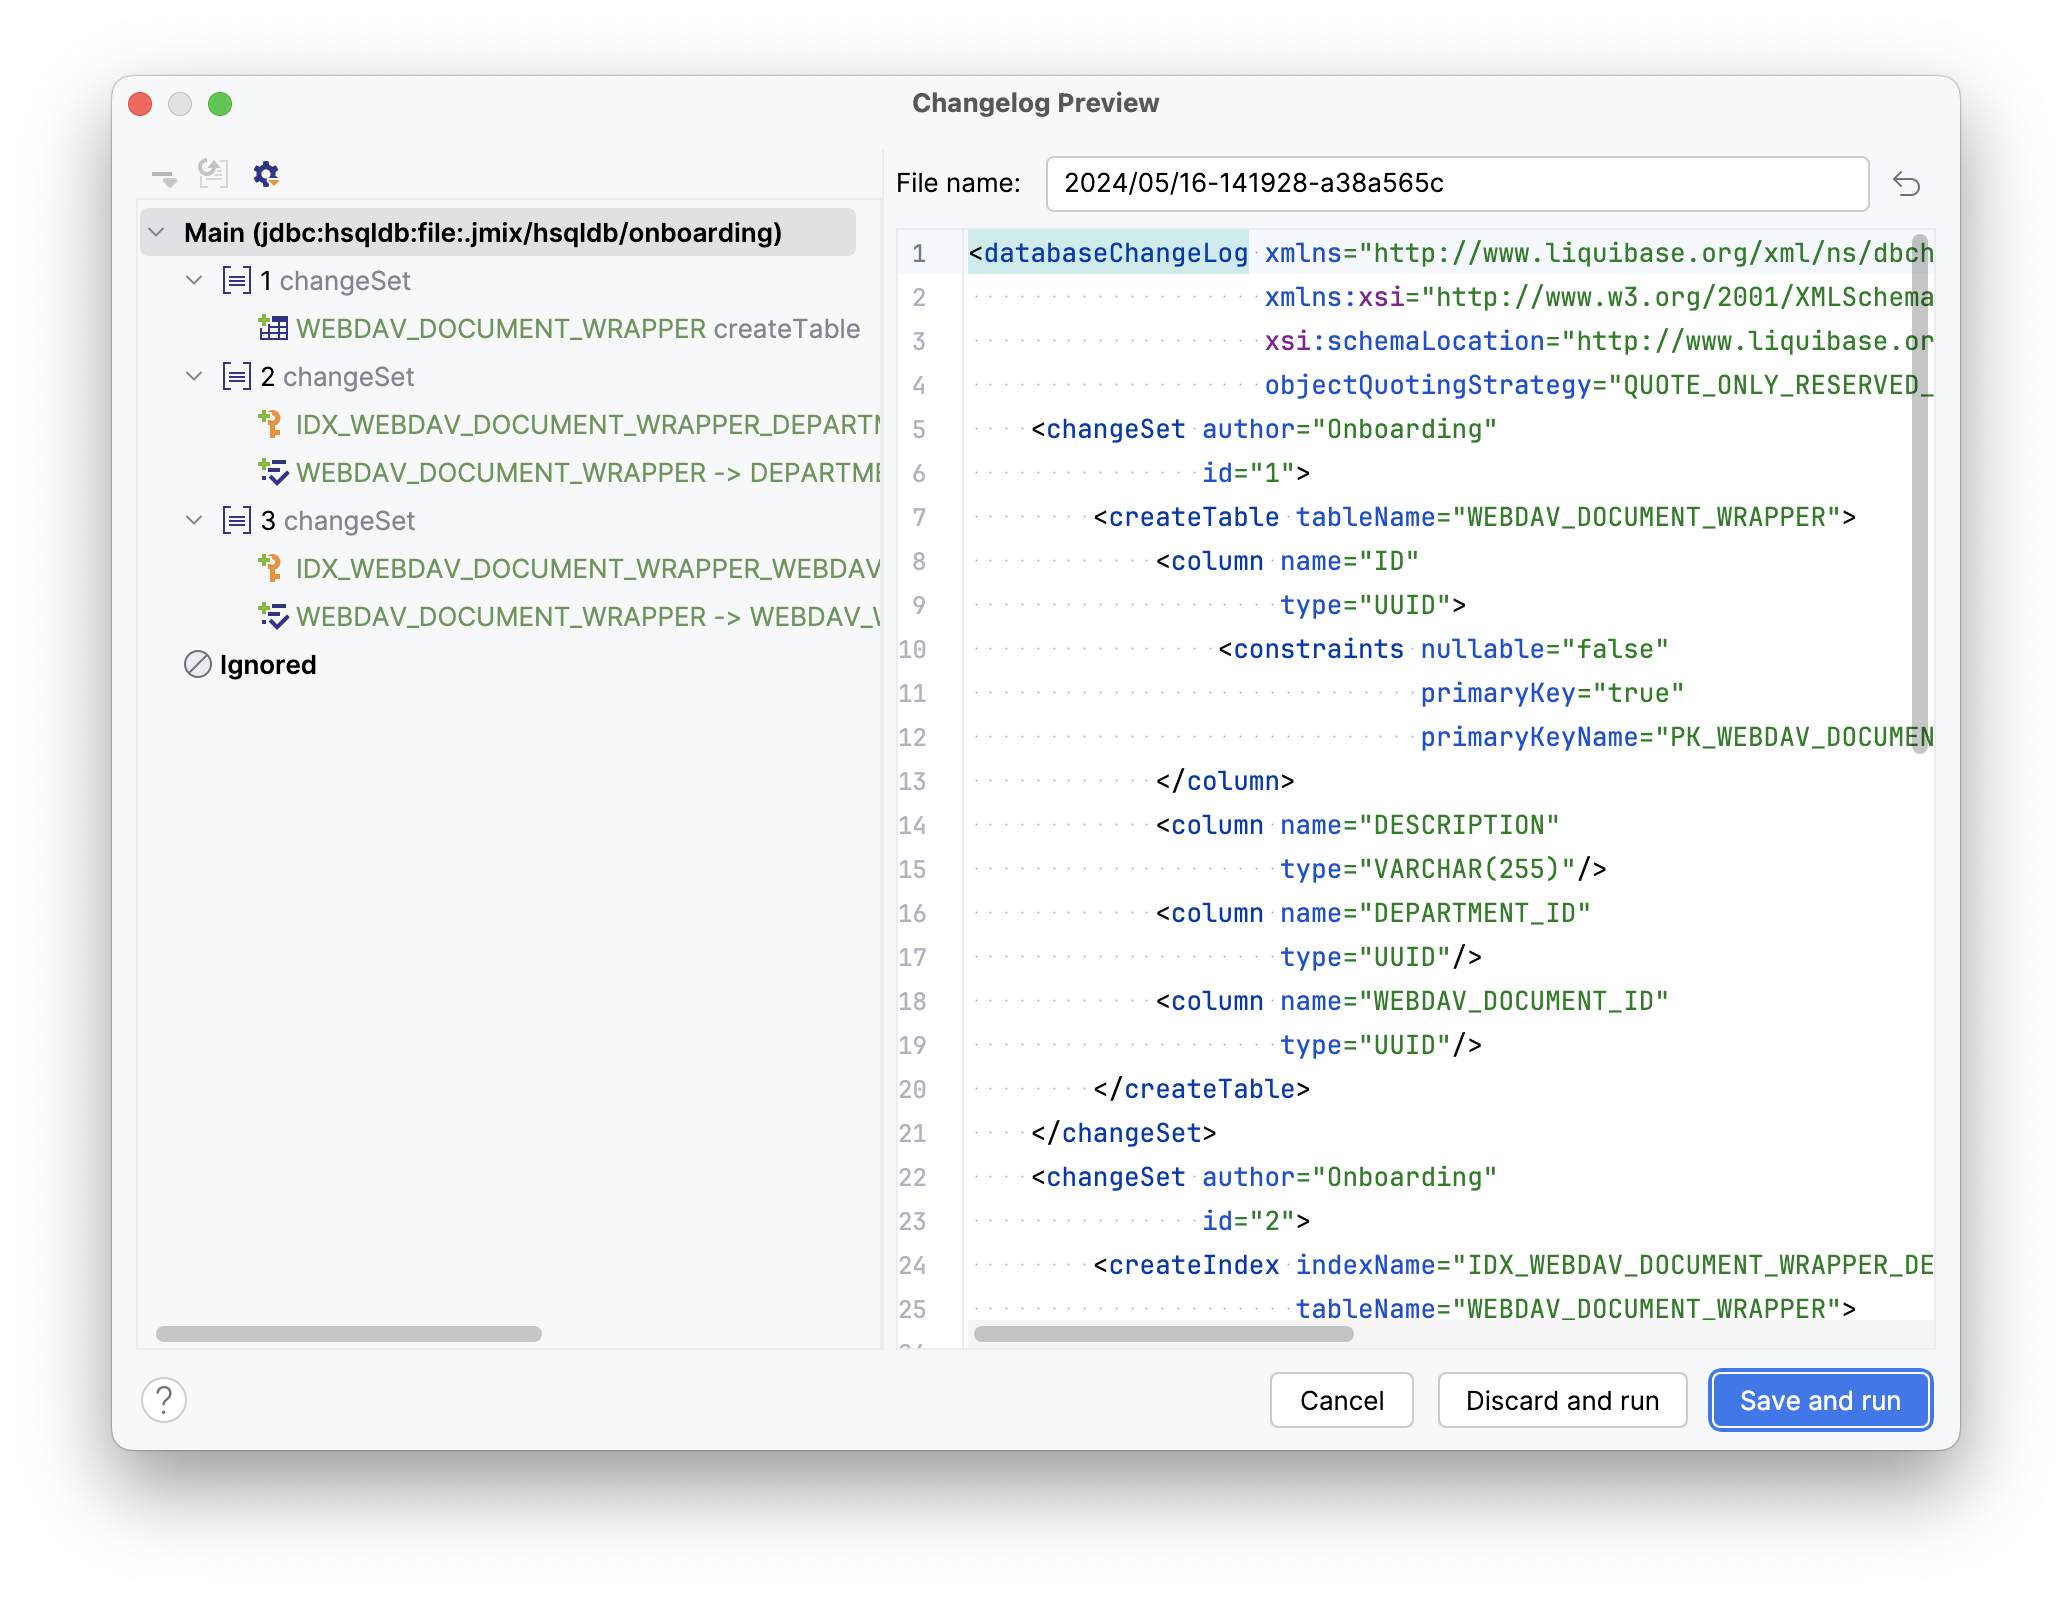
Click Save and run.
Studio will carry out the changelog on your database, followed by building and running the application:
Once the application is up and running, navigate to http://localhost:8080 using your web browser and sign in to the application with the credentials admin/admin.
Choose the Webdav document wrappers item from the Application menu. You will see the Webdav document wrapper.list view. Click Create. The Webdav document wrappers.detail view will open. Besides the text field used for file description, you may notice the built-in WebDAV add-on component for file upload. Try uploading a file using this component:
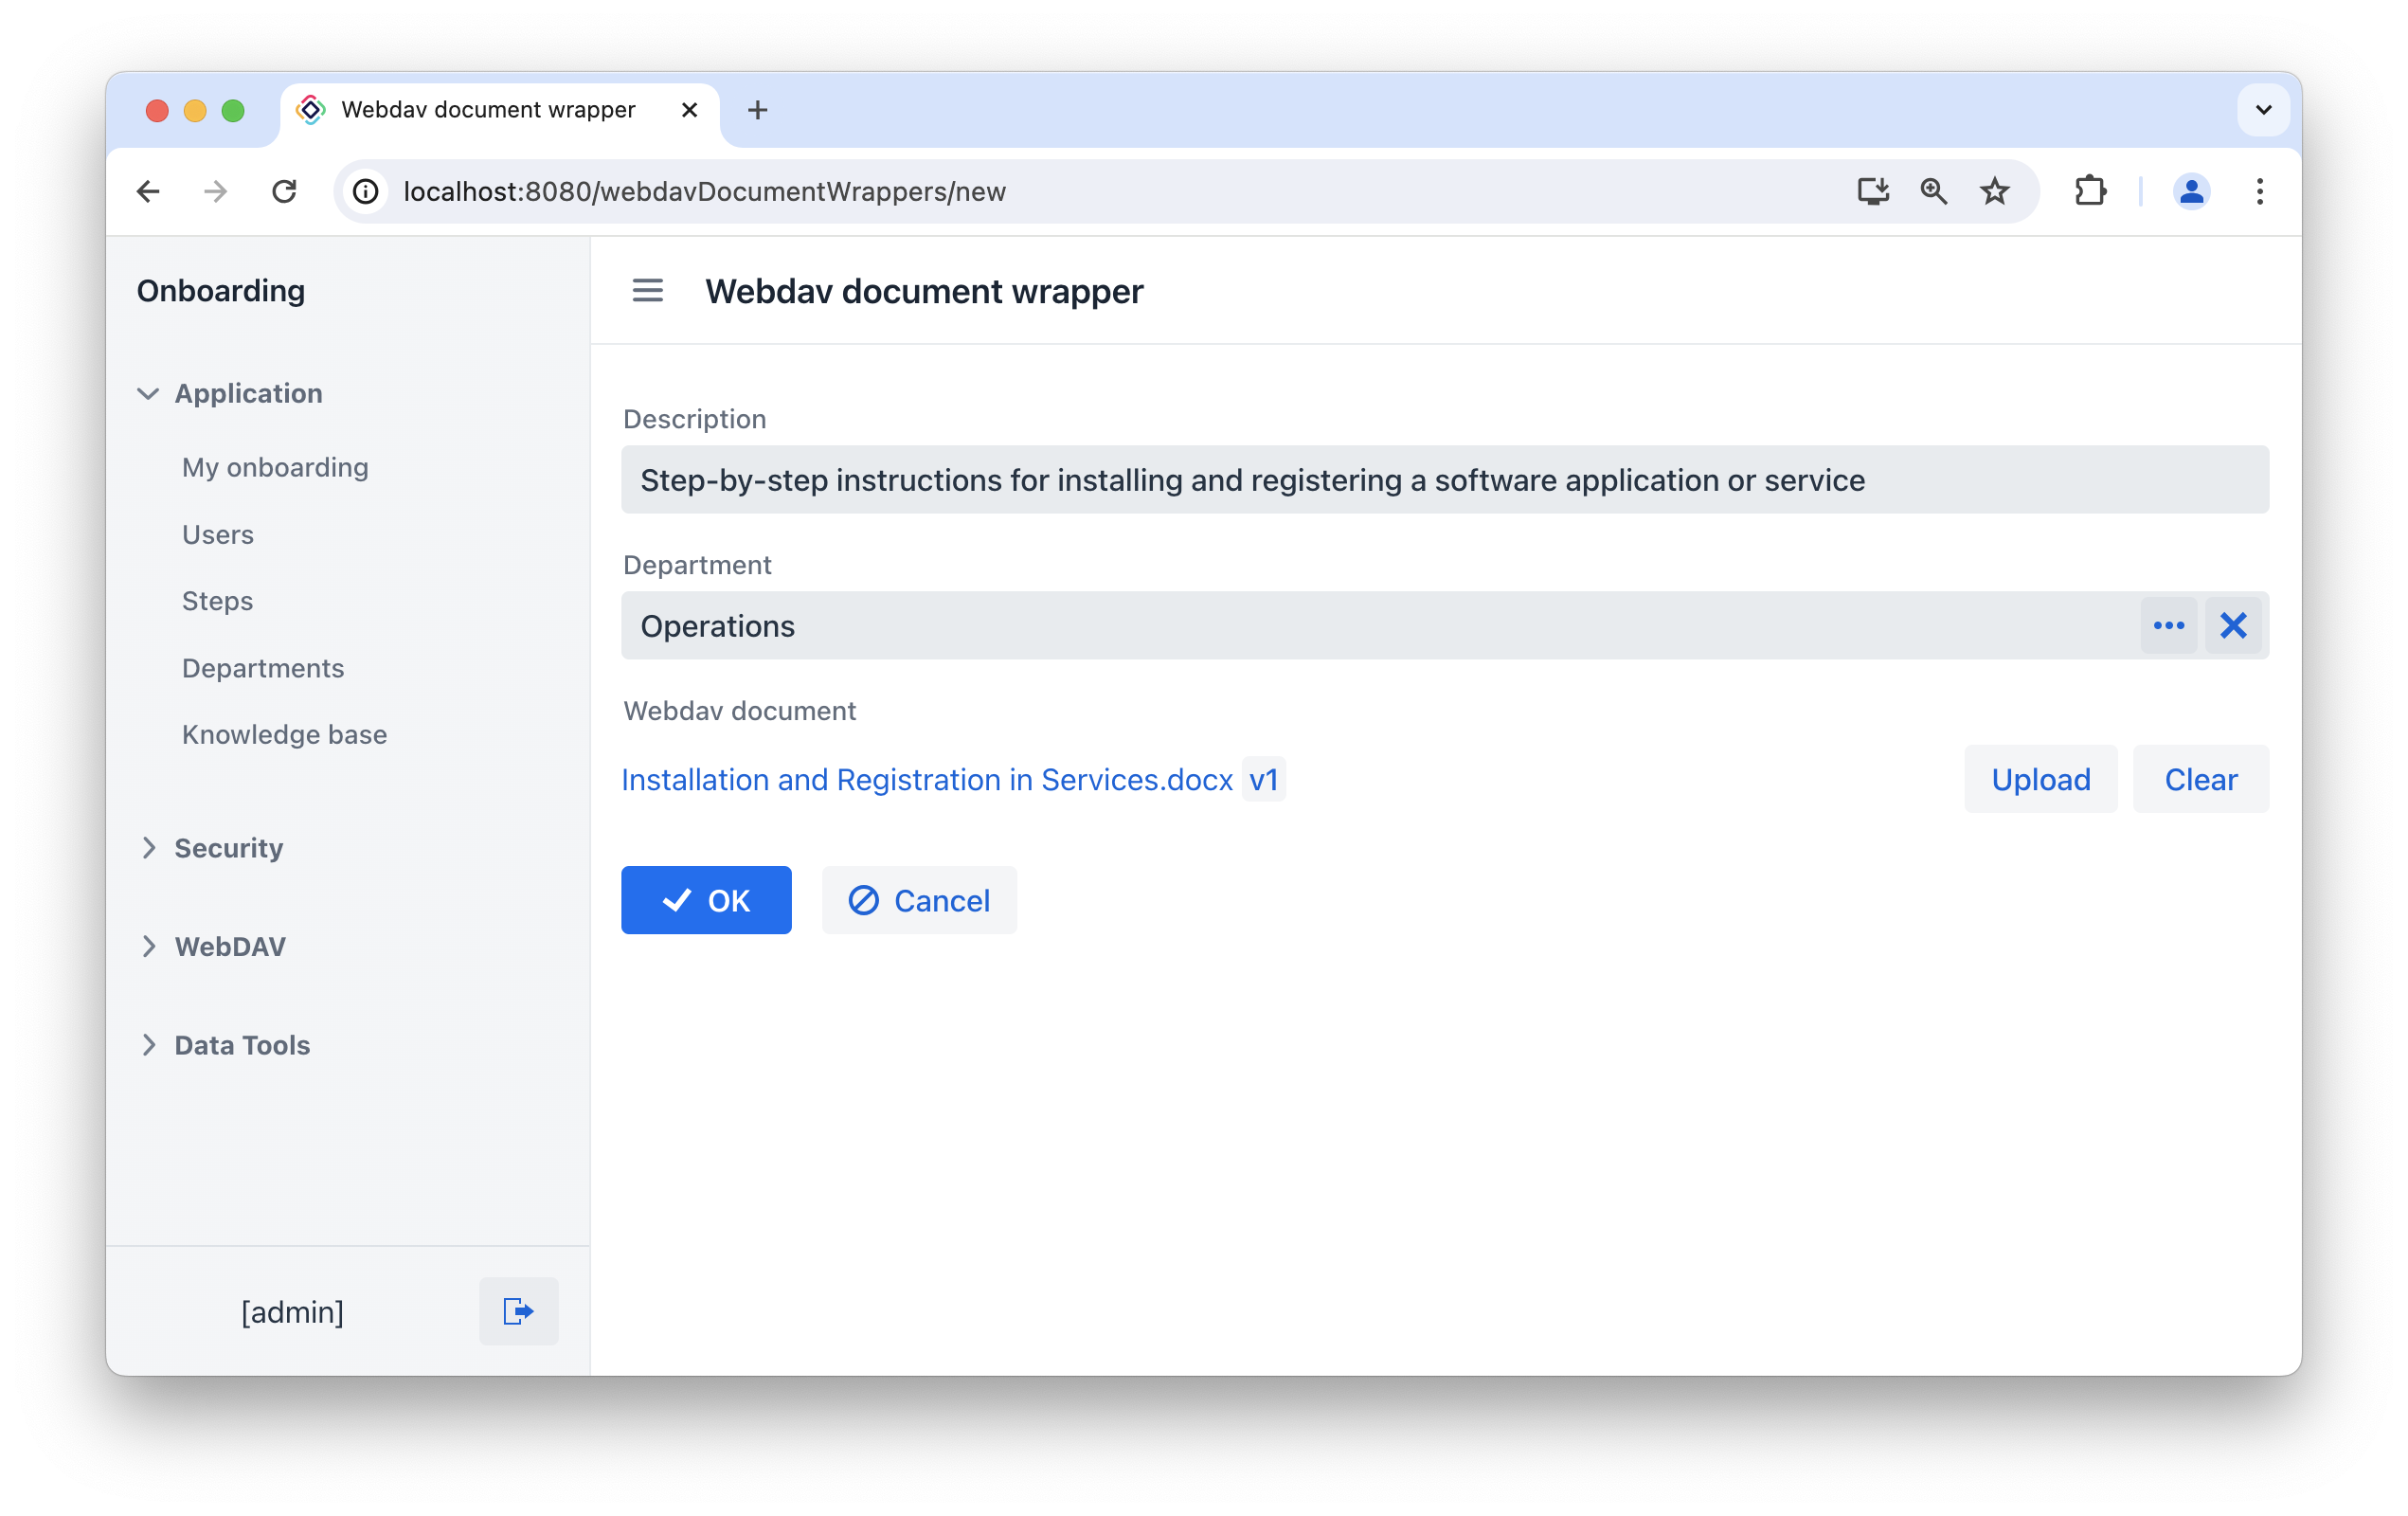
After clicking the OK button, you will be redirected to the list view. As you can see, the Webdav document column displays the file identifier. In the next section, we will demonstrate how to display a link to the document in the data grid instead of its identifier.
UI Customizations
Let’s make some customizations in the application UI.
Improving WebdavDocumentWrapper Data Grid
-
Let’s display a link to the document in the data grid instead of its identifier.
Open
webdav-document-wrapper-list-view.xmland findwebdavDocumentWrappersDataGrid.Select the
webdavDocumentcolumn, switch to the Handlers tab of the component inspector and create therendererhandler method:@Supply(to = "webdavDocumentWrappersDataGrid.webdavDocument", subject = "renderer") private Renderer<WebdavDocumentWrapper> webdavDocumentWrappersDataGridWebdavDocumentRenderer() { return null; }Inject
UiComponentsobject into controller class:@Autowired private UiComponents uiComponents;You can use the Inject button in the top actions panel of the editor to inject dependencies into view controllers and Spring beans. Implement the
webdavDocumentWrappersDataGridWebdavDocumentRenderermethod:@Supply(to = "webdavDocumentWrappersDataGrid.webdavDocument", subject = "renderer") private Renderer<WebdavDocumentWrapper> webdavDocumentWrappersDataGridWebdavDocumentRenderer() { return new ComponentRenderer<>( (1) () -> uiComponents.create(WebdavDocumentLink.class), (2) (link, wrapper) -> { WebdavDocument webdavDocument = wrapper.getWebdavDocument(); if (webdavDocument != null) { link.setWebdavDocument(webdavDocument); } }); }1 The method returns a Rendererobject that creates a UI component to be rendered in the column.2 The WebdavDocumentLink component instance is created using the UiComponentsfactory. -
In the
lastModifiedBycolumn, let’s configure the display of the author of the latest changes to the WebDAV file.Select the
lastModifiedBycolumn, switch to the Handlers tab of the component inspector and create therendererhandler method:@Supply(to = "webdavDocumentWrappersDataGrid.lastModifiedBy", subject = "renderer") private Renderer<WebdavDocumentWrapper> webdavDocumentWrappersDataGridLastModifiedByRenderer() { return null; }Implement the
webdavDocumentWrappersDataGridLastModifiedByRenderermethod:@Supply(to = "webdavDocumentWrappersDataGrid.lastModifiedBy", subject = "renderer") private Renderer<WebdavDocumentWrapper> webdavDocumentWrappersDataGridLastModifiedByRenderer() { return new TextRenderer<>(documentWrapper -> { (1) WebdavDocument webdavDocument = documentWrapper.getWebdavDocument(); if (webdavDocument == null) { return null; } WebdavDocumentVersion lastVersion = webdavDocument.getLastVersion(); return lastVersion.getCreatedBy(); (2) }); }1 The method returns a TextRendererobject.2 The renderer returns the name of the user who made changes to the latest version of the WebDAV document. -
In the
lastModifiedDatecolumn, let’s configure the display of the date of the latest changes to the WebDAV file.Select the
lastModifiedDatecolumn, switch to the Handlers tab of the component inspector and create therendererhandler method:@Autowired private ApplicationContext applicationContext; @Supply(to = "webdavDocumentWrappersDataGrid.lastModifiedDate", subject = "renderer") private Renderer<WebdavDocumentWrapper> webdavDocumentWrappersDataGridLastModifiedDateRenderer() { DateFormatter dateFormatter = applicationContext.getBean(DateFormatter.class); return new TextRenderer<>(documentWrapper -> { WebdavDocument webdavDocument = documentWrapper.getWebdavDocument(); if (webdavDocument == null) { return null; } WebdavDocumentVersion lastVersion = webdavDocument.getLastVersion(); Date lastModifiedDate = lastVersion.getCreatedDate(); dateFormatter.setFormat("MMM dd, yyyy"); return dateFormatter.apply(lastModifiedDate); }); }
Set Up View Opening
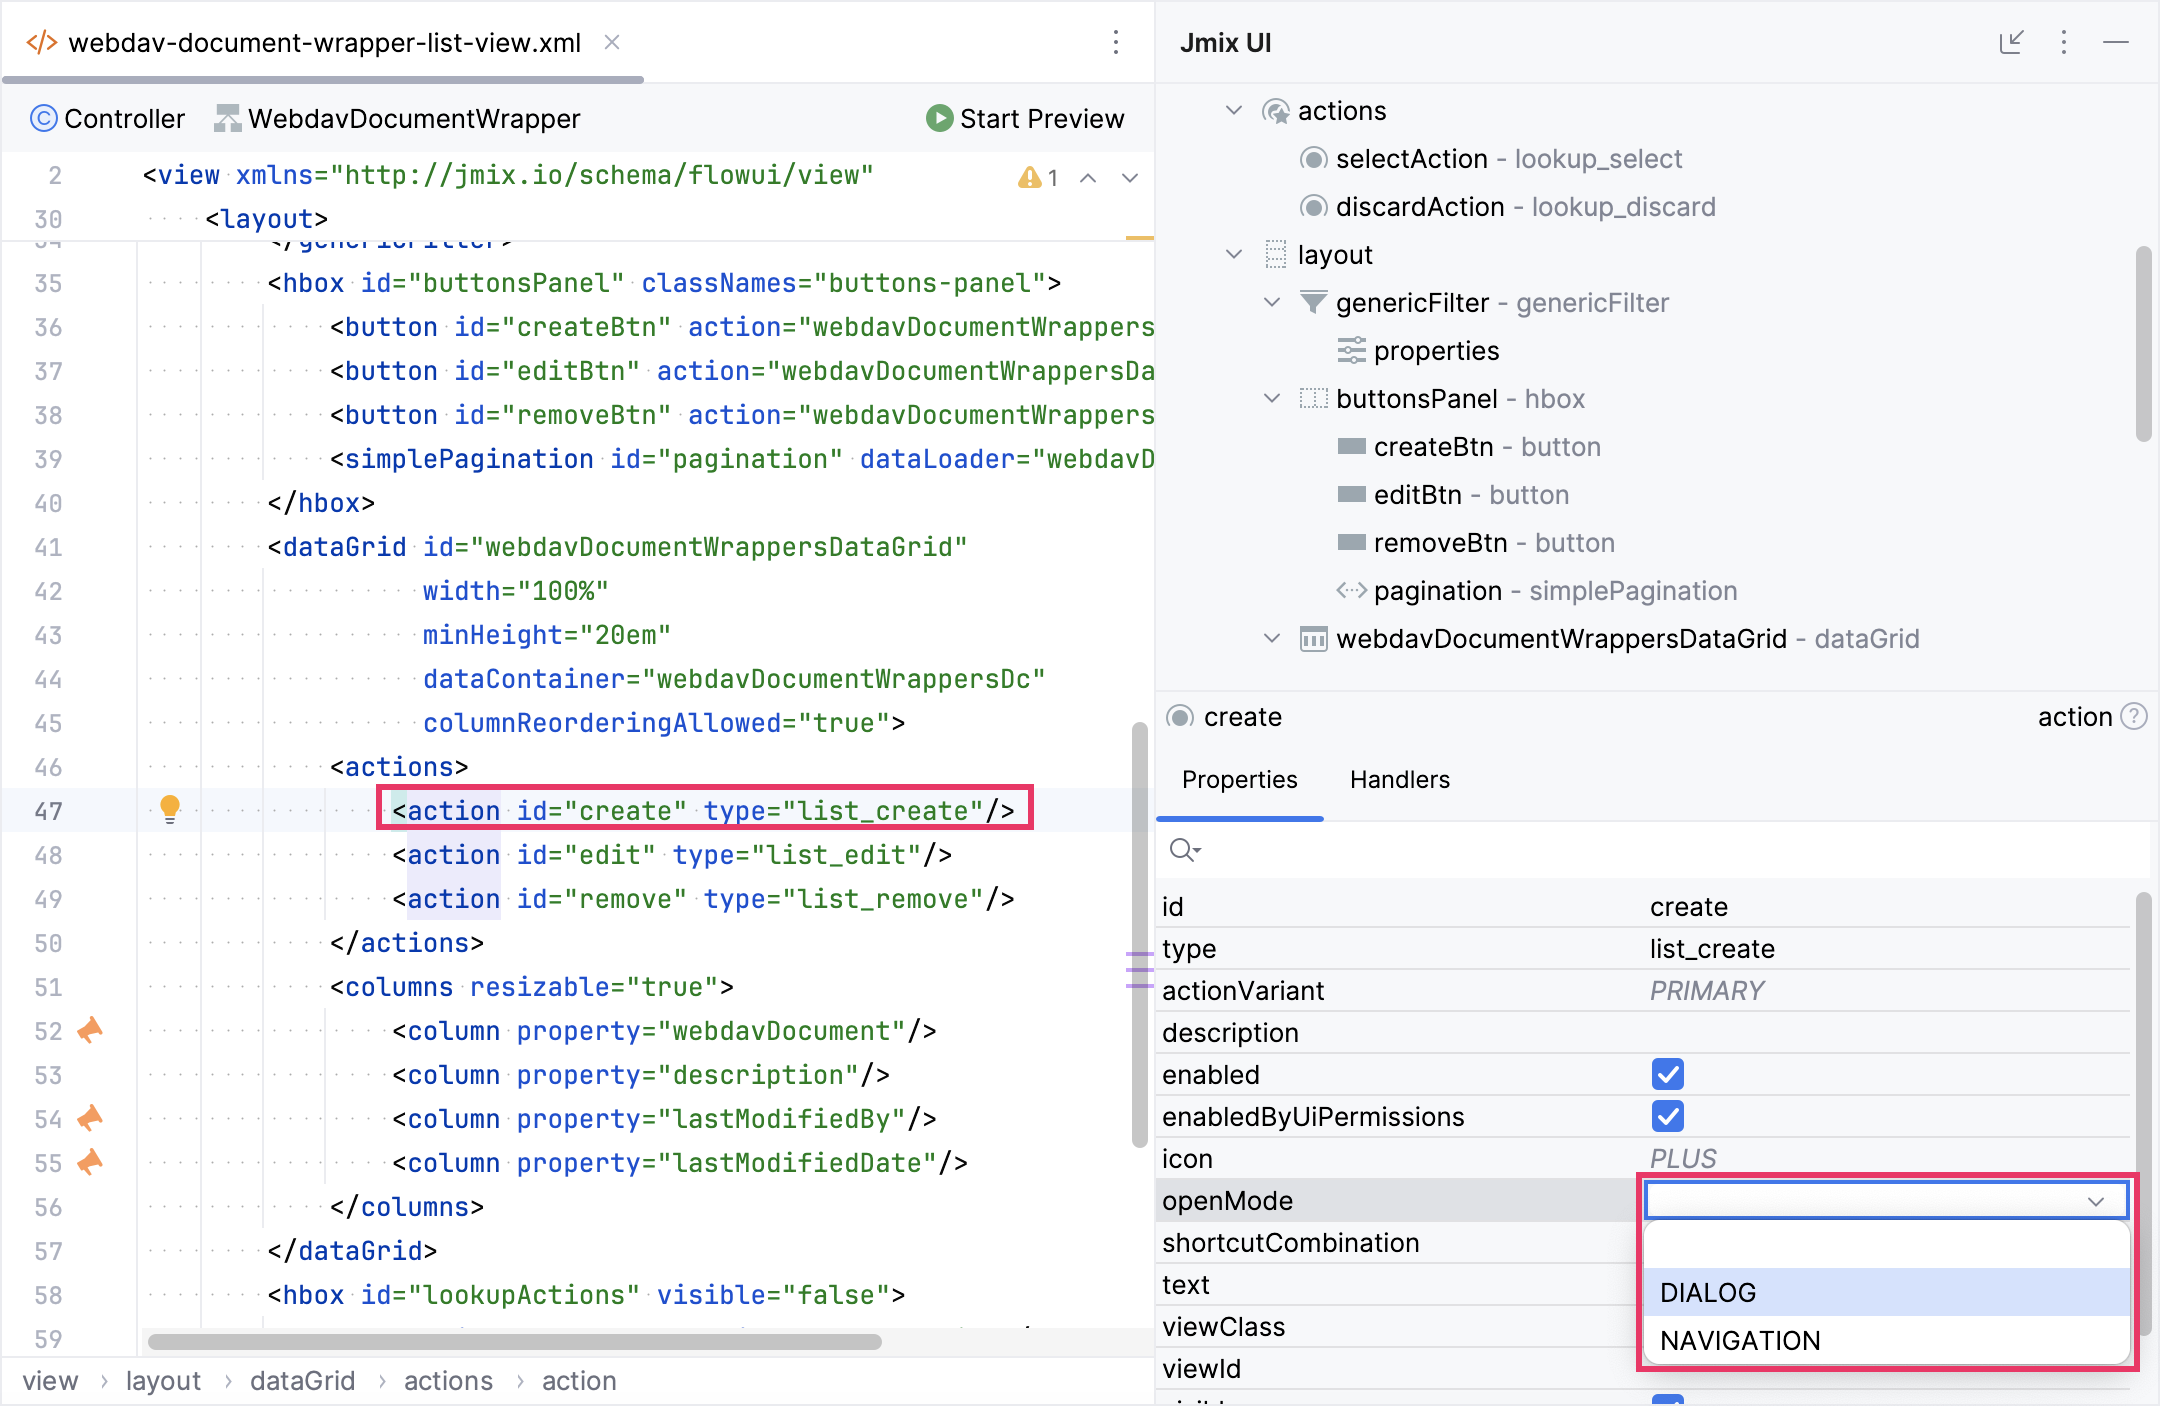
Let’s configure the WebdavDocumentWrapper detail view so that it opens as a dialog.
Open webdav-document-wrapper-list-view.xml and find webdavDocumentWrappersDataGrid. Select the create action and set the DIALOG openMode property in the Jmix UI Inspector panel.
Follow the same steps for the edit action.
Let’s run the application to observe the new feature in action.
Navigate to http://localhost:8080 using your web browser and sign in to the application with the credentials admin/admin.
Choose the Webdav document wrappers item from the Application menu. You will see the Webdav document wrappers.list view.
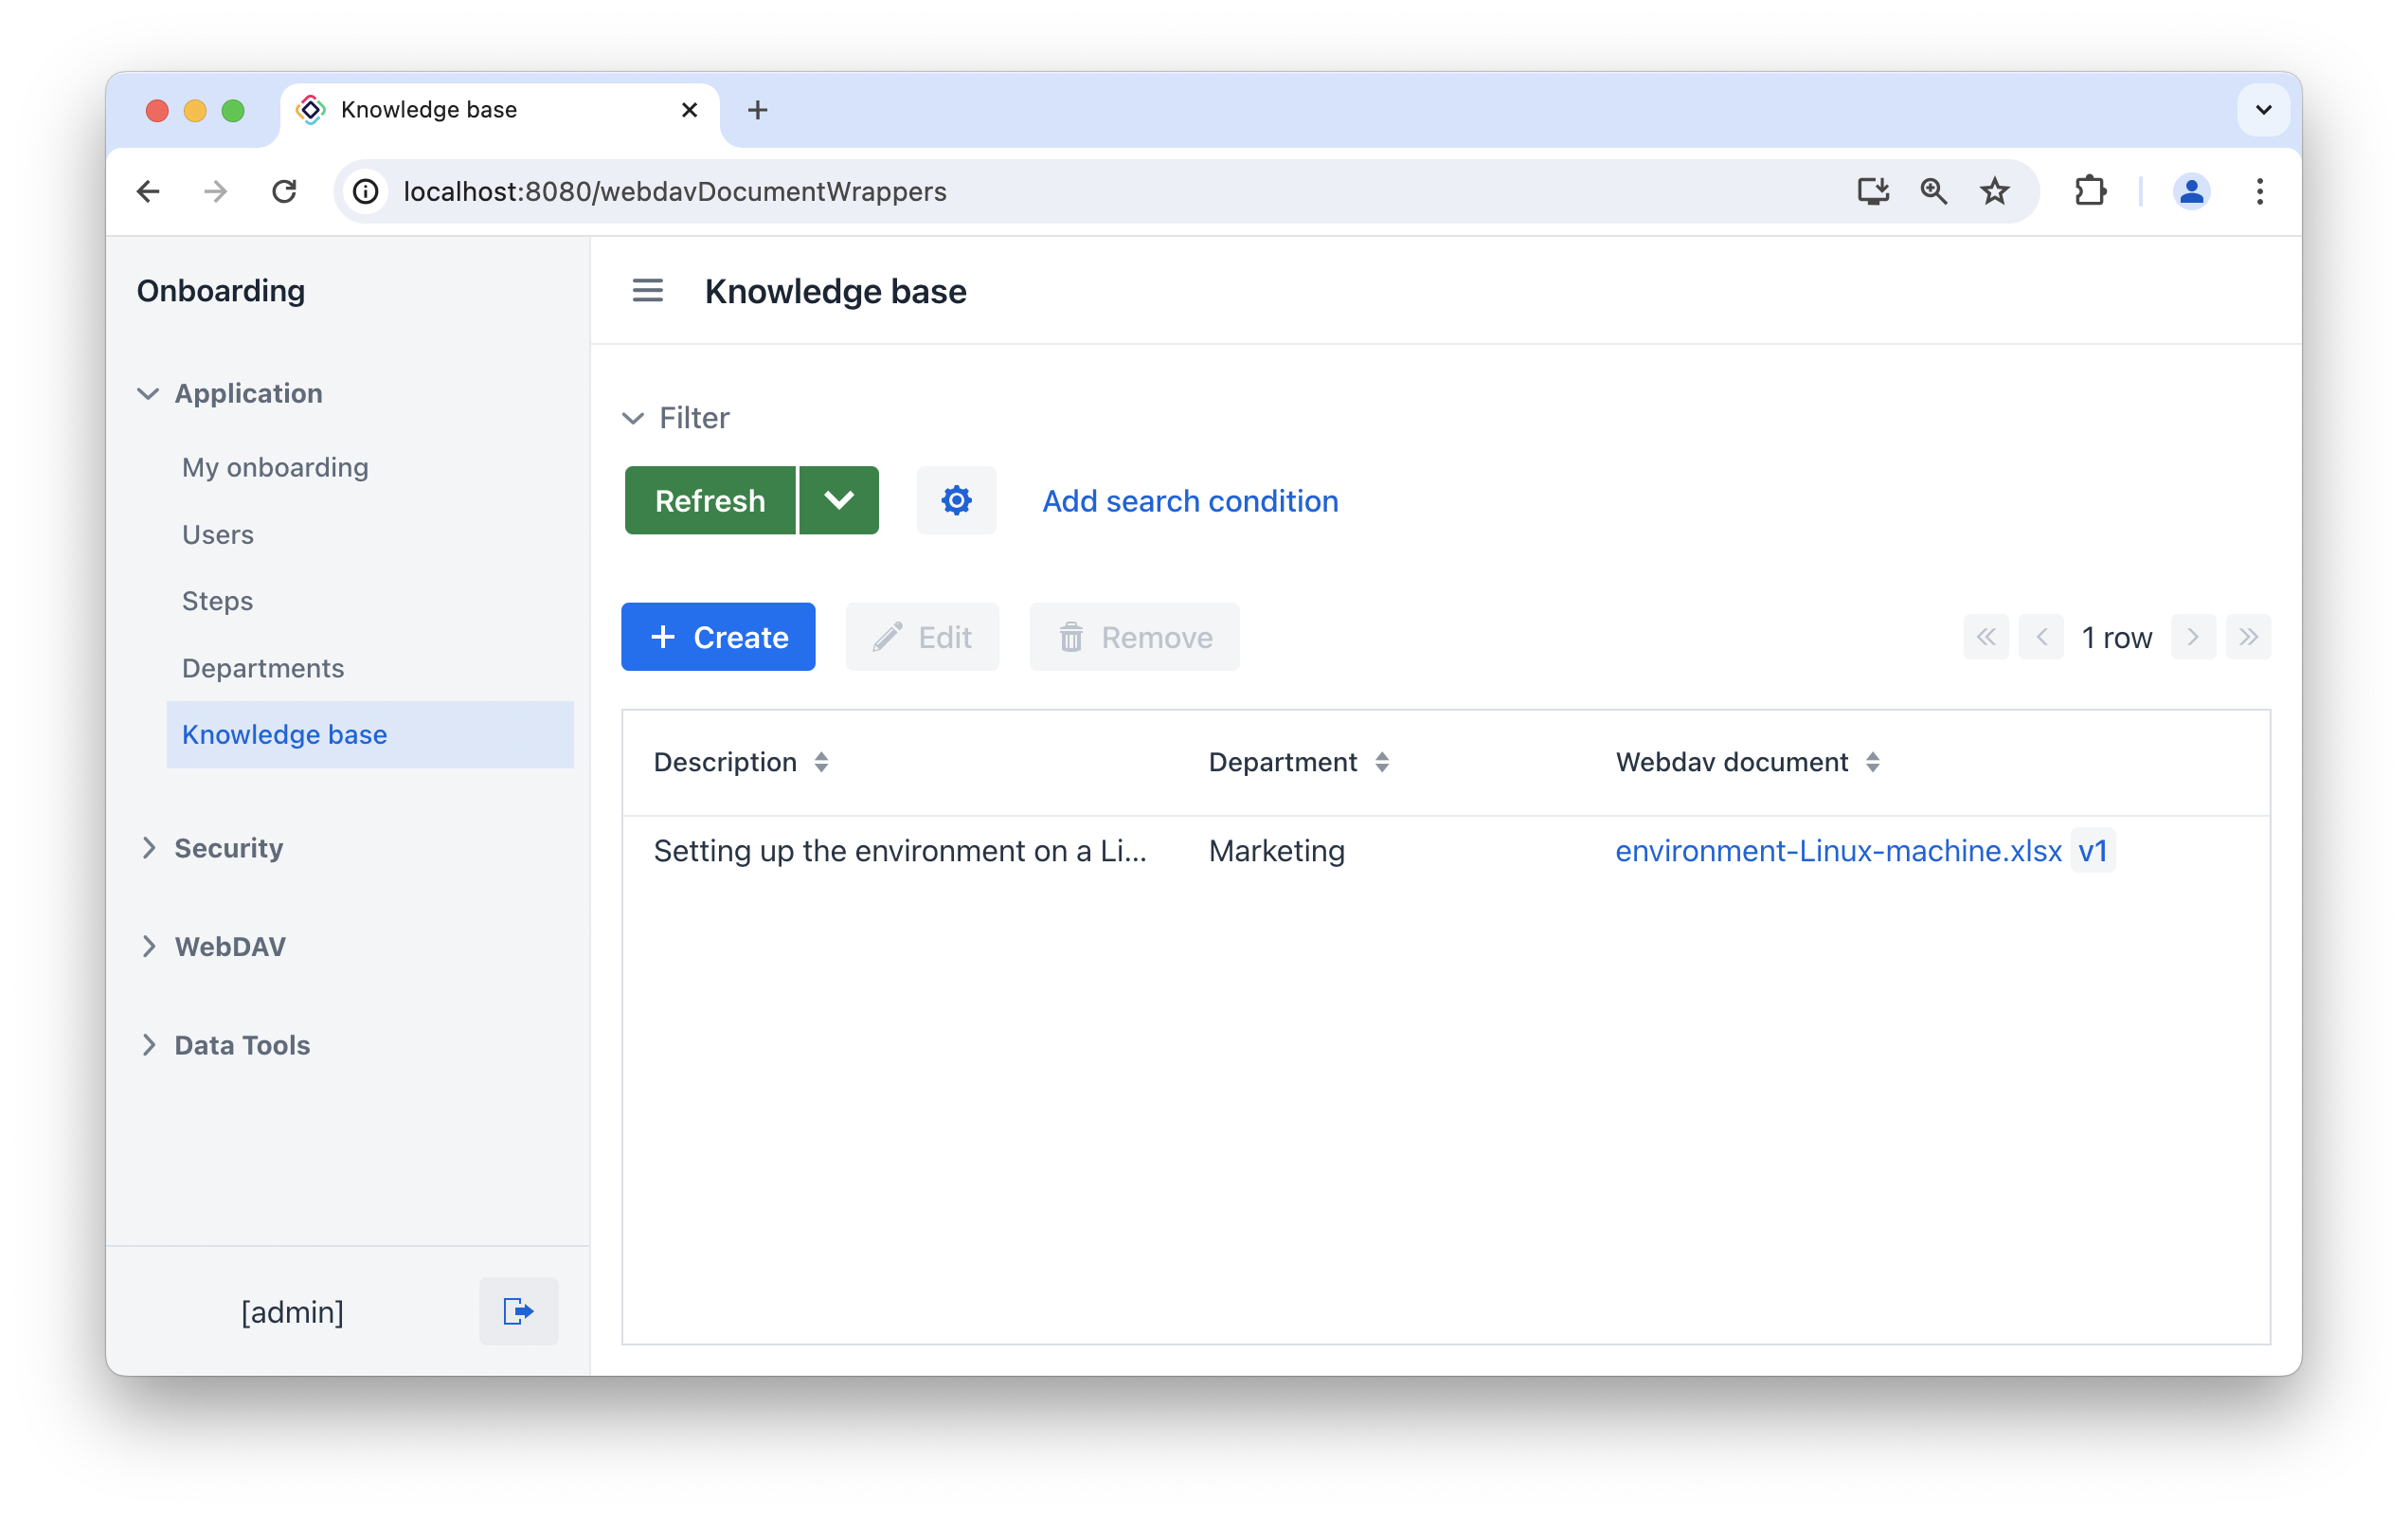
The Webdav document column contains a link to the WebDav document and a button allowing you to open the standard WebDAV document versions view. The Last modified by column displays the author of the latest modifications to the WebDav file, while the Last modified date column shows the date of the last modifications to the WebDav file.
Configuration
To authenticate desktop applications, the server must have HTTPS enabled. Here are simple instructions for configuring HTTPS in your development environment.
|
Self-signed certificates are suitable solely for testing purposes. When running production applications, it’s essential to utilize SSL certificates issued by a trusted authority. |
Creating a Keystore File
-
Generate a keystore using the keytool utility provided by JDK:
keytool -genkey -keyalg RSA -alias localhost -keystore localhost.jks -validity 365 -keysize 2048You will be asked for the keystore password and then for some names. Remember the password and the names.
-
Export certificate from the keystore:
keytool -export -keystore localhost.jks -storepass <password> -alias localhost -file localhost.cerUse the password entered on the first step instead of
<password>. -
Register the certificate as trusted in your operating system.
-
On Windows operating system:
-
Press the
Windowskey +Rto open the Run dialog, then type"certmgr.msc"and press Enter. This will open the Certificate Manager. -
In the left pane of the Certificate Manager, expand the Trusted Root Certification Authorities folder.
-
Right-click on the folder and select All Tasks > Import… from the context menu. This will open the Certificate Import Wizard.
-
In the Certificate Import Wizard, click Next and then browse to the location where your certificate file is stored. Select the certificate file and click Next.
-
Choose the option to place the certificate in the Trusted Root Certification Authorities store and click Next.
-
Review the information and click Finish to complete the import process.
-
You should see a message indicating that the import was successful. Click OK to close the wizard.
Once these steps are completed, the certificate should be registered as trusted in the Windows operating system.
-
-
On macOS:
-
Double-click on
localhost.cerfile in Finder. The Keychain Access application will open. -
Find your certificate under the name entered on the first step as "your first and last name" on the Certificates tab.
-
Double-click the certificate and select Trust → When using this certificate: Always Trust.
-
-
Configuring Server
This section explains how to use the certificate generated in the previous section in your application when it runs from the IDE or as an executable JAR.
-
Create
src/main/resources/<base-package>/keystoredirectory and copylocalhost.jksinto it. -
Set the following properties in the
application.propertiesfile replacing<base-package>and<password>with actual values:# Enables HTTPS server.ssl.enabled=true # The format used for the keystore server.ssl.key-store-type = JKS # The path to the keystore containing the certificate server.ssl.key-store = classpath:<base-package>/keystore/localhost.jks # The password used to generate the keystore server.ssl.key-store-password = <password> # The alias mapped to the certificate server.ssl.key-alias = localhost # Changes the server's port server.port = 8443The
<base-package>in the path to the keystore (server.ssl.key-storeproperty) should be presented as a slash-separated path:server.ssl.key-store = classpath:com/example/demo/keystore/localhost.jks
-
Open the main application class and change the
printApplicationUrl()method. The URL should be changed tohttps://after configuring HTTPS:@EventListener public void printApplicationUrl(final ApplicationStartedEvent event) { LoggerFactory.getLogger(DemoApplication.class).info("Application started at " + "https://localhost:" + environment.getProperty("local.server.port") + Strings.nullToEmpty(environment.getProperty("server.servlet.context-path"))); }
After following the instructions outlined above, launch the application and ensure that the uploaded documents open in desktop office applications.
Summary
In this section, you have created the simplest feature of the application: WebDAV document wrappers management.
You have learned that:
-
The WebDAVDocumentUploadField component includes convenient built-in tools for viewing and uploading WebDAV documents.
-
To enable opening and editing WebDAV documents using desktop office applications, you have to setup HTTPS for your web application.
