SideMenu
SideMenu is a component for displaying a vertical menu with a collapsible drop-down sub-menus. SideMenu allows you to customize the main screen, manage menu items, add icons and badges and apply custom styles.
SideMenu, together with the Drawer container, is used in the Main screen with side menu template.
It can also be used on any screen as any other visual component.
XML name of the component: sideMenu.
Basics
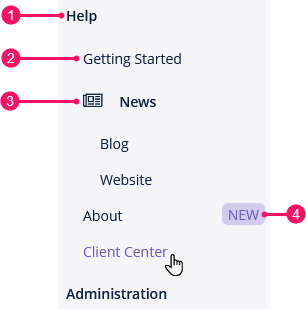
A typical side menu is shown below:

-
Root item
-
Sub-item
-
Item with icon
-
Badge
An example of component definition in an XML descriptor of a screen:
<sideMenu id="sideMenu"
          width="100%"
          stylename="jmix-drawer-content"/>
Data Binding
Using the SideMenu instance, you can create the menu items programmatically, for example:
@UiController("MainScreenSideMenu")
@UiDescriptor("main-screen-side-menu.xml")
@Route(path = "main", root = true)
public class MainScreenSideMenu extends Screen implements Window.HasWorkArea {
    @Autowired
    private SideMenu sideMenu;
    @Autowired
    private Notifications notifications;

    @Subscribe
    public void onInit(InitEvent event) {
        SideMenu.MenuItem rootItem = sideMenu.createMenuItem("help", "Help");
        SideMenu.MenuItem subItemStarted = sideMenu.createMenuItem("start",
                "Getting Started");
        SideMenu.MenuItem subItemNews = sideMenu.createMenuItem("news", "News",
                "font-icon:NEWSPAPER_O", null); (1)
        SideMenu.MenuItem subItemBlog = sideMenu.createMenuItem("blog", "Blog");
        SideMenu.MenuItem subItemSite = sideMenu.createMenuItem("site", "Website");
        SideMenu.MenuItem subItemAbout = sideMenu.createMenuItem("about", "About",
                null, menuItem -> { (2)
                    notifications.create()
                            .withCaption("About menu item clicked")
                            .withType(Notifications.NotificationType.HUMANIZED)
                            .show();
                });
        SideMenu.MenuItem subItemCenter = sideMenu.createMenuItem("center",
                "Client Center");

        subItemAbout.setBadgeText("NEW"); (3)

        subItemNews.addChildItem(subItemBlog);
        subItemNews.addChildItem(subItemSite);

        rootItem.addChildItem(subItemStarted);
        rootItem.addChildItem(subItemNews);
        rootItem.addChildItem(subItemAbout);
        rootItem.addChildItem(subItemCenter);

        sideMenu.addMenuItem(rootItem, 0);
    }
}| 1 | Create a new menu item with icon. |
| 2 | Create a new menu item with command action. |
| 3 | Create a badge for an item. |
Select on Click
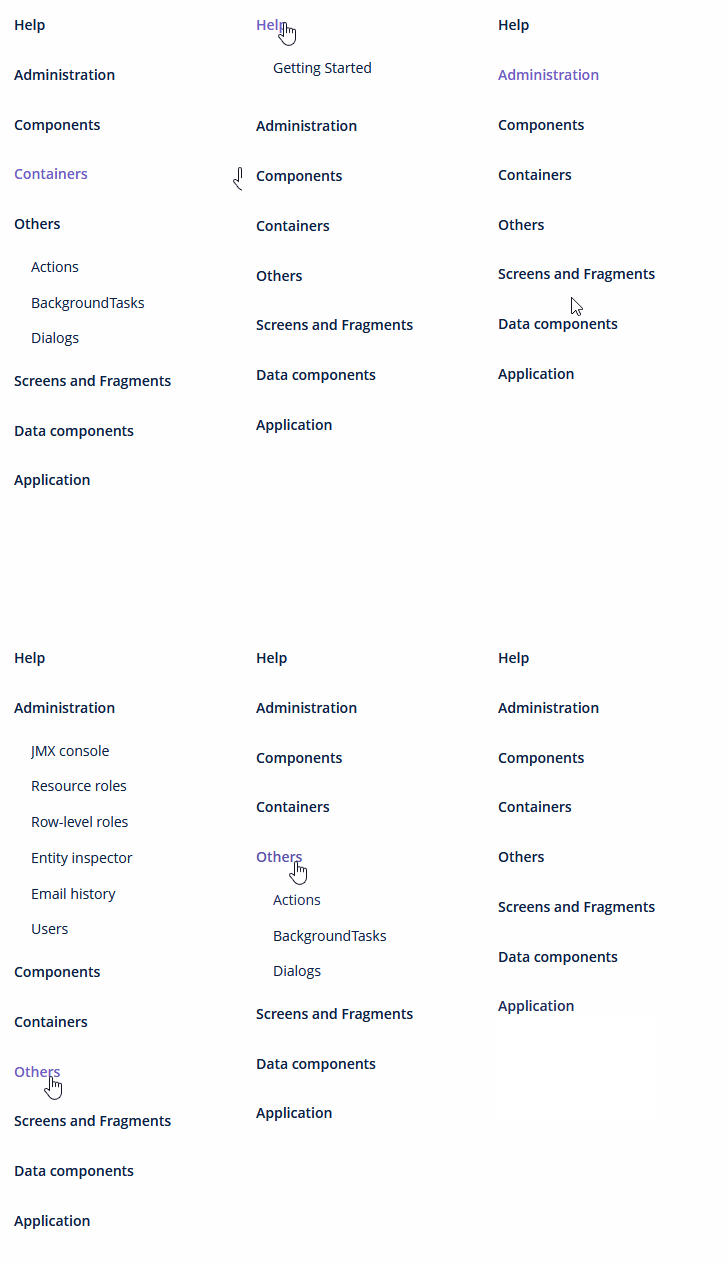
The selectOnClick attribute sets whether the current menu item is selected with a click. When selectOnClick="true", the selected menu item will be highlighted on mouse click.
The default value is false.
The screenshot below shows the behavior when the selectOnClick attribute is set to true:

Show Single Expanded Menu
The showSingleExpandedMenu attribute sets a value that specifies whether a submenu is collapsed when another parent menu item is clicked. The default value is false.
The screenshot below shows the behavior when the showSingleExpandedMenu attribute is set to true:

Styling
The appearance of the SideMenu component can be customized using SCSS variables (you can change these variables in the visual editor after creating a custom theme):
-
$jmix-sidemenu-layout-collapse-enabledenables or disables the side menu collapse mode. The default value istrue. -
$jmix-sidemenu-layout-collapsed-widthspecifies the width of the collapsed side menu. -
$jmix-sidemenu-layout-expanded-widthspecifies the width of the expanded side menu. -
$jmix-sidemenu-layout-collapse-animation-timespecifies the time for the side menu to collapse and expand in seconds.
When the $jmix-sidemenu-layout-collapse-enabled variable is set to false, the Collapse button is hidden, and the side menu is expanded.
Methods of MenuItem
-
addChildItem()/removeChildItem()- adds/removes the menu item to the end or to the specified position of children list.
-
getCaption()- returns the String caption of the menu item.
-
getChildren()- returns the list of child items.
-
setCaption()- sets the item caption.
-
getId()- returns the menu itemid.
-
hasChildren()- returnstrueif the menu item has child items.
-
setBadgeText()- sets badge text for the item. Badges are shown as small widget on the right side of menu items.
-
setCaptionAsHtml()- enables or disables HTML mode for caption.
-
setCommand()- sets the item command, or the action to be performed on this menu item click.
-
setDescription()- sets the String description of the menu item, displayed as a popup tip.
-
setExpanded()- expands or collapses sub-menu with children by default.
-
setIcon()- sets the item’s icon.
-
setStyleName()- sets one or more user-defined style names of the component, replacing any previous user-defined styles. Multiple styles can be specified as a space-separated list of style names. The style names must be valid CSS class names.
-
setVisible()- manages visibility of the menu item.
Events and Handlers
|
To generate a handler stub in Jmix Studio, select the component in the screen descriptor XML or in the Jmix UI hierarchy panel and use the Handlers tab of the Jmix UI inspector panel. Alternatively, you can use the Generate Handler button in the top panel of the screen controller. |
ItemSelectEvent
ItemSelectEvent is fired when the non-expandable menu item is selected and some command is being performed (for example, opening a screen). Event is not triggered when the item is containing children (for example, being expanded).
Example of subscribing to the event for the side menu defined in the screen XML with the sideMenu id:
@Subscribe("sideMenu")
public void onSideMenuItemSelect(SideMenu.ItemSelectEvent event) {
    notifications.create()
            .withCaption("ItemSelectEvent is fired for "
                    + event.getMenuItem().getCaption())
            .withType(Notifications.NotificationType.HUMANIZED)
            .show();
}
To register the event handler programmatically, use the addItemSelectListener() component method.
All XML Attributes
|
You can view and edit attributes applicable to the component using the Jmix UI inspector panel of the Studio’s Screen Designer. |
align - caption - captionAsHtml - description - descriptionAsHtml - enable - height - icon - id - loadMenuConfig - selectOnClick - showSingleExpandedMenu - stylename - visible - width
MenuItem API
addChildItem - getCaption - getChildren - getId - getMenu - hasChildren - removeChildItem - setBadgeText - setCaption - setCaptionAsHtml - setCommand - setDescription - setExpanded - setIcon - setStyleName - setVisible
