Getting Started with Reports
This section contains the instructions for using the report wizard and the report editor for creating and executing reports.
Examples in this section are based on the sample Library application, whose source code is available on GitHub.
Project Setup
-
Download and unpack the source code of the Jmix Samples project, or clone it using Git:
git clone https://github.com/jmix-framework/jmix-samples
-
Open the
jmix-samplesproject in Studio as described in the Opening Existing Project section. -
Select the Reports-sample Jmix Application configuration and run the application as described in the Starting Application section.
-
Log in to the Library application with username and password
admin/admin.
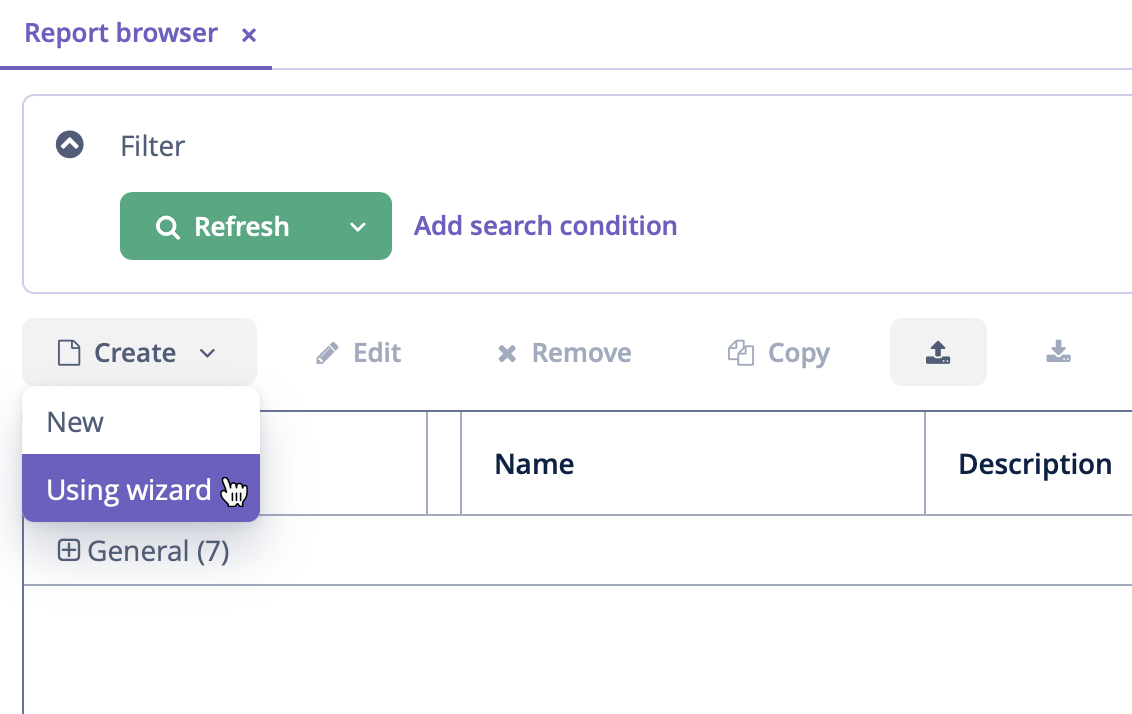
To run the wizard, open the Report browser and click Create → Using wizard.
The following types of reports can be created using the wizard:
-
Report for a single entity.
-
Report for a list of given entities.
-
Report for a list of entities filtered by query.
The process of creating a report using the wizard includes three steps:
-
Creating a data structure of a report.
-
Editing of report regions.
-
Saving the report.
The created report can be modified using the report editor and run through the report browser or using special actions (ListPrintFormAction, EditorPrintFormAction, etc.).
Using Report Wizard
For an easy start, the reports add-on comes with a report wizard, a visual tool for a quick report creation, including data structure and template design.
In this section, you will create a report with an overview of the book’s main data and authors of that book. The report template will be a document in the DOCX format, and the generated report will be saved as a PDF file.
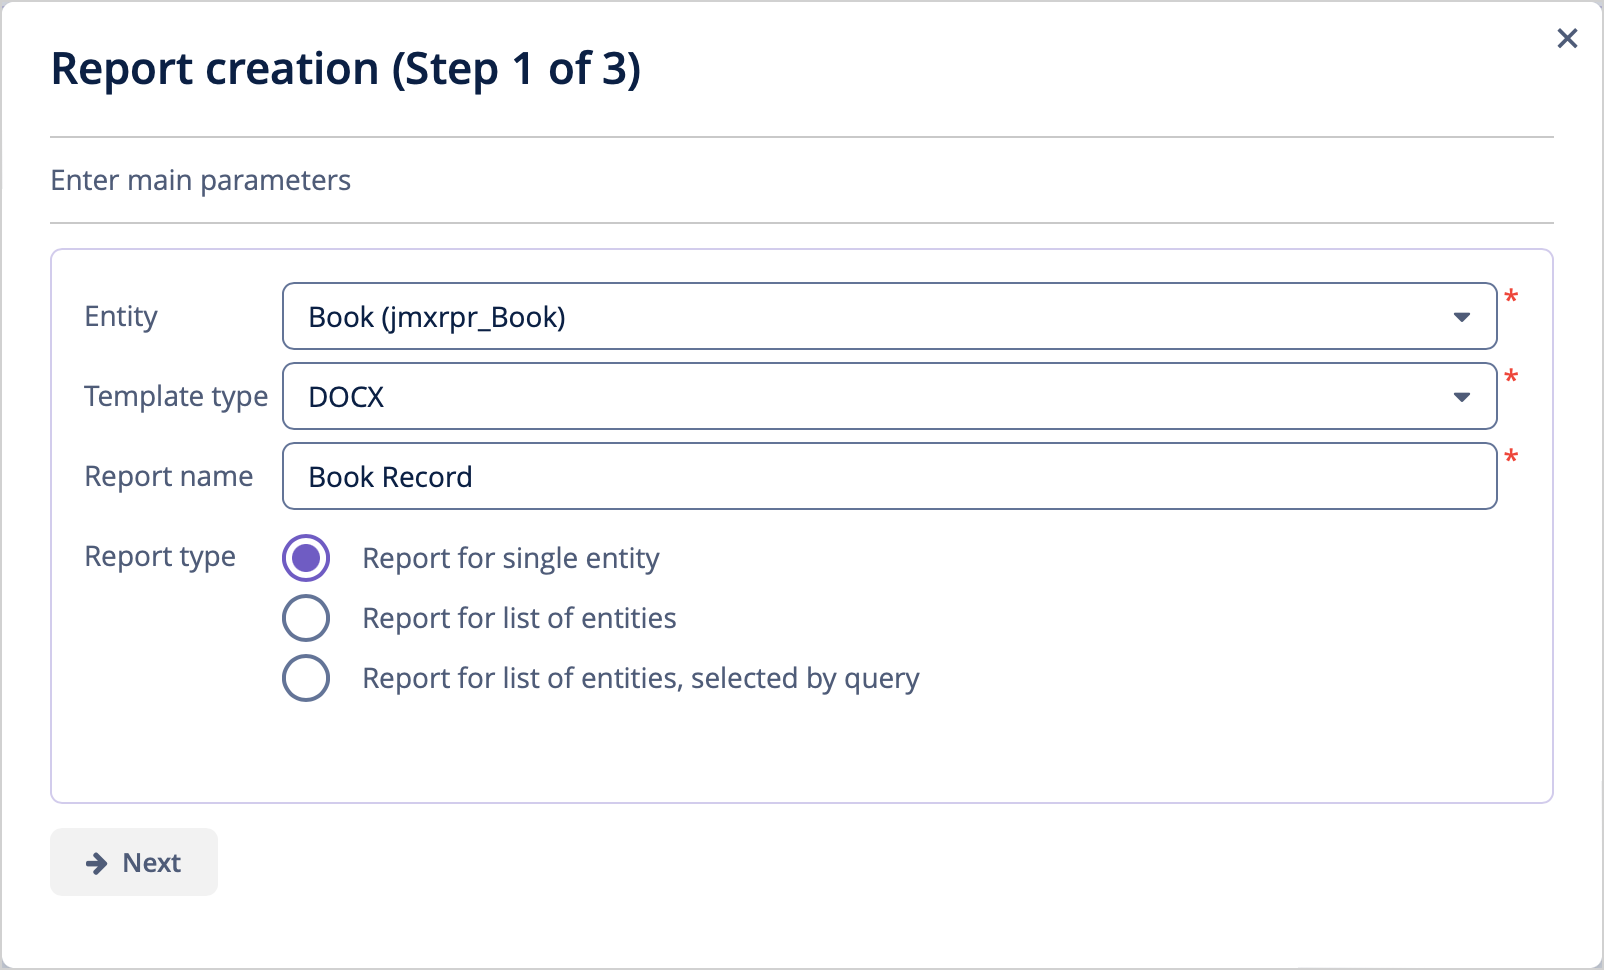
Open Reports → Reports screen in the main menu of the application and click Create → Using wizard. Enter the following parameters on the first step of the wizard:
-
Report Entity:
Book(jmxrpr_Book). -
Template Type: DOCX.
-
Report Name:
Book Record. -
Report Type:
Report for single entity.
Defining Attributes
On the next step of the wizard, specify the attributes of the Book entity and the linked LiteratureType entity that should be reflected in the report: Book.Name, Book.Summary, Book.Literature type.Name. Those attributes form the so-called "simple region".
Click OK to move to the next step - report regions editing.
The appeared screen contains a list of named regions - bands that display related data. The wizard enables adding several plain-text regions to the template in order to display different data sets.
A set of entity attributes loaded to a particular region can be modified by clicking the link represented as the list of the selected attributes. You can also add a new region by clicking Add simple region.
If the entity contains collection attributes, the Add tabulated region button will appear. It enables adding a region for tabular data display.
So, to display a list of associated authors of this Book entity, we’ll create another data band. Click on the Add tabulated region button.
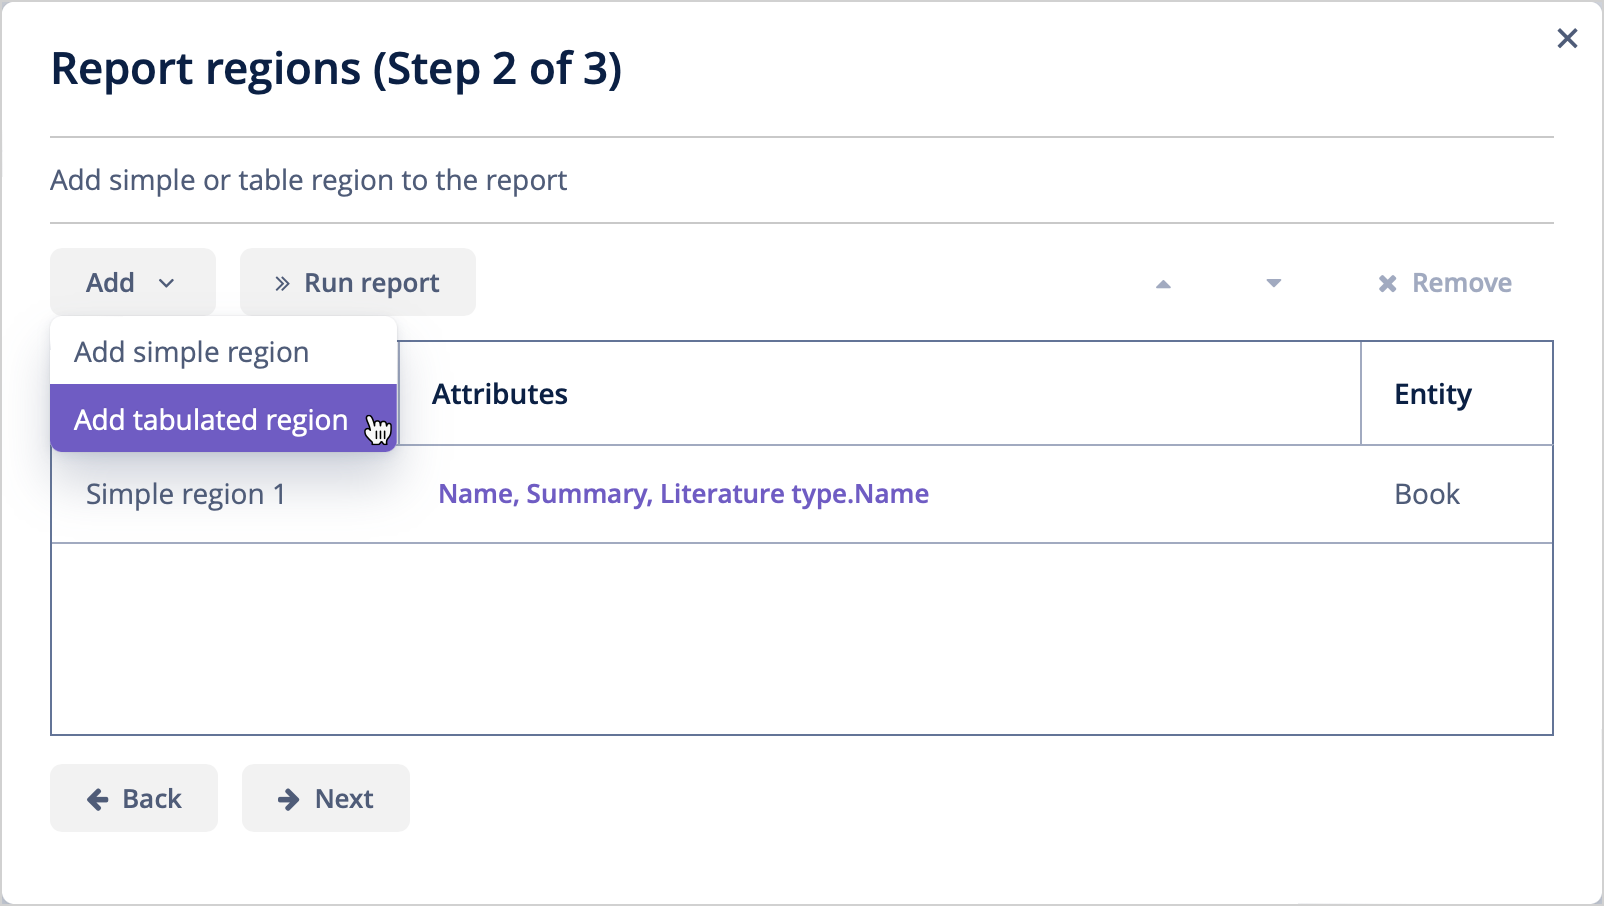
Select the Book.Authors.First name and Book.Authors.Last name attributes.
When all report regions are configured, you can move on to the final step: saving the report. At this point, you can view the complete report template, or change the name and format of the output file to one of the available types. Select PDF report output type.
After clicking the Save button, the standard report editor comes up. Now you can fine-tune the report.
Configuring Output Document
The output document for this report contains one template defined initially through the report wizard. The output type is set to PDF, while the template file is DOCX.
Click on the template file name and open it, for example, via LibreOffice. Change the template content according to the picture:
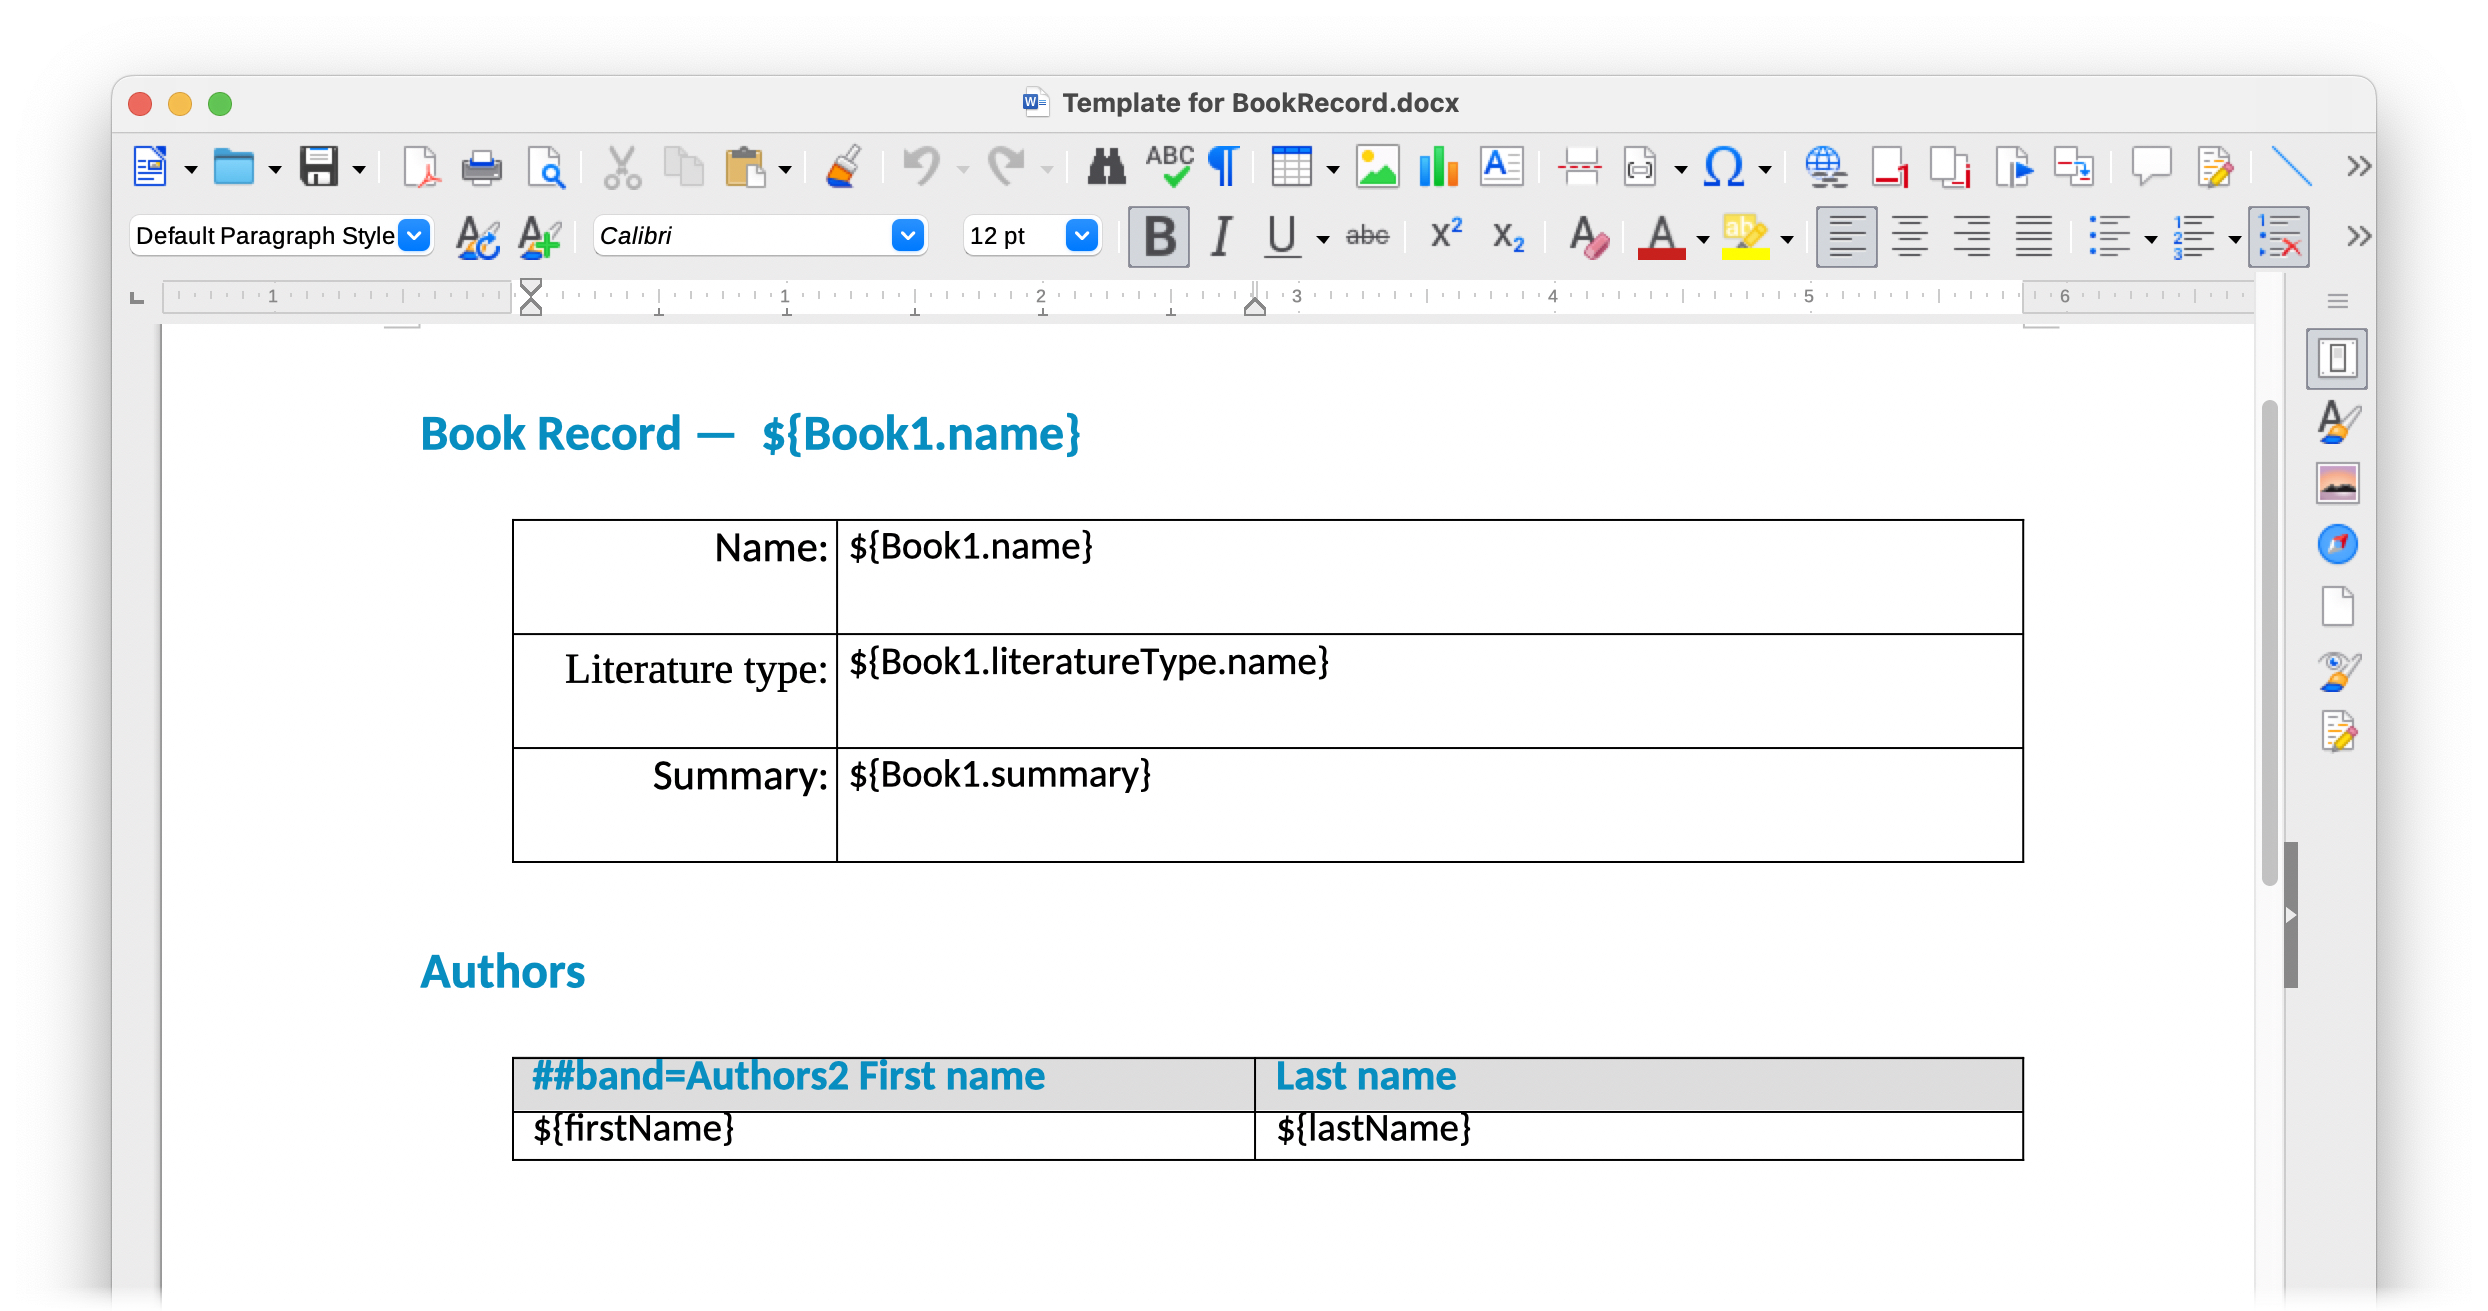
|
The templates of the reports can be found in the demo project under reports/templates. |
Additionally, it is possible to define the filename of the output document. This can either be a static filename or it can be programmatically configured.
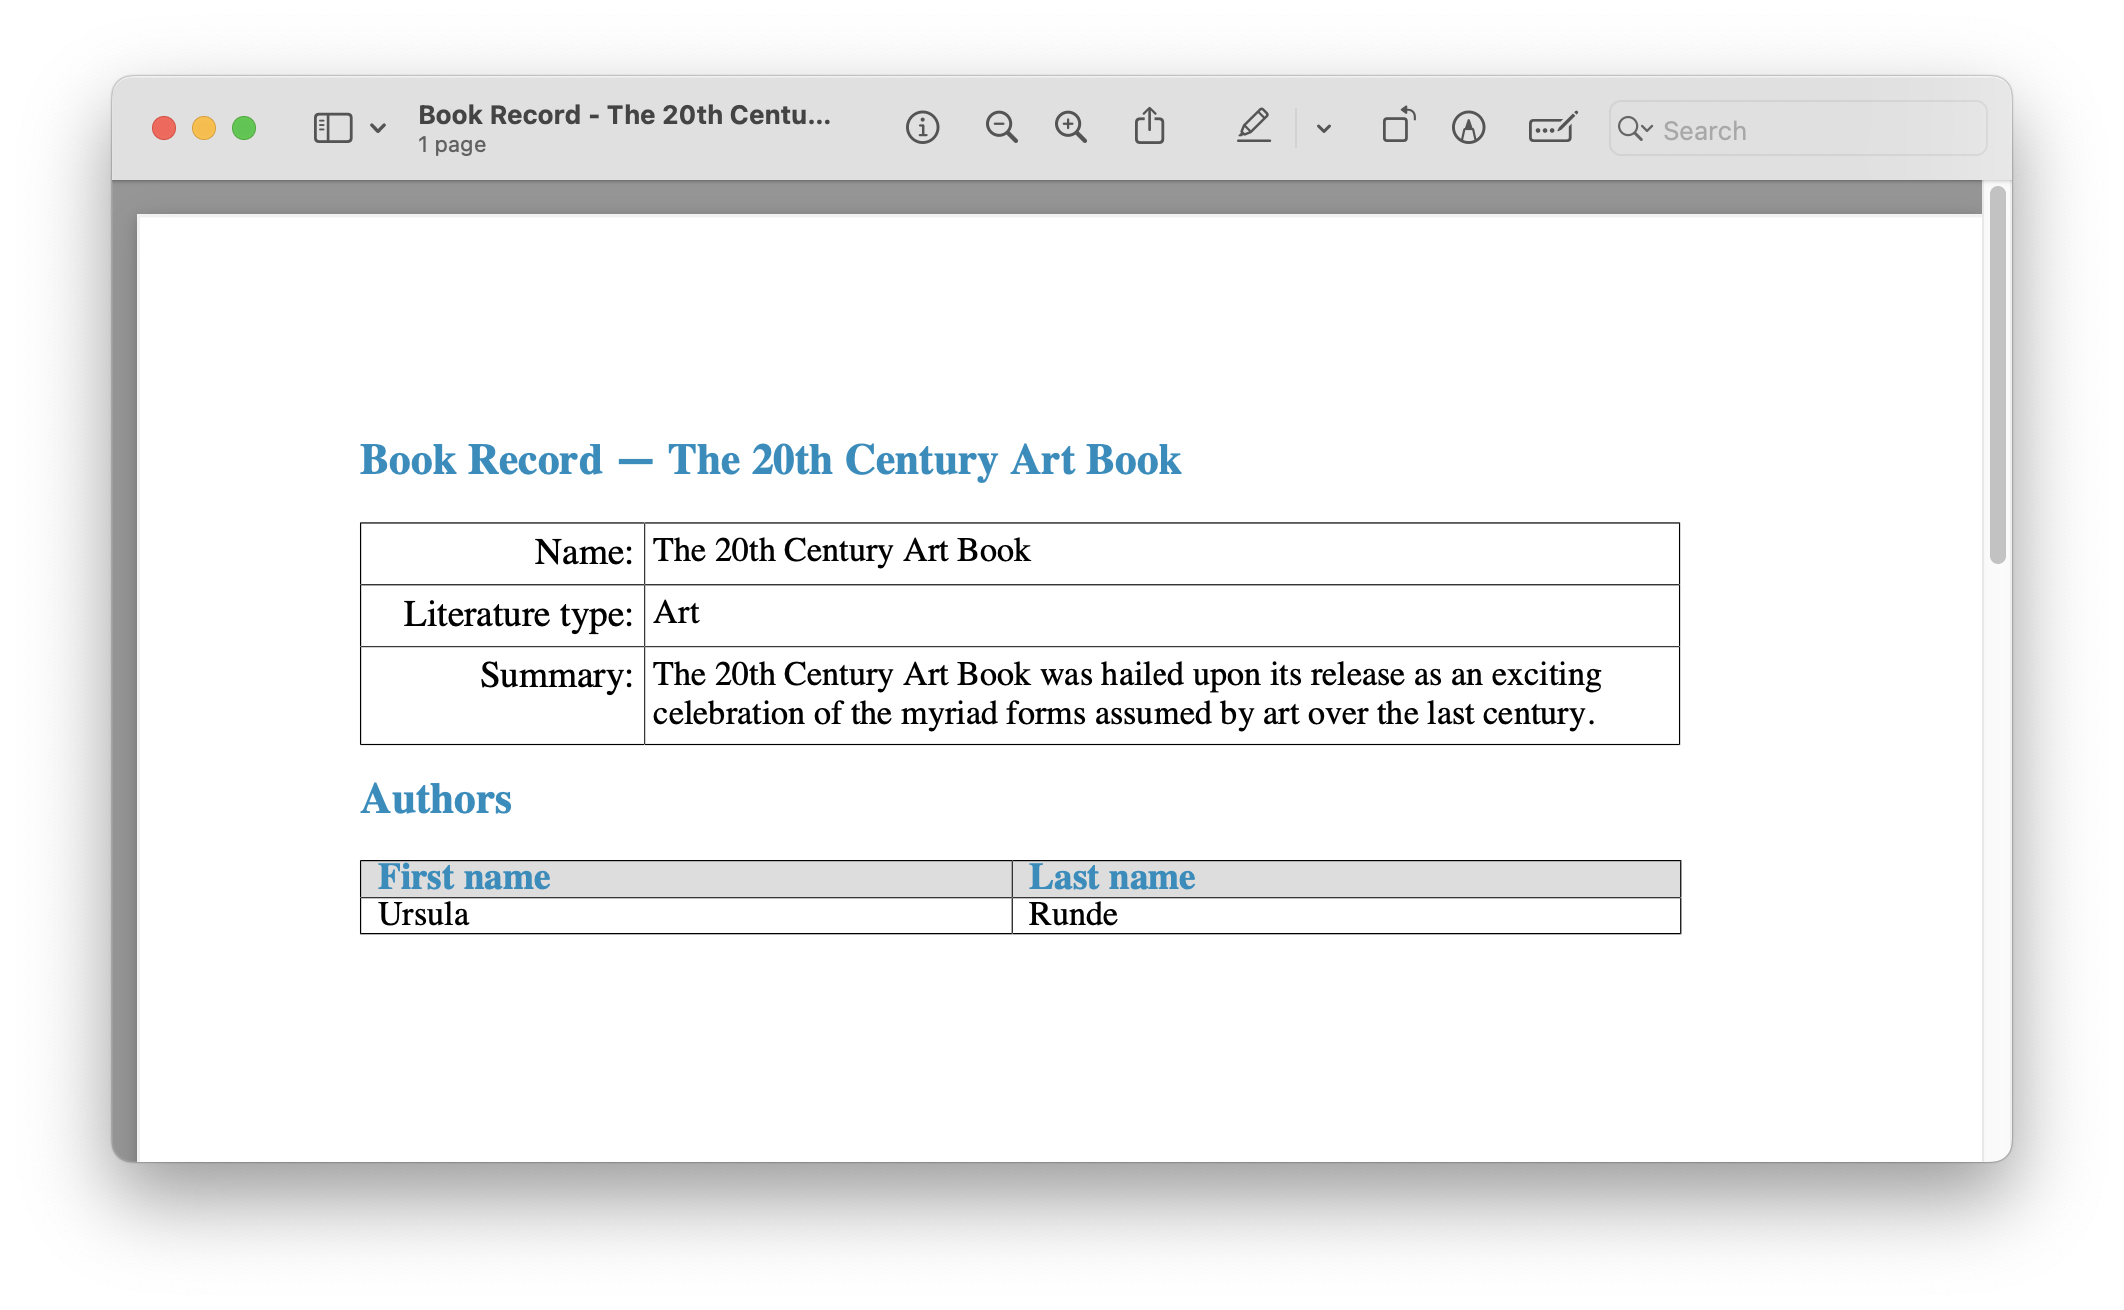
In this case, the filename should look like this for the book with the name "The 20th Century Art Book": Book Record - The 20th Century Art Book.pdf.
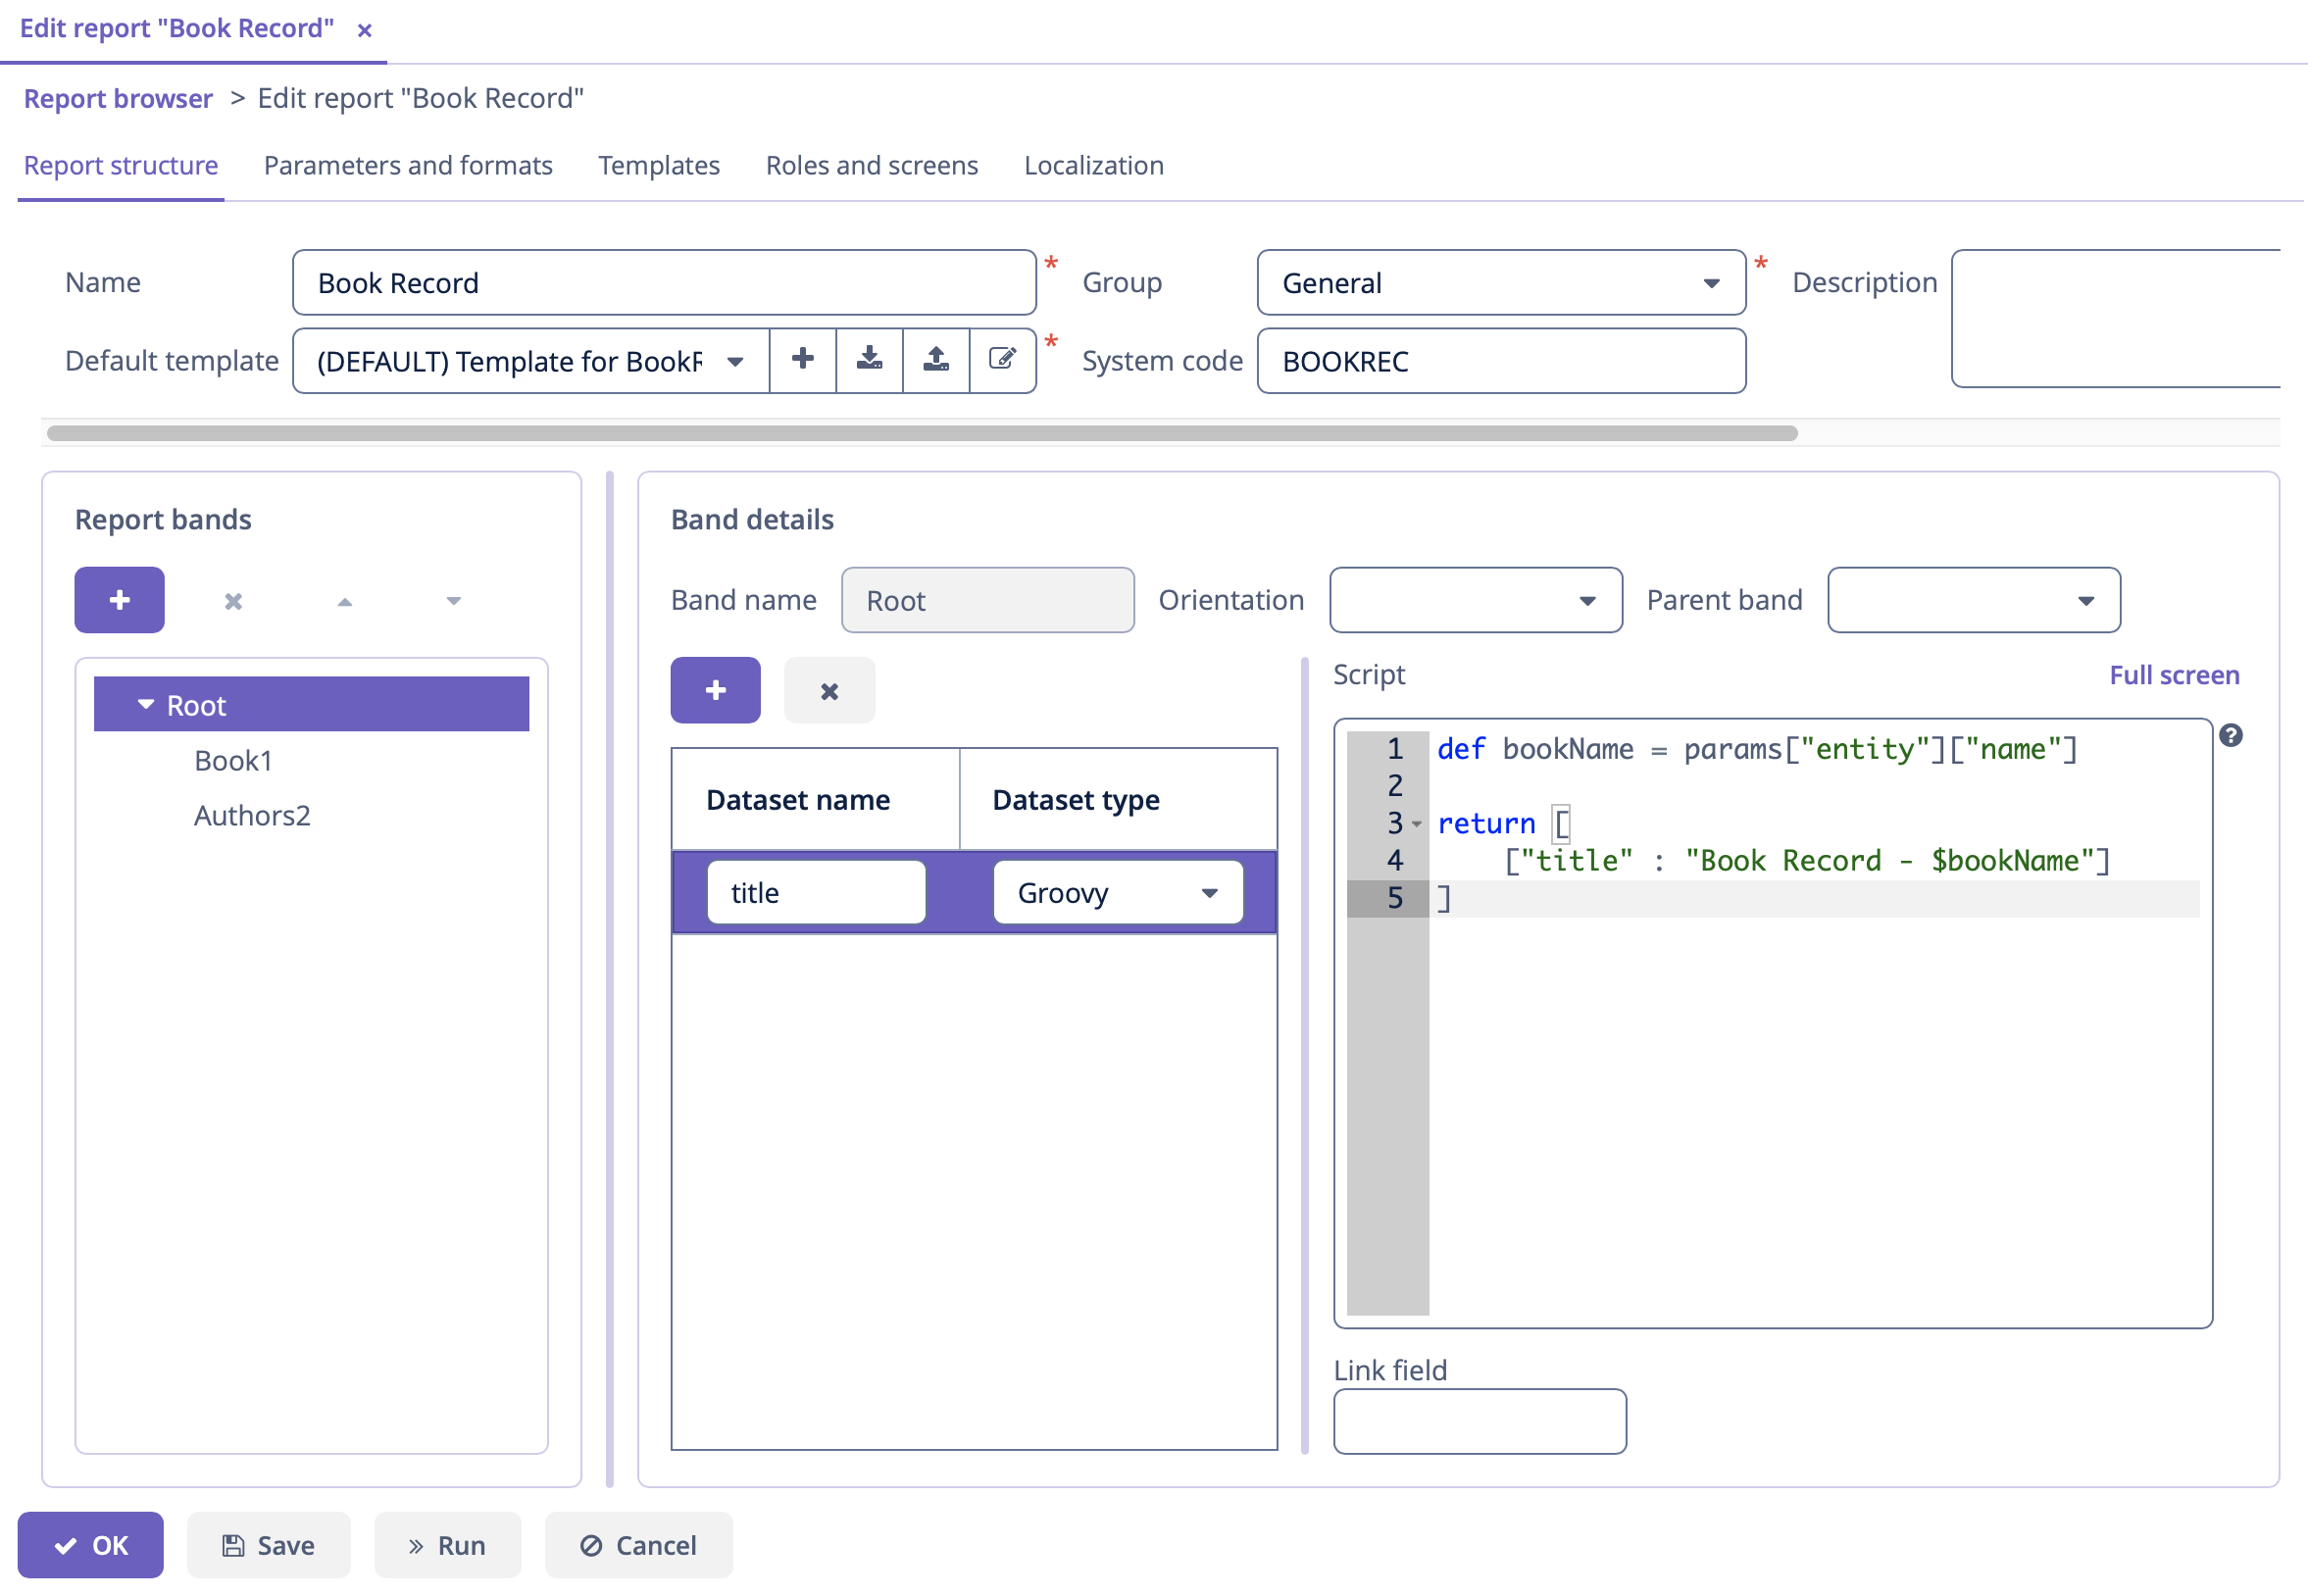
To achieve this, we can configure a pattern which references a particular band: ${Root.title}.pdf.
Root.title refers to the title value of the Root data band. A groovy based data set will define the value for the title attribute like this:
def bookName = params["entity"]["name"] (1)

return [
    ["title" : "Book Record - $bookName"] (2)
]| 1 | The params variable gives access to different external parameters. params["entity"] refers to the selected book instance. |
| 2 | A List of Maps has to be returned from this groovy script. Under the title key, it will put the target filename. |
The resulting usage of the groovy based data set looks like this:
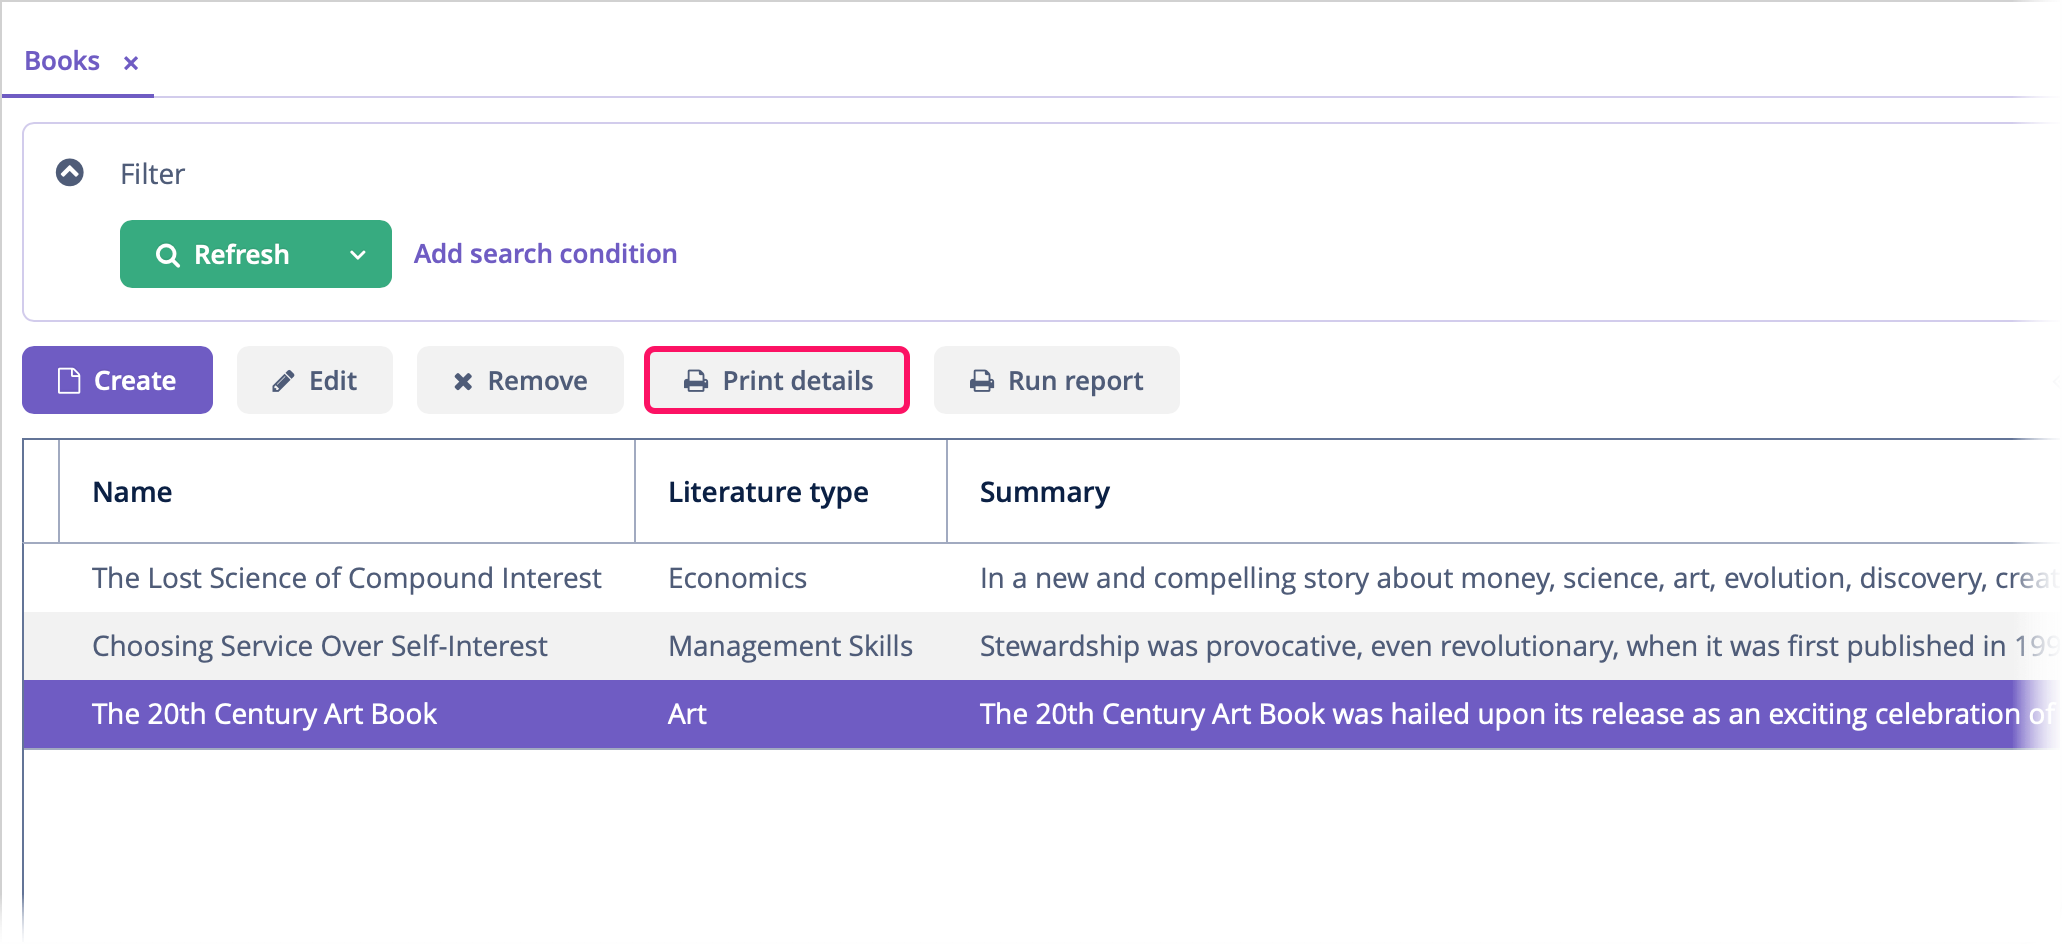
Running Report from Books Screen
Additionally, we can enable the report run on the book browser. To do this, we will declare a standard ListPrintFormAction in the book-browse.xml screen descriptor:
<actions>
    ...
    <action id="listPrintForm"
            type="listPrintForm"
            caption="Print details"/> (1)
    ...
</actions>
...
<buttonsPanel id="buttonsPanel" alwaysVisible="true">
    ...
    <button id="printBtn" action="booksTable.listPrintForm"/> (2)
    ...
</buttonsPanel>| 1 | The type attribute defines a specific listPrintForm action type. |
| 2 | Add a button with run report action. |
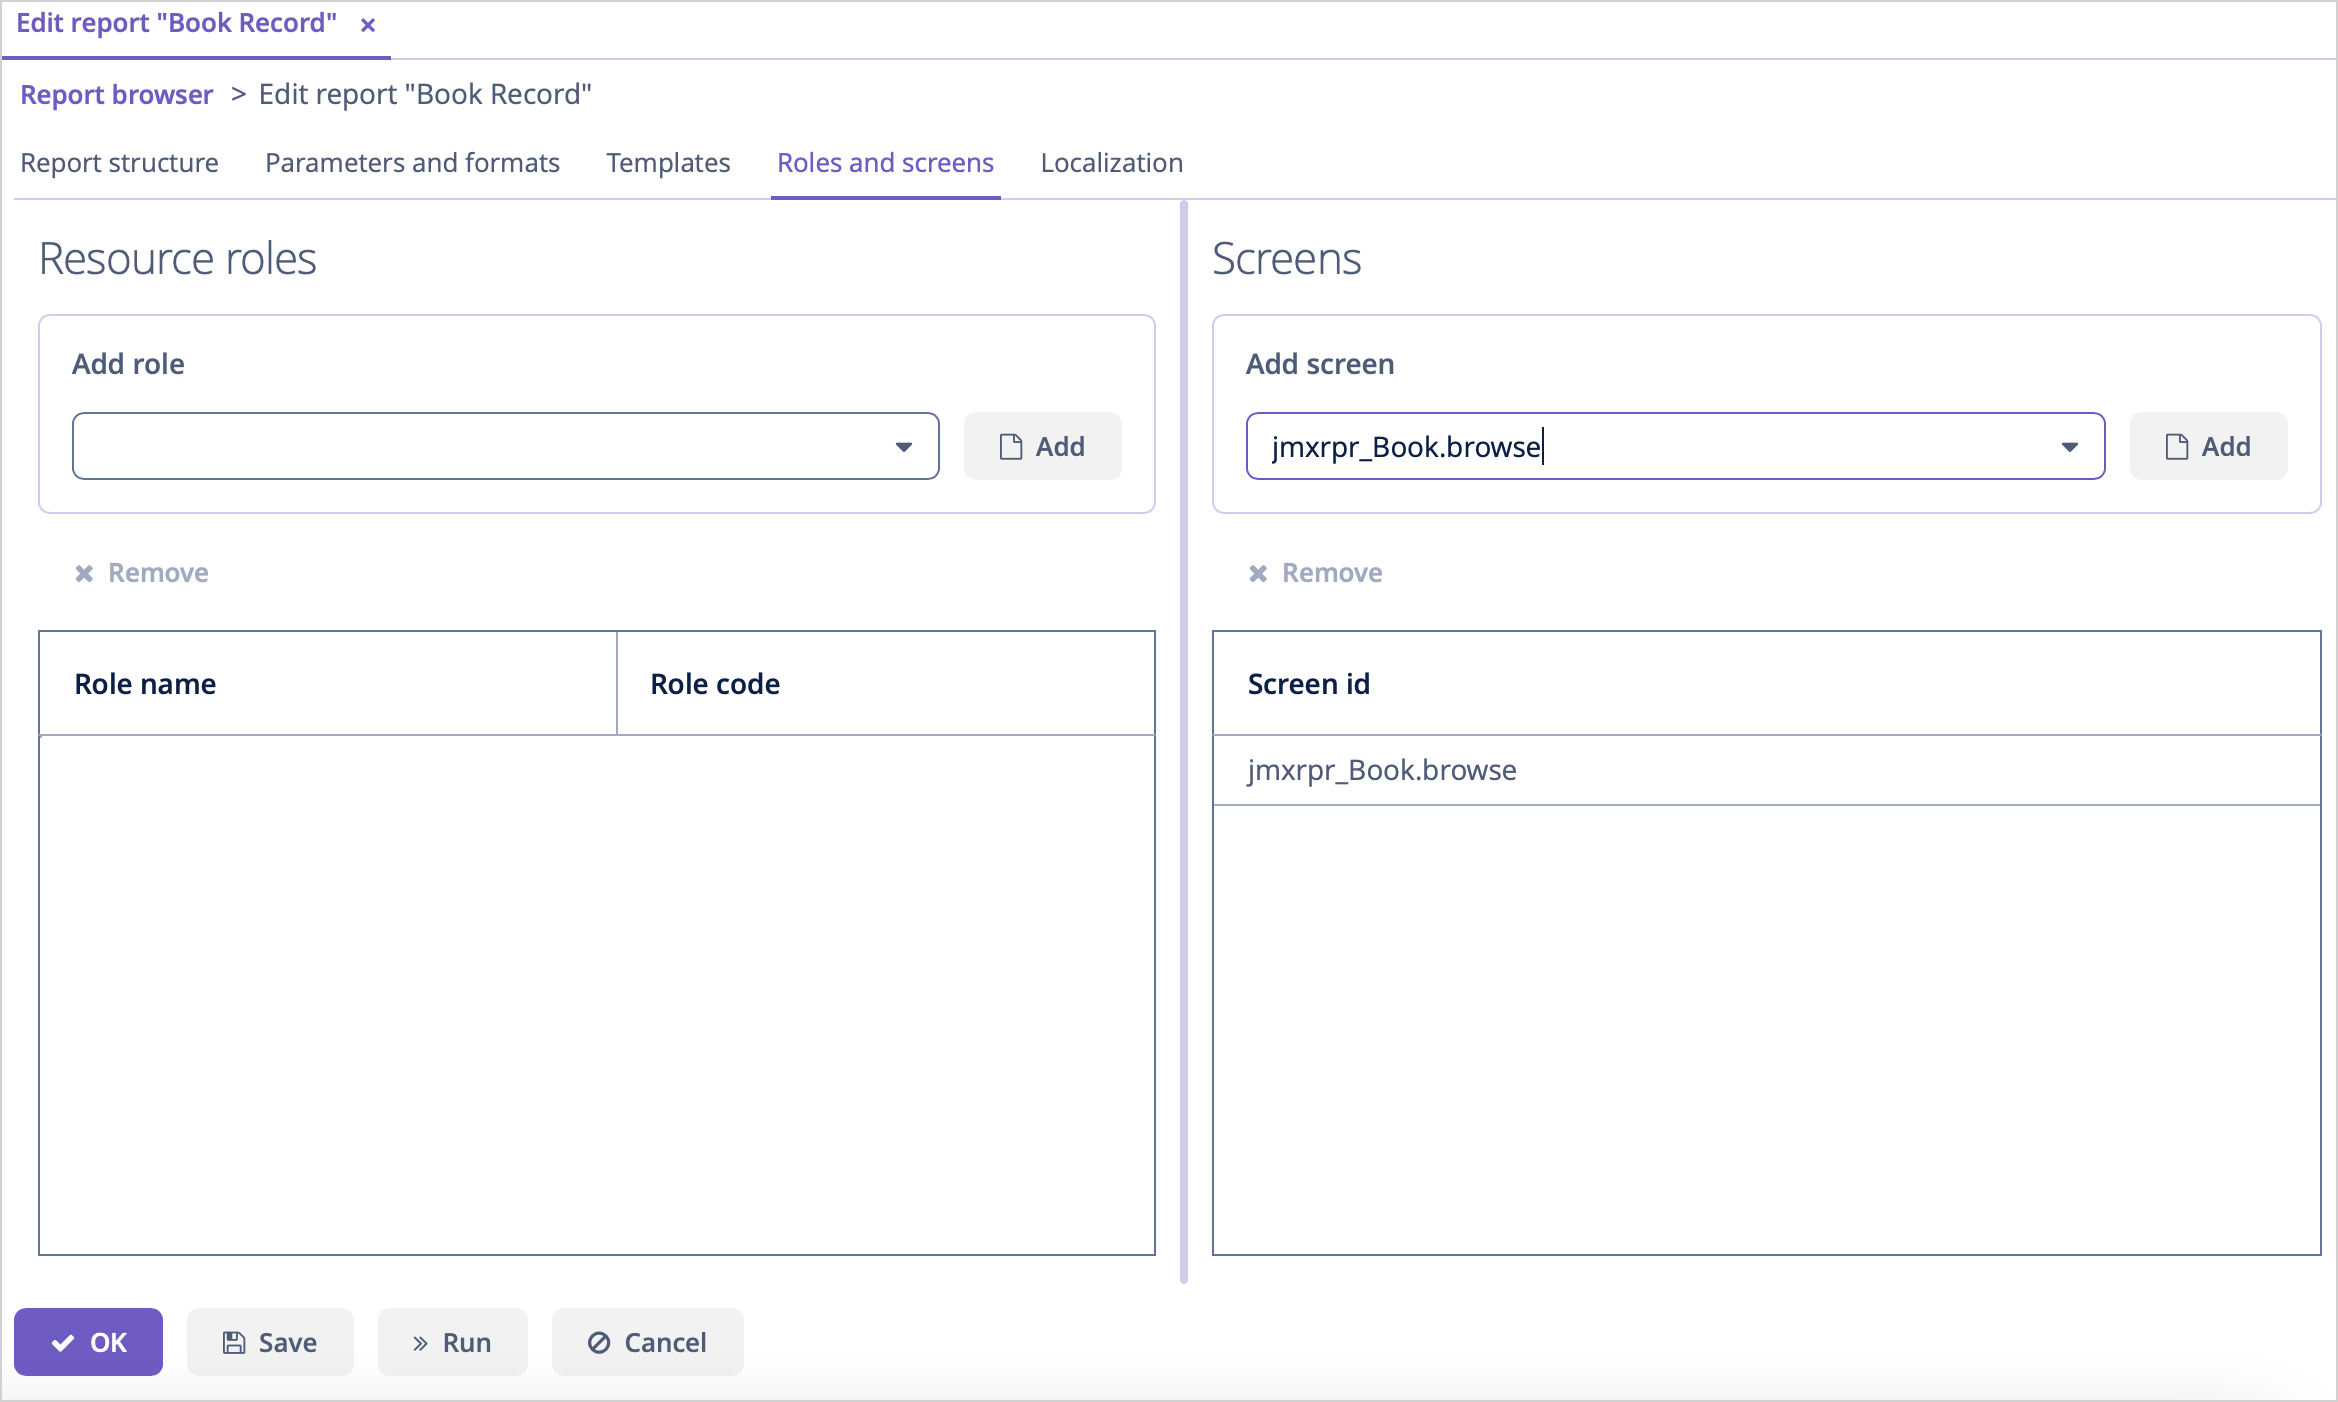
Then we should link our report with the Book browser. Open the report editor, switch to the Roles and Screens tab and add the Book.browse screen from the dropdown list to the table below:
Now you can run the report for any book by selecting it in the table and simply clicking the Print details button.
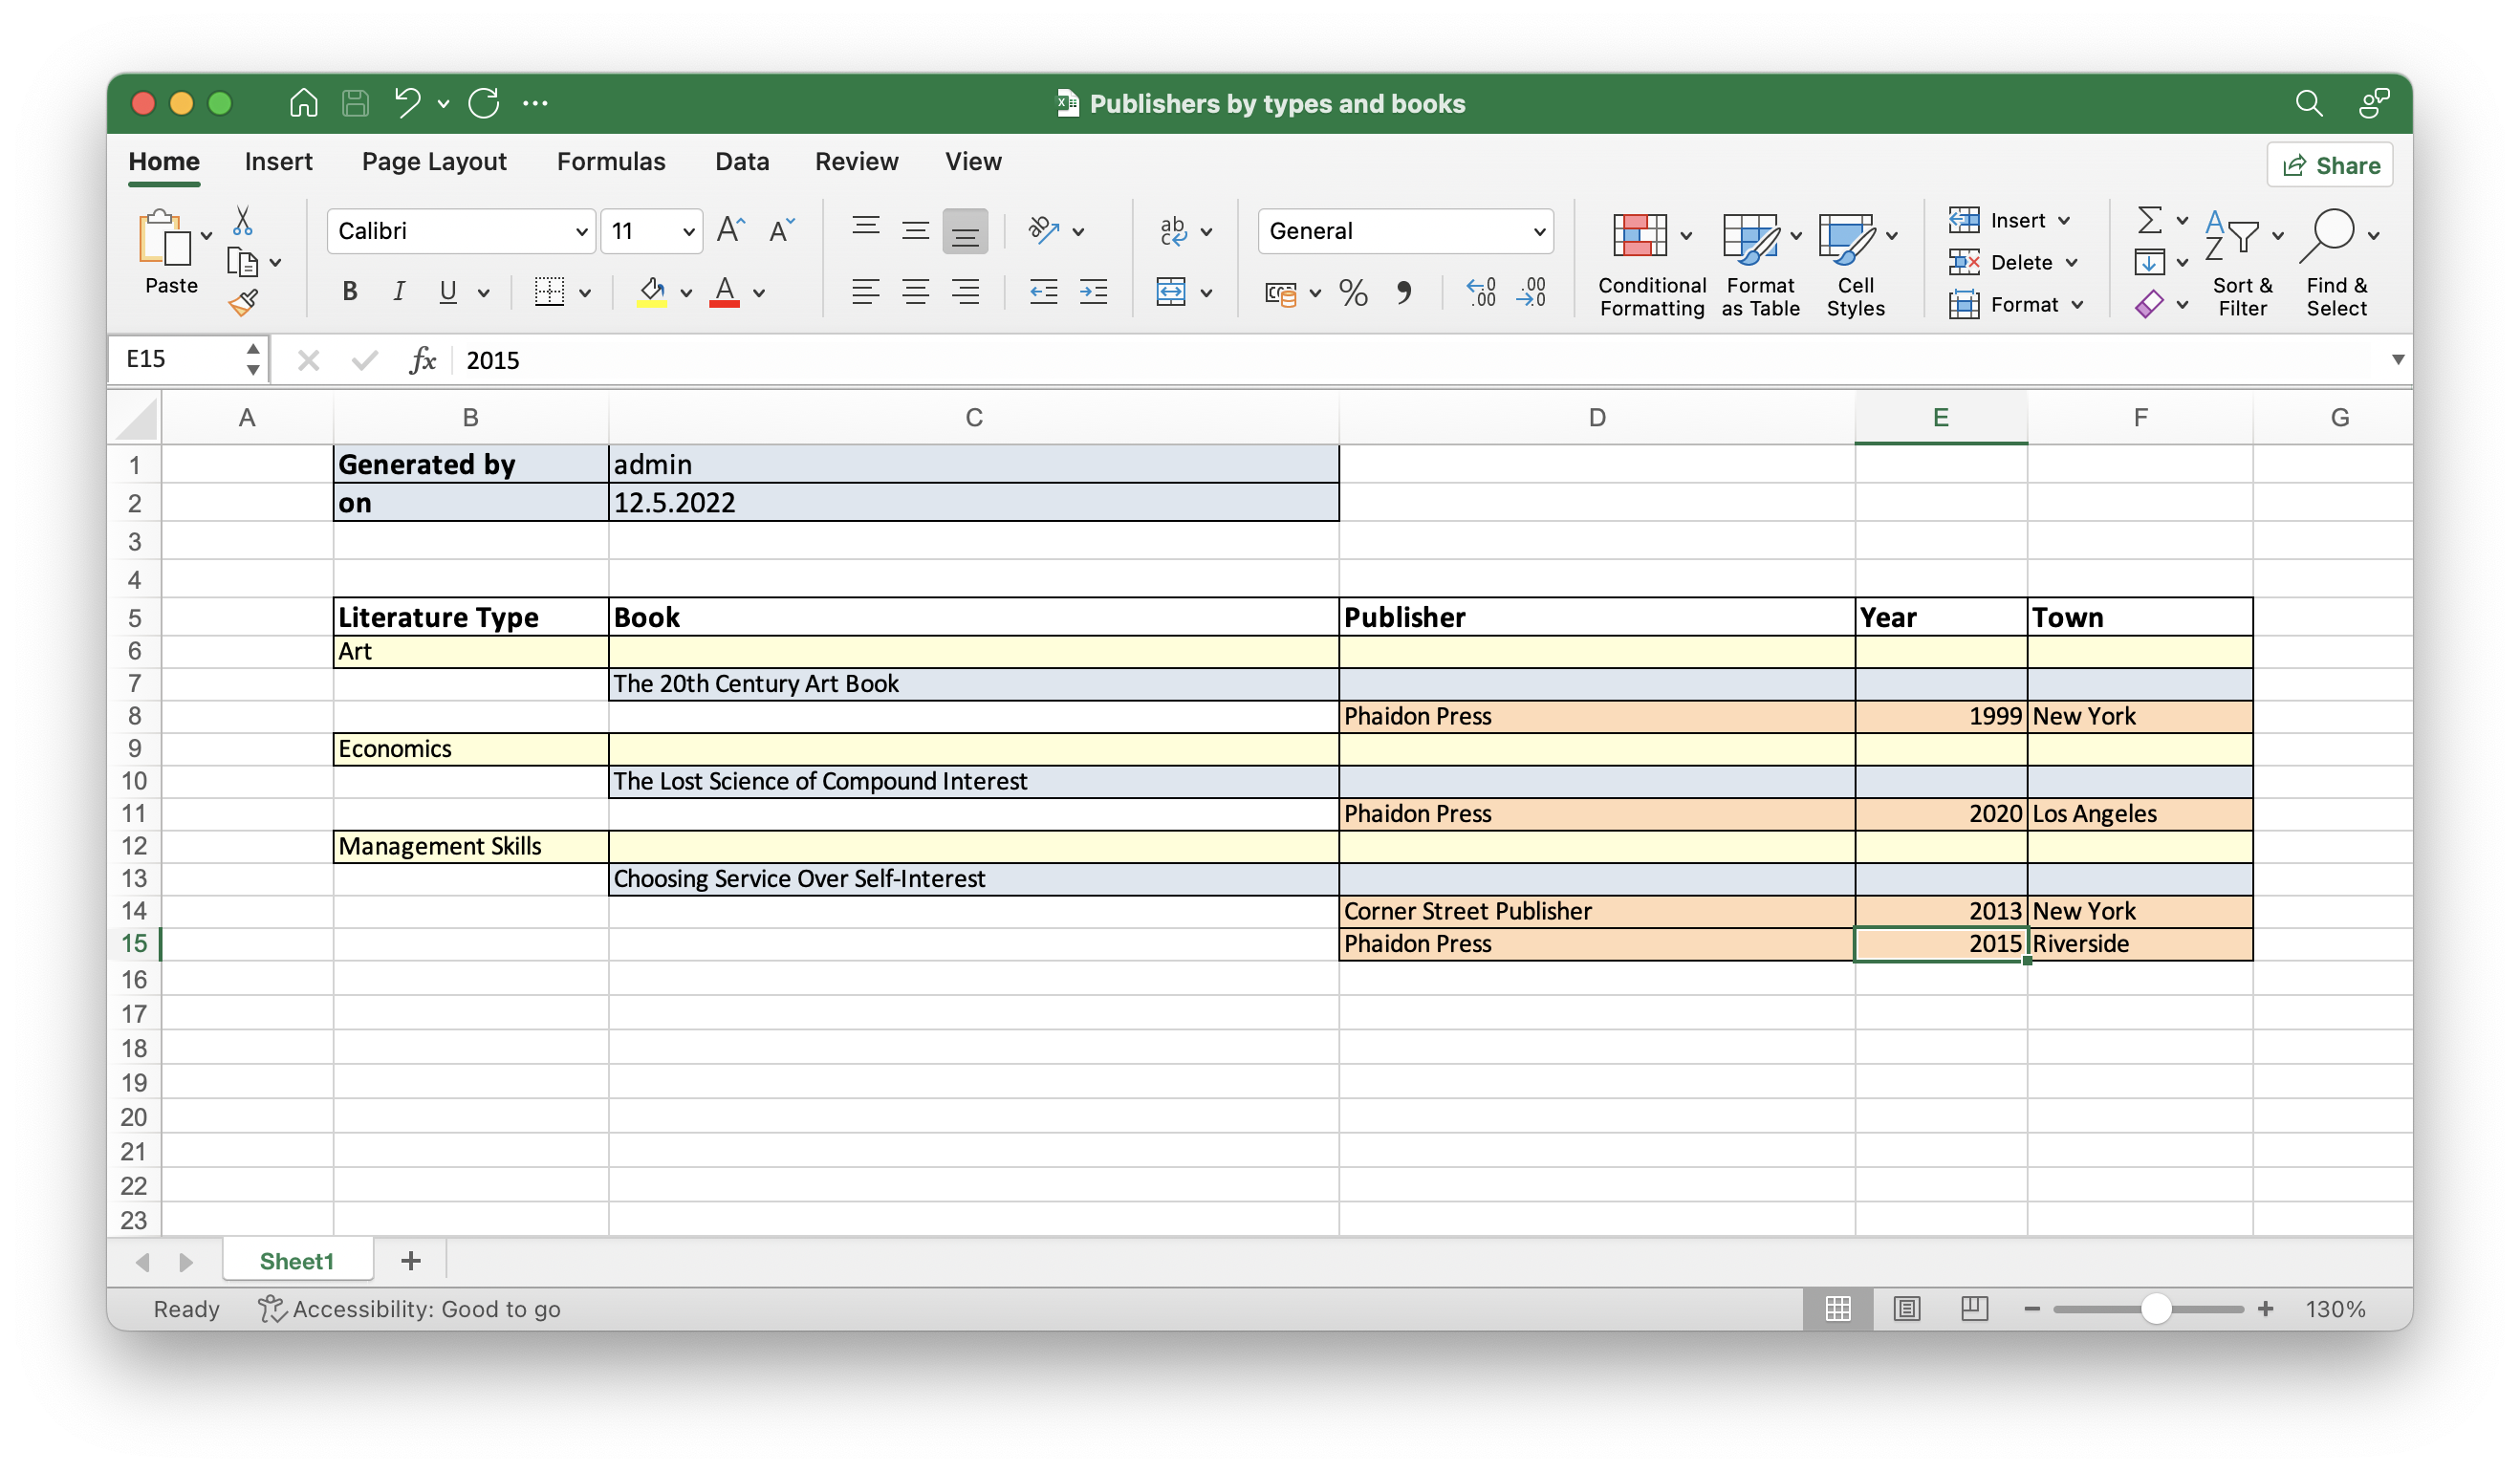
The output is as follows:
Creating Report Manually
In this section you will create a more complex report without using the wizard.
The report will contain the list of publications grouped by literature types and books.
The upper part of the report will contain an information about the report creator and the date of the report. A table with a sequential grouping by literature type and books will be listed below.
The report will have the following settings:
-
Template Type: XLSX.
-
Report Name:
Publications grouped by types and books.
Creating Template
Create a Template for publications by type.xlsx template for our report using Microsoft Office or LibreOffice.
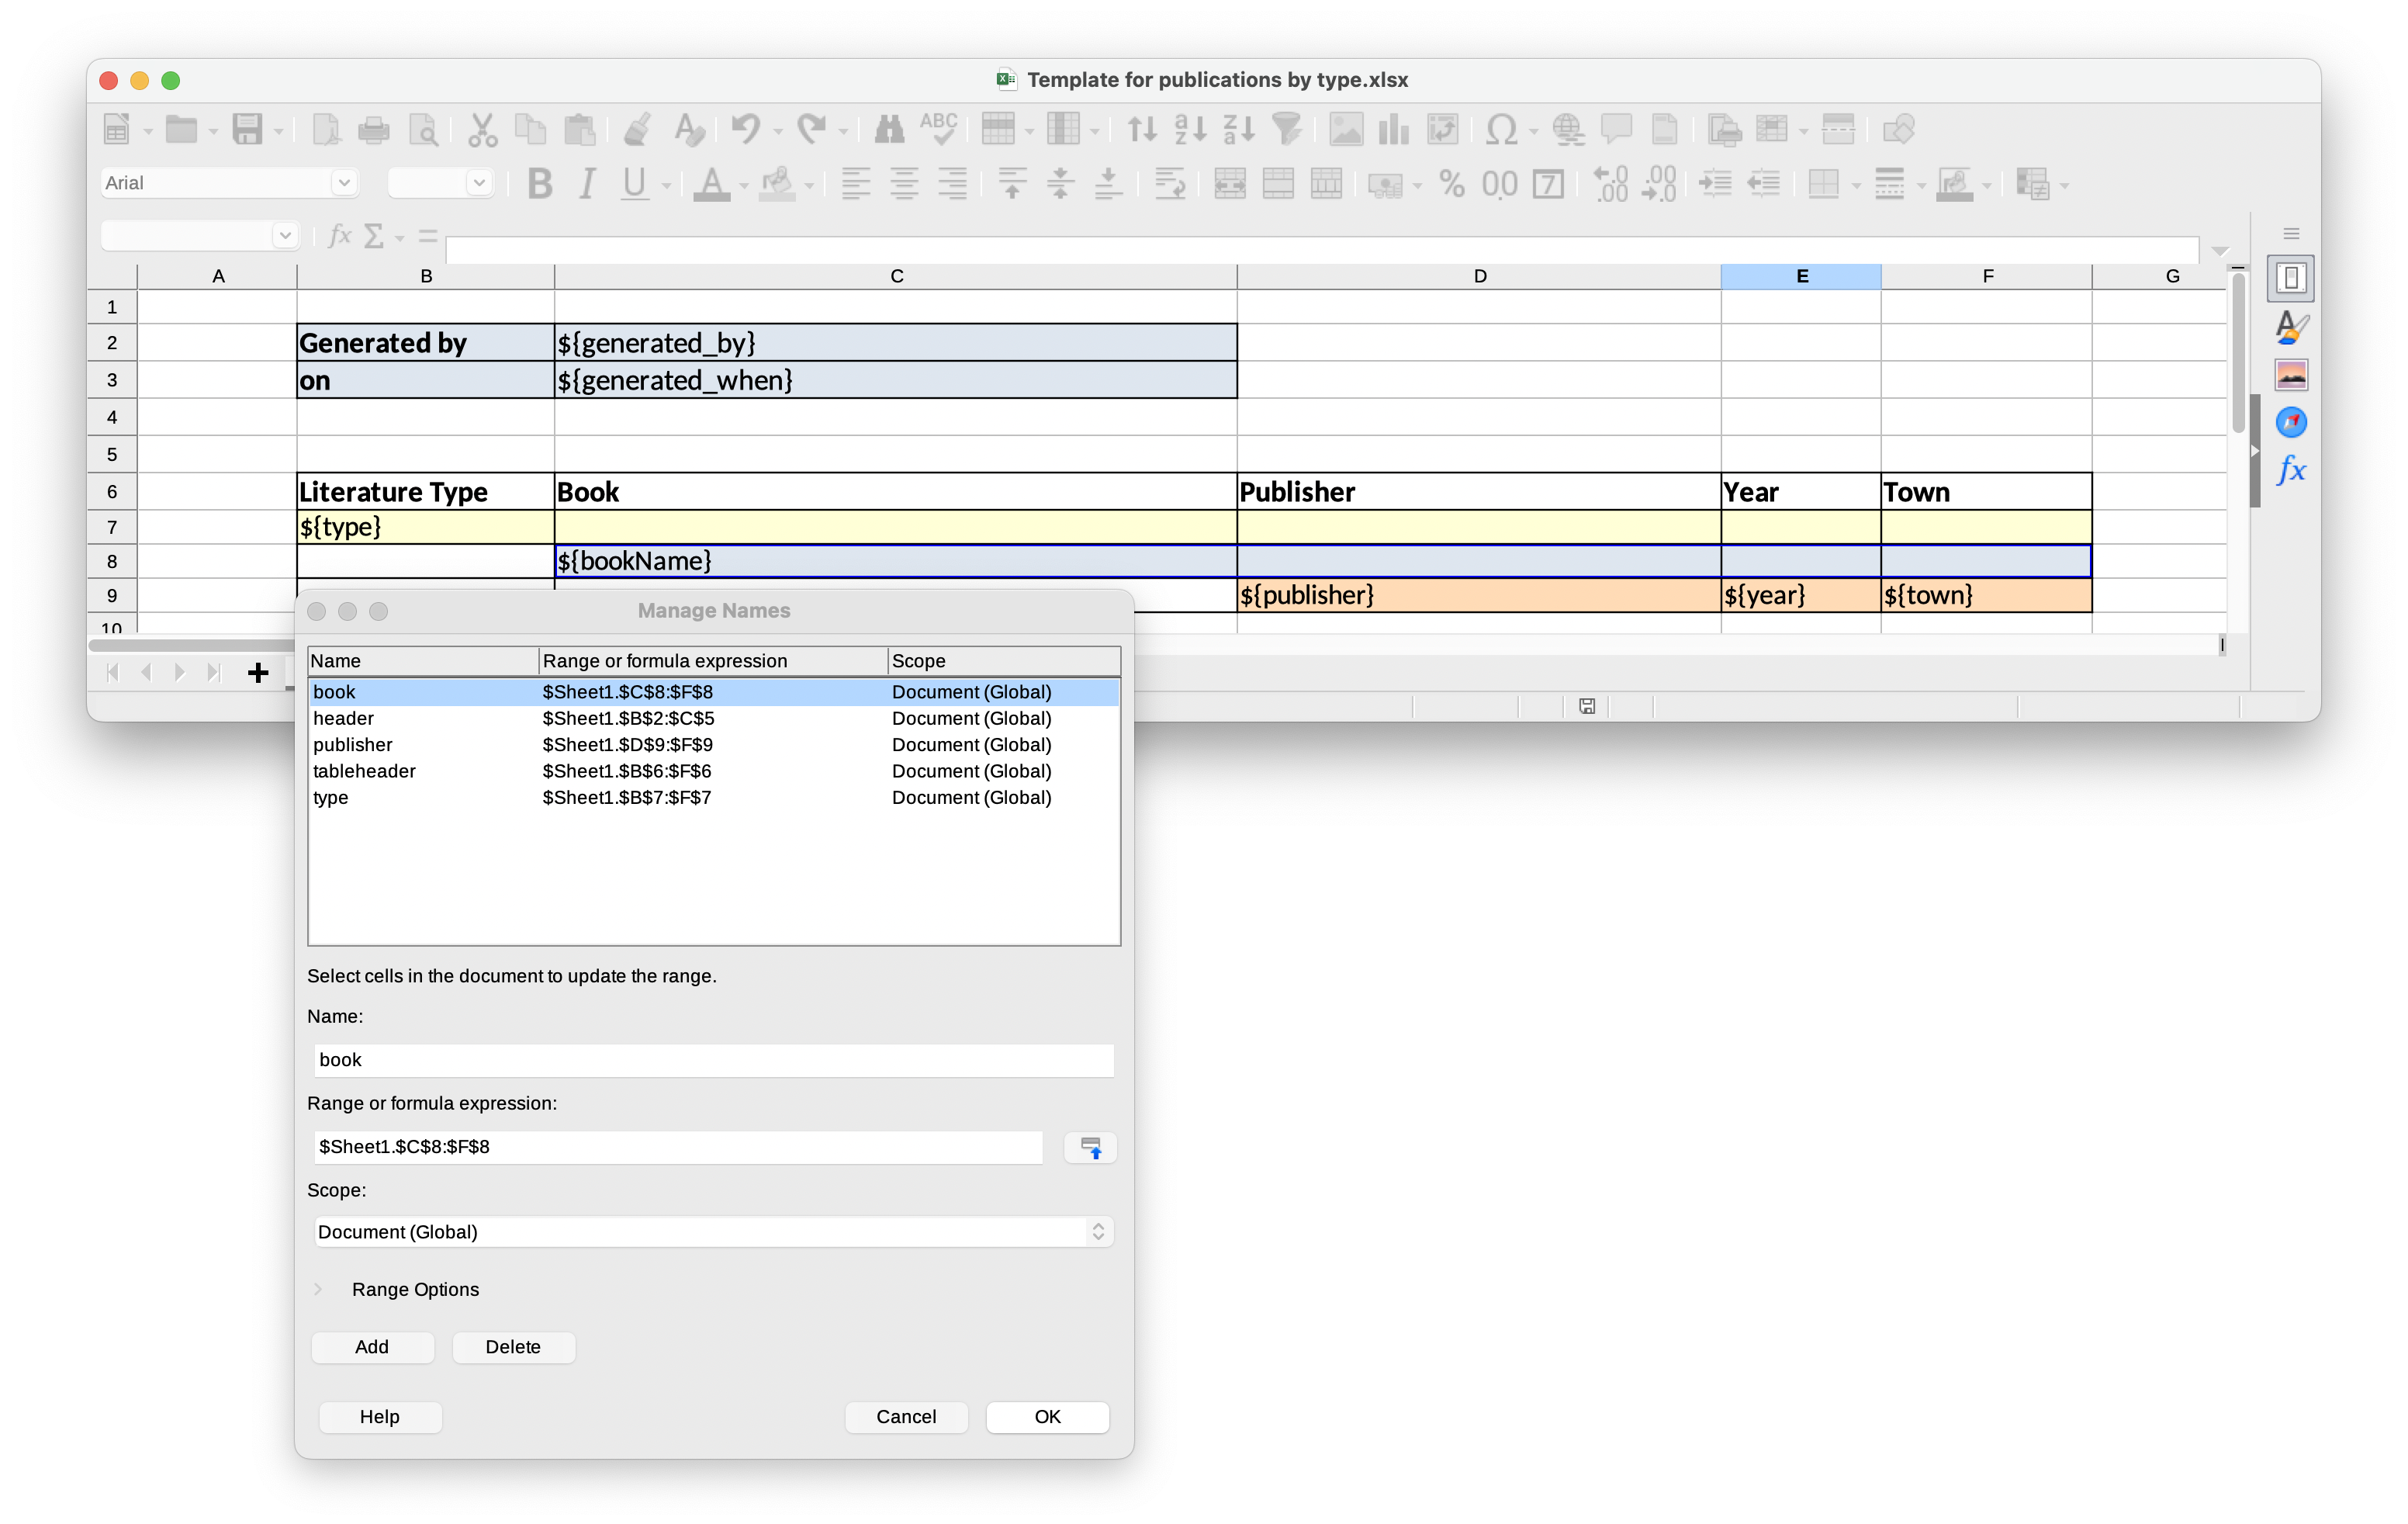
This report template contains named regions (type, book, publisher) for three datasets of dependent bands and, additionally, named regions for the column header (tableheader) and for additional information about the report (header).
|
The templates of the reports can be found in the demo project under reports/templates. |
Defining Report Structure
Open Reports → Reports screen in the main menu of the application and click Create → New.
The Report structure tab of the report editor is shown.
Define the report name - Publications grouped by types and books.

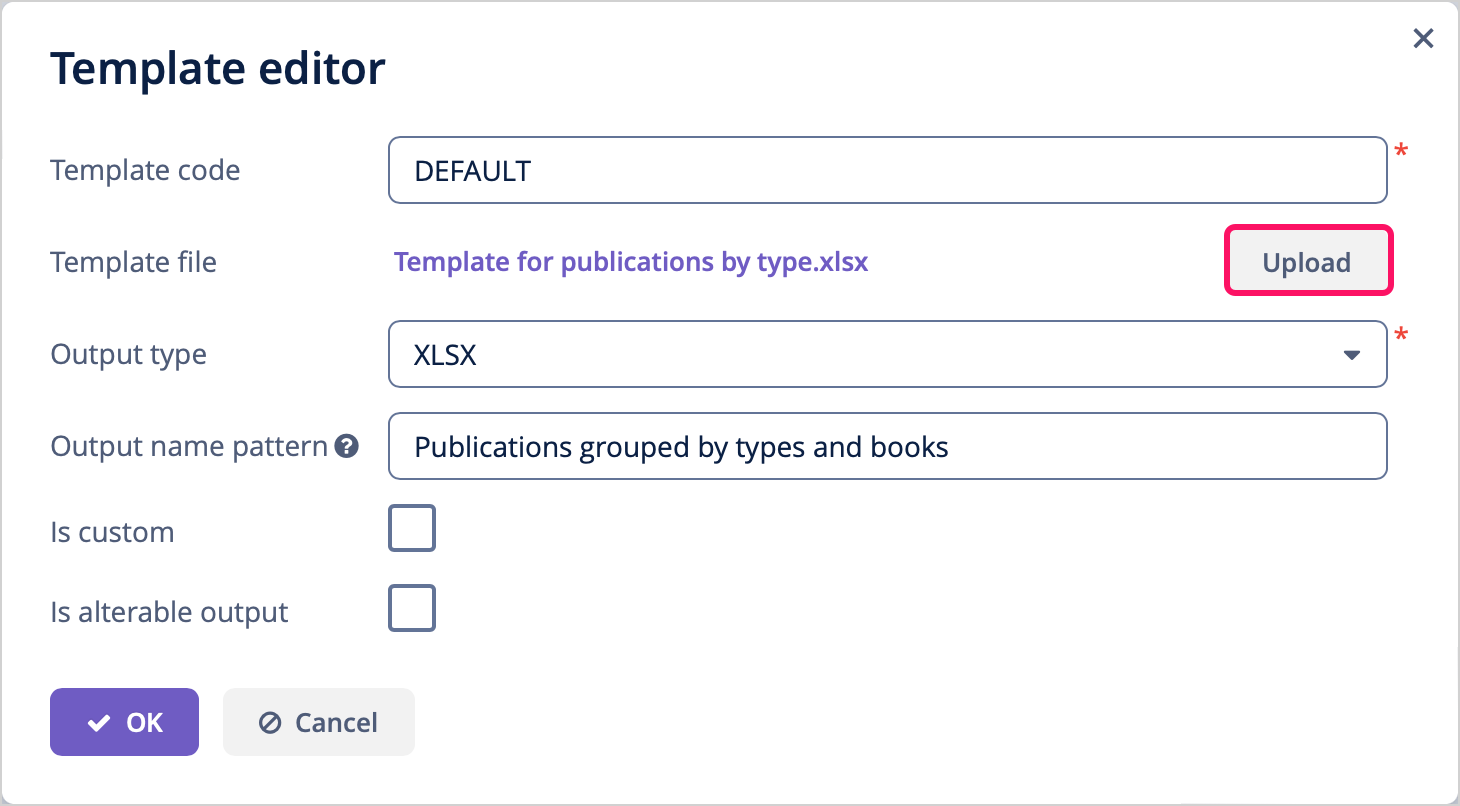
Click on the Create template button.
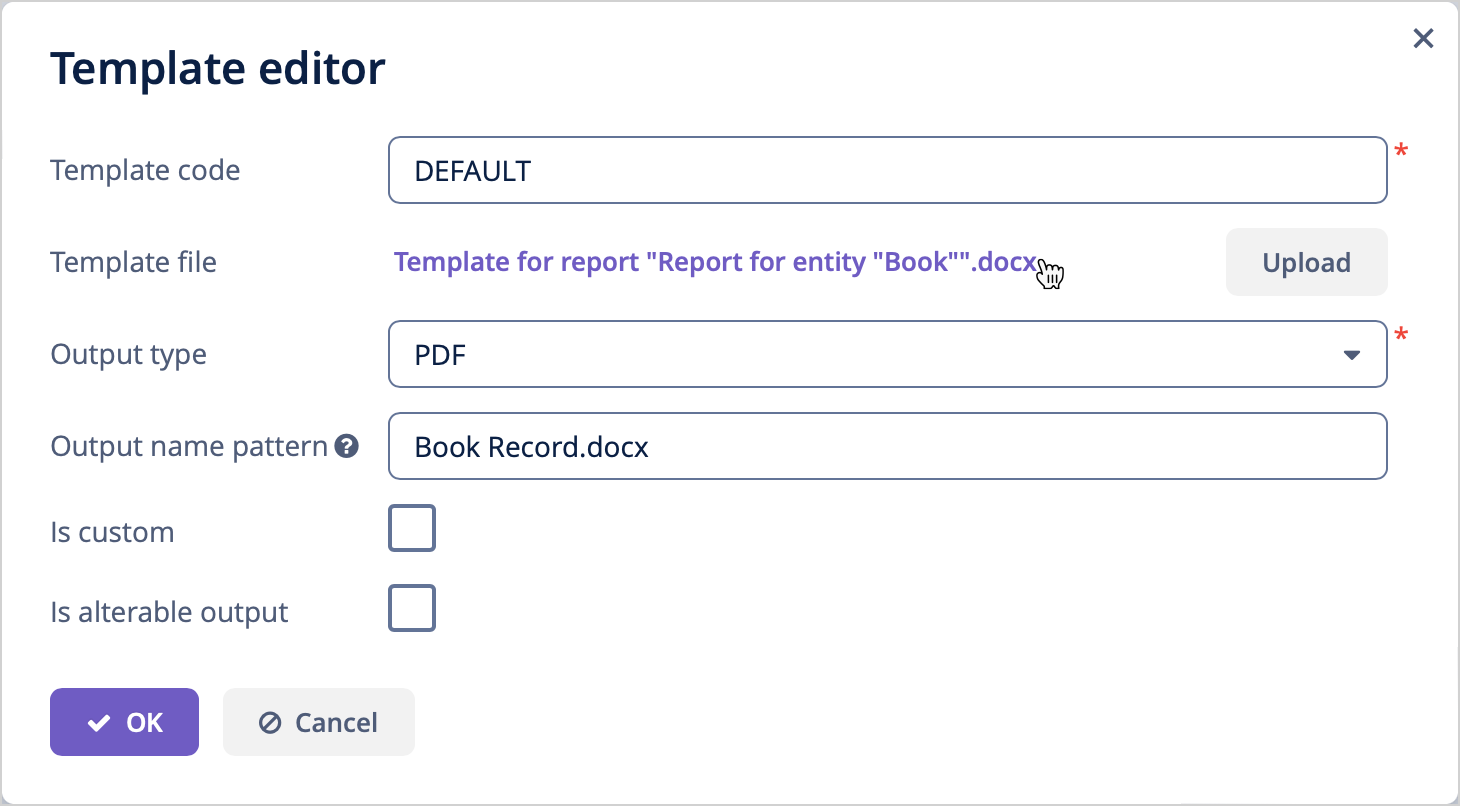
The Template editor dialog is opened. Upload the created template and define the output name pattern.
Let’s create report bands.
-
The header band contains the dataset with the Groovy script which outputs the name of the current user and the current date.
import io.jmix.core.security.CurrentAuthentication; import io.jmix.core.TimeSource; def user = currentAuthentication.getUser().getUsername(); def currentDate = timeSource.currentTimestamp(); return [["generated_by":user, "generated_when":currentDate]] -
The tableheader band is blank, it is used to display the table header.
-
The type band outputs the list of literature types by running the following JPQL query:
select b.literatureType.id as typeId,
b.literatureType.name as type
from jmxrpr_Book b
-
The book band, which is a child band of the type, outputs the books by running the following JPQL query:
select b.id as bookId,
b.name as bookName
from jmxrpr_Book b
where b.literatureType.id = ${type.typeId}
This query uses the parent band field
typeIdas a parameter. This provides dependency between the parent and child bands. -
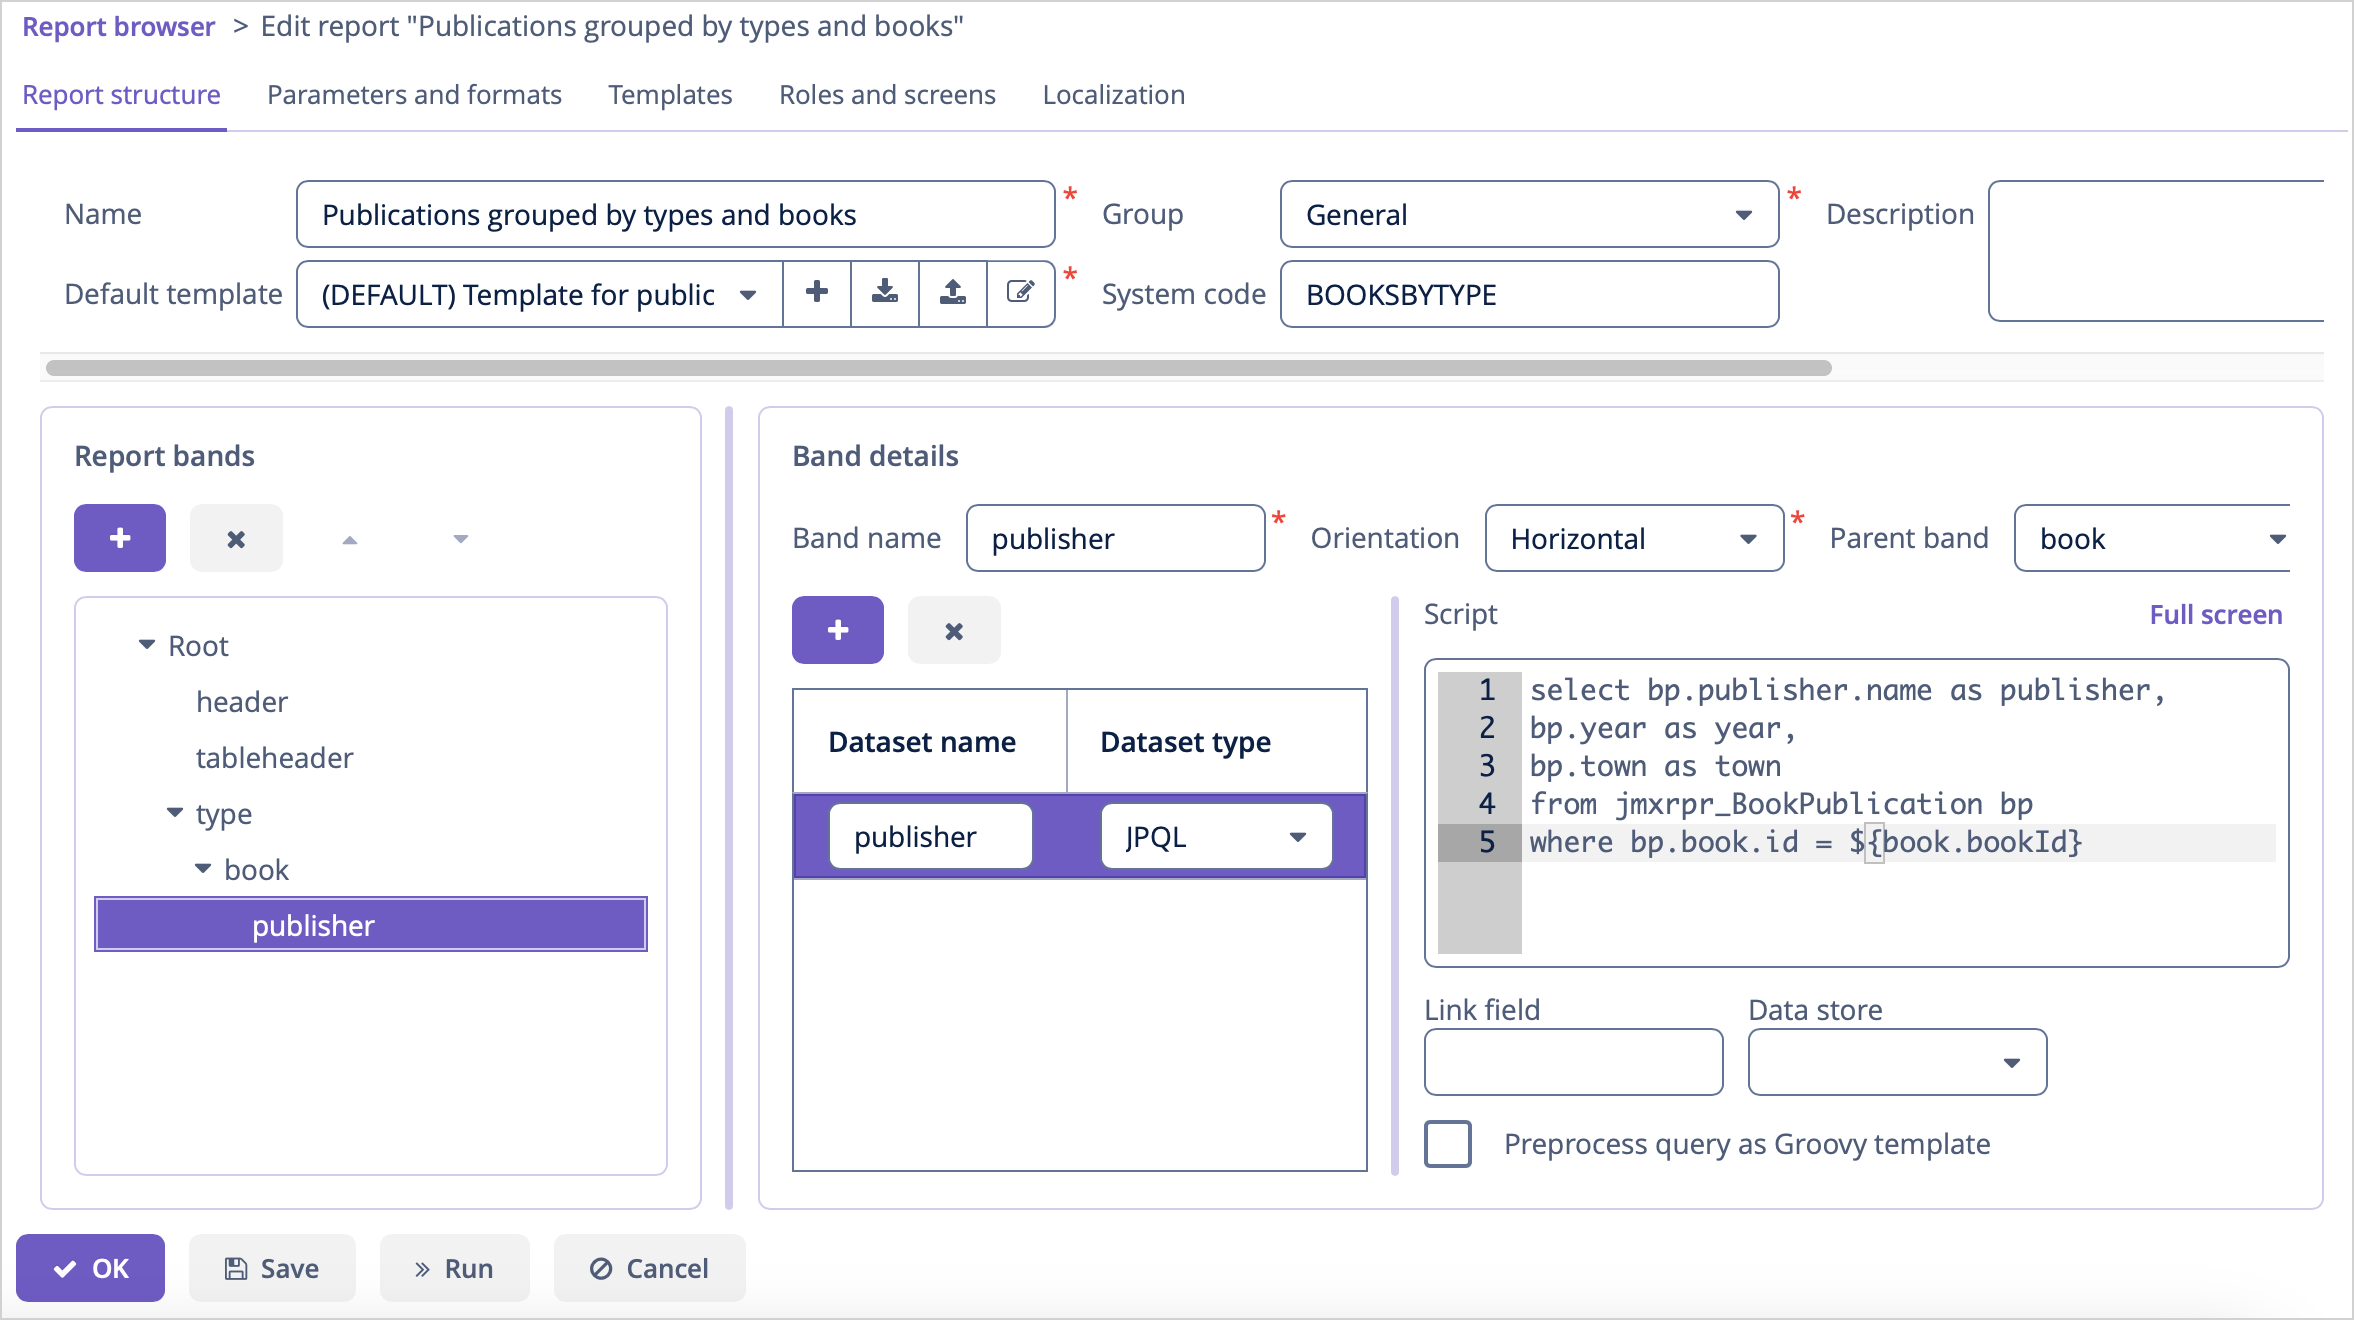
The publisher band, which is a child of the book band, outputs the book publications by running the following JPQL query:
select bp.publisher.name as publisher,
bp.year as year,
bp.town as town
from jmxrpr_BookPublication bp
where bp.book.id = ${book.bookId}
This query uses the parent band field
bookIdas parameter.
The report looks as follows in the report editor:
Running Report from Reports Browser
Once the report is saved, you can run it through the generic reports browser.
The output is as follows: