Getting Started with Search
This guide shows how to start using Search in your application.
Let’s consider that you want to add a couple of entities into your application and set up searching among their attributes.
First, do the following:
-
Add Search to your project according to the installation section.
-
Configure a connection to Elasticsearch depending on the service location.
Create Data Model and Screens
Let’s create the following classes:
-
The
Statusenumeration with theSILVERandGOLDvalues. -
The
Customerentity with the fields:-
firstNamewithStringtype -
lastNamewithStringtype -
statuswithStatustype -
cardwithFileReftype
-
-
The Order entity with the fields:
-
datewithDatetype -
numberwithStringtype -
amountwithIntegertype -
productwithStringtype -
customerwith association toCustomer, many-to-one cardinality
-
Set up the instance name for the Order entity to be displayed as the search result.
Create edit and browse screens for the Customer and Order entities.
Create Index Definition Interface
Then, you need to create Index Definition - an interface that describes what entities and attributes should be indexed. Let’s assume that we are going to search orders by their number, product name, customer status or customer last name. Within Index Definition we will create a method to define the necessary attributes.
@JmixEntitySearchIndex(entity = Order.class)
public interface OrderIndexDefinition {

    @AutoMappedField(includeProperties =
            {"number", "product", "customer.status", "customer.lastName"})
    void orderMapping();
}-
The interface should be annotated with
@JmixEntitySearchIndexwith the mandatory parameterentity. -
The interface can have any name.
-
The
@AutoMappedFieldannotation automatically maps requested properties. In our case we will useincludePropertiesparameter and specify names of the attributes that should be indexed. -
The method can have any name.
Configure Index Naming
By default, indexes created in the project have the search_index_ prefix. In the future, you may use the same Elasticsearch service in multiple projects. So, to ensure that the index names will be unique let’s change the default prefix. Add the following property to your application.properties file:
jmix.search.search-index-name-prefix = sample_prefix_Configure Indexing Queue Processing
Jmix application tracks data changes but does not pass them to Elasticsearch automatically. To update Elasticsearch indexes regularly, just add the Quartz add-on to the project. The Search add-on will use it for periodic processing of the indexing queue with default settings.
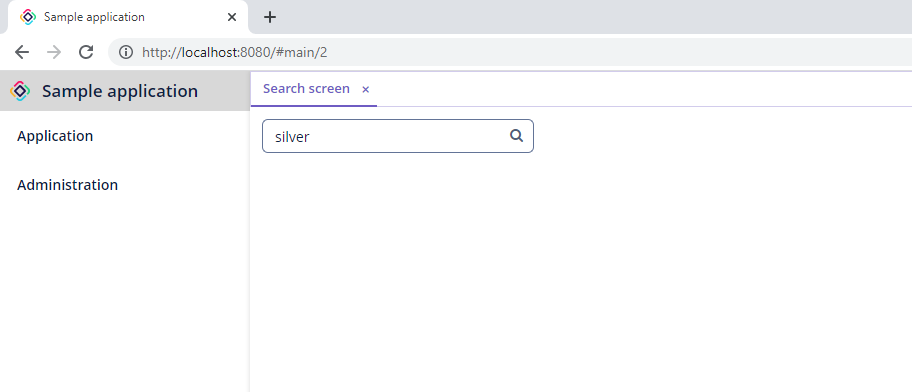
Create Search Screen
-
Create a blank screen using Studio templates with the Search screen name.
-
Add the
xmlns:search="http://jmix.io/schema/search/uinamespace to the root element of the screen XML descriptor:<window xmlns="http://jmix.io/schema/ui/window" xmlns:search="http://jmix.io/schema/search/ui" caption="msg://searchScreen.caption"> -
Add the
searchFieldcomponent inside thelayoutelement:<layout> <search:searchField id="mySearchField"/> </layout>
Now, the screen contains a text field for entering the search term and the button to run search.
Test Searching in Application
Now, we are ready to run and test the application.
First, add some instances of the Customer and Order entities.
Open the Search screen and let’s find customers with the Silver status.
The search results will be displayed in another screen.
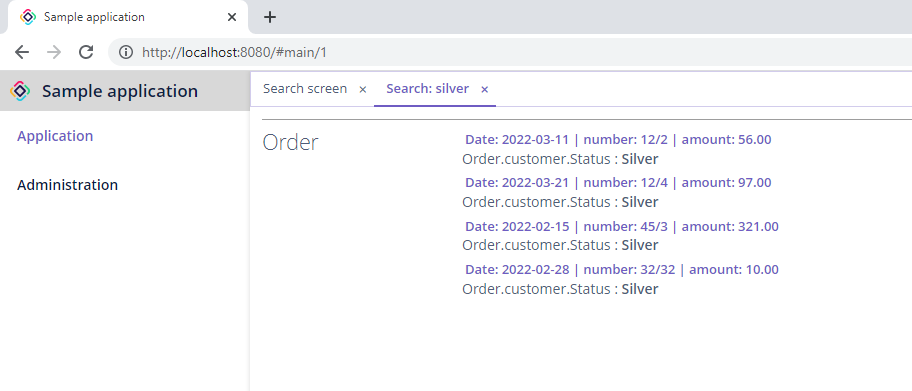
By clicking on one of the results, the editor screen will be opened.
