5. Working with Data in UI
At this stage of development, the application has the Steps and Departments management and the default User management with the added Onboarding status attribute. Now you need to link Users with Steps and Departments.
In this chapter, you will do the following:
-
Add
departmentandjoiningDateattributes to theUserentity and show them in UI. -
Create the
UserStepentity which links a user with an onboarding step. -
Add a collection of
UserStepentities to theUserentity and show it on theUser.editscreen. -
Implement the generation and saving of
UserStepinstances in theUser.editscreen.
The diagram below shows the entities and attributes addressed in this chapter:
Adding Reference Attribute
You’ve already done a similar task when created the HR Manager attribute of the Department entity as a reference to User. Now you need to create a link in the opposite direction: a User should have a reference to Department.
If your application is running, stop it using the Stop button ( ) in the main toolbar.
Double-click on the User entity in Jmix tool window and select its last attribute (to add the new attribute to the end).
Click Add ( ) in the Attributes toolbar.
In the New Attribute dialog, enter department into the Name field. Then select:
-
Attribute type:
ASSOCIATION -
Type:
Department -
Cardinality: Many to One
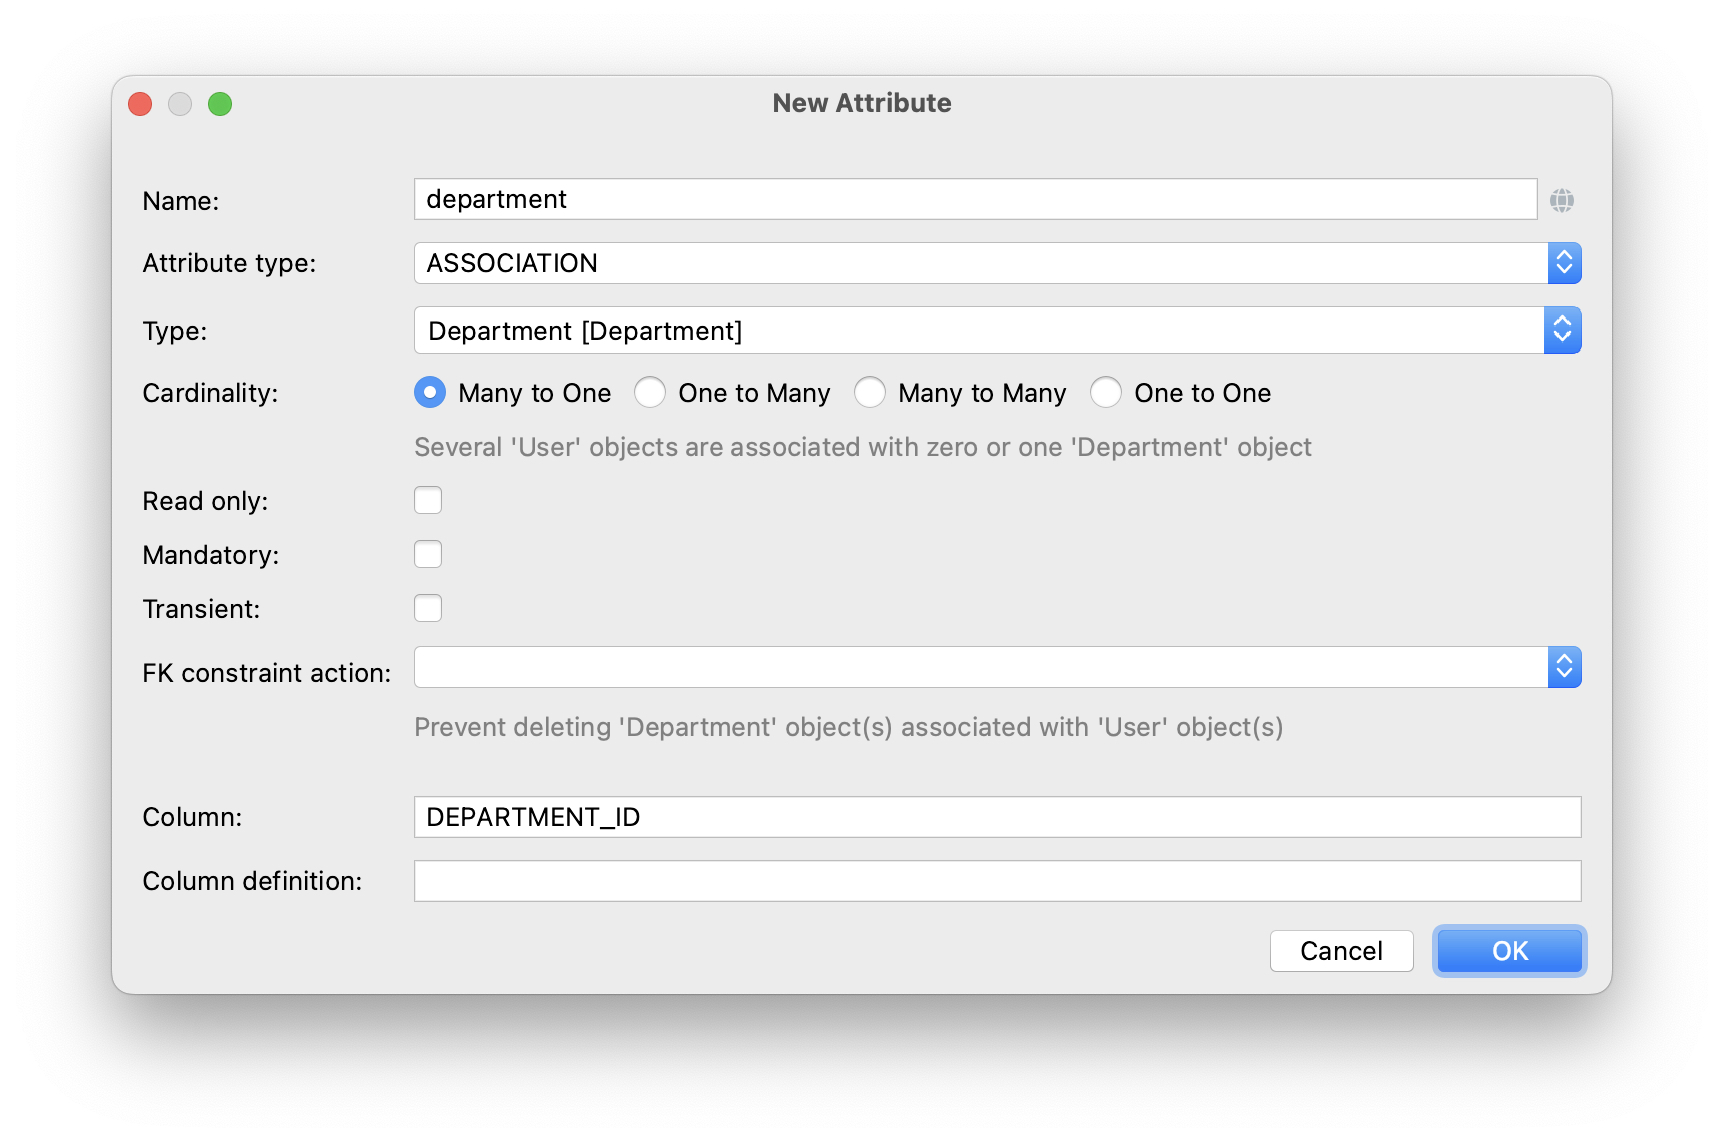
Click OK.
Select the new department attribute and click the Add to Screens ( ) button in the Attributes toolbar:
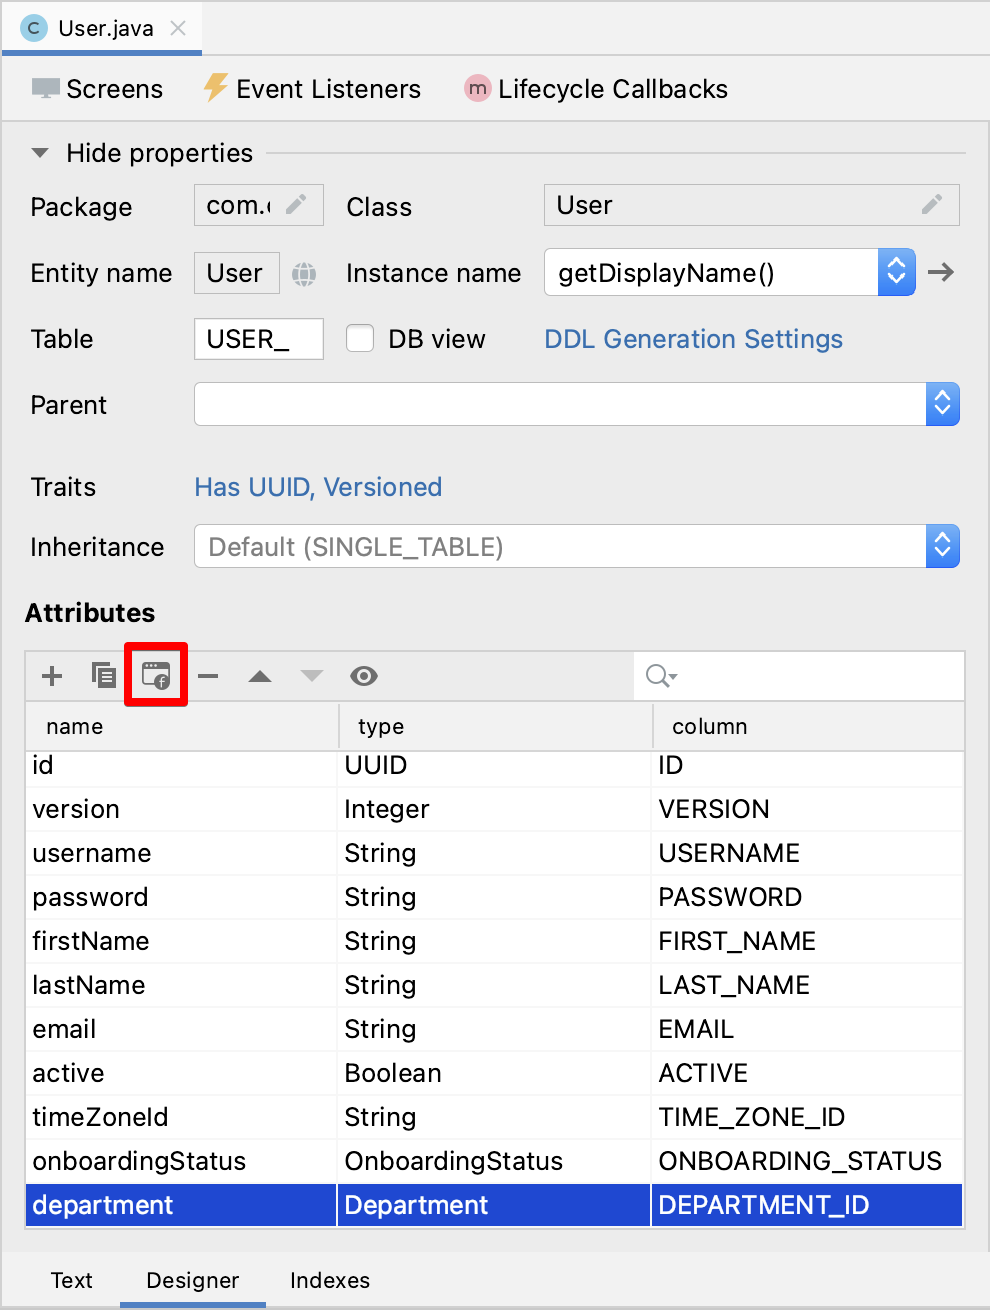
The appeared dialog window will show User.edit and User.browse screens. Select both screens and click OK.
Studio will add the department attribute to the table component of the User.browse screen and to the form component of the User.edit screen.
You may also notice the following code added by Studio automatically to User.browse:
<data readOnly="true">
    <collection id="usersDc"
                class="com.company.onboarding.entity.User">
        <fetchPlan extends="_base">
            <property name="department" fetchPlan="_base"/> <!-- added -->
        </fetchPlan>
And to User.edit:
<data>
    <instance id="userDc"
              class="com.company.onboarding.entity.User">
        <fetchPlan extends="_base">
            <property name="department" fetchPlan="_base"/> <!-- added -->
        </fetchPlan>
With this code, the referenced Department will be loaded together with the User in the same database query.
The screens would work without including department in the fetch plans due to the lazy loading of references. But in this case, the references would be loaded by separate requests to the database. Lazy loading can affect performance of the browse screen, because then it loads a list of Users with a first request, and after that, executes separate requests for loading a Department of each User in the list (N+1 query problem).
|
Let’s run the application and see the new attribute in action.
Click the Debug button ( ) in the main toolbar.
Studio will generate a Liquibase changelog for adding the DEPARTMENT_ID column to the USER_ table, creating a foreign key constraint and an index. Confirm the changelog.
Studio will execute the changelog and start the application.
Open http://localhost:8080 in your web browser and log in to the application with admin / admin credentials.
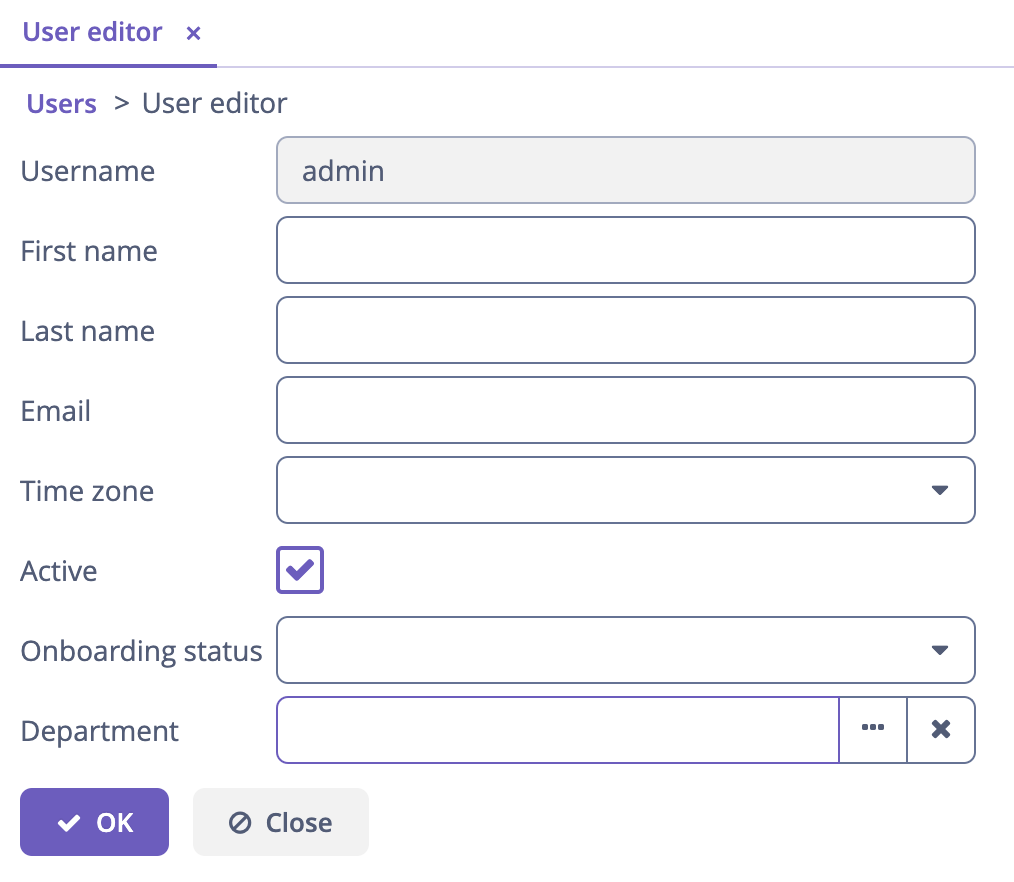
Click on the Users item in the Application menu. You will see the Department column in the User.browse screen and Department picker field in User.edit:
Using Dropdown for Selecting Reference
By default, Studio generates the entityPicker component for selecting references. You can see it in the User.edit screen. Open user-edit.xml and switch to XML editor using the button in the top panel:

Find the entityPicker component inside the form:
<layout ...>
    <form id="form" dataContainer="userDc">
        <column width="350px">
            ...
            <entityPicker id="departmentField" property="department"/>
        </column>
    </form>
This component allows you to select a related entity from a lookup screen with filtering, sorting and paging. But when the expected number of records is relatively small (say, less than 1000), it’s more convenient to select references from a simple dropdown list.
Let’s change the User.edit screen and use the entityComboBox component for selecting a Department.
Change the XML element of the component to entityComboBox:
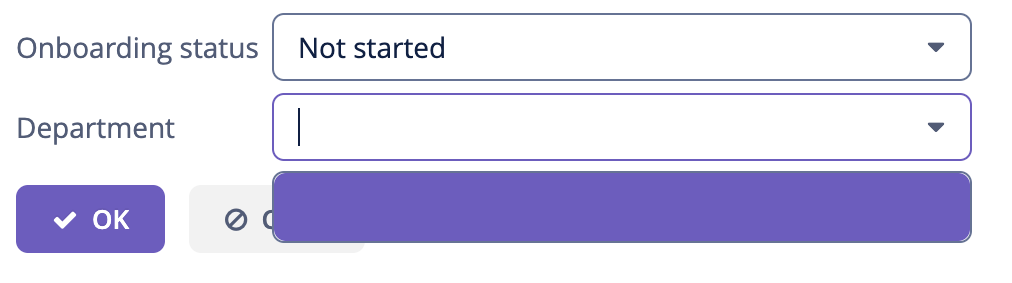
<entityComboBox id="departmentField" property="department"/>Switch to the running application and reopen the User editor screen.
You will see that the Department field is now a dropdown, but its list is empty, even if you have created some Departments.
Creating Options Data Container
Let’s provide a list of options to the entityComboBox component displaying the reference to Department. The list should contain all Departments ordered by name.
Select Data components section in the Component Palette tool window, drag the Collection item and drop it onto the data element in the Component Hierarchy. In the Data Container Properties Editor window, select Department in the Entity field and click OK:
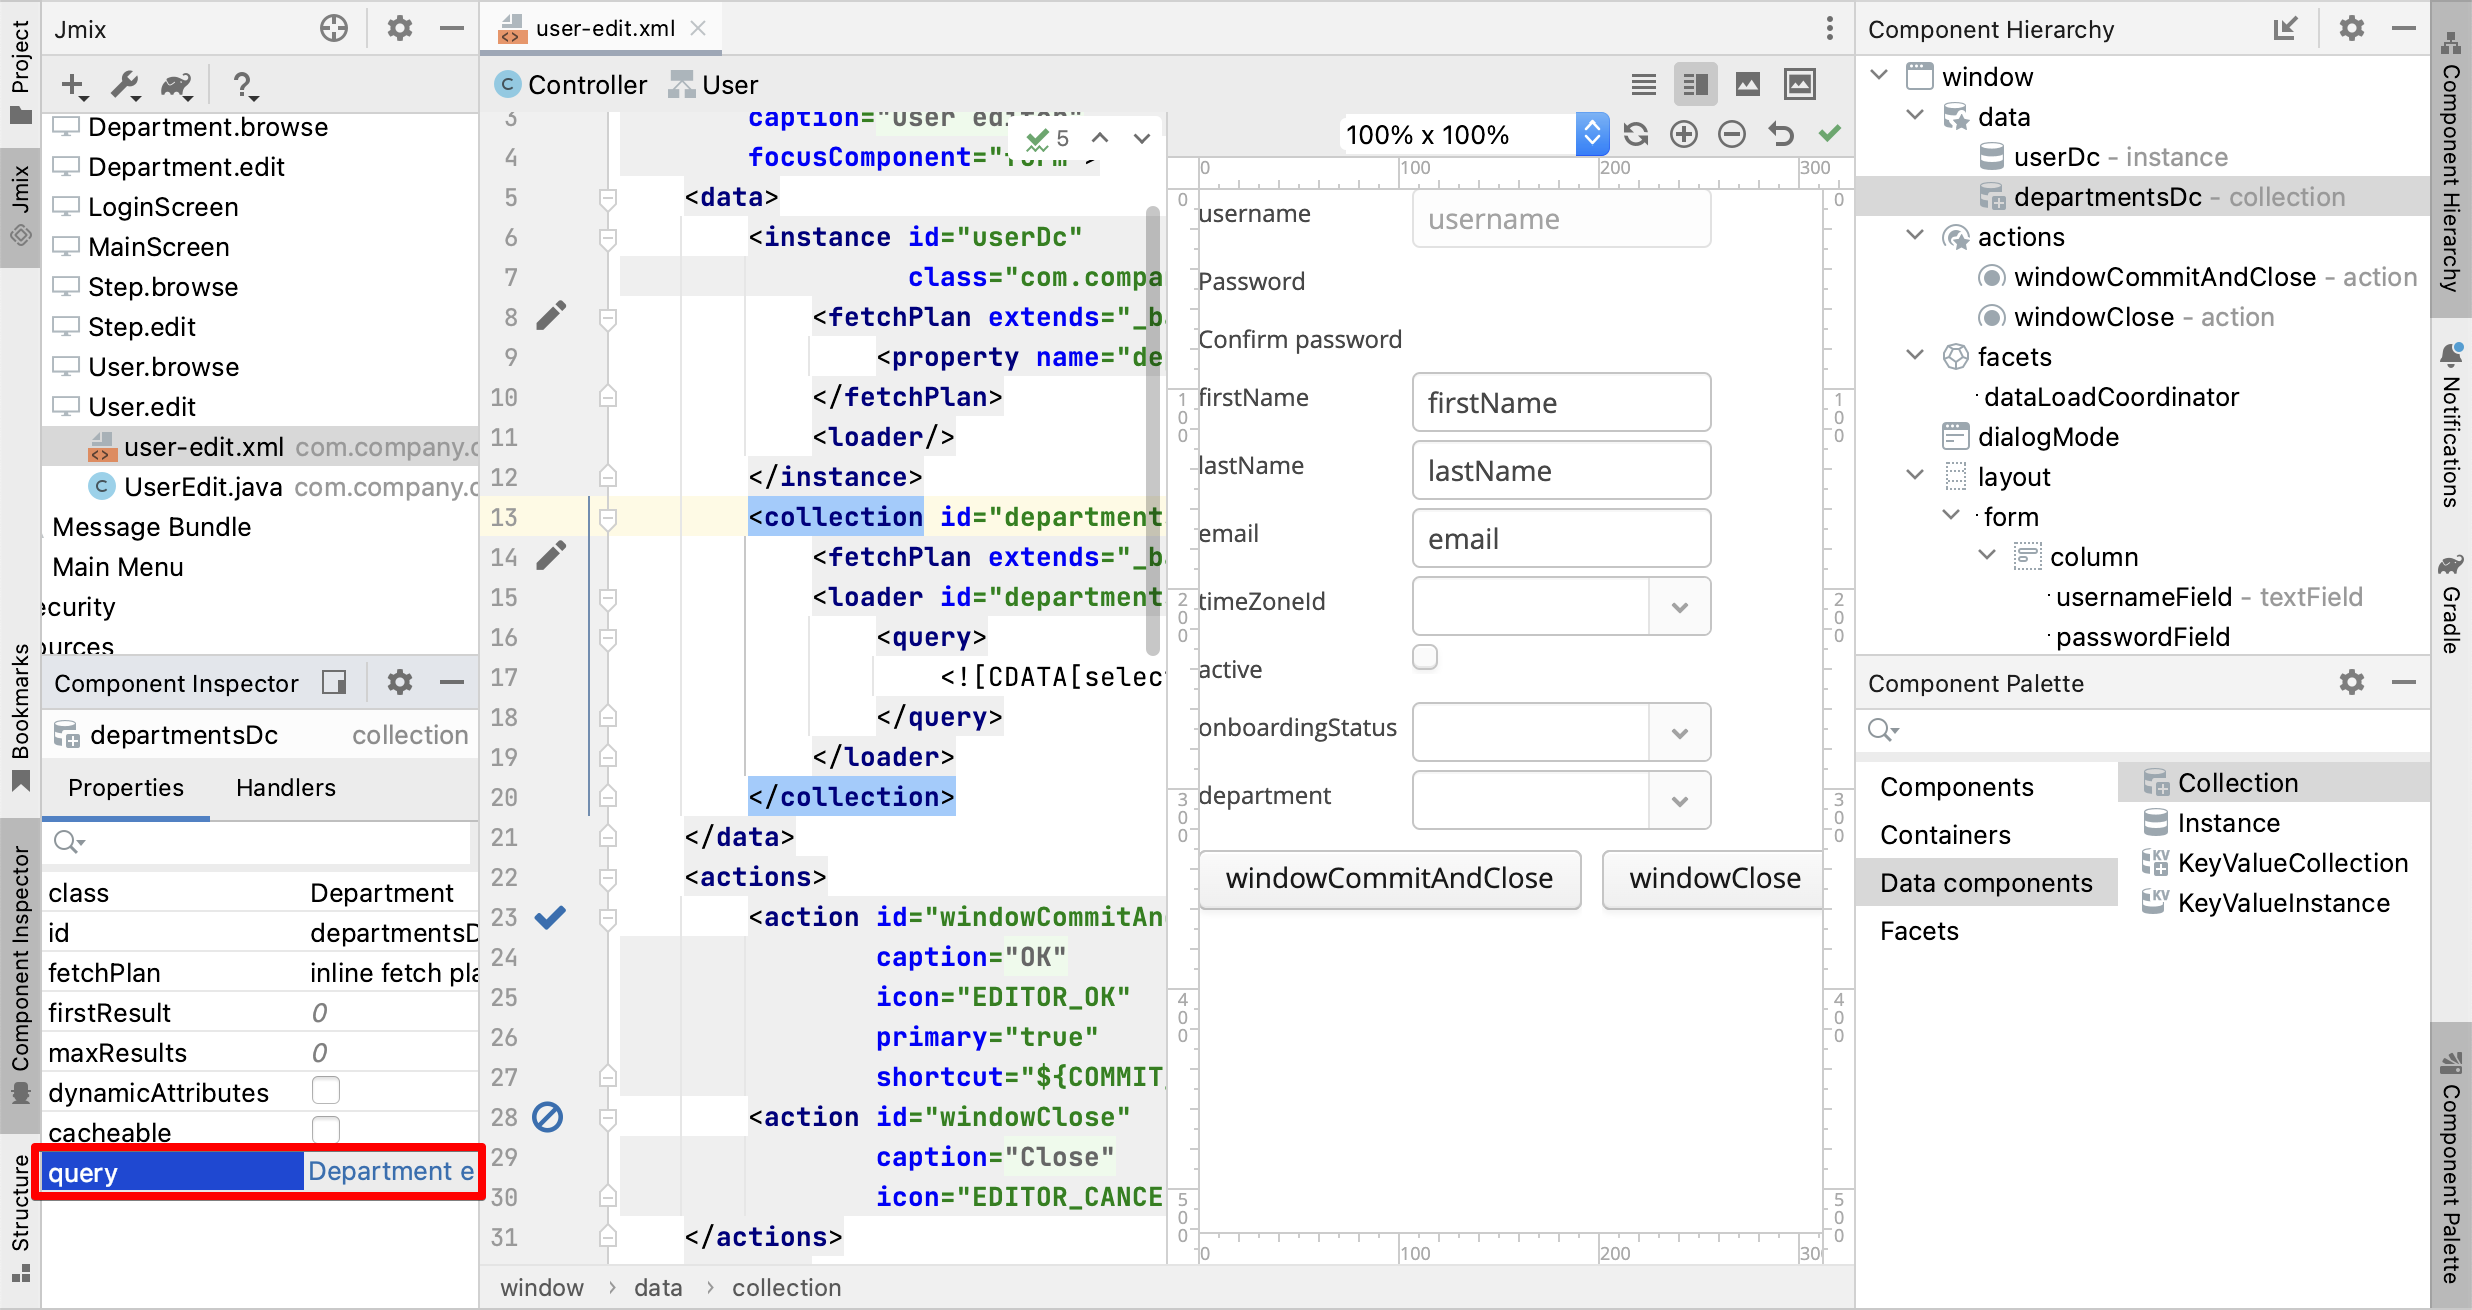
The new collection element with departmentsDc id will be created under the data element in Component Hierarchy and in XML:
<data>
    ...
    <collection id="departmentsDc" class="com.company.onboarding.entity.Department">
        <fetchPlan extends="_base"/>
        <loader id="departmentsDl">
            <query>
                <![CDATA[select e from Department e]]>
            </query>
        </loader>
    </collection>
</data>
This element defines a collection data container and a loader for it. The data container will contain a list of Department entities loaded by the loader with the specified query.
You can edit the query right in the XML or use the JPQL designer opened by the link in the query attribute shown in Component Inspector tool window:
In the JPQL Query Designer window, switch to the ORDER tab and add the name attribute to the list:
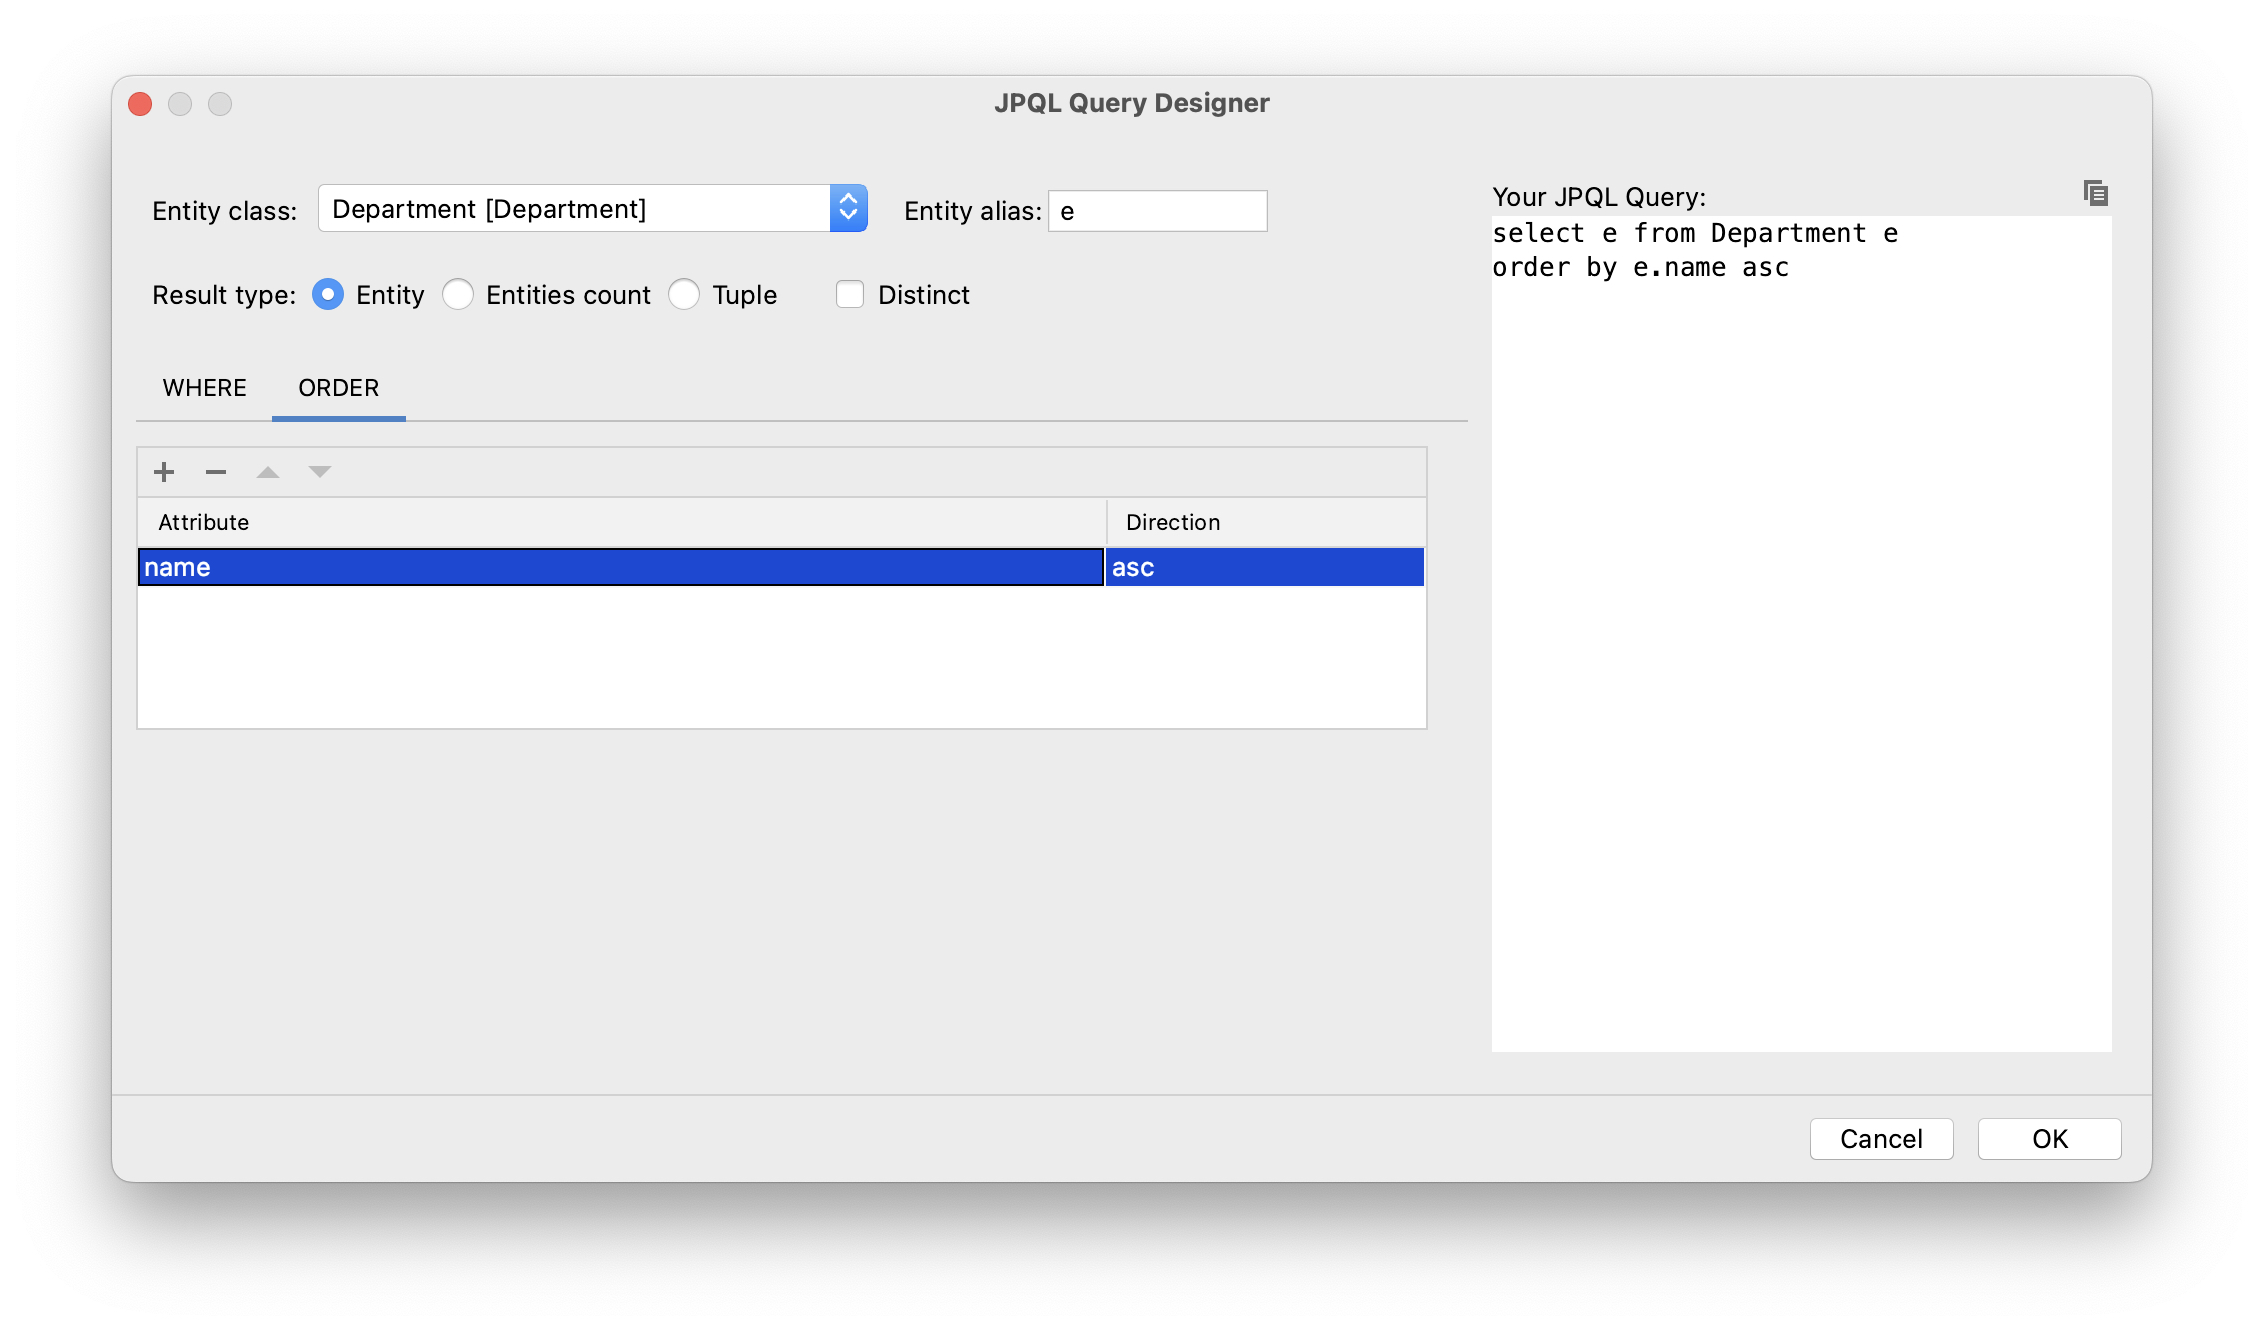
Click OK.
The resulting query in XML will look like this:
<data>
    ...
    <collection id="departmentsDc" class="com.company.onboarding.entity.Department">
        <fetchPlan extends="_base"/>
        <loader id="departmentsDl">
            <query>
                <![CDATA[select e from Department e
                order by e.name asc]]>
            </query>
        </loader>
    </collection>
</data>
Now you need to link the entityComboBox component with the departmentsDc collection container.
Select departmentField in Component Hierarchy and select departmentsDc for the optionsContainer attribute in Component Inspector:

Switch to the running application and reopen the User editor screen.
You will see that the Department dropdown now has a list of options:
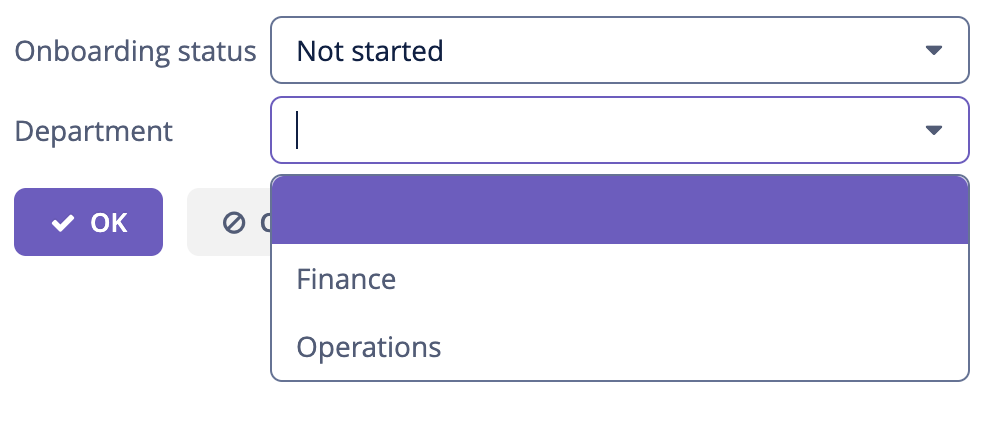
The entityComboBox component allows you to filter options by entering text into the field. But keep in mind that filtering is performed in the server memory, all options are loaded from the database at once.
|
Creating UserStep Entity
In this section, you will create the UserStep entity which represents onboarding Steps for a particular User:
If your application is running, stop it using the Stop button () in the main toolbar.
In the Jmix tool window, click New () → JPA Entity and create UserStep entity with Versioned trait as you did before.
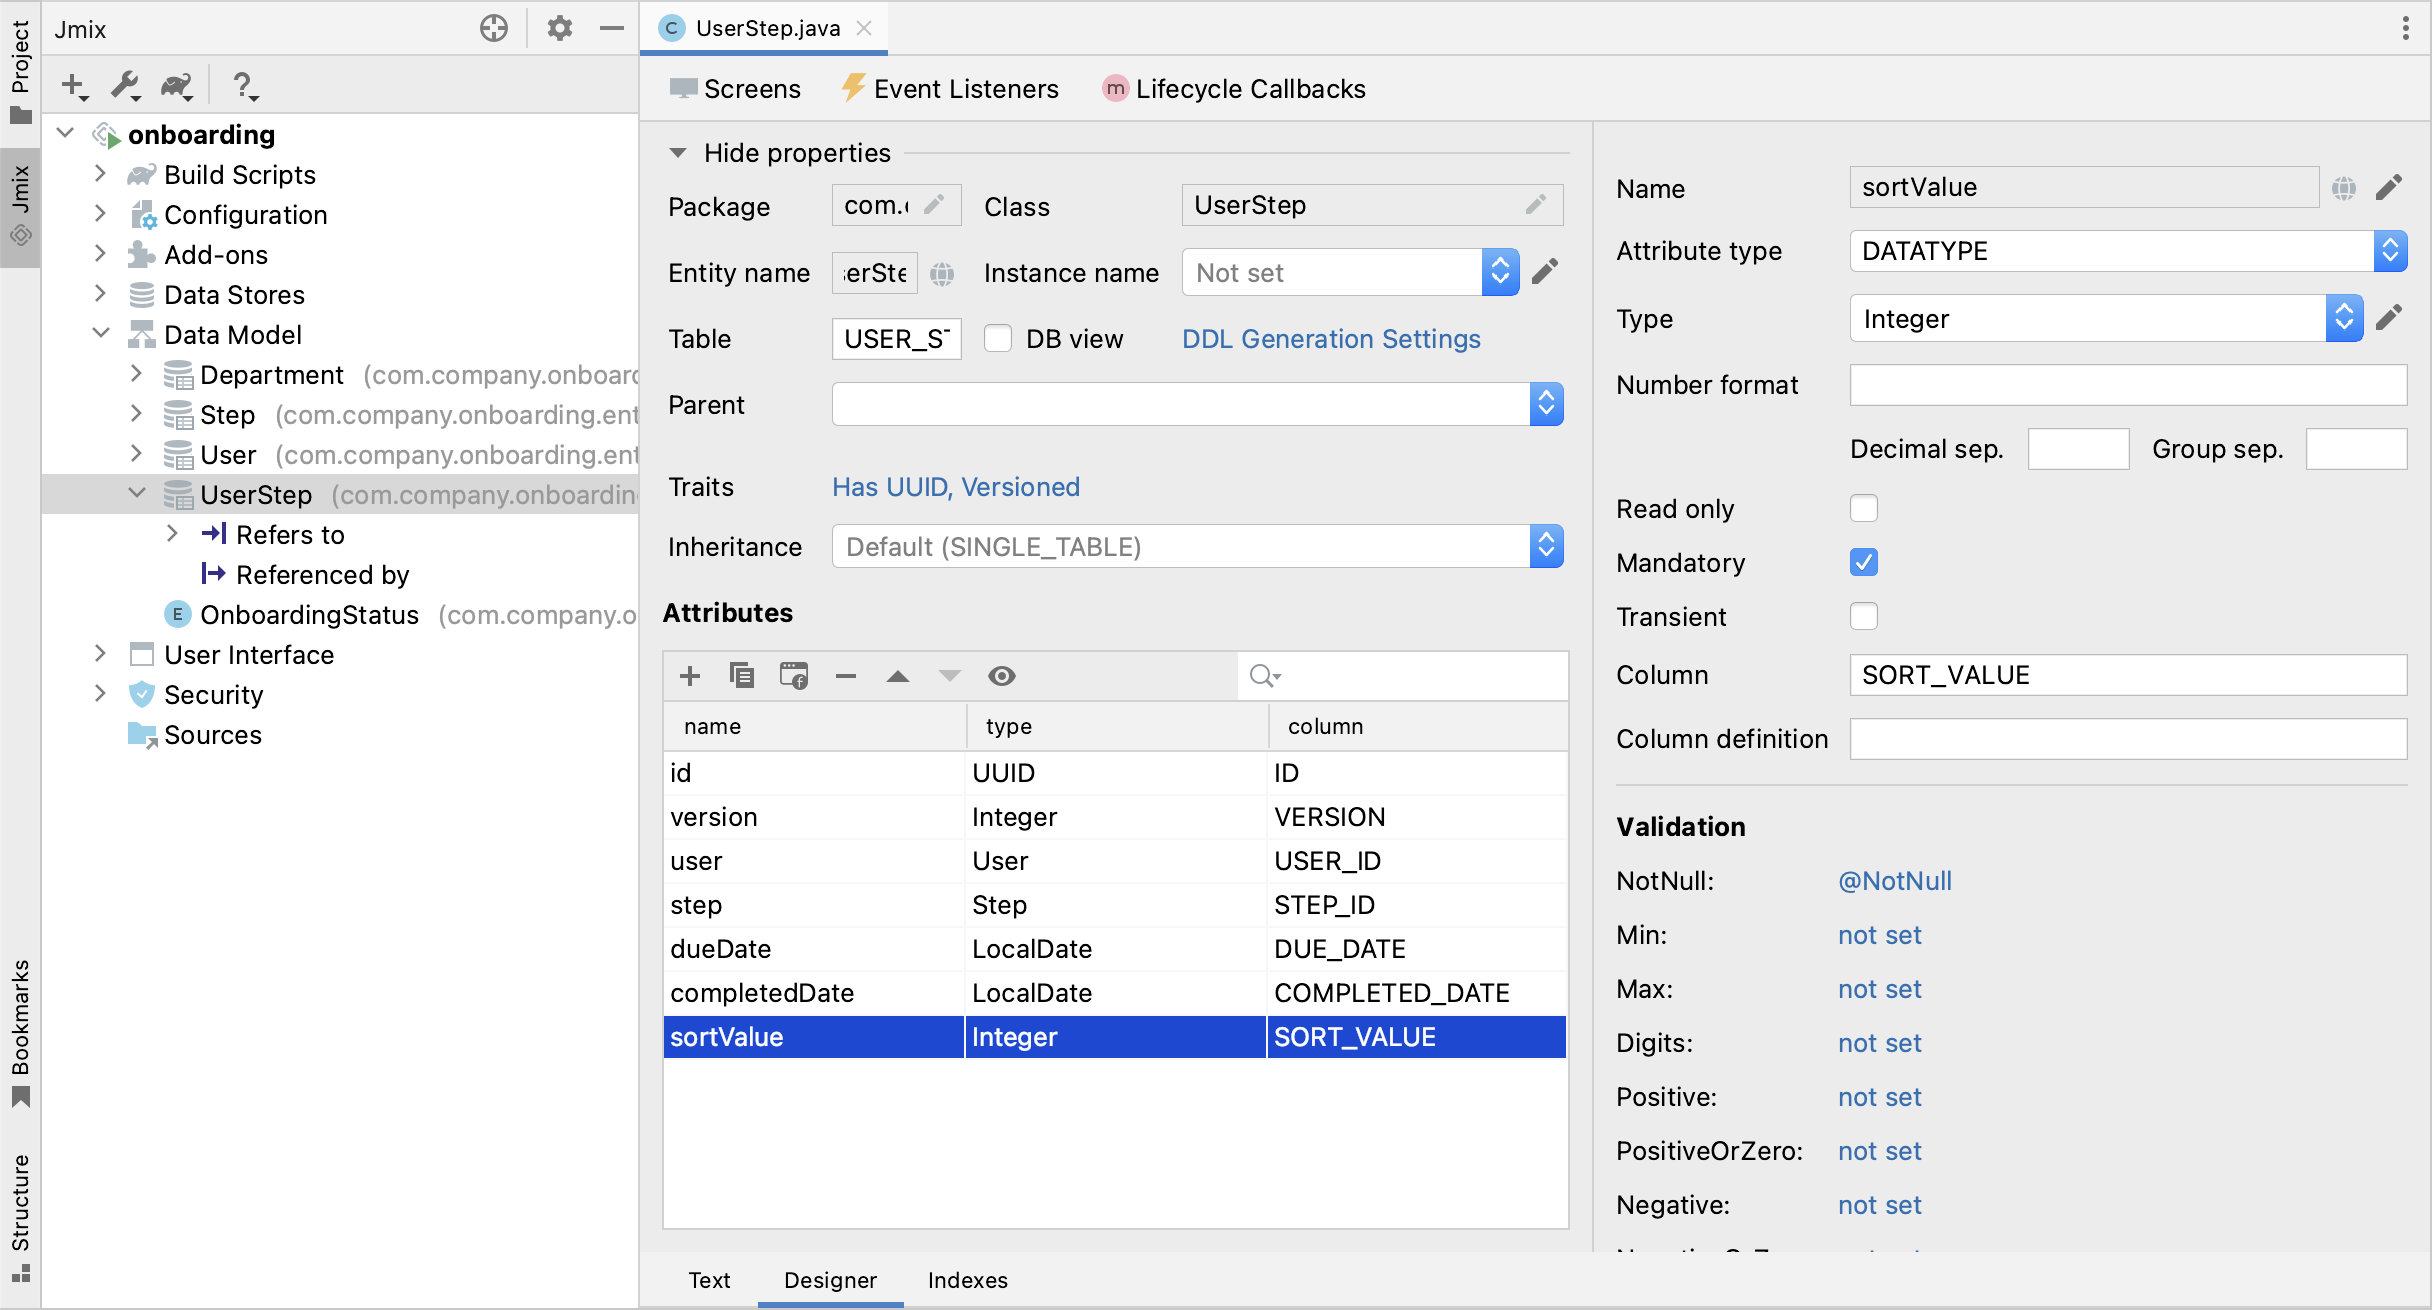
Add the following attributes to the new entity:
| Name | Attribute type | Type | Cardinality | Mandatory |
|---|---|---|---|---|
user |
ASSOCIATION |
User |
Many to One |
true |
step |
ASSOCIATION |
Step |
Many to One |
true |
dueDate |
DATATYPE |
LocalDate |
- |
true |
completedDate |
DATATYPE |
LocalDate |
- |
false |
sortValue |
DATATYPE |
Integer |
- |
true |
The final state of the entity designer should look as below:
Adding Composition Attribute
Consider the relationship between User and UserStep entities. UserStep instances exist only in the context of a particular User instance (owned by it). A UserStep instance cannot change its owner - it just doesn’t make any sense. Also, there are no links to UserStep from other data model objects, they are completely encapsulated in a User context.
In Jmix, such a relationship is called composition: the User is composed of a collection of UserSteps, among other attributes.
| Composition in Jmix implements the Aggregate pattern of Domain-Driven Design. |
It’s often convenient to create an attribute that contains the collection of composition items in the owning entity.
Let’s create the steps attribute in the User entity:
If your application is running, stop it using the Stop button () in the main toolbar.
Click Add () in the Attributes toolbar of the User entity designer. In the New Attribute dialog, enter steps into the Name field. Then select:
-
Attribute type:
COMPOSITION -
Type:
UserStep -
Cardinality: One to Many
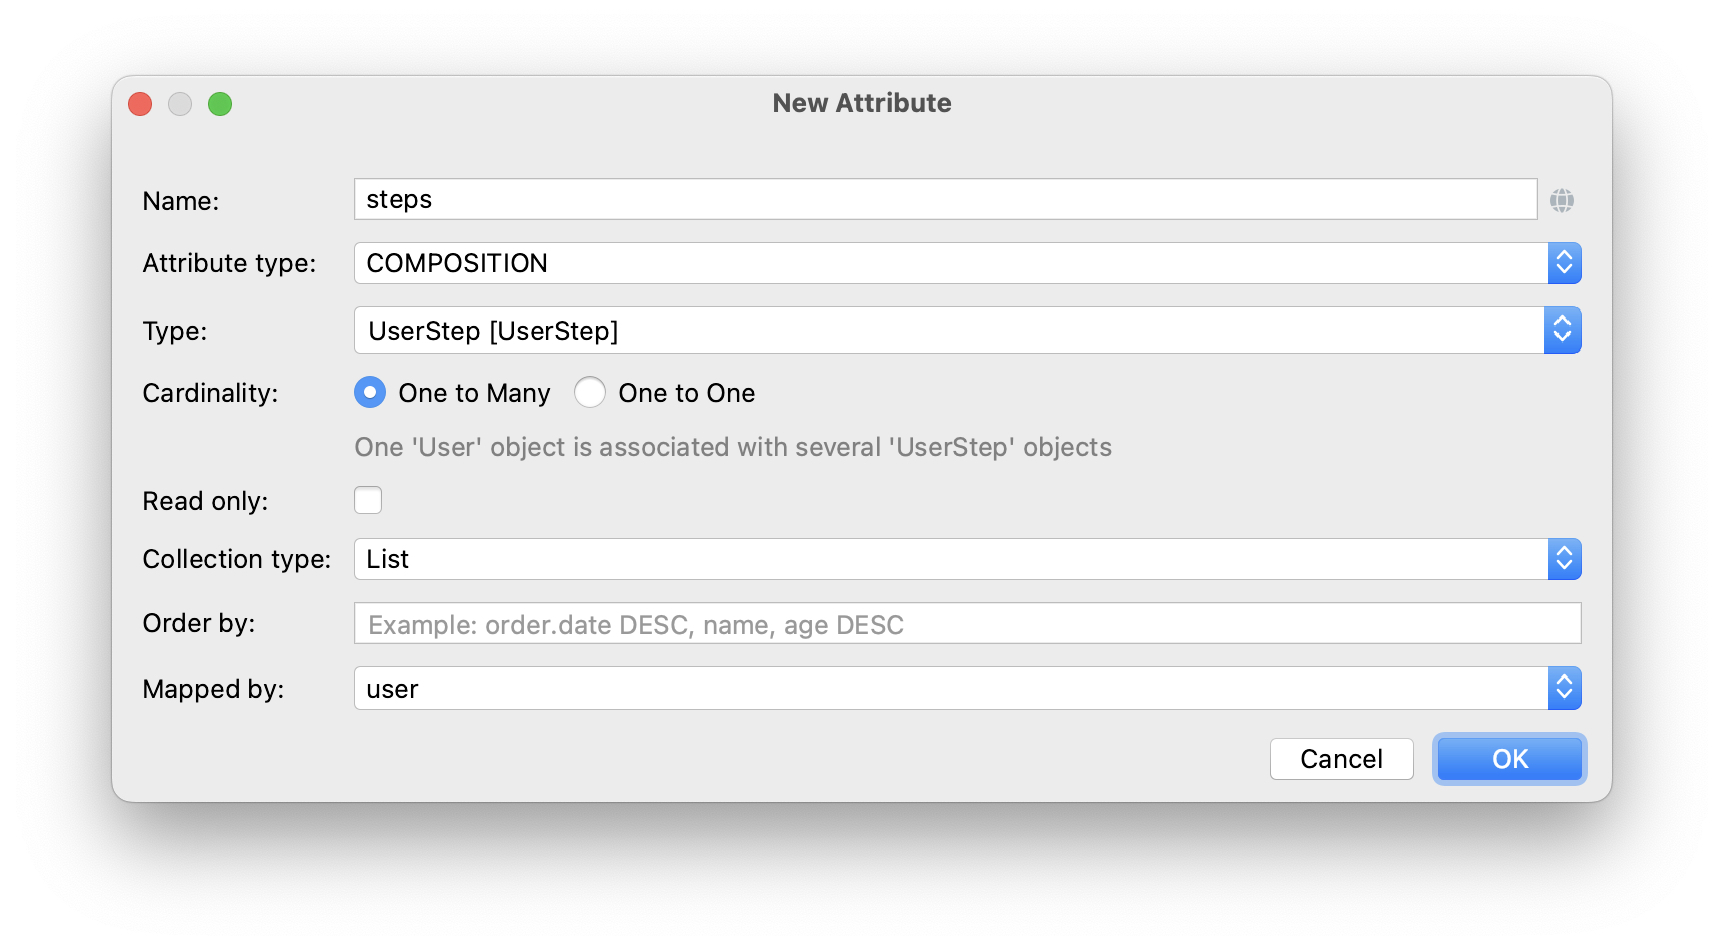
Notice that user is selected automatically in the Mapped by field. It’s the attribute of the UserStep entity mapped to a database column which maintains the relationship between UserSteps and Users (the foreign key).
Click OK.
The attribute source code will have the @Composition annotation:
@Composition
@OneToMany(mappedBy = "user")
private List<UserStep> steps;
UserSteps should be displayed in the User edit screen, so select the new steps attribute and click the Add to Screens () button in the Attributes toolbar. Select User.edit screen and click OK.
Studio will modify user-edit.xml as shown below:
<data>
    <instance id="userDc"
              class="com.company.onboarding.entity.User">
        <fetchPlan extends="_base">
            <property name="department" fetchPlan="_base"/>
            <property name="steps" fetchPlan="_base"/> (1)
        </fetchPlan>
        <loader/>
        <collection id="stepsDc" property="steps"/> (2)
    </instance>
    ...
<layout ...>
    <form id="form" dataContainer="userDc">
        ...
    </form>
    <groupBox id="stepsBox" ...>
        <table id="stepsTable" dataContainer="stepsDc" ...> (3)
            <actions>
                <action id="create" type="create"/>
                <action id="edit" type="edit"/>
                <action id="remove" type="remove"/>
            </actions>
            <columns>
                <column id="version"/>
                <column id="dueDate"/>
                <column id="completedDate"/>
                <column id="sortValue"/>
            </columns>
            <buttonsPanel>
                <button action="stepsTable.create"/>
                <button action="stepsTable.edit"/>
                <button action="stepsTable.remove"/>
            </buttonsPanel>
        </table>
</groupBox>| 1 | Attribute steps of the fetch plan ensures the collection of UserSteps is loaded eagerly together with User. |
| 2 | The nested stepsDc collection data container enables binding of visual components to the steps collection attribute. |
| 3 | The table component wrapped in groupBox displays data from the linked stepsDc collection container. |
Let’s run the application and see these changes in action.
Click the Debug button () in the main toolbar.
Studio will generate a Liquibase changelog for creating the USER_STEP table, foreign key constraints and indexes for references to USER_ and STEP. Confirm the changelog.
Studio will execute the changelog and start the application.
Open http://localhost:8080 in your web browser and log in to the application with admin / admin credentials.
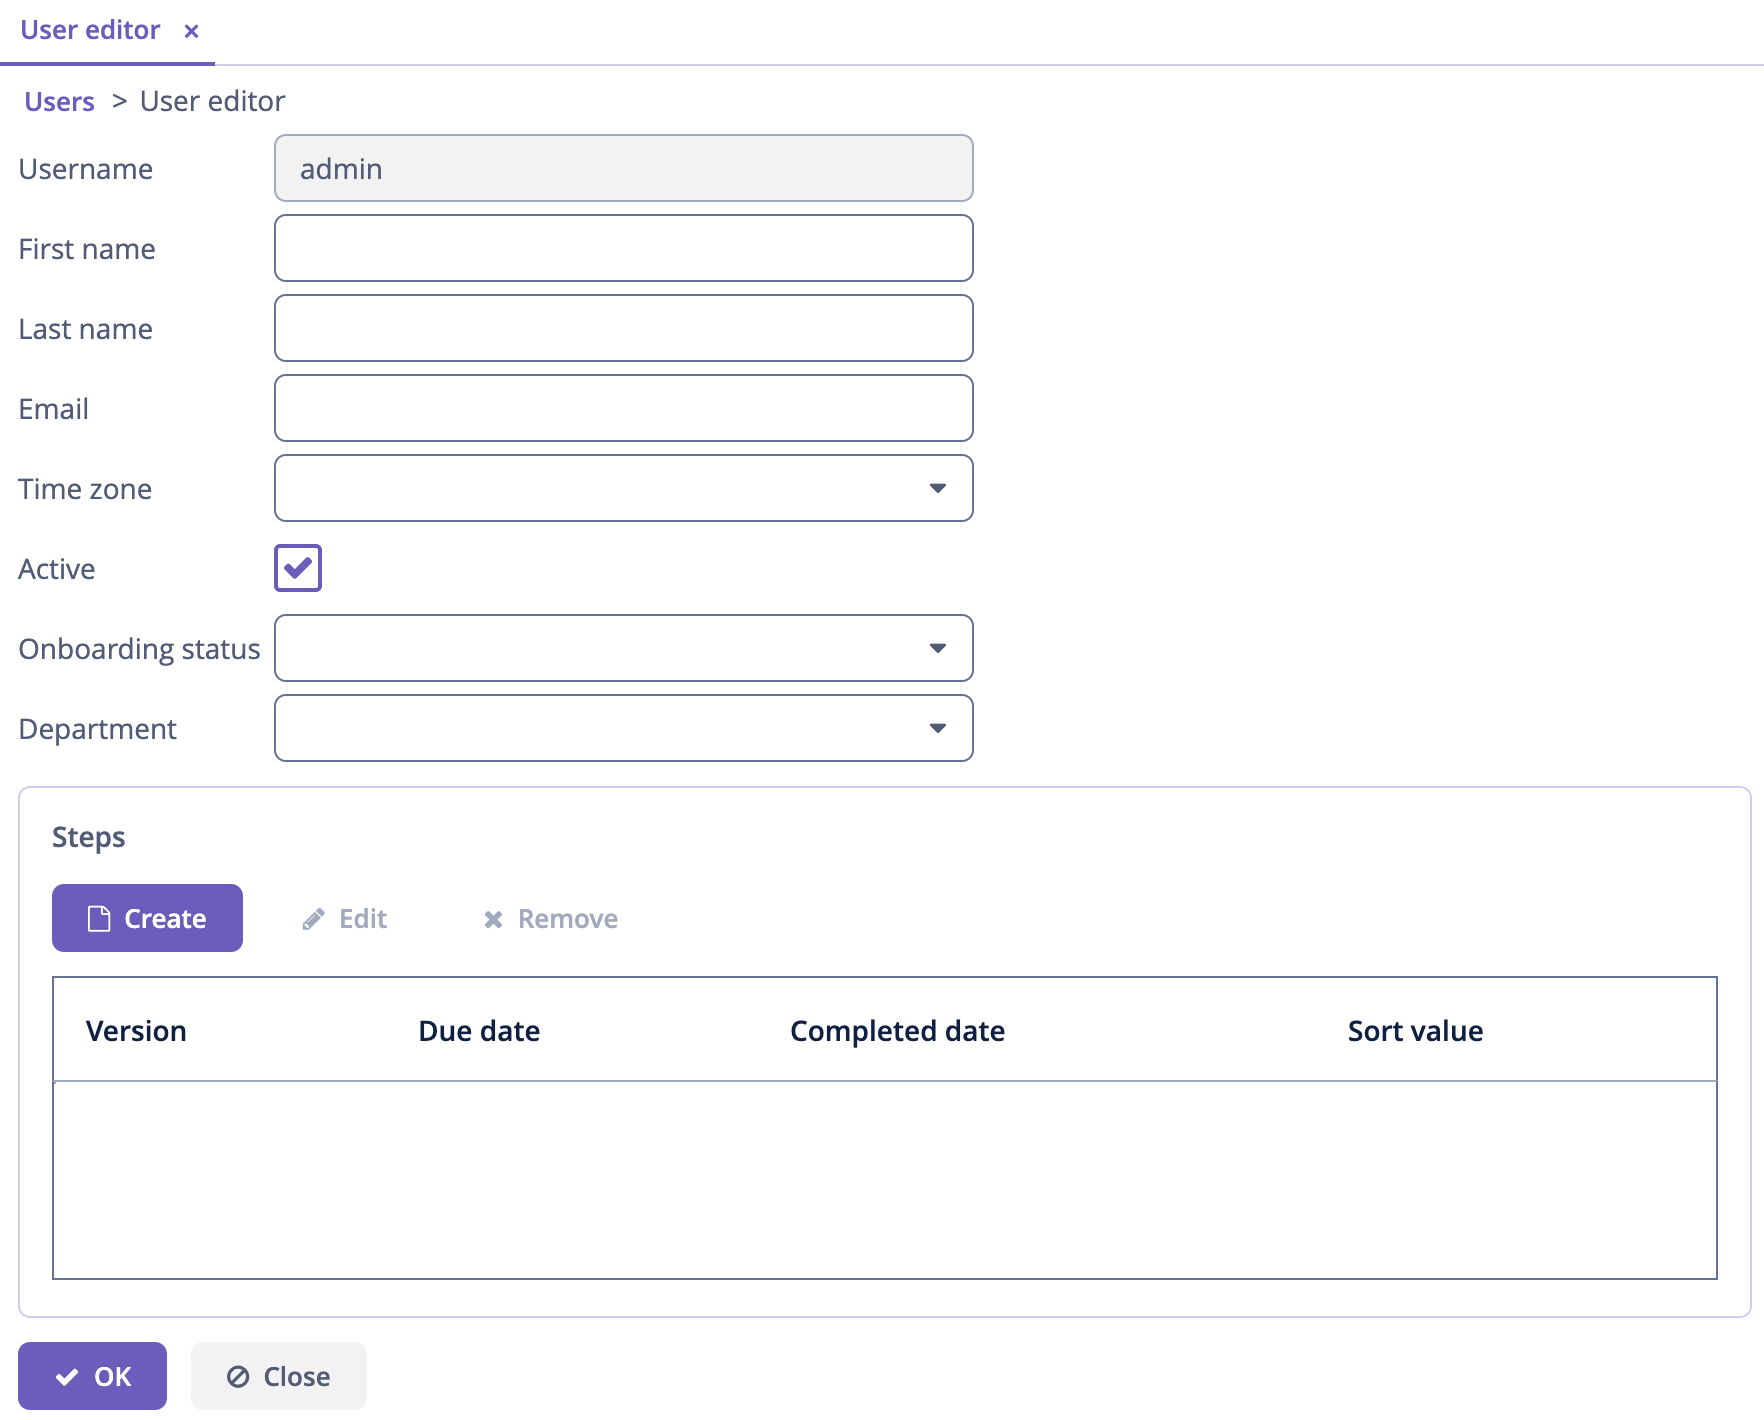
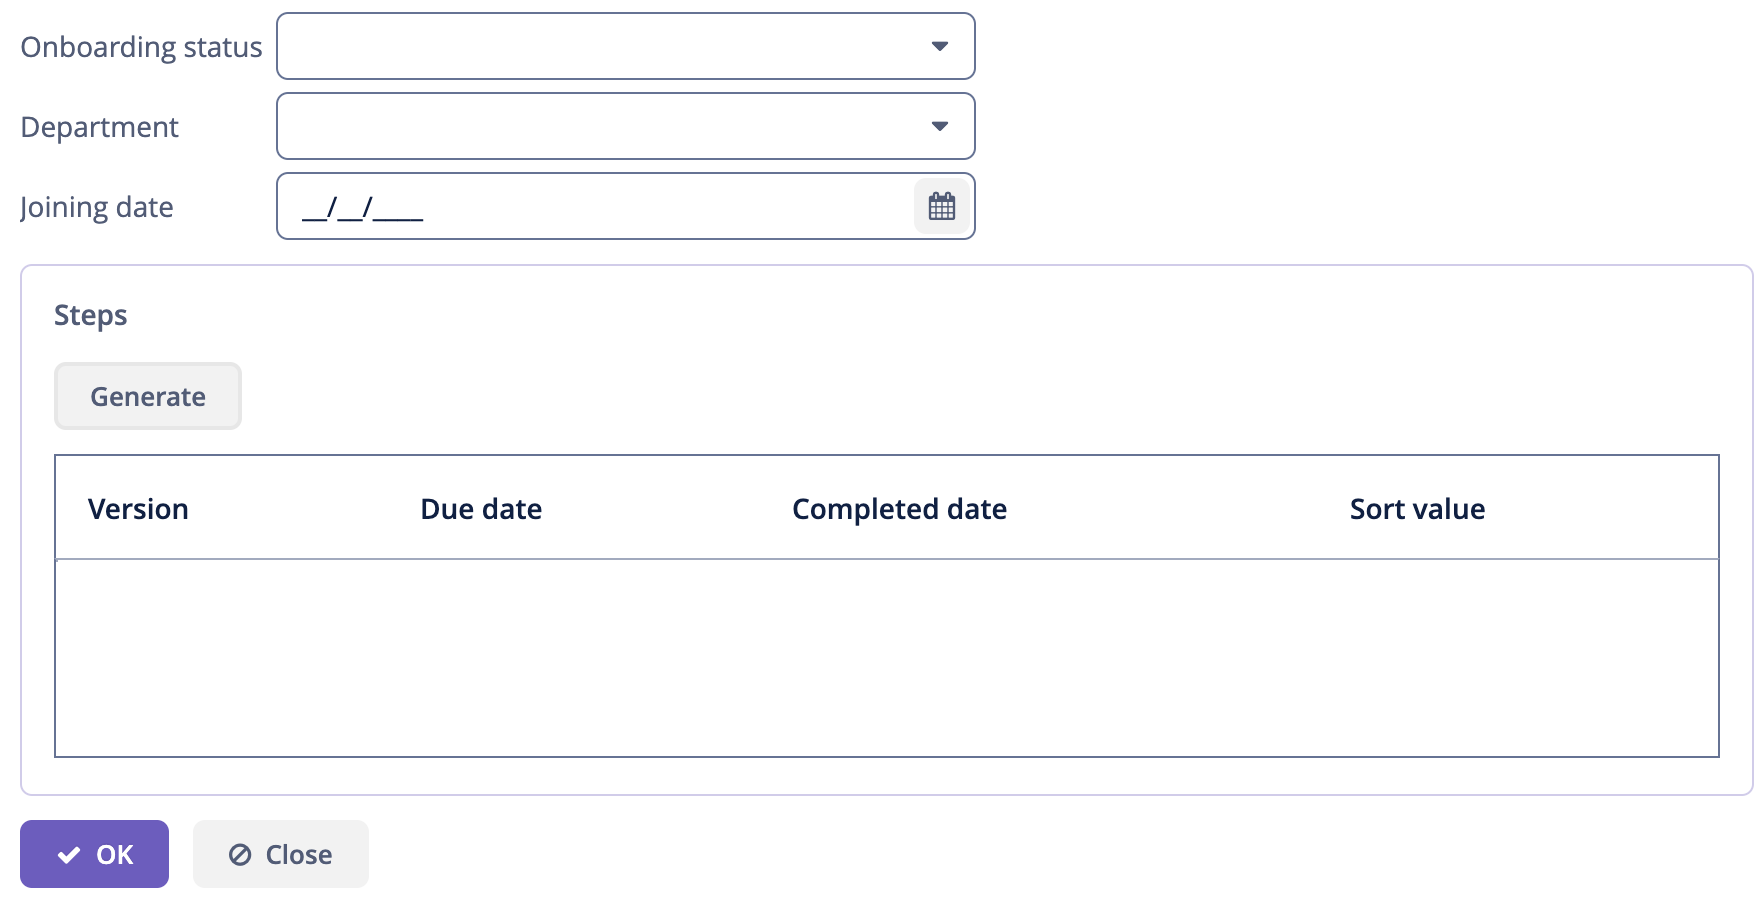
Open a user for editing. You will see the Steps table displaying the UserStep entity:
If you click Create in the Steps table, you will get an exception saying that Screen 'UserStep.edit' is not defined. This is true - you didn’t create an edit screen for the UserStep entity. But you don’t actually need it, because UserStep instances should be generated from the predefined Step instances for the particular User.
Generating UserSteps for User
In this section, you will implement the generation and showing of UserStep instances for the edited User.
Adding JoiningDate Attribute
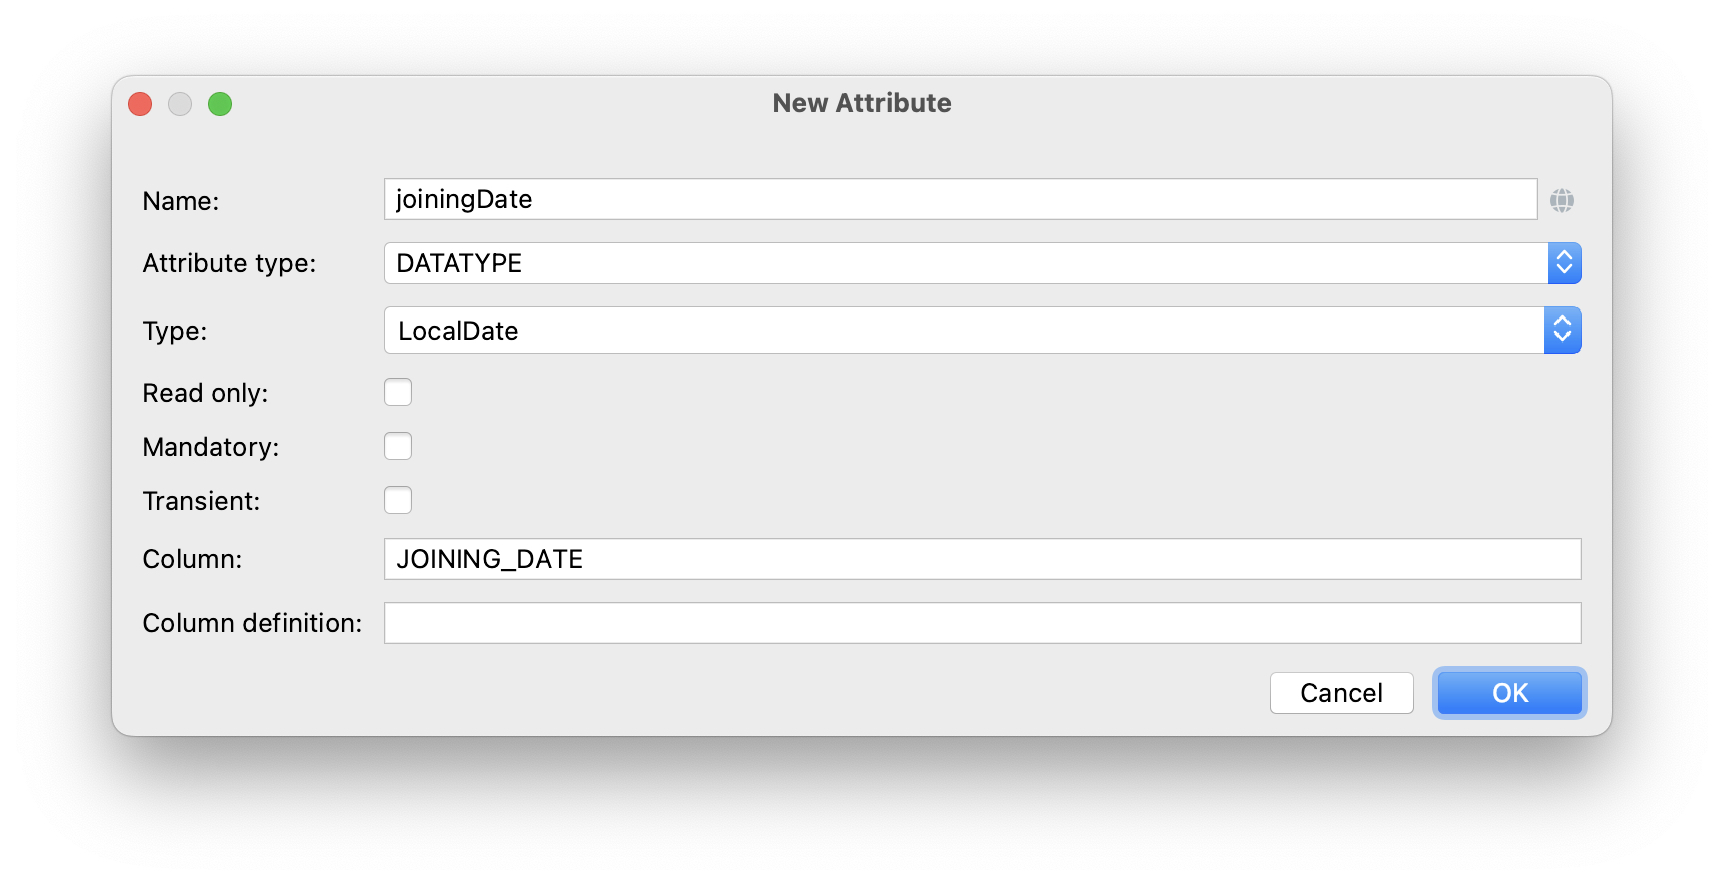
First, let’s add the joiningDate attribute to the User entity:
It will be used to calculate the dueDate attribute of the generated UserStep entity: UserStep.dueDate = User.joiningDate + Step.duration.
If your application is running, stop it using the Stop button () in the main toolbar.
Click Add () in the Attributes toolbar of the User entity designer. In the New Attribute dialog, enter joiningDate into the Name field and select LocalDate in the Type field:
Click OK.
Select the newly created joiningDate attribute and click the Add to Screens () button in the Attributes toolbar. Select both User.edit and User.browse screens in the appeared dialog and click OK.
Click the Debug button () in the main toolbar.
Studio will generate a Liquibase changelog for adding the JOINING_DATE column to the USER_ table. Confirm the changelog.
Studio will execute the changelog and start the application. Open http://localhost:8080 in your web browser, log in to the application and check that the new attribute is shown in the User browse edit screens.
Adding Custom Button
Now you need to remove the standard actions and buttons for managing UserSteps and add a button for starting a custom logic of creating entities.
Open user-edit.xml and remove the actions element and all button elements from table:
<table id="stepsTable" dataContainer="stepsDc" width="100%" height="200px">
    <columns>
        <column id="version"/>
        <column id="dueDate"/>
        <column id="completedDate"/>
        <column id="sortValue"/>
    </columns>
    <buttonsPanel>
    </buttonsPanel>
</table>
Then drag and drop the Button component from Component Palette onto the buttonsPanel element in Component Hierarchy. Then select the created button element and set its id to generateButton and caption to Generate in Component Inspector. After that, switch to the Handlers tab and create a ClickEvent handler method:

Press Ctrl/Cmd+S and switch to the running application. Reopen the User edit screen and check that the Generate button is shown instead of the standard CRUD buttons:
Creating and Saving UserStep Instances
Let’s implement the logic of generating UserStep instances.
Add the following fields to the UserEdit controller:
public class UserEdit extends StandardEditor<User> {

    @Autowired
    private DataManager dataManager;

    @Autowired
    private DataContext dataContext;

    @Autowired
private CollectionPropertyContainer<UserStep> stepsDc;|
You can inject screen components and Spring beans using the Inject button in the actions panel: 
|
Add the logic of creating and saving UserStep objects to the generateButton click handler method:
@Subscribe("generateButton")
public void onGenerateButtonClick(Button.ClickEvent event) {
    User user = getEditedEntity(); (1)

    if (user.getJoiningDate() == null) { (2)
        notifications.create()
                .withCaption("Cannot generate steps for user without 'Joining date'")
                .show();
        return;
    }

    List<Step> steps = dataManager.load(Step.class)
            .query("select s from Step s order by s.sortValue asc")
            .list(); (3)

    for (Step step : steps) {
        if (stepsDc.getItems().stream().noneMatch(userStep ->
                    userStep.getStep().equals(step))) { (4)
            UserStep userStep = dataContext.create(UserStep.class); (5)
            userStep.setUser(user);
            userStep.setStep(step);
            userStep.setDueDate(user.getJoiningDate().plusDays(step.getDuration()));
            userStep.setSortValue(step.getSortValue());
            stepsDc.getMutableItems().add(userStep); (6)
        }
    }
}| 1 | Use getEditedEntity() method of the base StandardEditor class to get the User being edited. |
| 2 | If joiningDate attribute is not set, show a message and quit. |
| 3 | Load the list of registered Steps. |
| 4 | Skip the Step if it’s already in the stepsDc collection container. |
| 5 | Create new UserStep instance using DataContext.create() method. |
| 6 | Add the new UserStep instance to the stepsDc collection container to show it in the UI. |
When you create an entity instance through the DataContext object, the instance becomes managed by DataContext and is saved automatically when the screen is committed, that is when you click OK button of the screen.
|
Press Ctrl/Cmd+S and switch to the running application. Reopen the User edit screen and check that when you click the Generate button, a few records corresponding to the onboarding Steps are created.
If you commit the screen by clicking OK, all created UserSteps will be saved. If you click Cancel, nothing will be saved to the database. It happens because in the code above, you don’t save the created UserStep objects directly to the database. Instead, you merge them into the screen’s DataContext by creating them through DataContext.create(). So the new instances are saved only when the entire DataContext is committed.
Improving UserSteps Table
In the sections below, you will finalize the UI for working with generated UserSteps.
Ordering Nested Collection
You may notice that when you open a User with previously generated UserSteps, they are not ordered according to the sortValue attribute:

The table displays the steps collection attribute of the User entity, so you can introduce ordering on the data model level.
Open the User entity, select steps attribute and enter sortValue to the Order by field:
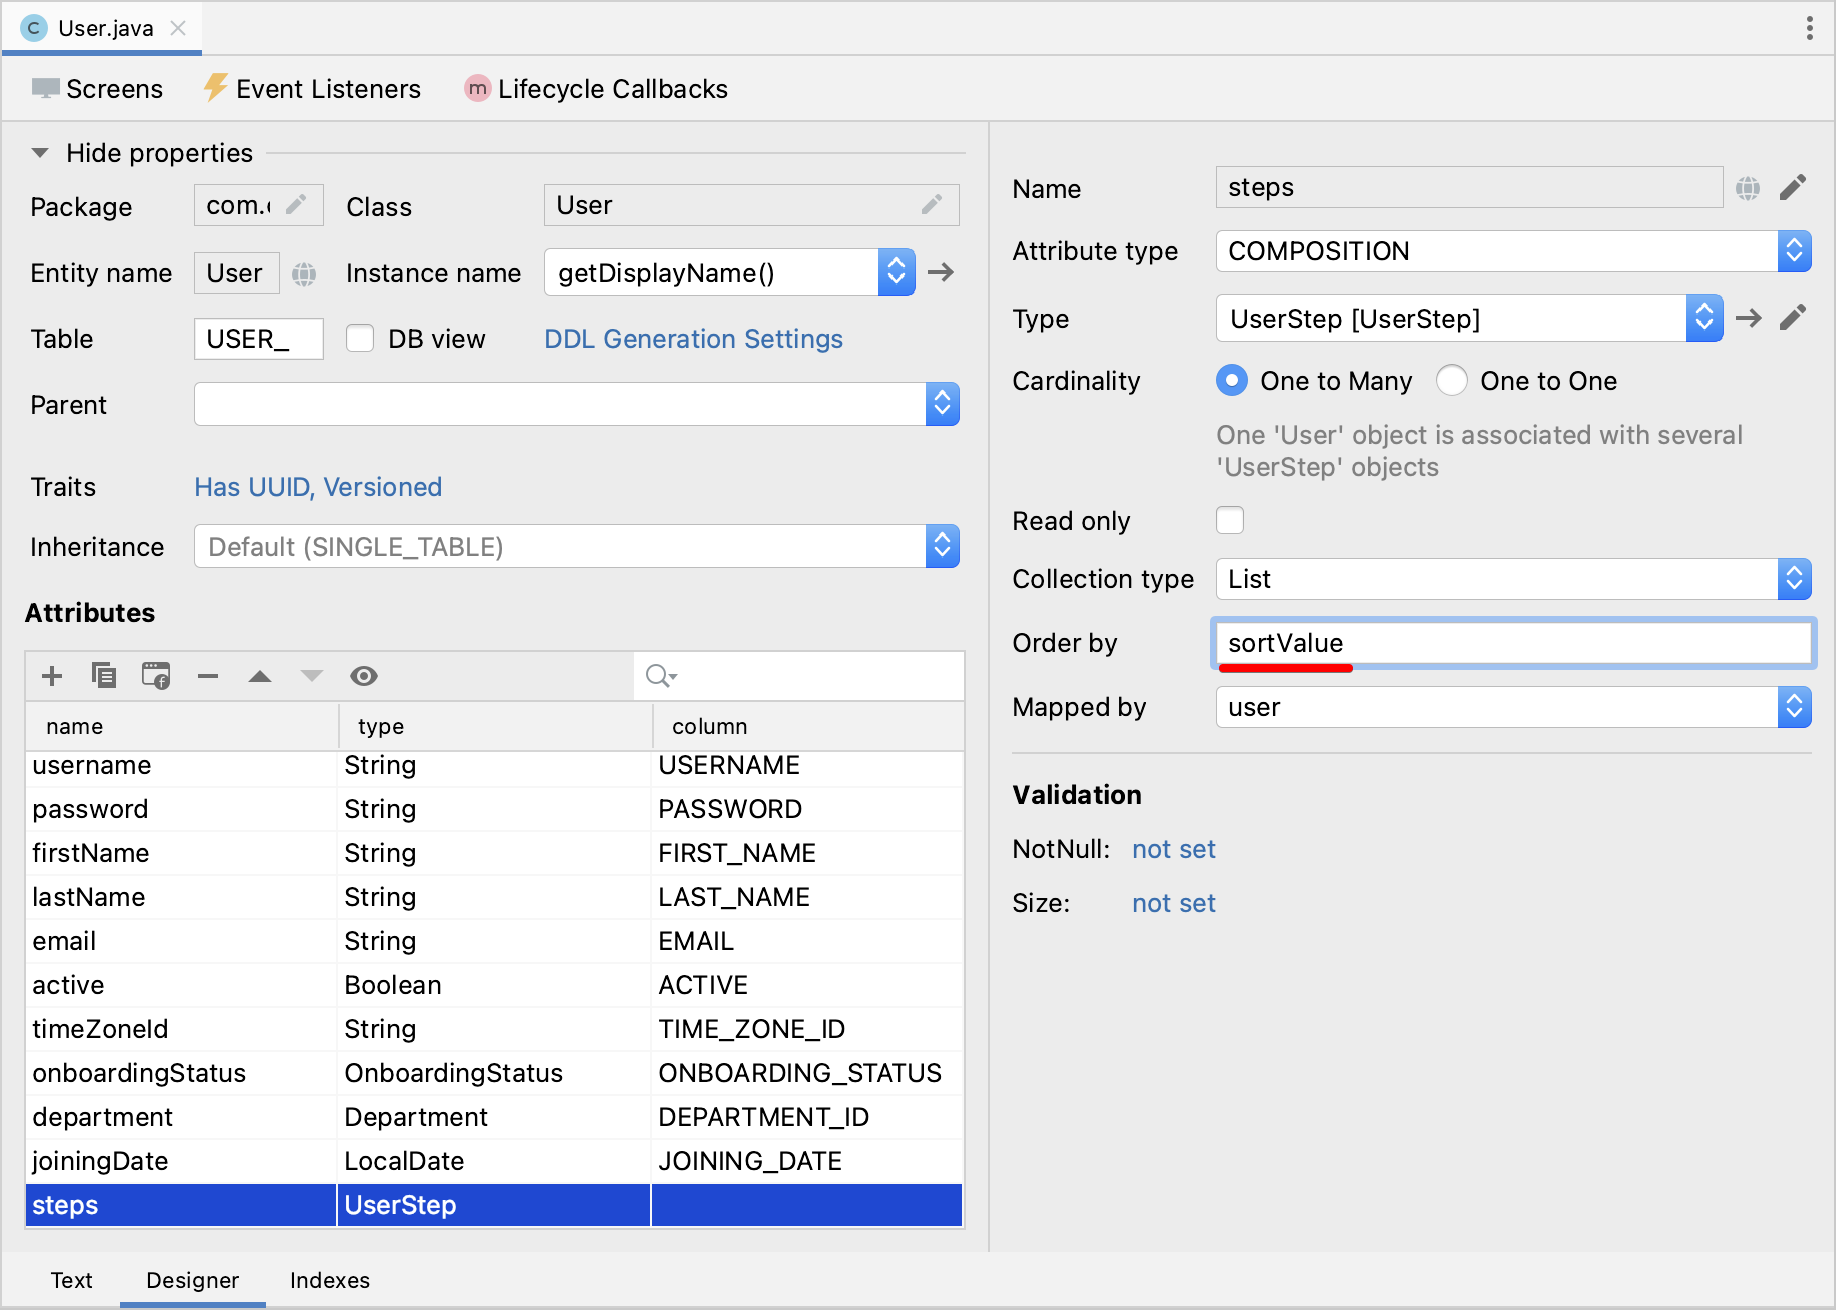
If you switch to the Text tab, you can see the @OrderBy annotation on the steps attribute:
@OrderBy("sortValue")
@Composition
@OneToMany(mappedBy = "user")
private List<UserStep> steps;
Now when you load the User entity, its steps collection will be sorted by the UserStep.sortValue attribute.
If your application is running, restart it.
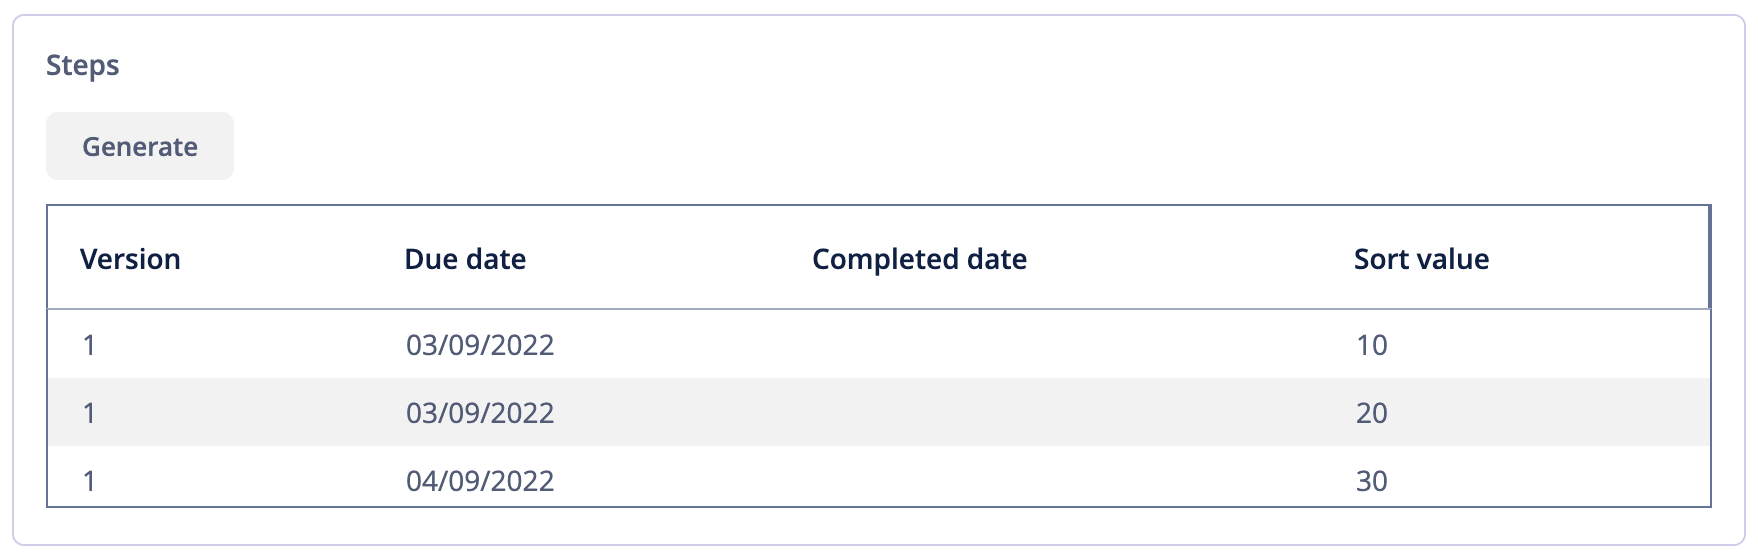
Open the User edit screen. Now the ordering of UserSteps is correct:
Rearranging Table Columns
Currently, the table of UserSteps is not very informative. Let’s remove the Version and Sort value columns and add a column showing the Step name.
Removing a column is straightforward: just select it in Component Hierarchy and press Delete, or remove the element directly from XML.
To add a column, select the columns element in Component Hierarchy and click Add → Column in the Component Inspector. The Add Column dialog appears:
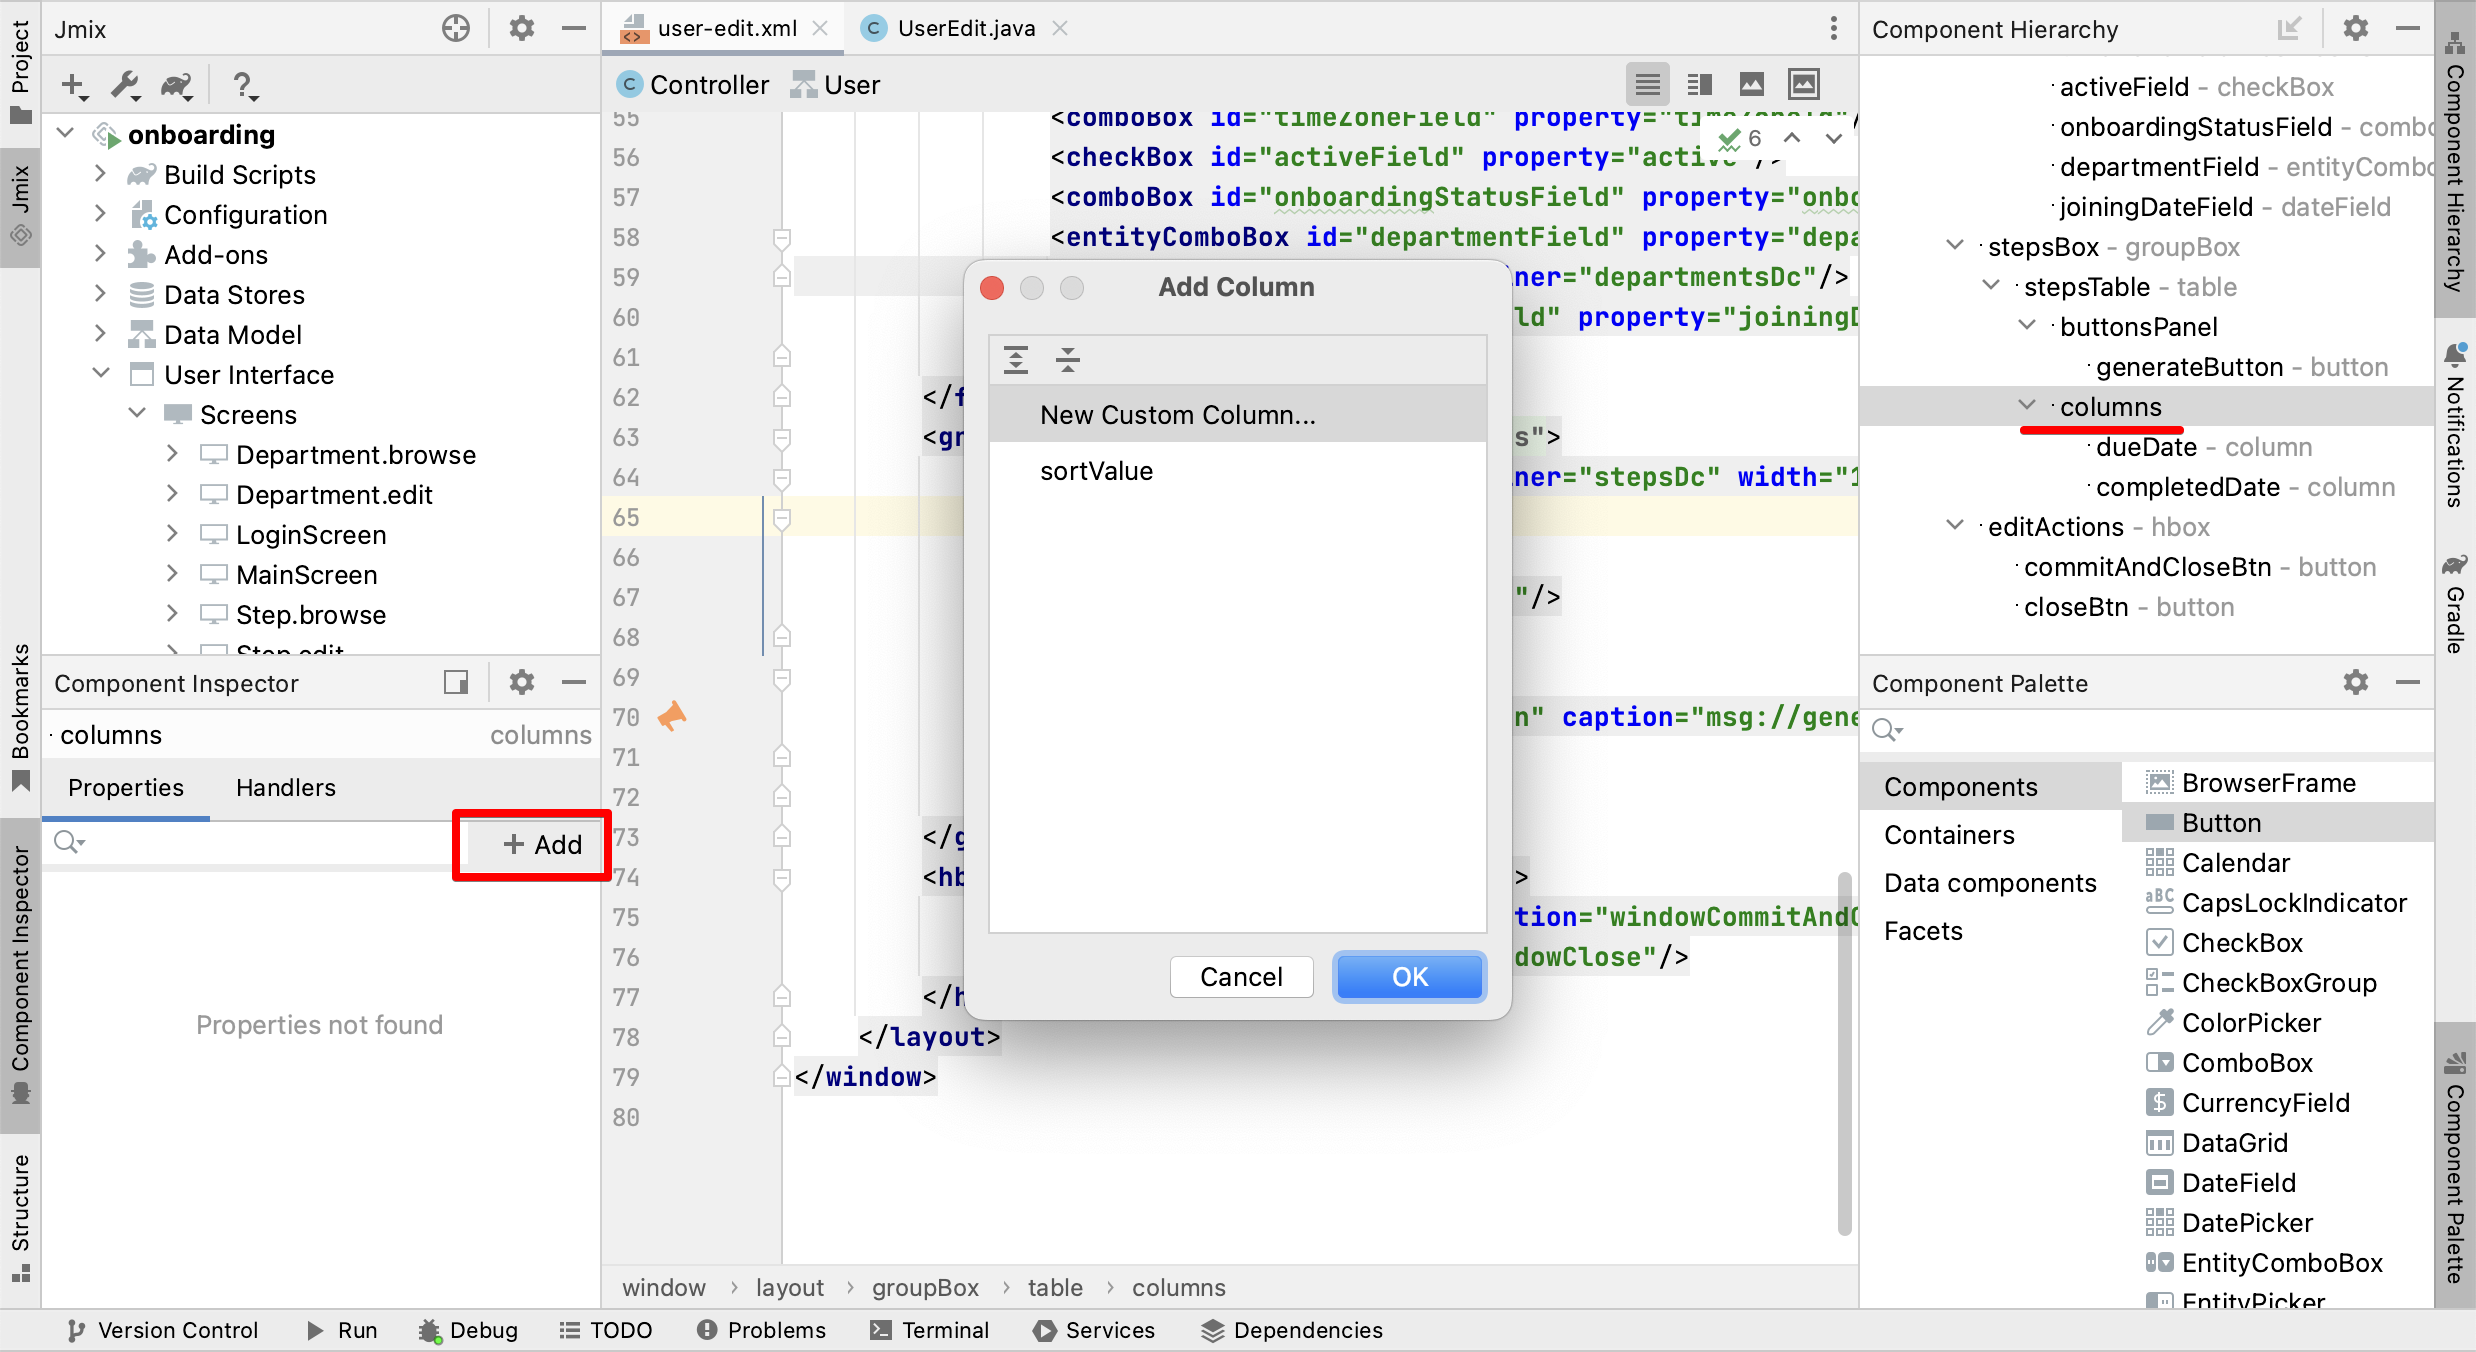
As you can see, it doesn’t allow you to add a Step name. This is because the step attribute is a reference, and you didn’t define a proper fetch plan to load it.
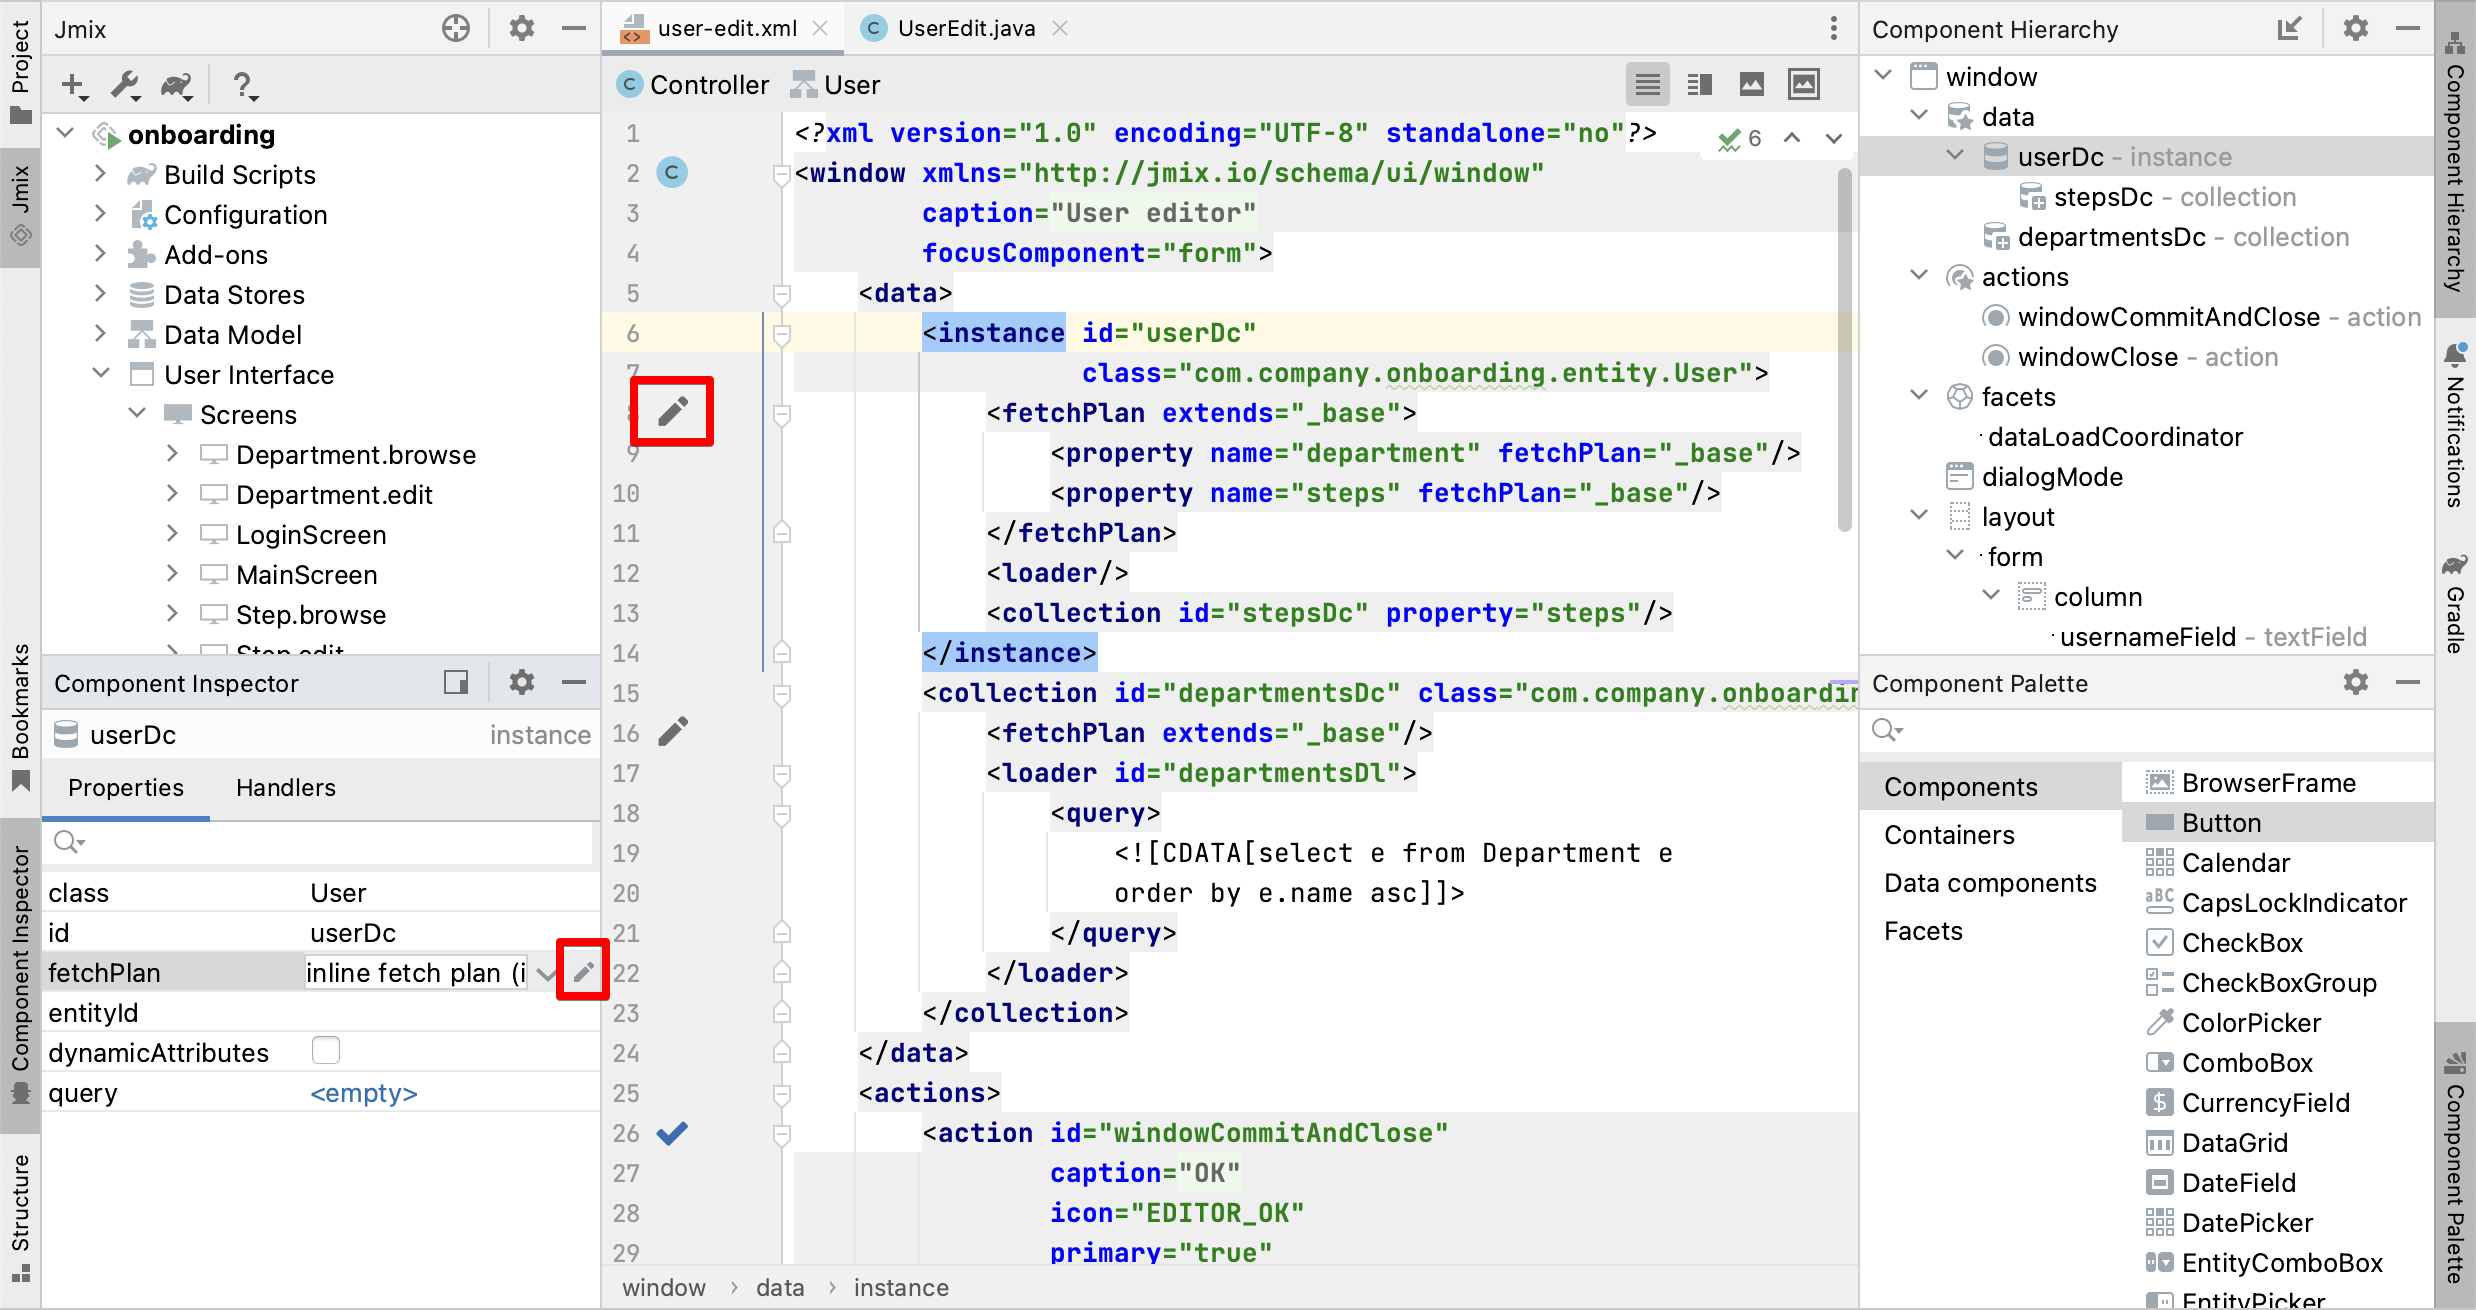
Select the userDc data container in Component Hierarchy and click the Edit button ( ) either in the
 fetchPlan property in Component Inspector or in the gutter of the XML editor:
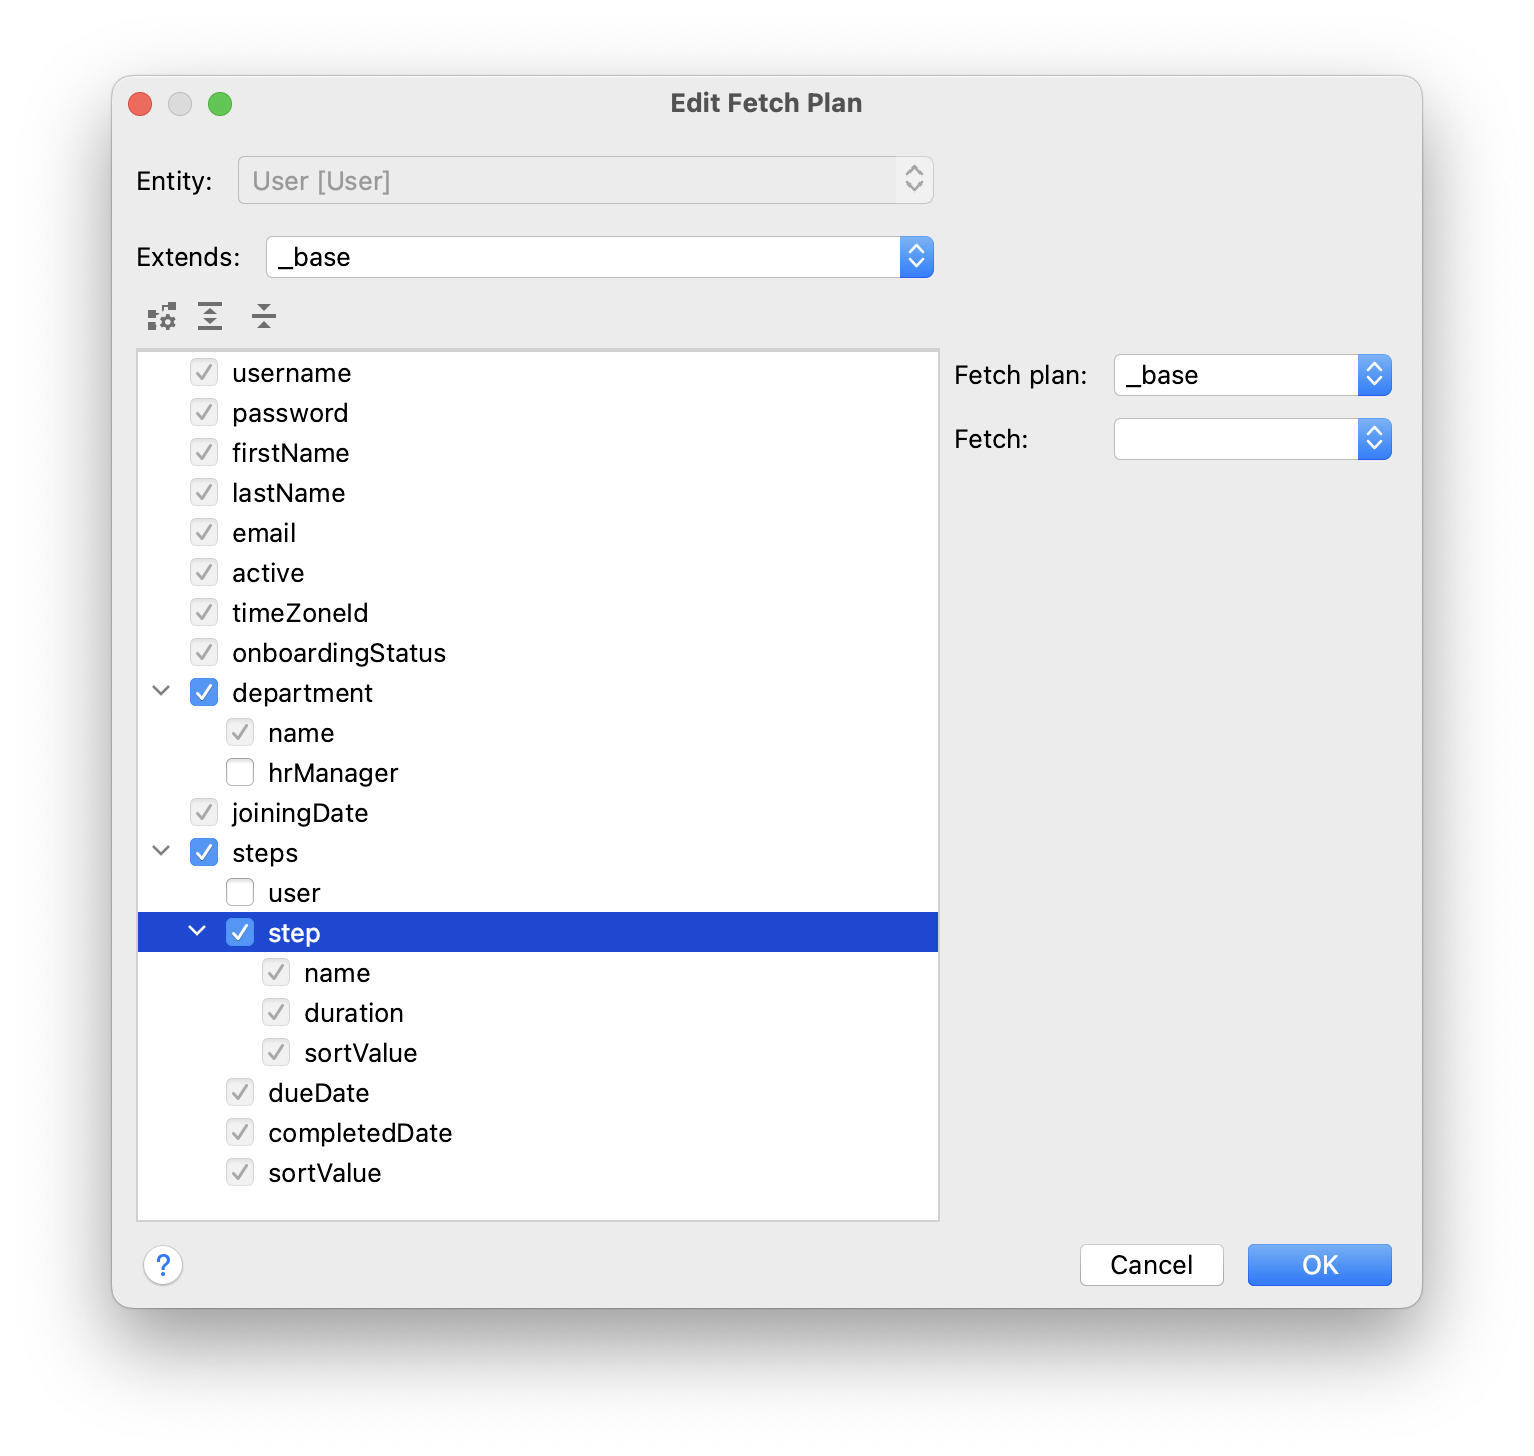
In the Edit Fetch Plan window, select steps → step attribute and click OK:
The nested attribute will be added to fetch plan XML:
<instance id="userDc"
          class="com.company.onboarding.entity.User">
    <fetchPlan extends="_base">
        <property fetchPlan="_base" name="department"/>
        <property fetchPlan="_base" name="steps">
            <property name="step" fetchPlan="_base"/>
        </property>
    </fetchPlan>
    <loader/>
    <collection id="stepsDc" property="steps"/>
</instance>
Now the collection of UserSteps will be eagerly loaded from the database together with the User instance.
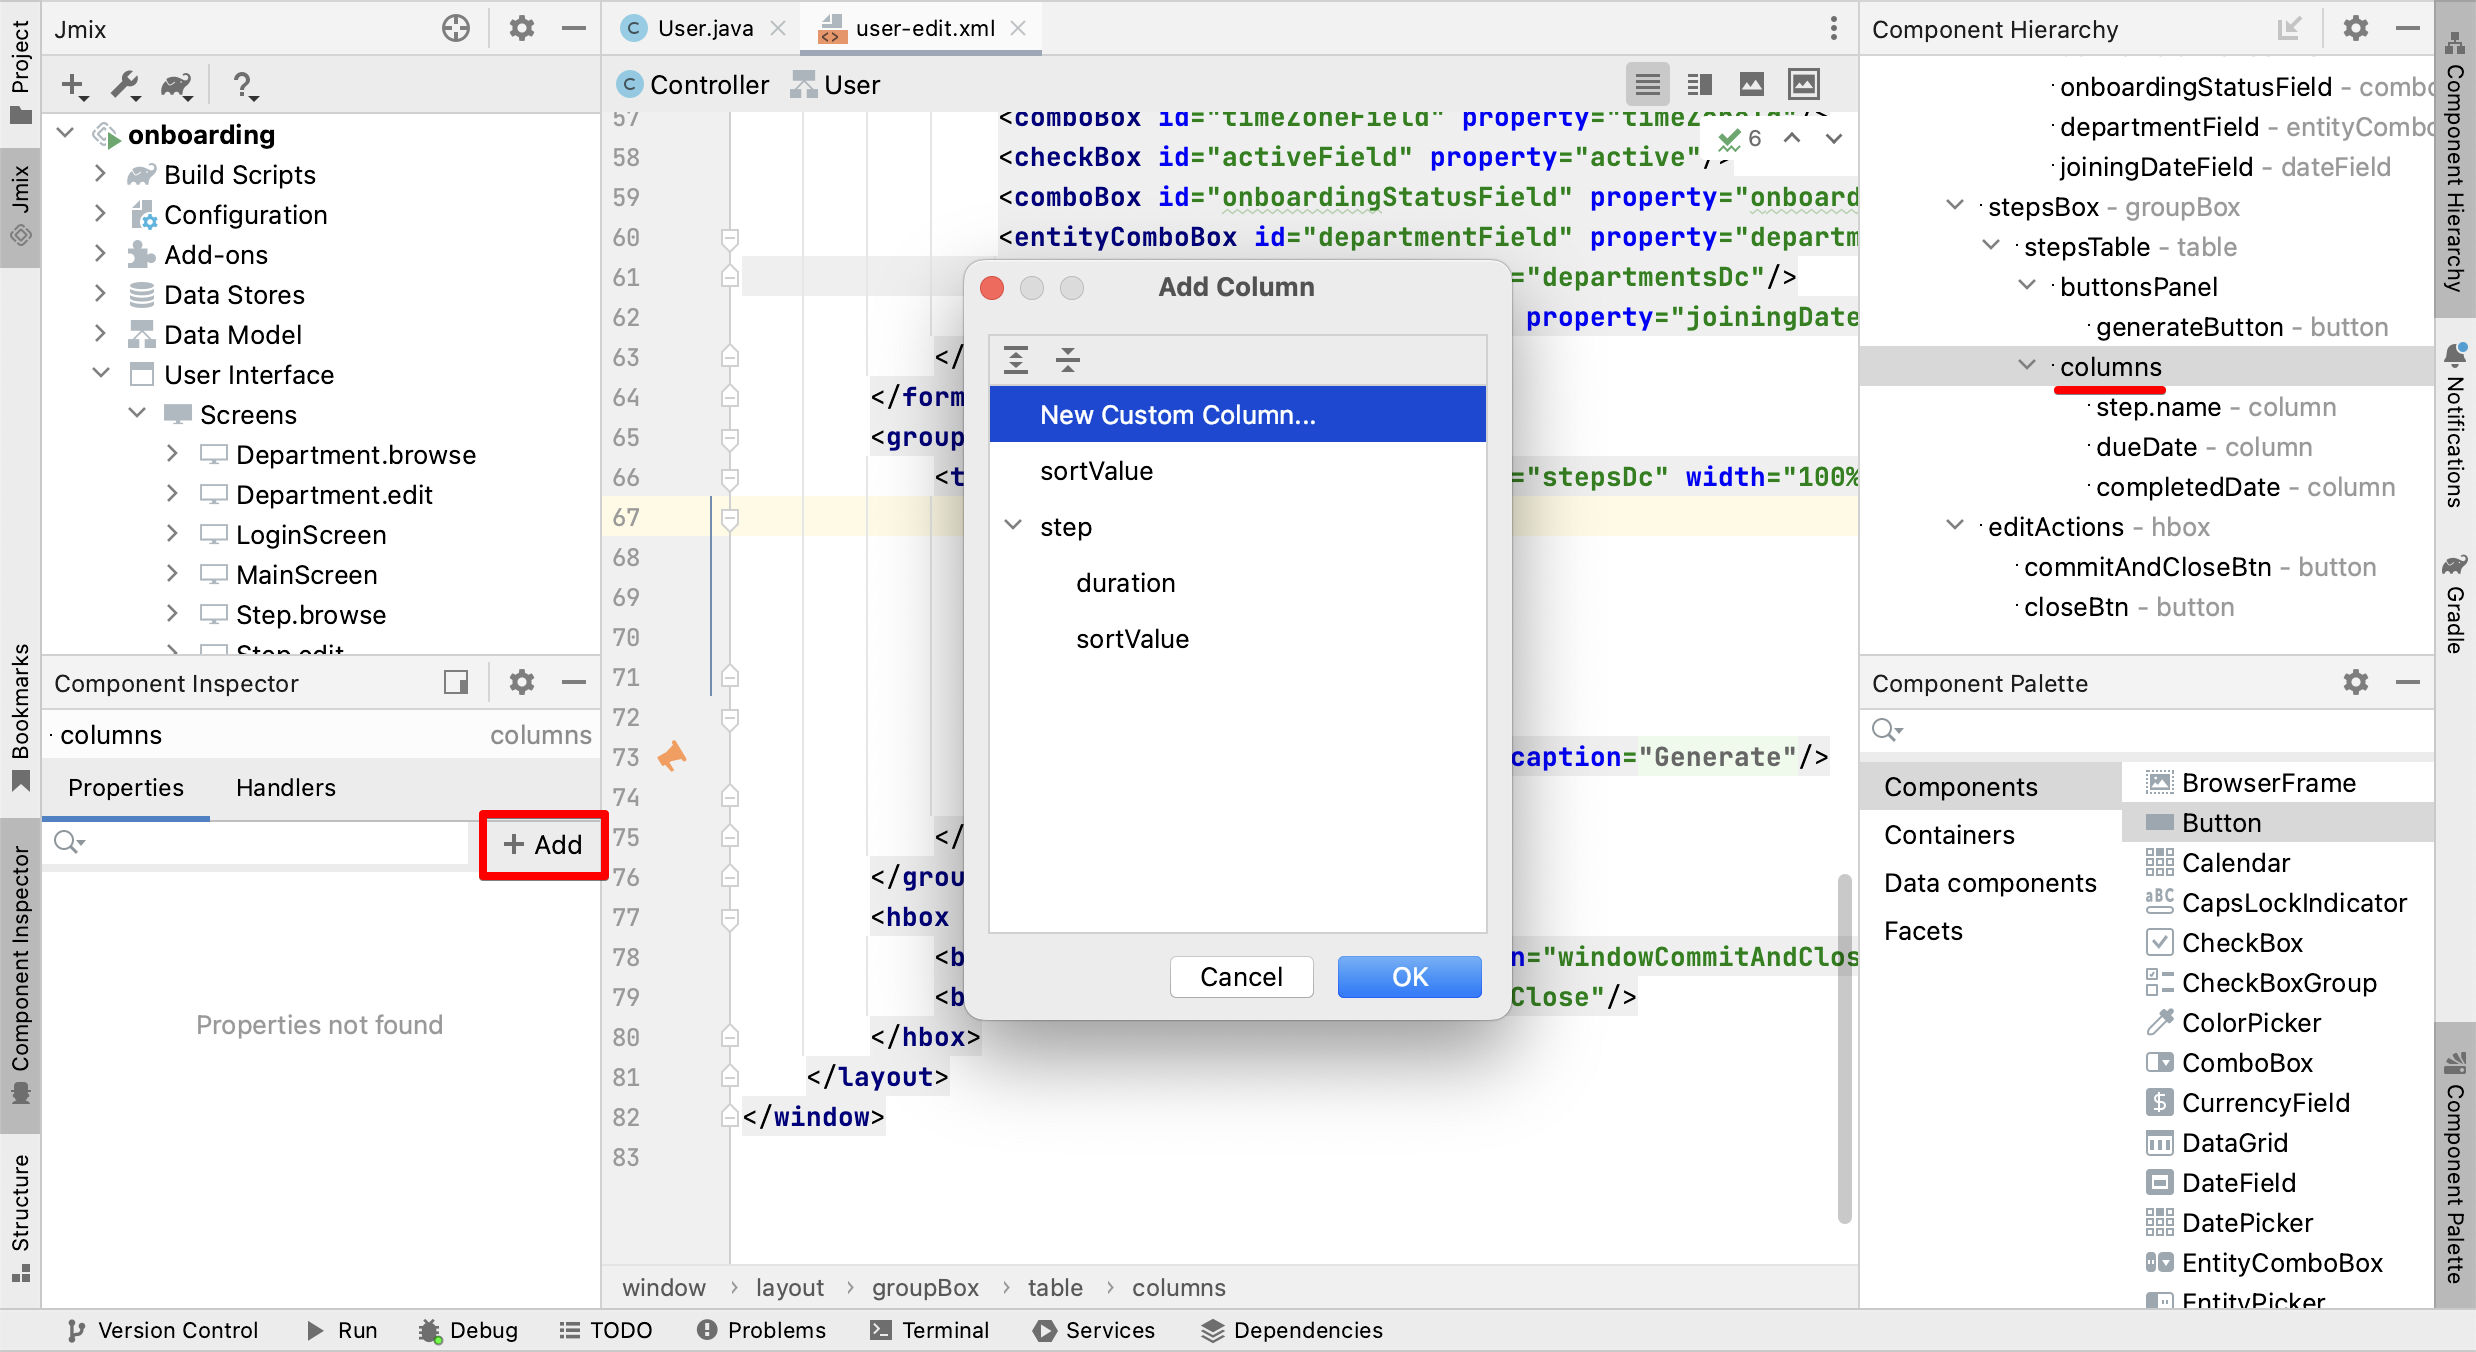
Select the columns element in Component Hierarchy and click Add → Column in the Component Inspector. The Add Column dialog now contains the related Step entity and its attributes:
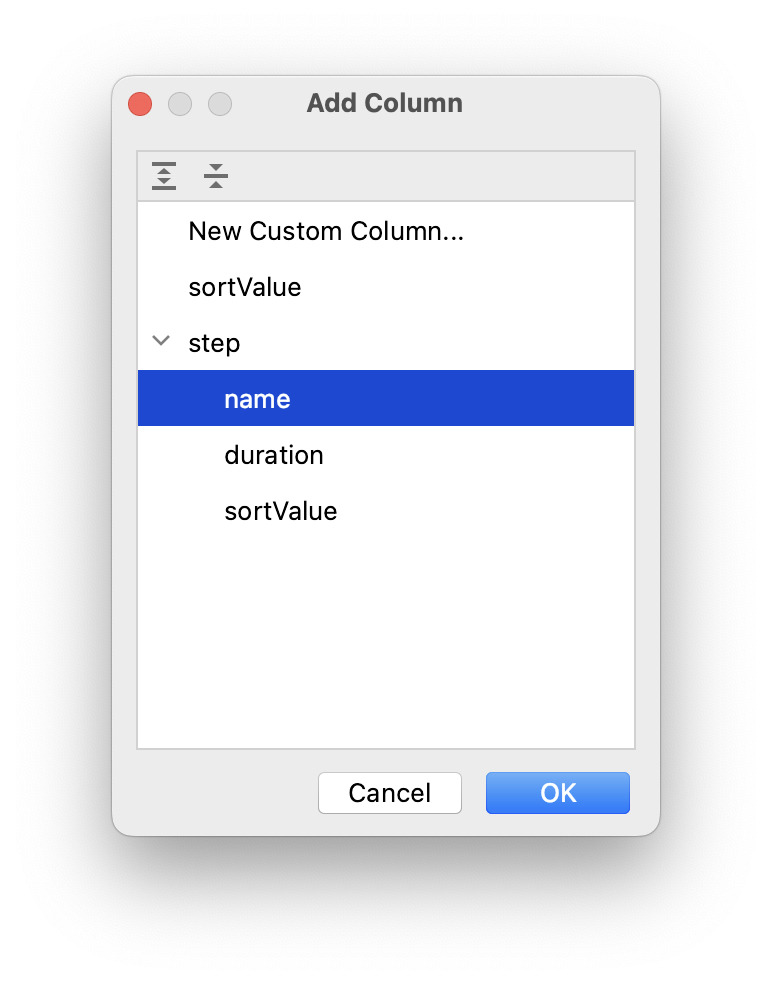
Select step → name and click OK. The new column will be added to the end of the columns list:
<table id="stepsTable" dataContainer="stepsDc" ...>
    <columns>
        <column id="dueDate"/>
        <column id="completedDate"/>
        <column id="step.name"/>
    </columns>
Instead of step.name you could use just step. In this case, the column would display the instance name of the entity. For Step, the instance name is obtained from the name attribute, so the result would be the same.
You could also add the step column directly in XML without modifying the fetch plan, and the UI would still work due to lazy loading of references. But then Step instances would be loaded by separate requests for each UserStep in the collection (N+1 query problem).
|
Move the step.name column to the beginning by dragging and dropping the element in Component Hierarchy or editing the XML directly:
<table id="stepsTable" dataContainer="stepsDc" ...>
<columns>
<column id="step.name"/>
<column id="dueDate"/>
<column id="completedDate"/>
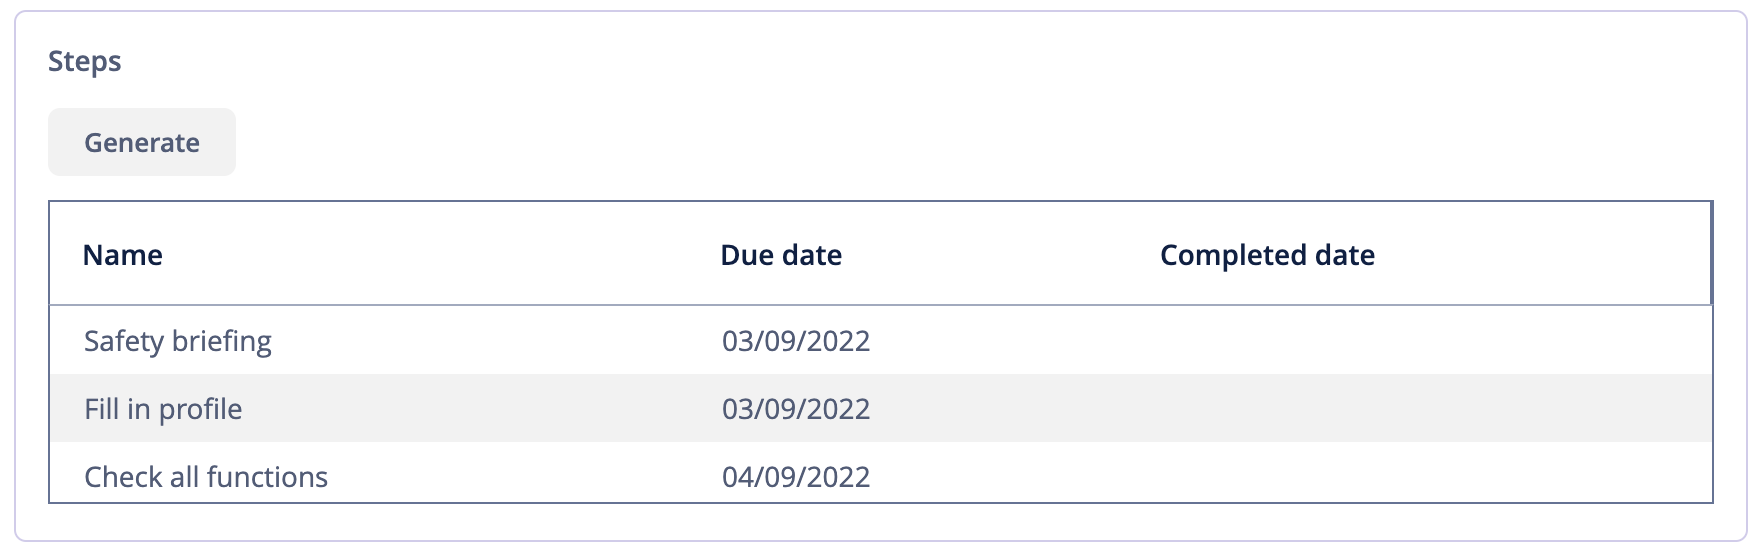
</columns>Press Ctrl/Cmd+S and switch to the running application. Reopen the User edit screen and make sure the Steps table now shows the Step name:
Adding Generated Column
In this section, you will implement an ability to mark a UserStep completed by clicking a checkbox in the table row.
A UI table component can have so called generated columns not linked with particular entity attributes. In a generated column’s cell, you can show any visual component or a container with multiple components inside.
Let’s add a generated column which displays a checkbox.
Select the columns element in Component Hierarchy and click Add → Column in the Component Inspector. The Add Column dialog appears:
Select New Custom Column and click OK.
In the Additional Settings for Custom Coulmn dialog, enter completed into Custom column id field and select the Create generator checkbox:
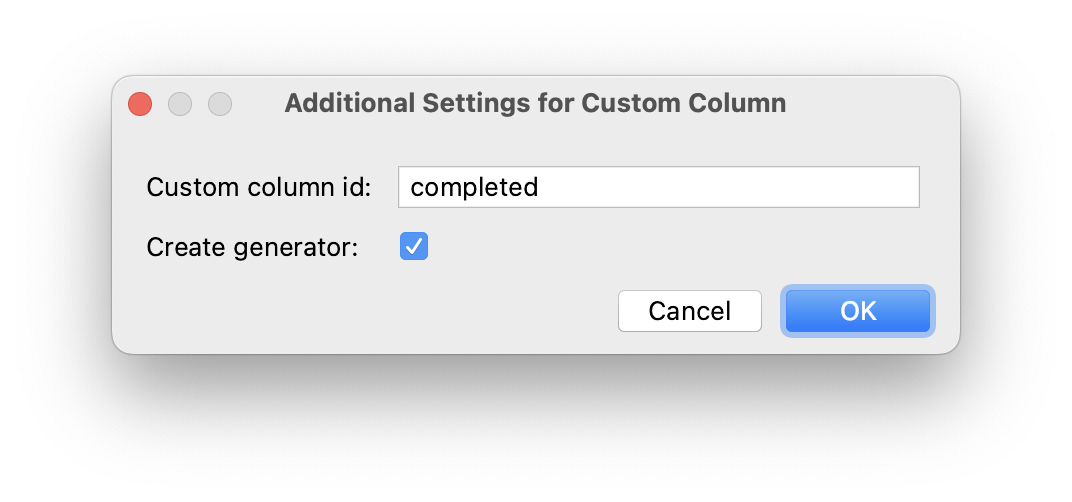
Click OK.
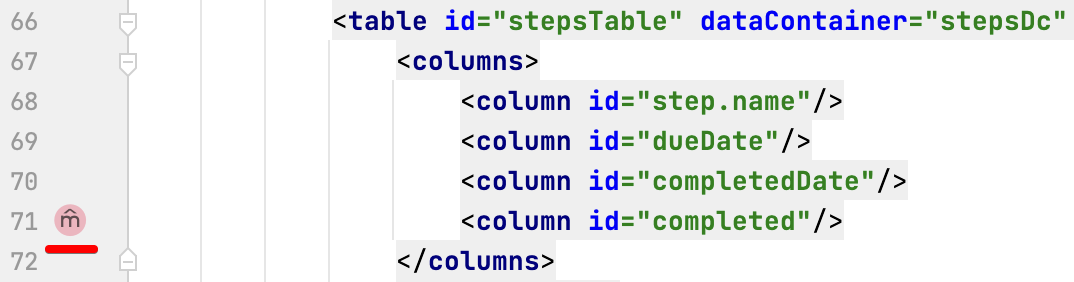
Studio will add the completed column to the table XML:
and a handler method to the UserEdit controller:

Notice the line markers on the left: they allow you to switch between the column definition in XML and its handler method in the controller.
Inject UiComponents object into controller class:
@Autowired
private UiComponents uiComponents;| You can use Inject button in the top actions panel of the editor to inject dependencies into screen controllers and Spring beans. |
Implement the handler method:
@Install(to = "stepsTable.completed", subject = "columnGenerator") (1)
private Component stepsTableCompletedColumnGenerator(UserStep userStep) { (2)
    CheckBox checkBox = uiComponents.create(CheckBox.class); (3)
    checkBox.setValue(userStep.getCompletedDate() != null);
    checkBox.addValueChangeListener(e -> { (4)
        if (userStep.getCompletedDate() == null) {
            userStep.setCompletedDate(LocalDate.now());
        } else {
            userStep.setCompletedDate(null);
        }
    });
    return checkBox; (5)
}| 1 | The @Install annotation indicates that the method is a delegate: a UI component (table in this case) invokes it on some stage of its lifecycle. |
| 2 | This specific delegate (column generator) receives an entity instance which is shown in the table row as an argument. |
| 3 | The CheckBox component instance is created using the UiComponents factory. |
| 4 | When you click the checkbox, its value changes and the checkbox calls its ValueChangeEvent listener. The listener sets the completedDate attribute of the UserStep entity. |
| 5 | The column generator delegate returns the visual component to be shown in the column cells. |
Move the completed column on top, set its caption attribute to empty string and width to 50px:
<table id="stepsTable" dataContainer="stepsDc" ...>
<columns>
<column id="completed" caption="" width="50px"/>
<column id="step.name"/>
<column id="dueDate"/>
<column id="completedDate"/>
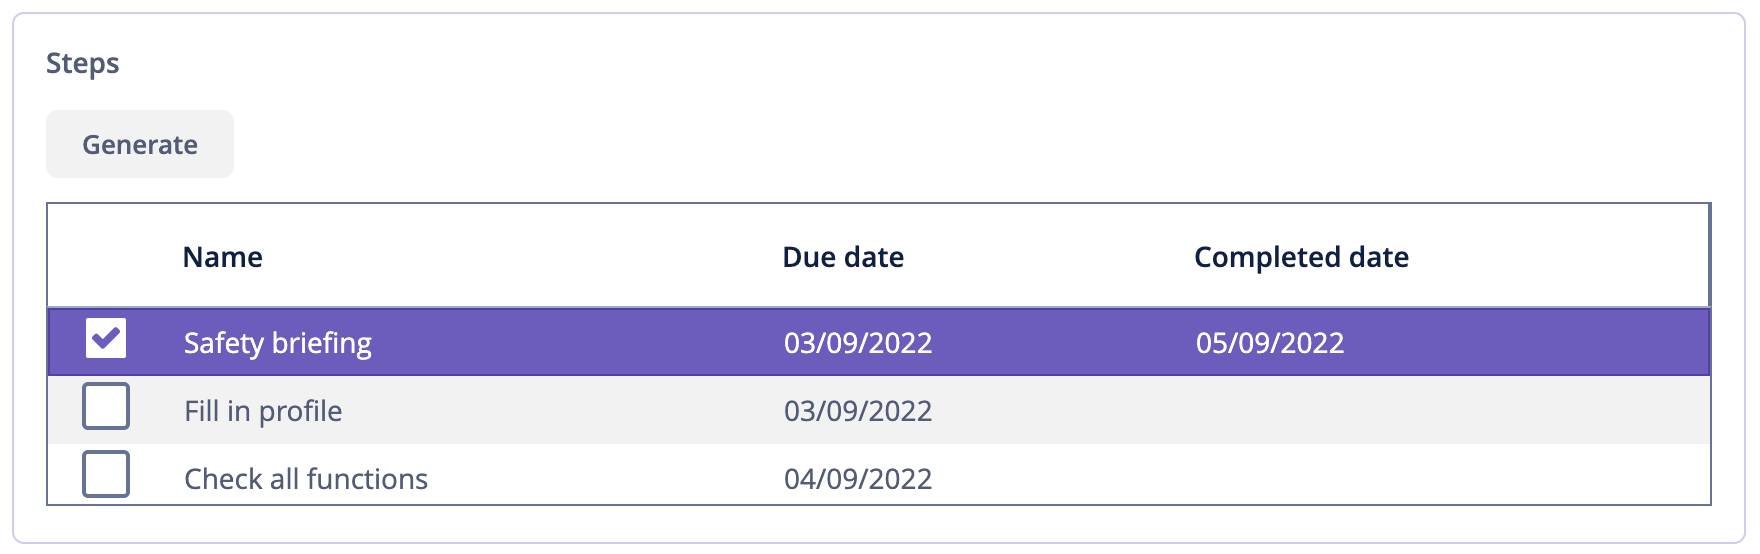
</columns>Press Ctrl/Cmd+S and switch to the running application. Reopen the User edit screen and click checkboxes for some rows. The Completed date column will change accordingly:
The changes in UserStep instances will be saved to the database when you click OK in the screen. It’s the responsibility of the screen’s DataContext: it tracks changes in all entities and saves to the database changed instances.
Reacting to Changes
When you generate steps for the user, mark a UserStep completed or remove a step, the Onboarding status field should change accordingly.
Let’s implement reaction to the UserSteps collection changes.
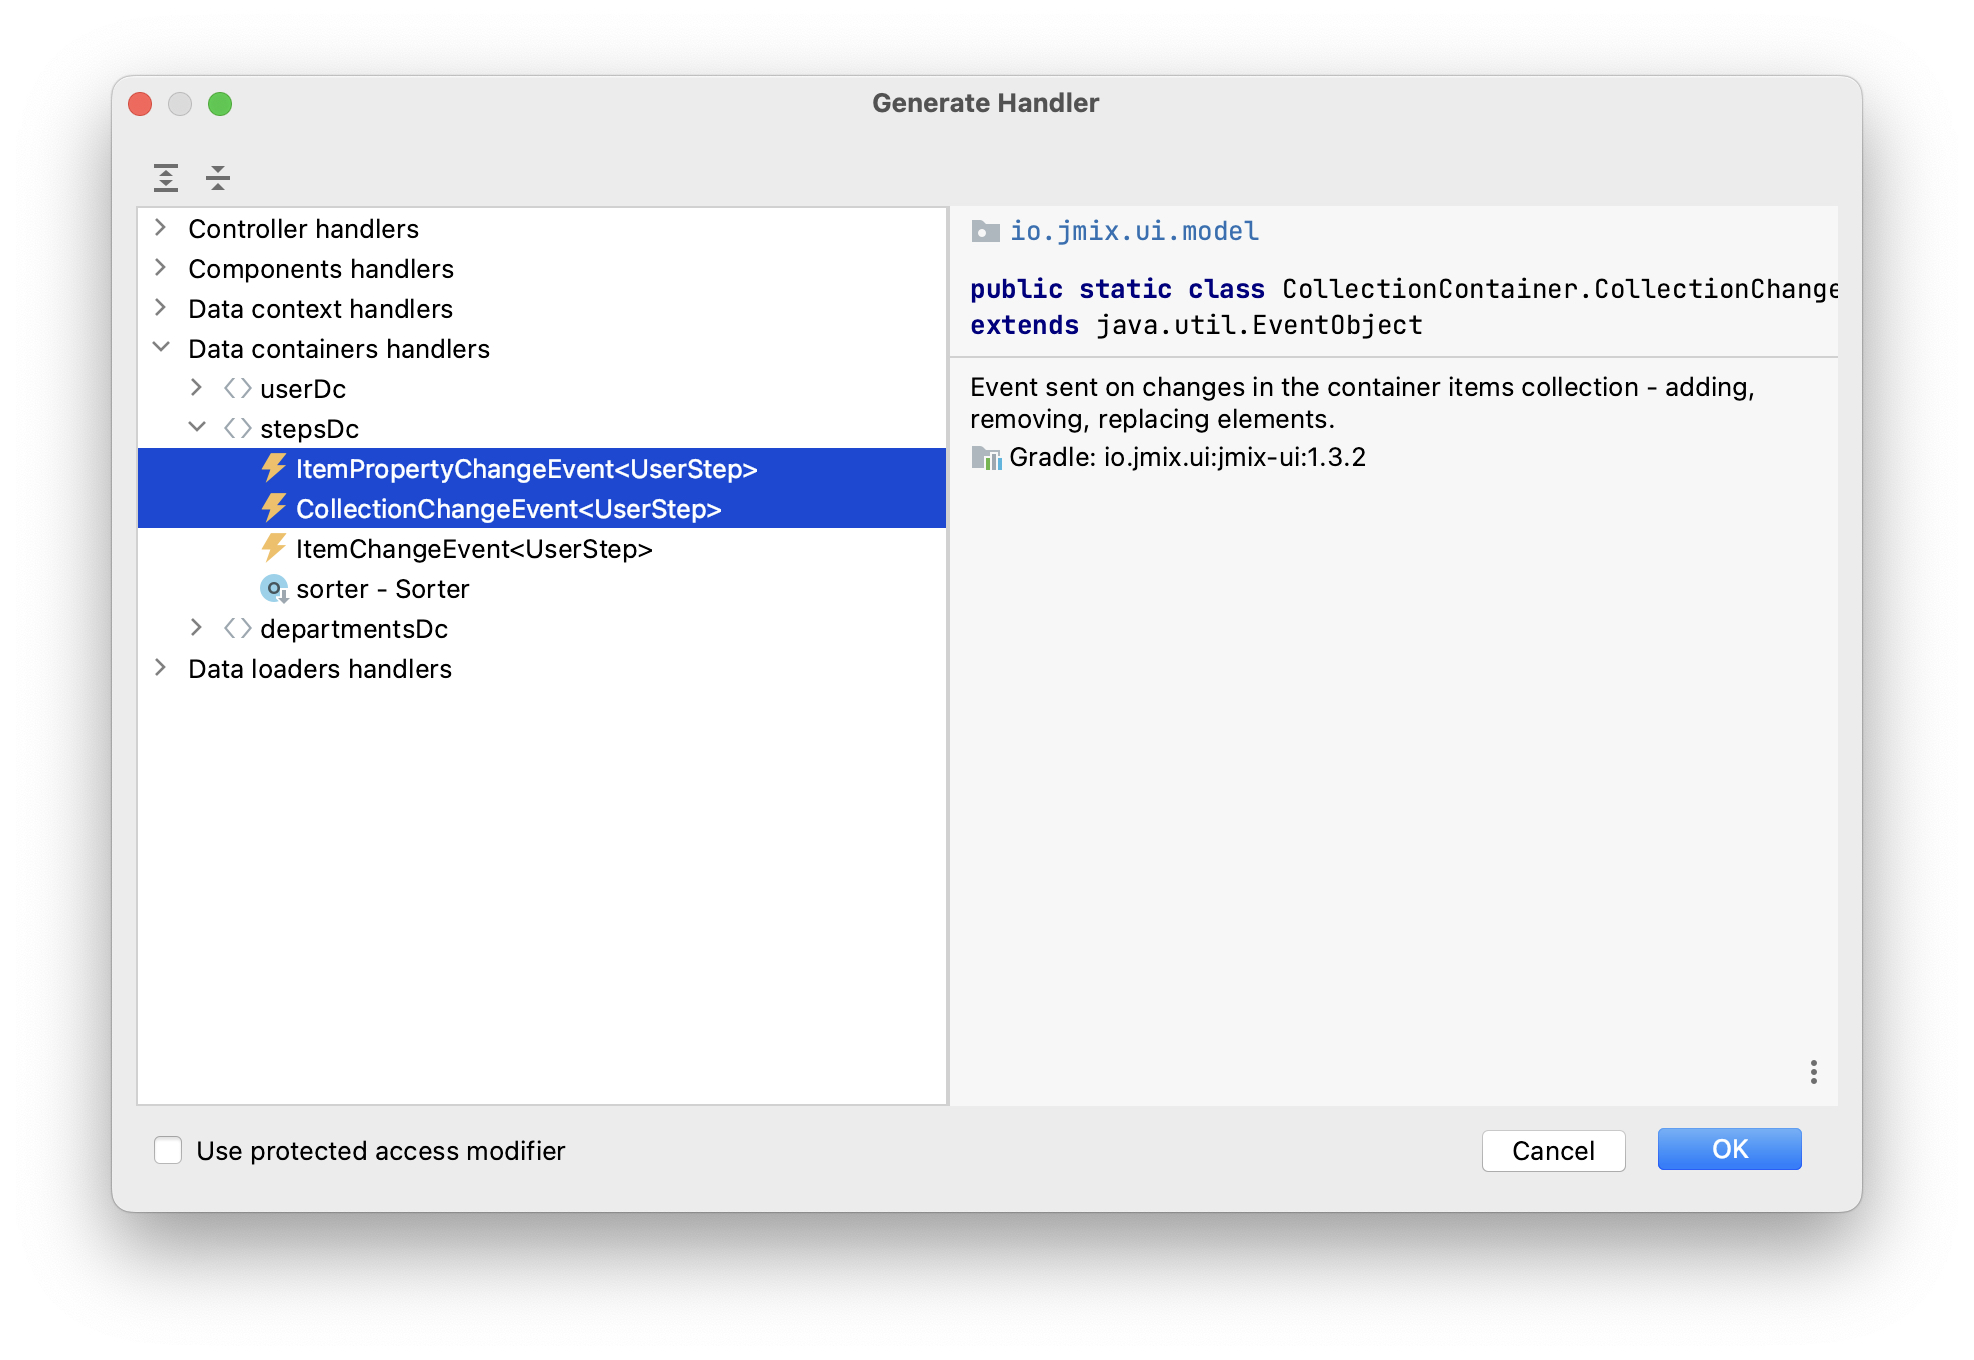
Open UserEdit controller and click Generate Handler in the top actions panel. Collapse all items, then select ItemPropertyChangeEvent and CollectionChangeEvent items in Data containers handlers → stepsDc:
Click OK.
Studio will generate two method stubs: onStepsDcItemPropertyChange() and onStepsDcCollectionChange(). Implement them as below:
@Subscribe(id = "stepsDc", target = Target.DATA_CONTAINER)
public void onStepsDcItemPropertyChange(InstanceContainer.ItemPropertyChangeEvent<UserStep> event) {
    updateOnboardingStatus(); (1)
}

@Subscribe(id = "stepsDc", target = Target.DATA_CONTAINER)
public void onStepsDcCollectionChange(CollectionContainer.CollectionChangeEvent<UserStep> event) {
    updateOnboardingStatus(); (2)
}

private void updateOnboardingStatus() {
    User user = getEditedEntity(); (3)

    long completedCount = user.getSteps() == null ? 0 :
            user.getSteps().stream()
                    .filter(us -> us.getCompletedDate() != null)
                    .count();
    if (completedCount == 0) {
        user.setOnboardingStatus(OnboardingStatus.NOT_STARTED); (4)
    } else if (completedCount == user.getSteps().size()) {
        user.setOnboardingStatus(OnboardingStatus.COMPLETED);
    } else {
        user.setOnboardingStatus(OnboardingStatus.IN_PROGRESS);
    }
}| 1 | ItemPropertyChangeEvent handler is invoked when an attribute of the entity changes. |
| 2 | CollectionChangeEvent handler is invoked when items are added to or removed from the container. |
| 3 | Get the currently edited User instance. |
| 4 | Update onboardingStatus attribute. Thanks to the data binding, the changed value will be immediately shown by the UI attribute. |
Press Ctrl/Cmd+S and switch to the running application. Reopen the User edit screen and make some changes in the UserStep table. Watch the Onboarding status field value.
Summary
In this section, you have implemented two features:
-
Ability to specify a department for a user.
-
Generation and management of onboarding steps for a user.
You have learned that:
-
Reference attributes should be added to a screen’s fetch plan to avoid the N+1 query problem.
-
The EntityComboBox component can be used to select a related entity from a dropdown. This component requires a CollectionContainer with options to be set in the optionsContainer property.
-
The relationship between
UserandUserStepentities is an example of composition, when instances of the related entity (UserStep) can exist only as a part of its owner (User). Such a reference is marked with @Composition annotation. -
A collection of related entities can be ordered using the
@OrderByannotation on the reference attribute. -
The
ClickEventhandler of the Button component is used to handle button clicks. It can be generated on the Handlers tab of the Component Inspector tool window. -
The
getEditedEntity()method of the edit screen controller returns the entity instance being edited. -
The Notifications interface is used to show popup notifications.
-
The DataManager interface can be used to load data from the database.
-
A nested collection of related entities is loaded into a CollectionPropertyContainer. Its
getItems()andgetMutableItems()methods can be used to iterate over and to add/remove items to the collection. -
DataContext tracks changes in entities and saves changed instances to the database when user clicks OK in the screen.
-
The UI table can have generated columns which display arbitrary visual components.
-
ItemPropertyChangeEvent and CollectionChangeEvent can be used to react to changes in entities located in data containers.
