Quick Start
This section describes how to model and run a simple business process.
Let’s consider that we want to create a process for reimbursement.
Three participants will be involved in the process:
-
an employee who asks for the reimbursement;
-
a manager who approves the reimbursement;
-
an accountant who transfers money to the account of the employee.
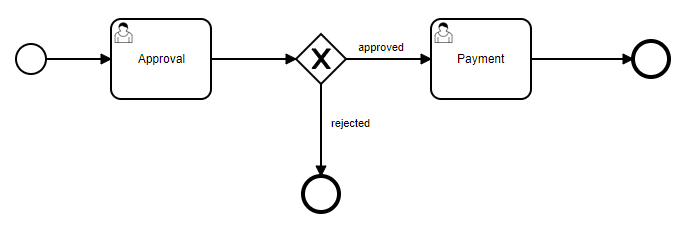
The model that we are going to create:
Modeling Process
Start the application and open the BPM → Modeler screen.
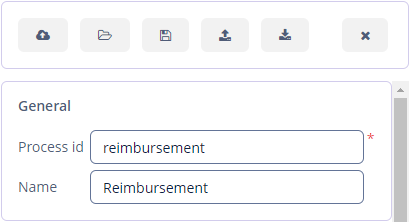
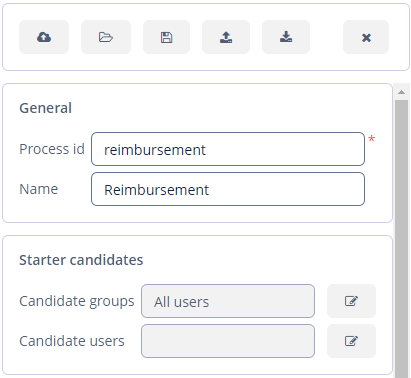
When the modeler is first opened, the properties panel on the right displays properties of the process itself. Modify the fields:
-
Process id:
reimbursement -
Name:
Reimbursement
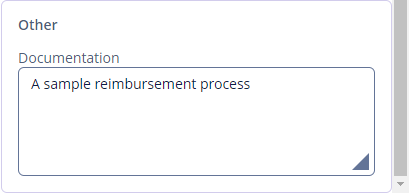
Find the Documentation text area in the properties panel and write a process description there.
Creating Start Form
Click on the StartEvent element on the canvas. The properties will be displayed on the properties panel.
The Form section describes the form that will be displayed to users when they start the process. Let’s specify the Input dialog as a start process form.
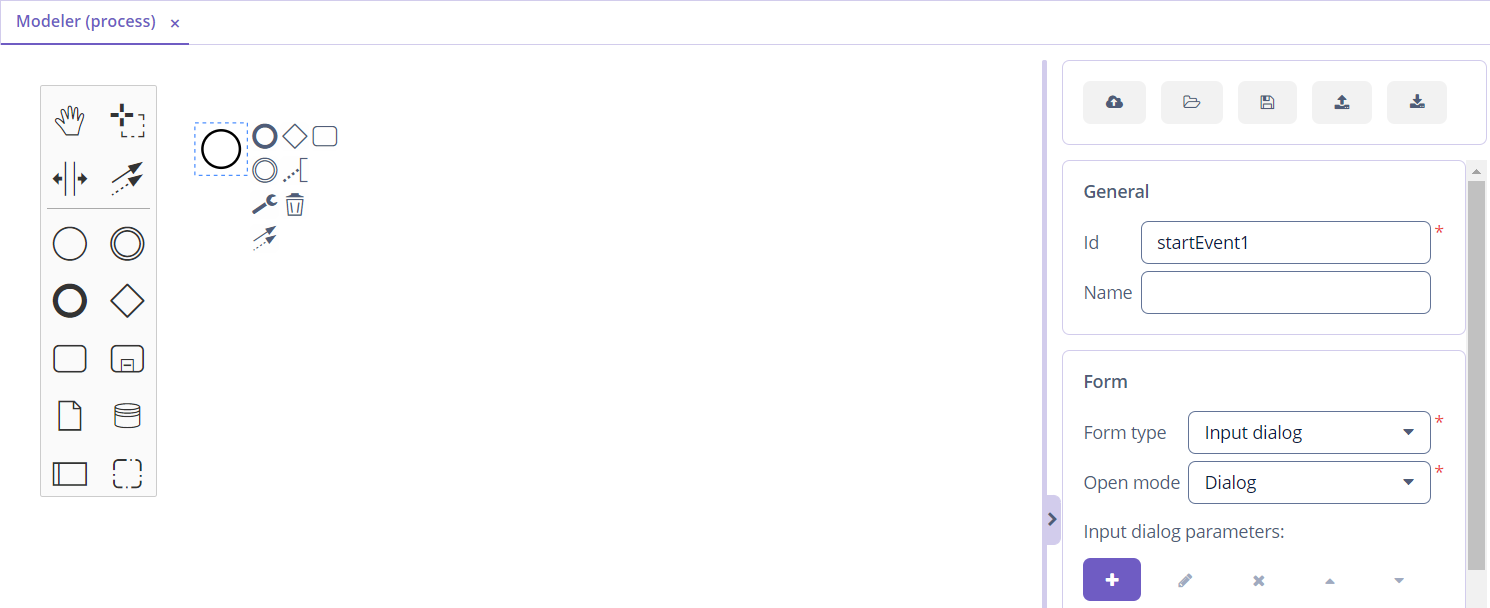
Then we need to specify the parameters that will be displayed to a user in the input dialog form.
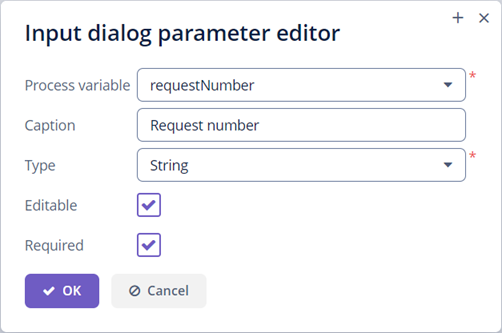
Click the Plus button and in the Input dialog parameter edit dialog create a requestNumber parameter with the following properties:
-
Caption – Request number.
-
Type – String.
-
Editable – true.
-
Required – true.
Create three more input dialog parameters:
-
expenseAmount(type isDecimal (double), editable and required) -
expenseDate(type isDate, editable and required) -
document(type isFile, editable and required)
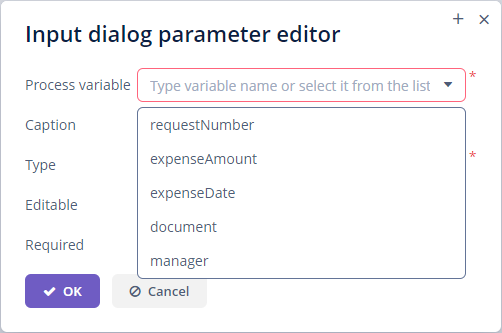
After that create an input dialog parameter manager with the Entity type, required and editable. Select User entity name. Specify ComboBox UI component for user selection. We will leave the JPQL query field blank — that means that the default query select e from smpl_User e will be used.
Select the requestNumber field in the Business key lookup field under the list of input dialog parameters. A business key is a domain-specific identifier of a process instance.
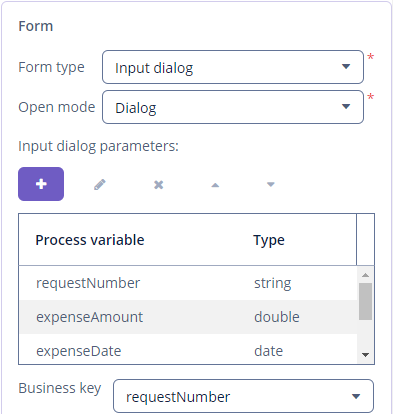
After adding all the parameters, the Form section should look this way:
When a process is started, input dialog parameters will be saved in the corresponding process variables.
Creating Approval User Task
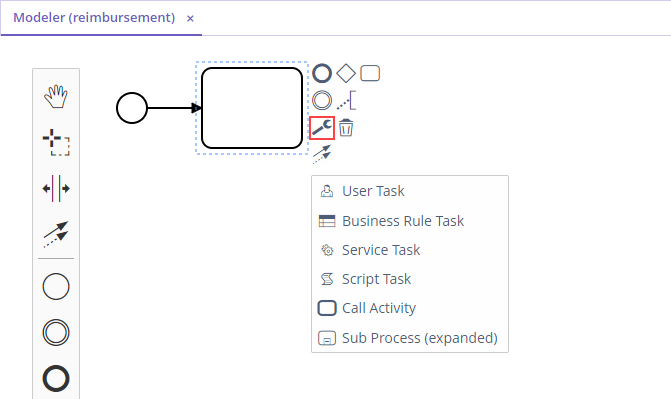
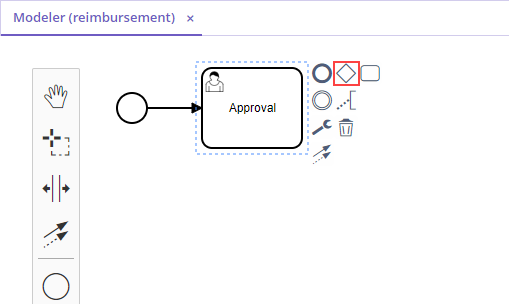
Let’s create the Approval user task. The start event should be selected on the canvas for displaying the pop-up menu. Click the Append task icon.
Then click the Change type icon (a wrench) and select the User Task there.
In the properties panel, specify a task name Approval and a task id approval.
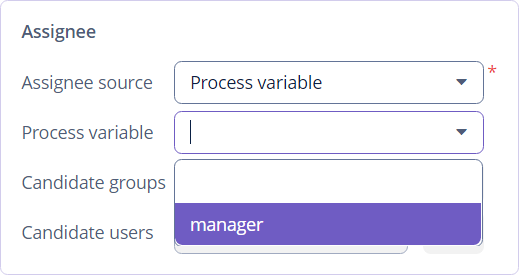
We’ll use the Process variable assignee source. The drop-down list displays those fields and process variables that are of the Entity type, and their entity class implements the UserDetails interface. Select the manager process variable from the list.
For the Approval task, we should also specify a process form. It will be an input dialog again. The dialog will display process variables from the start form and one more new parameter.
Create a new input dialog parameter and in the Process variable drop-down list select the requestNumber variable. Make the field non-editable by unselecting the Editable checkbox.
In the same way create input dialog parameters for expenseAmount, expenseDate and document variables. They all must be non-editable.
Add a new dialog parameter with the comment process variable name and the Multiline string type. The field must be editable and non-required. This field will be used by the manager if the manager wants to make some notes when approving or rejecting the reimbursement request.
Creating Outcomes
At the Approval step, the manager has two options: to approve and to reject the request. An easy way to support this is to use outcomes. For each outcome, a button will be displayed on the form and the result will be stored in a special process variable.
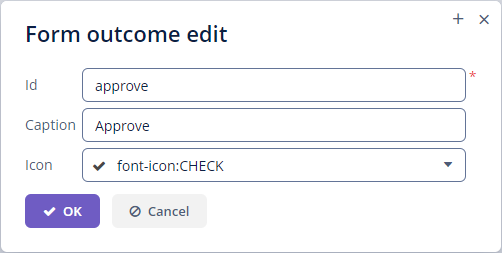
Let’s create the first outcome for the Approval user task using the corresponding button of the Outcomes section in the properties panel. In the outcome editor specify an outcome id approve, a caption Approve and select an icon CHECK in the icons list.
Then create the second outcome: the id is reject, the caption is Reject, the icon is BAN.
After the Approval task is completed, the process must decide which path to choose using the outcome value. Let’s create an exclusive gateway.
Select the Approval task element and click the Append Gateway action of the context menu.
Click the gateway and with the help of the context menu create EndEvent and User task. One sequence flow goes from the exclusive gateway to the EndEvent element and another one to the user task. Give names to the sequence flows: approved and rejected.
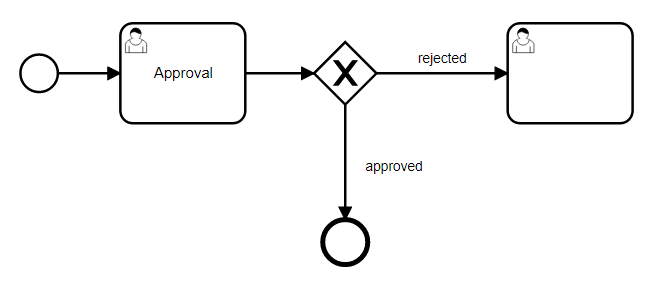
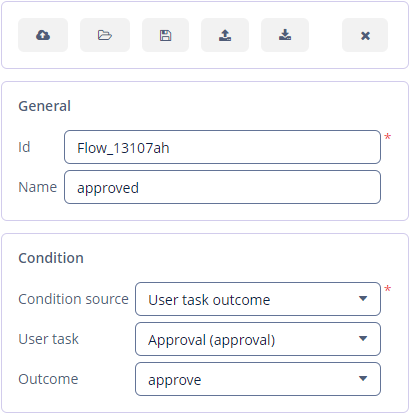
To specify a condition for the approved flow, click on the element and in the sequence flow properties panel select the User task outcome value in the Condition source combo box field. Select the Approval user task and the approve outcome.
Do the same for the rejected sequence flow, but select the reject outcome value for it.
Creating Payment User Task
For the second user task set a task name Payment and a task id payment.
We will implement the following behavior: the task should be displayed for all accountants and any of them will be able to claim this task for himself. To achieve this we should not specify a particular assignee for the user task but should specify Candidate groups or Candidate users.
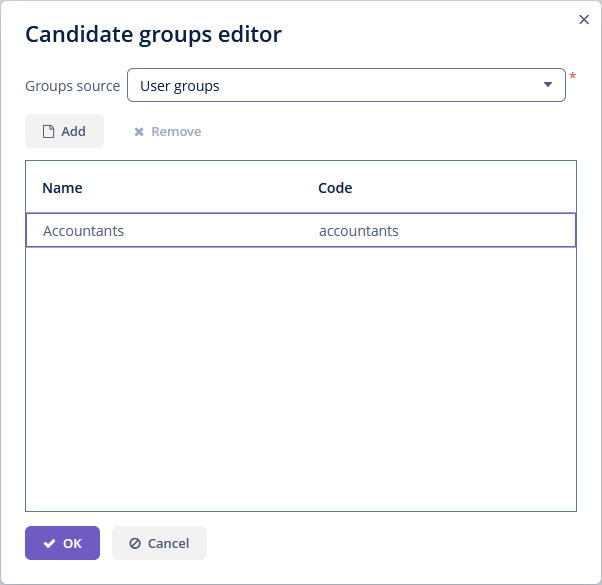
Let’s create Candidate group for accountants. Go to the BPM → User groups screen and create a new group called Accountants with the accountants code. Change the group type to Users and add several users to the group.
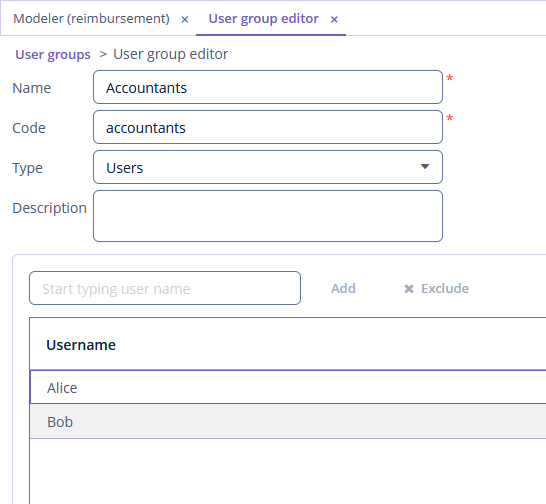
The bpm-process-actor-ui role should be assigned to these users to grant access to BPM screens and entities required for starting the process and working with user tasks. You can assign roles in the Application → Users screen.
Go back to the modeler, select the Payment user task and click the edit button near the Candidate groups field in the Assignee section.
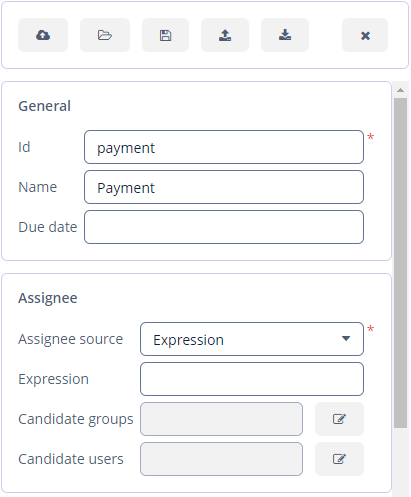
In the appeared dialog select Groups source value as User groups and add the Accountants group.
Configure an input dialog form for the Payment task. Add existing requestNumber, expenseAmount, expenseDate, document and comment fields. Make them all non-editable.
Add the EndEvent element that goes after the Payment user task.
Specifying Users to Start Process
The last thing we need to do is to specify who can start this process. If we want the process to be started by any user we may create and use a special user group.
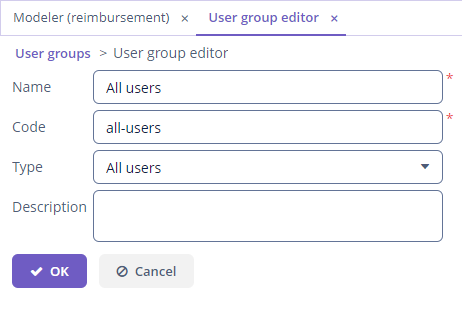
Open the User groups screen and create a new group called All users. Set its Type to All users, which means that this group will automatically include every user. In the modeler, select the All users group for process starter candidates.
Go back to the modeler and click on the free space on the canvas to display the process properties. Similarly to the Payment task, we will define Candidate groups in the Starter candidates section.
Starting Process
The process model is ready to be deployed to the process engine. Click the Deploy process button on the toolbar.

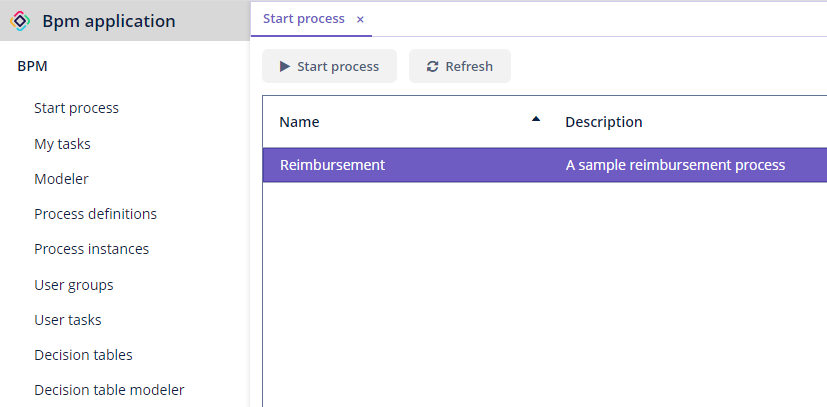
To start the process, open the BPM → Start Process screen. This screen displays process definitions available for starting by the current user.
Testing Process
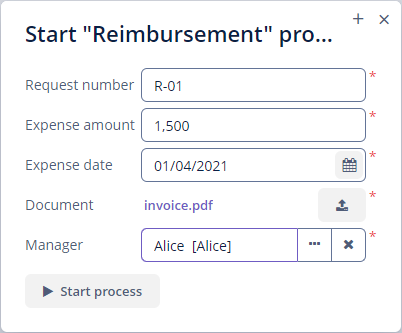
Select the reimbursement process and click the Start process button.
The start form will appear. Fill in the fields, select manager and click the Start process button.
The manager will see the assigned task in the BPM → My Tasks screen.

Double-click the task. Some fields on this form are read-only as we configured in the modeler and there are two buttons for outcomes: Approve and Reject.

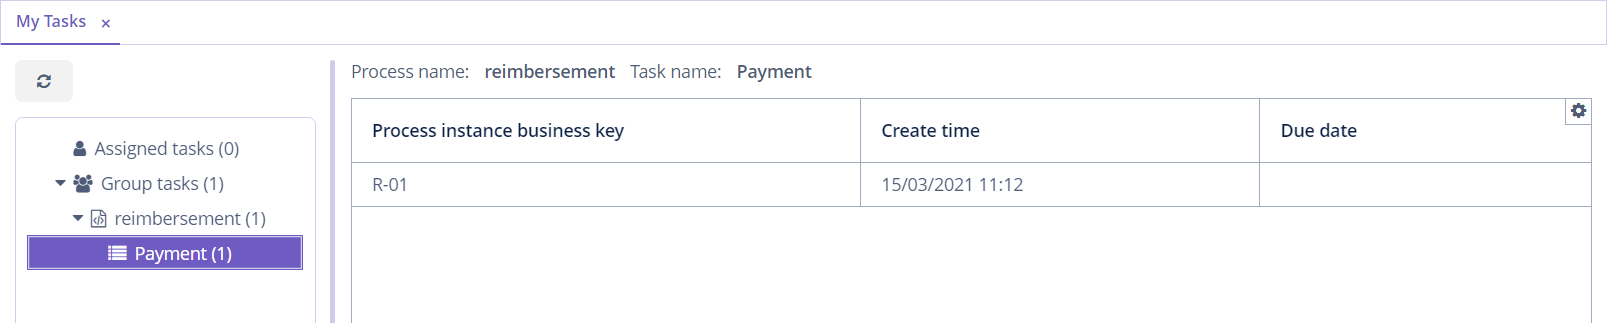
Enter the comment and click the Approve button. Log in on behalf of any user who is a member of the Accountants user group. Open the BPM → My Tasks screen. You’ll see that the table is empty, but in the filter, there is an indicator that the user has a group task that can be claimed. Expand the Group tasks node.
All users of the Accountants group will see the Payment task among their group tasks until any of the accountants claims it. Open the task form. The form is read-only – you cannot do anything with the task until you claim it. On the bottom of the form, there are two buttons: Claim and resume and Claim and close.
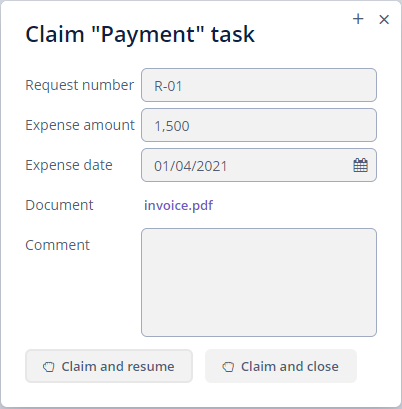
-
Claim and resume button will remove the task from the list of group tasks of other users and will leave the task form on the screen. The form will become editable and buttons for completing the task will be displayed.
-
Claim and close will remove the task from other user task lists, the process form will be closed. The task will appear in the Assigned tasks list for the current user.
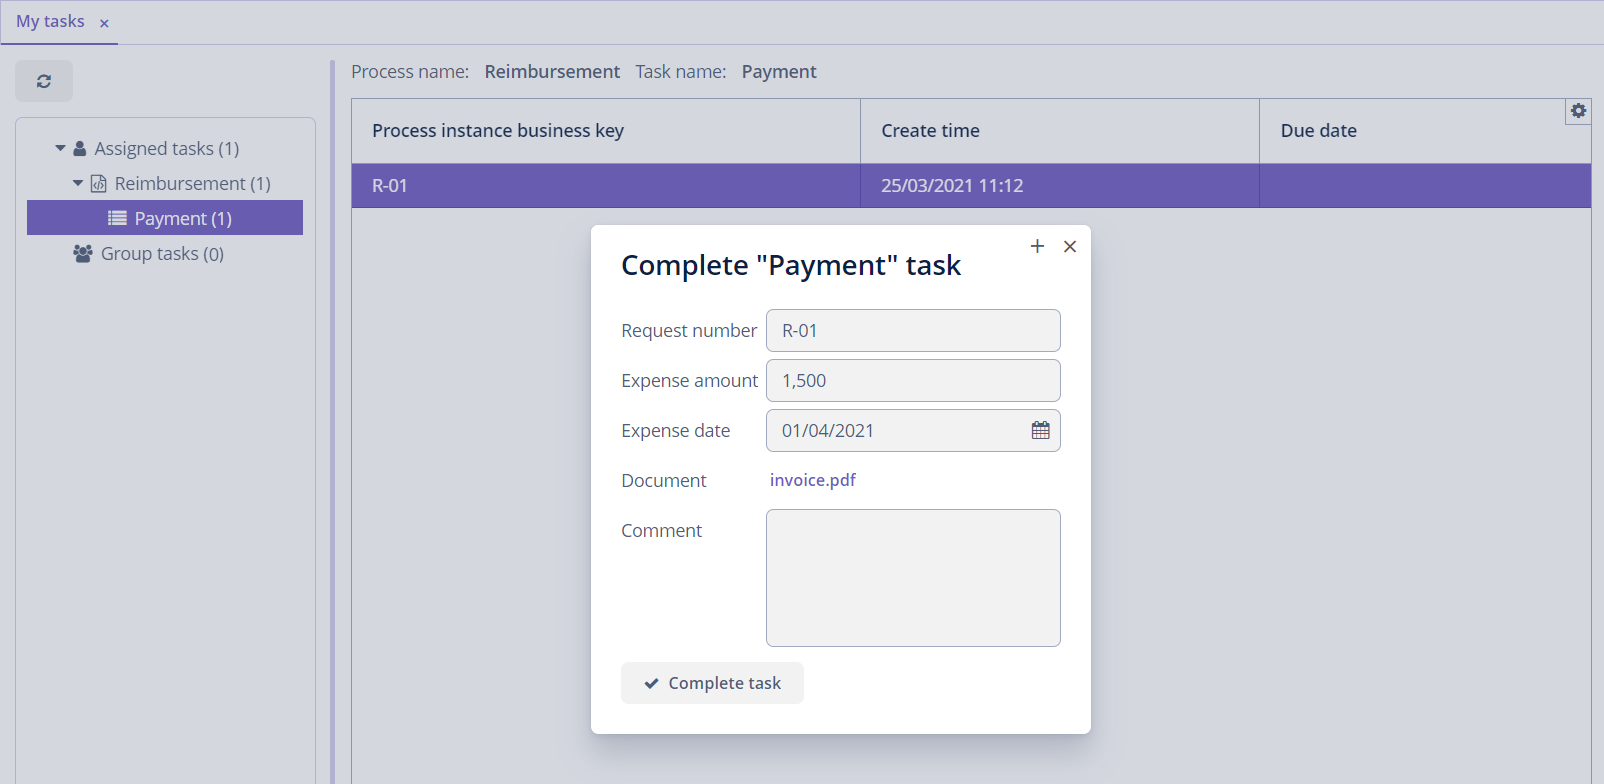
Click the Claim and close button. Select the Payment tasks node from the Assigned tasks group. Open the task form and complete the task using the default Complete task button. When we don’t specify task outcomes in the model, this default button is displayed.
The process is completed.
