Using Data Components
This section provides practical examples of working with data components.
Declarative Usage
Usually, data components are defined and bound to visual components declaratively in the view XML descriptor. If you create a view for an entity using Studio, you can see the top-level <data> element which contains the data component declarations.
Below is an example of data components in a detail view for the User entity that has a to-one reference to Department and a to-many reference to the UserStep entity:
<data> (1)
    <instance id="userDc"
              class="com.company.onboarding.entity.User"> (2)
        <fetchPlan extends="_base"> (3)
            <property name="department" fetchPlan="_base"/>
            <property name="steps" fetchPlan="_base">
                <property name="step" fetchPlan="_base"/>
            </property>
        </fetchPlan>
        <loader/> (4)
        <collection id="stepsDc" property="steps"/> (5)
    </instance>
    <collection id="departmentsDc" class="com.company.onboarding.entity.Department"> (6)
        <fetchPlan extends="_base"/>
        <loader> (7)
            <query>
                <![CDATA[select e from Department e
                order by e.name asc]]>
            </query>
        </loader>
    </collection>
</data>| 1 | The root data element defines the DataContext instance. |
| 2 | InstanceContainer of the User entity. |
| 3 | The optional fetchPlan attribute defines the object graph that should be eagerly loaded from the database. |
| 4 | InstanceLoader that loads the User instance. |
| 5 | CollectionPropertyContainer for the nested UserStep entity. It is bound to the User.steps collection attribute. |
| 6 | A standalone CollectionContainer for the Department entity. It can be used as a source of dropdown items for selecting a department. |
| 7 | CollectionLoader that loads the Department entity instances using the specified query. |
The data containers defined above can be used in visual components as follows:
<textField id="usernameField" dataContainer="userDc" property="username"/> (1)
<formLayout id="form" dataContainer="userDc"> (2)
    <textField id="firstNameField" property="firstName"/>
    <textField id="lastNameField" property="lastName"/>
    <entityComboBox id="departmentField" property="department"
                    itemsContainer="departmentsDc"/> (3)
</formLayout>
<dataGrid id="stepsDataGrid" width="100%" minHeight="10em"
          dataContainer="stepsDc"> (4)
    <columns>
        <column property="step"/>
        <column property="dueDate"/>
        <column property="completedDate"/>
    </columns>
</dataGrid>| 1 | Standalone fields have dataContainer and property attributes. |
| 2 | The formLayout component propagates dataContainer to its fields, so they need only the property attribute. |
| 3 | The entityComboBox field has also the itemsContainer attribute to get the list of dropdown items. |
| 4 | dataGrid has only the dataContainer attribute. |
Programmatic Usage
Data components can be created and used in visual components programmatically.
In the example below, we create a detail view with the same data and visual components as defined in the previous section using only Java code without any XML descriptor.
@Route(value = "users2/:id", layout = MainView.class)
@ViewController("User.detail2")
public class UserDetailViewProgrammatic extends StandardDetailView<User> {

    @Autowired
    private DataComponents dataComponents; (1)
    @Autowired
    private UiComponents uiComponents;
    @Autowired
    private FetchPlans fetchPlans;
    @Autowired
    private Metadata metadata;

    private InstanceContainer<User> userDc;
    private InstanceLoader<User> userDl;
    private CollectionPropertyContainer<UserStep> stepsDc;
    private CollectionContainer<Department> departmentsDc;
    private CollectionLoader<Department> departmentsDl;

    @Subscribe
    public void onInit(InitEvent event) {
        createDataComponents();
        createUiComponents();
    }

    private void createDataComponents() {
        DataContext dataContext = dataComponents.createDataContext();
        getViewData().setDataContext(dataContext); (2)

        userDc = dataComponents.createInstanceContainer(User.class);

        userDl = dataComponents.createInstanceLoader();
        userDl.setContainer(userDc); (3)
        userDl.setDataContext(dataContext); (4)

        FetchPlan userFetchPlan = fetchPlans.builder(User.class)
                .addFetchPlan(FetchPlan.BASE)
                .add("department", FetchPlan.BASE)
                .add("steps", FetchPlan.BASE)
                .add("steps.step", FetchPlan.BASE)
                .build();
        userDl.setFetchPlan(userFetchPlan);

        stepsDc = dataComponents.createCollectionContainer(
                UserStep.class, userDc, "steps"); (5)

        departmentsDc = dataComponents.createCollectionContainer(Department.class);

        departmentsDl = dataComponents.createCollectionLoader();
        departmentsDl.setContainer(departmentsDc);
        departmentsDl.setDataContext(dataContext);
        departmentsDl.setQuery("select e from Department e"); (6)
        departmentsDl.setFetchPlan(FetchPlan.BASE);
    }

    private void createUiComponents() {
        TypedTextField<String> usernameField = uiComponents.create(TypedTextField.class);
        usernameField.setValueSource(new ContainerValueSource<>(userDc, "username")); (7)
        getContent().add(usernameField);

        FormLayout formLayout = uiComponents.create(FormLayout.class);
        getContent().add(formLayout);

        TypedTextField<String> firstNameField = uiComponents.create(TypedTextField.class);
        firstNameField.setValueSource(new ContainerValueSource<>(userDc, "firstName"));
        formLayout.add(firstNameField);

        TypedTextField<String> lastNameField = uiComponents.create(TypedTextField.class);
        lastNameField.setValueSource(new ContainerValueSource<>(userDc, "lastName"));
        formLayout.add(lastNameField);

        EntityComboBox<Department> departmentField = uiComponents.create(EntityComboBox.class);
        departmentField.setValueSource(new ContainerValueSource<>(userDc, "department"));
        departmentField.setItems(departmentsDc); (8)
        formLayout.add(departmentField);

        DataGrid<UserStep> dataGrid = uiComponents.create(DataGrid.class);
        dataGrid.addColumn(metadata.getClass(UserStep.class).getPropertyPath("step.name"));
        dataGrid.setItems(new ContainerDataGridItems<>(stepsDc)); (9)
        getContent().add(dataGrid);
        getContent().expand(dataGrid);

        Button okButton = uiComponents.create(Button.class);
        okButton.setText("OK");
        okButton.addClickListener(clickEvent -> closeWithSave());
        getContent().add(okButton);

        Button cancelButton = uiComponents.create(Button.class);
        cancelButton.setText("Cancel");
        cancelButton.addClickListener(clickEvent -> closeWithDiscard());
        getContent().add(cancelButton);
    }

    @Override
    protected InstanceContainer<User> getEditedEntityContainer() { (10)
        return userDc;
    }

    @Subscribe
    protected void onBeforeShow(BeforeShowEvent event) { (11)
        userDl.load();
        departmentsDl.load();
    }
}| 1 | DataComponents is a factory to create data components. |
| 2 | The DataContext instance is registered in the view for standard save action to work properly. |
| 3 | The userDl loader will load data to userDc container. |
| 4 | The userDl loader will merge loaded entities into the data context for change tracking. |
| 5 | The stepsDc is created as a property container. |
| 6 | A query is specified for the departmentsDl loader. |
| 7 | ContainerValueSource is used to bind single fields to containers. |
| 8 | CollectionContainer is directly used to provide items to combo boxes. |
| 9 | ContainerDataGridItems is used to bind DataGrids to containers. |
| 10 | getEditedEntityContainer() is overridden to specify the container instead of @EditedEntityContainer annotation. |
| 11 | Loads data before opening the view. The edited entity id will be set to userDl by the framework automatically. |
Dependencies Between Data Components
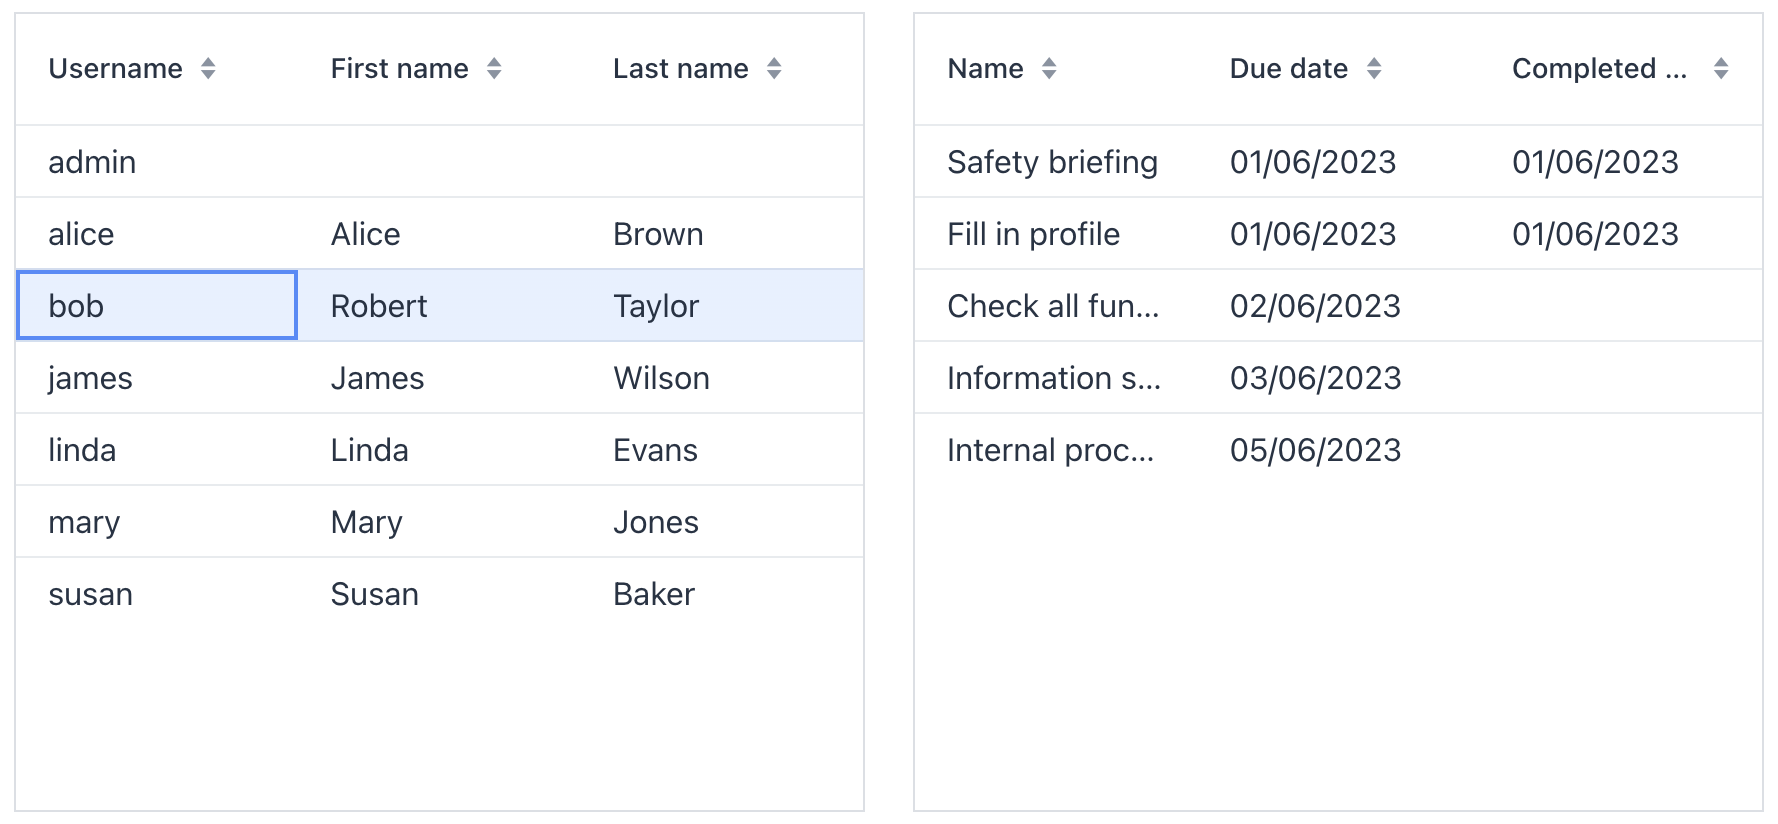
Sometimes you need to load and display data that depends on other data in the same view. For example, on the image below the left table displays the list of users (User entity) and the right one displays the list of onboarding steps (UserStep entity) for the selected user. The right list is refreshed each time the selected item in the left list changes.
In this example, the User entity contains the steps attribute that is a one-to-many collection. So the simplest way to implement the view is to load the list of users with a fetch plan containing the steps attribute and use a property container to hold the list of dependent UserStep lines. Then bind the left table to the master container and the right table to the property container.
But this approach has the following performance implication: you will load UserStep instances for all users from the left table, even though you display the UserStep lines only for a single user at a time. This is why we recommend using property containers and deep fetch plans having collection attributes only when loading a single master item, for example, in the user detail view.
Also, the master entity may have no direct property pointing to the dependent entity. In this case, the above approach with a property container would not work at all.
The common approach to organize relations between data in a view is to use queries with parameters. The dependent loader contains a query with a parameter that links data to the master, and when the current item in the master container changes, you set the parameter and trigger the dependent loader.
Below is an example of the view which has two dependent container/loader pairs and the tables bound to them.
<view xmlns="http://jmix.io/schema/flowui/view"
      title="Users with onboarding steps"
      focusComponent="usersTable">
    <data readOnly="true">
        <collection id="usersDc"
                    class="com.company.onboarding.entity.User"> (1)
            <fetchPlan extends="_base"/>
            <loader id="usersDl">
                <query>
                    <![CDATA[select e from User e order by e.username asc]]>
                </query>
            </loader>
        </collection>
        <collection id="userStepsDc"
                    class="com.company.onboarding.entity.UserStep"> (2)
            <fetchPlan extends="_base"/>
            <loader id="userStepsDl">
                <query>
                    <![CDATA[select e from UserStep e where e.user = :user
                    order by e.sortValue asc]]>
                </query>
            </loader>
        </collection>
    </data>
    <facets/> (3)
    <layout>
        <formLayout>
            <dataGrid id="usersTable"
                      dataContainer="usersDc"> (4)
                <columns>
                    <column property="username"/>
                    <column property="firstName"/>
                    <column property="lastName"/>
                </columns>
            </dataGrid>
            <dataGrid id="userStepsTable"
                      dataContainer="userStepsDc"> (5)
                <columns>
                    <column property="step.name"/>
                    <column property="dueDate"/>
                    <column property="completedDate"/>
                </columns>
            </dataGrid>
        </formLayout>
    </layout>
</view>| 1 | Master container and loader. |
| 2 | Dependent container and loader. |
| 3 | The DataLoadCoordinator facet is not used, so we will trigger the loaders programmatically in the controller. |
| 4 | Master table. |
| 5 | Dependent table. |
@Route(value = "users-with-steps", layout = MainView.class)
@ViewController("UserWithStepsListView")
@ViewDescriptor("user-with-steps-list-view.xml")
@LookupComponent("usersTable")
@DialogMode(width = "50em", height = "37.5em")
public class UserWithStepsListView extends StandardListView<User> {

    @ViewComponent
    private CollectionLoader<User> usersDl;
    @ViewComponent
    private CollectionLoader<UserStep> userStepsDl;

    @Subscribe
    public void onBeforeShow(final BeforeShowEvent event) {
        usersDl.load(); (1)
    }

    @Subscribe(id = "usersDc", target = Target.DATA_CONTAINER)
    public void onUsersDcItemChange(final InstanceContainer.ItemChangeEvent<User> event) {
        userStepsDl.setParameter("user", event.getItem()); (2)
        userStepsDl.load();
    }
}| 1 | The master loader is triggered in the BeforeShowEvent handler. |
| 2 | In the ItemChangeEvent handler of the master container, a parameter is set to the dependent loader and it is triggered. |
| The DataLoadCoordinator facet allows you to link data components declaratively without writing any Java code. |
Custom Sorting
Sorting of UI tables by entity attributes is performed by CollectionContainerSorter which is set for a CollectionContainer. The standard implementation sorts data in memory if it fits in one page of loaded data, otherwise it sends a new request to the database with the appropriate "order by" clause. The "order by" clause is created by the JpqlSortExpressionProvider bean.
Some entity attributes can require a special implementation of sorting. Below we explain how to customize sorting on a simple example: suppose there is the Department entity with a num attribute of type String, but we know that the attribute actually stores only numeric values. So we want the sort order to be 1, 2, 3, 10, 11. With the default behavior, the order would be 1, 10, 11, 2, 3.
First, create a subclass of the CollectionContainerSorter class for sorting in memory:
package com.company.onboarding.app;

import com.company.onboarding.entity.Department;
import io.jmix.core.Sort;
import io.jmix.core.metamodel.model.MetaClass;
import io.jmix.core.metamodel.model.MetaPropertyPath;
import io.jmix.flowui.model.BaseCollectionLoader;
import io.jmix.flowui.model.CollectionContainer;
import io.jmix.flowui.model.impl.CollectionContainerSorter;
import io.jmix.flowui.model.impl.EntityValuesComparator;
import org.springframework.beans.factory.BeanFactory;

import java.util.Comparator;
import java.util.Objects;

public class CustomCollectionContainerSorter extends CollectionContainerSorter {

    public CustomCollectionContainerSorter(CollectionContainer<?> container,
                                           BaseCollectionLoader loader,
                                           BeanFactory beanFactory) {
        super(container, loader, beanFactory);
    }

    @Override
    protected Comparator<?> createComparator(Sort.Order sortOrder, MetaClass metaClass) {
        MetaPropertyPath metaPropertyPath = Objects.requireNonNull(
                metaClass.getPropertyPath(sortOrder.getProperty()));

        if (metaPropertyPath.getMetaClass().getJavaClass().equals(Department.class)
                && "num".equals(metaPropertyPath.toPathString())) {
            boolean isAsc = sortOrder.getDirection() == Sort.Direction.ASC;
            return Comparator.comparing((Department e) ->
                            e.getNum() == null ? null : Integer.valueOf(e.getNum()),
                    new EntityValuesComparator<>(isAsc, metaClass, beanFactory));
        }
        return super.createComparator(sortOrder, metaClass);
    }
}
Create the sorter in the required view:
public class DepartmentListView2 extends StandardListView<Department> {

    @ViewComponent
    private CollectionContainer<Department> departmentsDc;

    @ViewComponent
    private CollectionLoader<Department> departmentsDl;

    @Autowired
    private BeanFactory beanFactory;

    @Subscribe
    public void onInit(final InitEvent event) {
        Sorter sorter = new CustomCollectionContainerSorter(departmentsDc, departmentsDl, beanFactory);
        departmentsDc.setSorter(sorter);
    }
If your sorter defines some global behavior, create your own factory that instantiates sorters system-wide:
package com.company.onboarding.app;

import io.jmix.flowui.model.BaseCollectionLoader;
import io.jmix.flowui.model.CollectionContainer;
import io.jmix.flowui.model.Sorter;
import io.jmix.flowui.model.SorterFactory;
import jakarta.annotation.Nullable;
import org.springframework.context.annotation.Primary;
import org.springframework.stereotype.Component;

@Primary
@Component
public class CustomSorterFactory extends SorterFactory {

    @Override
    public Sorter createCollectionContainerSorter(CollectionContainer container,
                                                  @Nullable BaseCollectionLoader loader) {
        return new CustomCollectionContainerSorter(container, loader, beanFactory);
    }
}
Also, you can create own implementation of JpqlSortExpressionProvider for sorting at the database level:
package com.company.onboarding.app;

import com.company.onboarding.entity.Department;
import io.jmix.core.metamodel.model.MetaPropertyPath;
import io.jmix.data.impl.DefaultJpqlSortExpressionProvider;
import org.springframework.context.annotation.Primary;
import org.springframework.stereotype.Component;

@Primary
@Component
public class CustomSortExpressionProvider extends DefaultJpqlSortExpressionProvider {

    @Override
    public String getDatatypeSortExpression(MetaPropertyPath metaPropertyPath, boolean sortDirectionAsc) {
        if (metaPropertyPath.getMetaClass().getJavaClass().equals(Department.class)
                && "num".equals(metaPropertyPath.toPathString())) {
            return String.format("CAST({E}.%s BIGINT)", metaPropertyPath);
        }
        return String.format("{E}.%s", metaPropertyPath);
    }
}