entityPicker
entityPicker displays an entity instance in a text field and performs actions when the user clicks buttons on the right.
-
XML element:
entityPicker -
Java class:
EntityPicker
Basics
Use entityPicker if:
-
The field value is a reference to an entity instance.
-
Users need to select or create an entity instance via the lookup view or enter a specific value.
-
Users need to open the detail view for a related entity instance.
By default, Jmix Studio generates entityPicker when creating an entity detail view with a reference attribute.
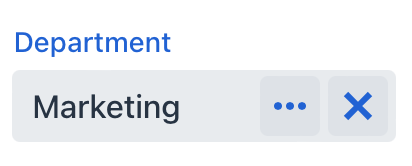
In the following example, the User entity has a reference to the Department entity. Thus, the userDc data container fetches the department attribute of the User entity. In the entityPicker element, the dataContainer attribute contains a link to the userDc data container, and the property attribute refers to the department entity attribute.
<data>
    <instance class="com.company.onboarding.entity.User" id="userDc">
        <fetchPlan extends="_base">
            <property name="department" fetchPlan="_base"/>
        </fetchPlan>
        <loader id="userDl"/>
    </instance>
</data>
<layout>
    <entityPicker id="entityPicker"
                  dataContainer="userDc"
                  property="department"
                  label="Department" >
        <actions>
            <action id="entityLookup" type="entity_lookup"/>
            <action id="entityClear" type="entity_clear"/>
        </actions>
    </entityPicker>
</layout>|
For |
Actions
You can define custom and predefined actions for entityPicker displayed as buttons on the right.
You can do it either in the XML descriptor using the actions nested element or programmatically in the controller using the addAction() method.
|
To add |
Predefined Action
When Studio generates entityPicker in the detail view, it also generates two predefined standard actions: entity_lookup and entity_clear. There are also the entity_open and entity_openComposition actions.
Use the type and id attributes for declaring predefined action in XML.
If you create entityPicker without actions, the XML loader will define only the entity_lookup and entity_clear actions. To add another predefined action, for example, the entity_open, you should specify the actions element as follows:
<entityPicker dataContainer="userDc"
              property="department"
              label="Department" >
    <actions>
        <action id="entityLookup" type="entity_lookup"/>
        <action id="entityClear" type="entity_clear"/>
        <action id="entityOpen" type="entity_open"/>
    </actions>
</entityPicker>
The actions element does not extend but overrides a set of standard actions. You should define the identifiers of all required actions explicitly.
Custom Actions
To define a custom action in XML, use the actions nested element. Specify the id and icon attributes for the action:
<entityPicker id="departmentEntityPicker"
              dataContainer="userWithDeptManagerDc"
              property="department">
    <actions>
        <action id="entityLookup" type="entity_lookup"/>
        <action id="knowManager" icon="QUESTION"
                description="Know HR-manager"/>
    </actions>
</entityPicker>
Then implement custom logic in the view controller by subscribing to ActionPerformedEvent:
@ViewComponent
private EntityPicker<Department> departmentEntityPicker;

@Autowired
private Notifications notifications;

@Subscribe("departmentEntityPicker.knowManager")
public void onKnowManager(ActionPerformedEvent event) {
    Department department = departmentEntityPicker.getValue();
    if (department != null)
        notifications.create(department.getName() + " has "
                + department.getHrManager() + " HR-manager")
                .show();
    else notifications.create("Choose a department").show();
}|
You can generate the |
Adding Actions Programmatically
Use the addAction() method to set actions programmatically.
-
Adding Standard Action
For example, if the component is defined in the XML descriptor without the
actionsnested element, it is sufficient to add missing standard actions:@ViewComponent private EntityPicker<Department> departmentEntityPicker; @Autowired private Actions actions; @Subscribe public void onInit(InitEvent event) { departmentEntityPicker.addAction(actions.create(EntityOpenAction.class)); } -
Adding Custom Action
An example of creating a custom action:
@ViewComponent
private EntityPicker<Department> departmentEntityPicker;

@Subscribe
public void onInit(InitEvent event) {
    departmentEntityPicker.addAction(new BaseAction("showManager")
            .withIcon(VaadinIcon.QUESTION_CIRCLE)
            .withHandler(e -> {
                Department department = departmentEntityPicker.getValue();
                if (department != null)
                    notifications.create(department.getName() + " has "
                                    + department.getHrManager() + " HR-manager")
                            .show();
                else notifications.create("Choose a department").show();
            }));
}
Attributes
id - allowCustomValue - autofocus - classNames - colspan - dataContainer - enabled - errorMessage - height - helperText - invalid - label - maxHeight - maxWidth - metaClass - minHeight - minWidth - placeholder - property - readOnly - required - requiredIndicatorVisible - requiredMessage - tabIndex - themeNames - title - visible - width
metaClass
You can use entityPicker without binding to the data container, that is, without setting dataContainer and property. In this case, the metaClass attribute should be used to specify an entity type for entityPicker. For example:
<entityPicker metaClass="Department">
    <actions>
        <action id="entityLookup" type="entity_lookup"/>
        <action id="entityOpen" type="entity_open"/>
    </actions>
</entityPicker>
You can get an instance of a selected entity by injecting the component into a controller and invoking its getValue() method.
Handlers
AttachEvent - BlurEvent - ComponentValueChangeEvent - CustomValueSetEvent - DetachEvent - FocusEvent - formatter - statusChangeHandler - validator
|
To generate a handler stub in Jmix Studio, use the Handlers tab of the Jmix UI inspector panel or the Generate Handler action available in the top panel of the view class and through the Code → Generate menu (Alt+Insert / Cmd+N). |
