Configuration
Adding Widgets
By default, the add-on does not have predefined widgets. To create a widget, do the following:
-
Create a new fragment using Studio interface. In the Jmix Tool Window, go to New → Screen and select Screen Fragment template. Set the names of the descriptor and controller.
-
In the screen controller, add the
@DashboardWidgetannotation.-
Fill in the
nameparameter. It will be displayed in the Dashboard editor. -
In case you are going to use a custom widget editor, fill in
editFragmentId- id of the fragment for editing a widget.
-
Here is an example of a simple widget that displays a company logo:
@UiController("sample_Logo")
@UiDescriptor("logo-widget.xml")
@DashboardWidget(name = "Logo")
public class LogoWidget extends ScreenFragment {
}<fragment xmlns="http://jmix.io/schema/ui/fragment">
<layout>
<image>
<resource>
<classpath path="dashboards/ex1/screen/widgets/image/jmix-logo.png"/>
</resource>
</image>
</layout>
</fragment>Updatable Widget
The RefreshableWidget interface allows widget to be refreshed from time to time. If the widget implements the RefreshableWidget interface, the refresh() method will be invoked automatically on every dashboard update event.
In the example below, the widget displays a random joke. The refresh period is set in the Dashboard editor while creating a dashboard.
@UiController("sample_RandomJokeWidget")
@UiDescriptor("random-joke-widget.xml")
@DashboardWidget(name = "Random Joke")
public class RandomJokeWidget extends ScreenFragment implements RefreshableWidget {

    @Autowired
    private TextArea<String> randomJoke;

    @Subscribe
    private void onAfterInit(AfterInitEvent event) {
        randomJoke.setValue(getNewJoke());
    }

    @Override
    public void refresh(DashboardEvent dashboardEvent) {
        randomJoke.setValue(getNewJoke());
    }

    private String getNewJoke() {
        String host = "icanhazdadjoke.com";
        String url = "https://" + host;
        RestTemplate restTemplate = new RestTemplate();
        HttpHeaders headers = new HttpHeaders();
        headers.set("Accept", "text/plain");
        headers.set("User-Agent", "CubaDashboardDemoApp");
        headers.set("Cache-Control", "no-cache");
        headers.set("Host", host);
        HttpEntity<String> request = new HttpEntity<>("", headers);

        ResponseEntity<String> response = restTemplate.exchange(url, HttpMethod.GET, request, String.class);
        return response.getBody();

    }
}
Widget Parameters
You should add the @WindowParam and @WidgetParam annotations to the class field that you want to use as a widget parameter.
The add-on provides the Parameter editor dialog that allows creating parameters and passing them to your widget.
Let’s look at the example of how to access parameters in code. The widget shows the picture that is kept in one of the fields:
@UiController("sample_ArtWidget")
@UiDescriptor("art-widget.xml")
@DashboardWidget(name = "Pokemon Art")
public class ArtWidget extends ScreenFragment {

    public static final String INIT_POKEMON = "Cubone"; (1)

    @Autowired
    private InstanceContainer<Pet> petDc; (2)

    @Autowired
    private DataManager dataManager;

    @WindowParam
    @WidgetParam
    protected Pet pet; (3)

    @WindowParam
    protected Widget widget; (4)

    @Subscribe
    public void onInit(InitEvent event) {
        if (pet == null || pet.getPicture() == null) { (5)
            pet = dataManager.loadValue("select s from sample_Pet s where " +
                            "s.name = :name", Pet.class)
                    .parameter("name", INIT_POKEMON)
                    .one();
        }
        petDc.setItem(pet); (6)
        widget.setCaption(pet.getName()); (7)
    }
}| 1 | A constant containing a value of the name field of an entity. It will be used in case a parameter is not set in a widget. |
| 2 | Injects an instance container that holds an entity with a picture. |
| 3 | A class field of the Pet type. It should have the same name as the alias field in the parameter editor. |
| 4 | Injects a widget itself to set a new caption for it. |
| 5 | In case the parameter is not set, the entity with the name specified in the constant will be used. |
| 6 | Puts the entity in the instance container. |
| 7 | Sets the caption of the widget. |
A screen controller of a widget can look like this:
<fragment xmlns="http://jmix.io/schema/ui/fragment">
    <data>
        <instance id="petDc" class="dashboards.ex1.entity.Pet">
            <fetchPlan extends="_base"/>
            <loader id="petDl"/>
        </instance>
    </data>
    <layout>
        <image id="pokemonImage"
               dataContainer="petDc"
               property="picture"/>
    </layout>
</fragment>
Custom Widget Editor
You can customize the Widget editor dialog according to your needs.
Let’s look at the example with a custom widget editor that adds the EntityPicker component. Then the selected entity will be used in the widget as a parameter.
First, create a blank screen fragment using Studio interface. In the Jmix Tool Window, go to New → Screen and select Screen Fragment template. Set the names of the descriptor and controller.
The descriptor will look like this:
<fragment xmlns="http://jmix.io/schema/ui/fragment">
    <layout expand="hBox">
        <hbox id="hBox" width="AUTO" spacing="true" expand="pokemonPicker">
            <label value="msg://dashboards.ex1.screen.widget/pokemonToShow.caption"/>
            <entityPicker id="pokemonPicker"
                          metaClass="sample_Pet"
                          property="name"
                          required="true"/>
        </hbox>
    </layout>
</fragment>
Here is a controller class of the editor:
@UiController("sample_PokemonWidgetEditor")
@UiDescriptor("pokemon-widget-editor.xml")
public class PokemonWidgetEditor extends ScreenFragment {

    @Autowired
    private EntityPicker<Pet> pokemonPicker;

    @WindowParam
    @WidgetParam
    protected Pet pet; (1)

    @Subscribe("pokemonPicker") (2)
    public void onPokemonPickerValueChange(HasValue.ValueChangeEvent<String> event) {
        pet = pokemonPicker.getValue(); (3)
    }

}| 1 | Defines a field that is used as a widget parameter. |
| 2 | Subscribes to ValueChangeEvent. |
| 3 | Sets the selected value to the widget parameter. |
Then, you need to define the custom editor in the widget.
@UiController("sample_PokemonWidget")
@UiDescriptor("pokemon-widget.xml")
@DashboardWidget(name = "Pokemon Widget", editFragmentId = "sample_PokemonWidgetEditor") (1)
public class PokemonWidget extends ScreenFragment {

    @Autowired
    private InstanceContainer<Pet> petDc;

    @WindowParam
    @WidgetParam
    protected Pet pet; (2)

    @Subscribe
    public void onInit(InitEvent event) {
        petDc.setItem(pet);
    }
}| 1 | The id of the custom widget editor is defined in the @DashboardWidget annotation. |
| 2 | The widget parameter is passed from the widget editor. |
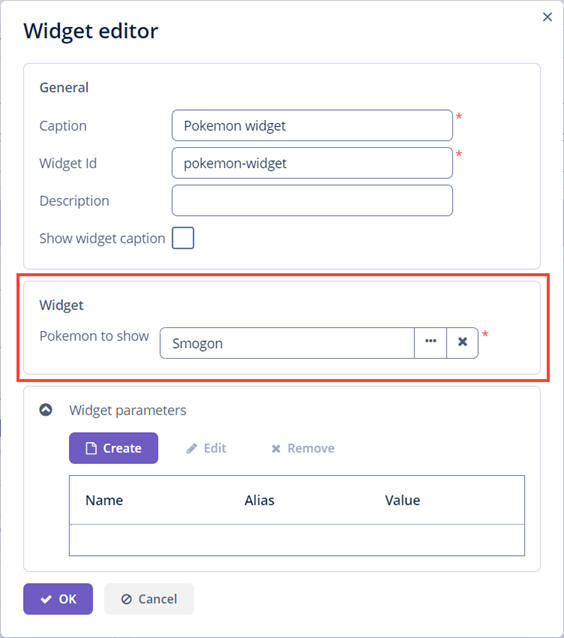
The created editor will look like this in the user interface:
Predefined Roles
The add-on provides the following predefined roles:
-
dashboards-admin- allows users to create and edit dashboards and widget templates. -
dashboards-view- allows users to view embedded dashboards. -
dashboards-browse- allows users to view a list of available dashboards.
