Jmix Screen
When you need a process form with a complex layout and behavior, you can use an existing Jmix UI screen instead of input dialog forms. A screen controller should be annotated with the @ProcessForm annotation to be used as a process form.
The @ProcessForm annotation indicates that the screen must appear in the process forms combo box in the modeler.
Process Variables
@ProcessVariable annotation can be placed on injected UI components or regular class fields.
It indicates that the value of the process variable will be written to this field when the process form is opened. In case of the UI component, the value of the process variable will be set to the UI component.
@ProcessVariable
private Date date;

@Autowired
@ProcessVariable(name = "order")
private EntityPicker<Order> orderEntityPicker;
If you configure the ProcessFormContext with the saveInjectedProcessVariables() method, then the values of annotated fields will be saved as process variables when the process is started or the user task is completed.
@ProcessVariable annotation has an optional name attribute. The value of this attribute is the process variable name. If the name attribute is missing, then the field name is used as the process variable name.
ProcessFormContext
The ProcessFormContext object contains information about a process’s definition to be started (when the form is used for starting the process) or a user task to be completed.
You can use ProcessFormContext if the process form is opened from the Start process and My tasks screens. If you need to open the process form with the injected ProcessFormContext programmatically, use the ProcessFormScreens bean.
The ProcessFormContext object also contains methods for starting the process and task completion.
An example of how to start a process:
@ProcessVariable
private Date date;

@Autowired
@ProcessVariable(name = "order")
private EntityPicker<Order> orderEntityPicker;

@Autowired
private ProcessFormContext processFormContext;

@Subscribe("startProcessBtn")
public void onStartProcessBtnClick(Button.ClickEvent event) {
    processFormContext.processStarting() (1)
            .withBusinessKey("order-1") (2)
            .addProcessVariable("date", date)
            .addProcessVariable("order", orderEntityPicker.getValue()) (3)
            .start(); (4)
    closeWithDefaultAction(); (5)
}| 1 | Creates a ProcessStarting instance. |
| 2 | Sets a business key to the process instance. |
| 3 | Adds a process variable. |
| 4 | Starts the actual process. |
| 5 | Closes the opened window. |
An example of how to complete the user task:
@Autowired
private ProcessFormContext processFormContext;

@Subscribe("rejectBtn")
protected void onRejectBtnClick(Button.ClickEvent event) {
    processFormContext.taskCompletion() (1)
            .withOutcome("reject") (2)
            .saveInjectedProcessVariables() (3)
            .complete(); (4)
    closeWithDefaultAction(); (5)
}| 1 | Creates a TaskCompletion instance. |
| 2 | Sets a task outcome. |
| 3 | Indicates that values of class fields annotated with the @ProcessVariables should be collected and saved as process variables. |
| 4 | Completes the actual task. |
| 5 | Closes the opened window. |
Declare Task Outcomes
In the modeler, for the sequence flow element, you can define a condition by selecting a user task and its outcome from the drop-down list. To fill this list for a user task that uses a Jmix screen process form, you can declare a list of possible outcomes in the form controller. Use the outcomes attribute of the @ProcessForm annotation for that.
@ProcessForm(
        outcomes = { (1)
                @Outcome(id = "approve"),
                @Outcome(id = "reject")
        }
)
public class TaskApprovalForm extends Screen {
Process Form Parameters
Jmix screen process forms can accept external parameters defined in the modeler. The form parameters used by the form are defined in the params attribute of the @ProcessForm annotation:
@ProcessForm(
        params = {
                @Param(name = "variableName"),
                @Param(name = "entityPickerCaption")
        }
)
These parameters are read by the modeler and you can see them after selecting the screen.
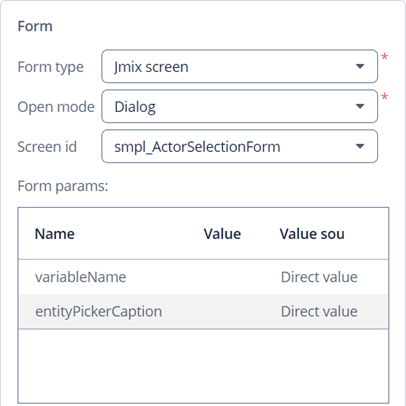
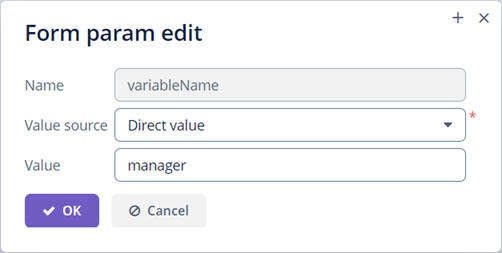
You can edit the parameters and provide a direct param value or use one of the existing process variables as a parameter value.
Inside the process form controller, use the @ProcessFormParam annotation on class fields to get parameter values.
@ProcessFormParam
private String variableName;

@ProcessFormParam
private String entityPickerCaption;
Another way to get a full list of process form parameters is to get them from the ProcessFormContext object:
List<FormParam> formParams = processFormContext.getFormData().getFormParams();As the @ProcessVariable annotation, the @ProcessFormParam supports an optional name attribute. If the attribute is not defined, then a field name is used as a parameter name.
See an example of a process form with parameters.
Output Variables
When you model the process, it may be useful to know which variables are set by the Jmix screen process form in order to reuse them later in the process model. A way to achieve this is to use the outputVariabes attribute of the @ProcessForm annotation.
@ProcessForm(
outputVariables = {
@OutputVariable(name = "order", type = Order.class),
@OutputVariable(name = "comment", type = String.class)
}
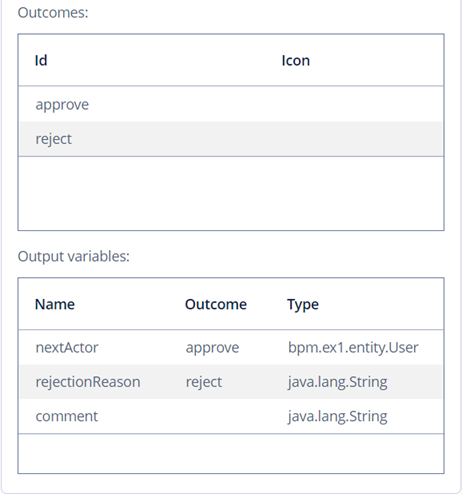
)Often there are cases when a process variable is set only when the task is completed using a particular outcome. To declare this, place the outputVariables annotation attribute to the @Outcome annotation.
@ProcessForm(
        outcomes = {
                @Outcome(
                        id = "approve",
                        outputVariables = {
                                @OutputVariable(name = "nextActor", type = User.class) (1)
                        }
                ),
                @Outcome(
                        id = "reject",
                        outputVariables = {
                                @OutputVariable(name = "rejectionReason", type = String.class) (2)
                        }
                )
        },
        outputVariables = {
                @OutputVariable(name = "comment", type = String.class) (3)
        }
)| 1 | The nextActor variable can be set when the task is completed with the approve outcome. |
| 2 | The rejectionReason variable can be set when the task is completed with the reject outcome. |
| 3 | The comment variable can be set in any case. |
Output variables information is displayed in the corresponding section in the properties panel when you select the process form.
Restrict Process Form Usage
By default, all process forms screens are available within any process model. If you want to use some screen in particular processes only, then you should specify processes keys in the allowedProcessKeys attribute of the @ProcessForm annotation.
@ProcessForm(allowedProcessKeys = {"process-1", "process-2"})The form will be available only for process with process-1 and process-2 rocess ids in the modeler.
Opening Forms Programmatically
You can use the ProcessFormScreens service to create start process forms and task process forms defined in the modeler.
In the example below, the start process form is opened by clicking the button in the browser screen.
@Autowired
private RepositoryService repositoryService;

@Autowired
protected ProcessFormScreens processFormScreens;

@Subscribe("startProcBtn")
public void onStartProcBtnClick(Button.ClickEvent event) {
    ProcessDefinition processDefinition = repositoryService.createProcessDefinitionQuery() (1)
            .processDefinitionKey("order-process")
            .latestVersion()
            .singleResult();

    Screen startProcessForm = processFormScreens.createStartProcessForm(processDefinition, this); (2)
    startProcessForm.show(); (3)
}| 1 | Gets a process definition with the order-process key. |
| 2 | Creates the start process form with the received process definition. |
| 3 | Shows the start process form of the order-process. |
The start process form can look like an example in the ProcessFormContext section.
To create a task form, use the createTaskProcessForm method:
@Autowired
private TaskService taskService;

@Autowired
private ProcessFormScreens processFormScreens;

@Subscribe("openTaskBtn")
public void onOpenTaskBtnClick(Button.ClickEvent event) {

    Task task = taskService.createTaskQuery()
            .processDefinitionKey("approve-order-process")
            .taskAssignee("admin")
            .active()
            .orderByTaskCreateTime()
            .list()
            .get(0);

    Screen taskProcessForm = processFormScreens.createTaskProcessForm(task, this);
    taskProcessForm.show();
}
The task process form can look like an example in the ProcessFormContext section.
Examples
Start Process Form
Let’s look at the example of the process form that is used as a start form. The form displays two fields:
-
a text field to enter the order number.
-
a users drop-down list to select the manager. The manager can be the next process actor.
Screen XML descriptor:
<window xmlns="http://jmix.io/schema/ui/window"
        caption="msg://startProcessForm.caption">
    <layout expand="actionsPanel" spacing="true">
        <form>
            <textField id="orderNumber" caption="msg://orderNumber.caption"/>
            <entityPicker id="managerEntityPicker"
                          metaClass="smpl_User"
                          caption="msg://managerEntityPicker.caption">
                <actions>
                    <action id="lookup" type="entity_lookup"/>
                    <action id="clear" type="entity_clear"/>
                </actions>
            </entityPicker>
        </form>
        <hbox id="actionsPanel" spacing="true">
            <button id="startProcessBtn" icon="font-icon:CHECK" caption="msg://startProcessBtn.caption"/>
        </hbox>
    </layout>
</window>
Screen controller:
@UiController("smpl_StartProcessForm")
@UiDescriptor("start-process-form.xml")
@ProcessForm (1)
public class StartProcessForm extends Screen {

    @Autowired
    @ProcessVariable (2)
    private TextField<String> orderNumber;

    @Autowired
    @ProcessVariable(name = "manager") (3)
    private EntityPicker<User> managerEntityPicker;

    @Autowired
    private ProcessFormContext processFormContext; (4)

    @Subscribe("startProcessBtn")
    public void onStartProcessBtnClick(Button.ClickEvent event) {
        processFormContext.processStarting()
                .withBusinessKey(orderNumber.getValue()) (5)
                .saveInjectedProcessVariables() (6)
                .start();
        closeWithDefaultAction();
    }
}| 1 | The @ProcessForm annotation indicates that this screen is a process form and the screen will be available in the modeler. |
| 2 | We declare that the injected orderNumber UI component is a process variable. Since we develop a start process form, the variable has no value yet, but the annotation will be used on process start. |
| 3 | The same as 2, but here the manager process variable name differs from the managerEntityPicker field name. |
| 4 | ProcessFormContext is the object that we use to start the process. |
| 5 | When we start the process, we can pass an optional process instance business key. We use the orderNumber here. |
| 6 | The saveInjectedProcessVariables() indicates that values of the fields annotated with the @ProcessVariables should be saved as process variables on process start. |
Instead of using saveInjectedProcessVariables() method you can explicitly set process variables:
@Subscribe("startProcessBtn")
public void onStartProcessBtnClick(Button.ClickEvent event) {
    processFormContext.processStarting()
            .withBusinessKey(orderNumber.getValue())
            .addProcessVariable("orderNumber", orderNumber.getValue())
            .addProcessVariable("manager",managerEntityPicker.getValue())
            .start();
    closeWithDefaultAction();
}
Task Process Form
Let’s look at the example of the task process form that displays two fields:
-
The first one will display a value of the existing process variable -
orderNumber. -
The second field will be used for the new process variable -
comment.
Approve and Reject buttons complete the user task with the corresponding outcome.
Screen XML descriptor:
<window xmlns="http://jmix.io/schema/ui/window"
        caption="msg://taskApprovalForm.caption">
    <layout expand="actionsPanel" spacing="true">
        <form>
            <textField id="orderNumber" editable="false" caption="msg://orderNumber.caption"/>
            <textField id="commentField" caption="msg://comment"/>
        </form>
        <hbox id="actionsPanel" spacing="true">
            <button id="approveBtn" icon="font-icon:CHECK" caption="msg://approveBtn.caption"/>
            <button id="rejectBtn" icon="font-icon:BAN" caption="msg://rejectBtn.caption"/>
        </hbox>
    </layout>
</window>
Screen controller:
@UiController("smpl_TaskApprovalForm")
@UiDescriptor("task-approval-form.xml")
@ProcessForm(
        outcomes = { (1)
                @Outcome(id = "approve"),
                @Outcome(id = "reject")
        }
)
public class TaskApprovalForm extends Screen {

    @Autowired
    @ProcessVariable (2)
    private TextField<String> orderNumber;

    @Autowired
    @ProcessVariable(name = "comment") (3)
    private TextField<String> commentField;

    @Autowired
    private ProcessFormContext processFormContext;

    @Subscribe("approveBtn")
    protected void onApproveBtnClick(Button.ClickEvent event) {
        processFormContext.taskCompletion()
                .withOutcome("approve")
                .saveInjectedProcessVariables() (4)
                .complete();
        closeWithDefaultAction();
    }

    @Subscribe("rejectBtn")
    protected void onRejectBtnClick(Button.ClickEvent event) {
        processFormContext.taskCompletion()
                .withOutcome("reject")
                .addProcessVariable("comment", commentField.getValue()) (5)
                .complete();
        closeWithDefaultAction();
    }
}| 1 | The form defines two possible outcomes that can be used in a sequence flow node condition in the modeler. This information is used by the modeler only. |
| 2 | The orderNumber variable has been already set on process start. Because of the @ProcessVariable annotation, the value of the orderNumber process variables will be set to the orderNumber text field when the form is displayed. |
| 3 | The comment variable is not set yet, but the @ProcessVariable annotation will be taken into account when we complete the task in the button click listener. |
| 4 | Values of all fields annotated with the @ProcessVariable will be saved as process variables on task completion. |
| 5 | An alternative way to define process variables. Instead of using the saveInjectedProcessVariables() method, you can define process variables directly. |
StandardEditor Process Form
This example demonstrates how to use StandardEditor as a process form. It can be useful when you store some entity in a process variable and want to view or edit entity fields using the task process form.
Let’s suppose that we added the Start process button to the standard Order entity editor. The Start process button starts the process programmatically and puts the edited Order entity instance to the process variables.
@Autowired
private RuntimeService runtimeService;

@Subscribe("startProcessBtn")
public void onStartProcessBtnClick(Button.ClickEvent event) {
    Order order = getEditedEntity();
    Map<String, Object> processVariables = new HashMap<>();
    processVariables.put("order", order); (1)
    runtimeService.startProcessInstanceByKey("order-approval", (2)
            order.getNumber(),
            processVariables);
    closeWithCommit();
}| 1 | Puts the edited entity to the order process variable. |
| 2 | Starts process with the order-approval id, order number as business key, and a map with process variables. |
For example, the XML descriptor of the process form for the next user task can lool like this:
<window xmlns="http://jmix.io/schema/ui/window"
        caption="msg://orderEdit2.caption"
        focusComponent="form">
    <data>
        <instance id="orderDc"
                  class="bpm.ex1.entity.Order" fetchPlan="_local">
            <loader/>
        </instance>
    </data>
    <facets>
        <dataLoadCoordinator auto="true"/>
        <screenSettings id="settingsFacet" auto="true"/>
    </facets>
    <actions>
        <action id="windowCommitAndClose" caption="msg:///actions.Ok"
                icon="EDITOR_OK"
                primary="true"
                shortcut="${COMMIT_SHORTCUT}"/>
        <action id="windowClose"
                caption="msg:///actions.Close"
                icon="EDITOR_CANCEL"/>
    </actions>
    <dialogMode height="600"
                width="800"/>
    <layout spacing="true" expand="editActions">
        <form id="form" dataContainer="orderDc">
            <column width="350px">
                <textField id="numberField" property="number"/>
                <dateField id="dateField" property="date"/>
                <entityPicker id="customerField" property="customer">
                    <actions>
                        <action id="lookup" type="entity_lookup"/>
                        <action id="clear" type="entity_clear"/>
                    </actions>
                </entityPicker>
                <comboBox id="productField" property="product"/>
                <textField id="amountField" property="amount"/>
            </column>
        </form>
        <hbox id="editActions" spacing="true">
            <button id="completeTaskBtn" caption="msg://completeTaskBtn.caption"/>
        </hbox>
    </layout>
</window>
The only thing that differs the form XML descriptor from regular entity editor is that we replaced the editActions panel with the Complete task button.
Process form screen controller:
@UiController("smpl_OrderEditTaskForm")
@UiDescriptor("order-edit-task-form.xml")
@EditedEntityContainer("orderDc")
@ProcessForm (1)
public class OrderEditTaskForm extends StandardEditor<Order> {

    @ProcessVariable
    protected Order order; (2)

    @Autowired
    protected ProcessFormContext processFormContext;

    @Subscribe
    protected void onInit(InitEvent event) {
        setEntityToEdit(order); (3)
    }

    @Subscribe("completeTaskBtn")
    protected void onCompleteTaskBtnClick(Button.ClickEvent event) {
        commitChanges() (4)
                .then(() -> {
                    processFormContext.taskCompletion()
                            .complete();
                    closeWithDefaultAction();
                });
}| 1 | The @ProcessForm annotation indicates that the screen can be used as a process form. |
| 2 | Injects the order process variable. |
| 3 | By the time the InitEvent listener is fired, values of the @ProcessVariable fields must be already set. We invoke the setEntityToEdit() method of the StandardEditor class – this method reloads the order entity with the view required for the editor screen and sets the entity to the data container. |
| 4 | When you click Complete task button, the editor is committed and the task completion is performed. |
Process Form with Parameters
Let’s assume that you need a form for the next process actor selection. The form should display EntityPicker field with users and save the result into a process variable. We want to use the form for selecting different actors at different process steps, so the form should have two parameters:
-
variableName -
entityPickerCaption
Screen XML descriptor:
<window xmlns="http://jmix.io/schema/ui/window"
        caption="msg://actorSelectionForm.caption">
    <layout spacing="true">
        <form width="400px">
            <entityPicker id="userEntityPicker"
                          metaClass="smpl_User"
                          property="username">
            <actions>
                <action id="lookup" type="entity_lookup"/>
                <action id="clear" type="entity_clear"/>
            </actions>
            </entityPicker>
        </form>
        <hbox spacing="true">
            <button id="completeTaskBtn" icon="font-icon:CHECK" caption="msg://completeTask"/>
        </hbox>
    </layout>
</window>
Screen controller:
@ProcessForm(
        params = {
                @Param(name = "variableName"),
                @Param(name = "entityPickerCaption")
        }
)
public class ActorSelectionForm extends Screen {

    @Autowired
    private ProcessFormContext processFormContext;

    @Autowired
    private EntityPicker<String> userEntityPicker;

    @ProcessFormParam
    private String variableName;

    @ProcessFormParam
    private String entityPickerCaption;

    @Subscribe
    private void onBeforeShow(BeforeShowEvent event) {
        userEntityPicker.setCaption(entityPickerCaption);
    }

    @Subscribe("completeTaskBtn")
    private void onCompleteTaskBtnClick(Button.ClickEvent event) {
        processFormContext.taskCompletion()
                .addProcessVariable(variableName, userEntityPicker.getValue())
                .complete();
        closeWithDefaultAction();
    }
}