Role Designer
|
This feature is free to use in small projects with up to 10 entities and roles. In a larger project, it requires a Sprint, Enterprise, or BPM subscription. |
Resource Role Designer
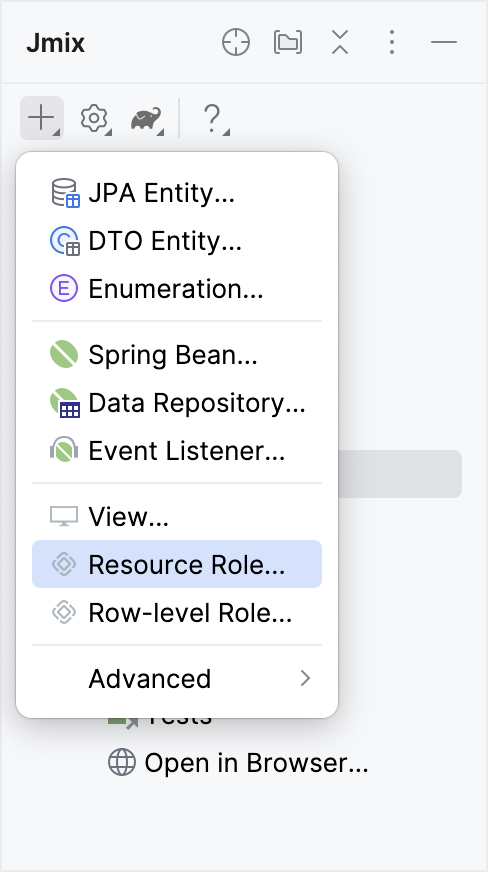
To create a new resource role, use the menu in Jmix Tool Window.
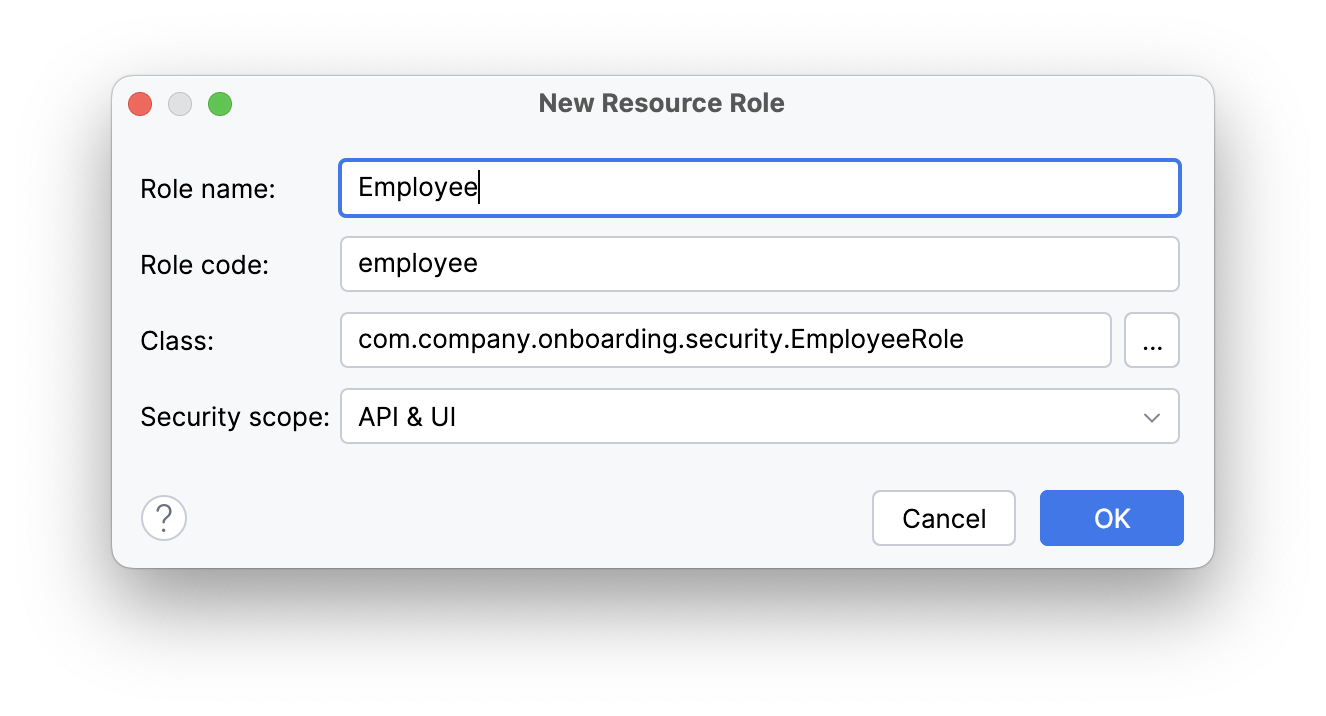
Enter a role name and code in the dialog that appears.
Text Tab
Resource Role Designer is integrated with the code editor that is available on the Text tab. You can edit the source code directly or use the Designer’s controls to generate the code.
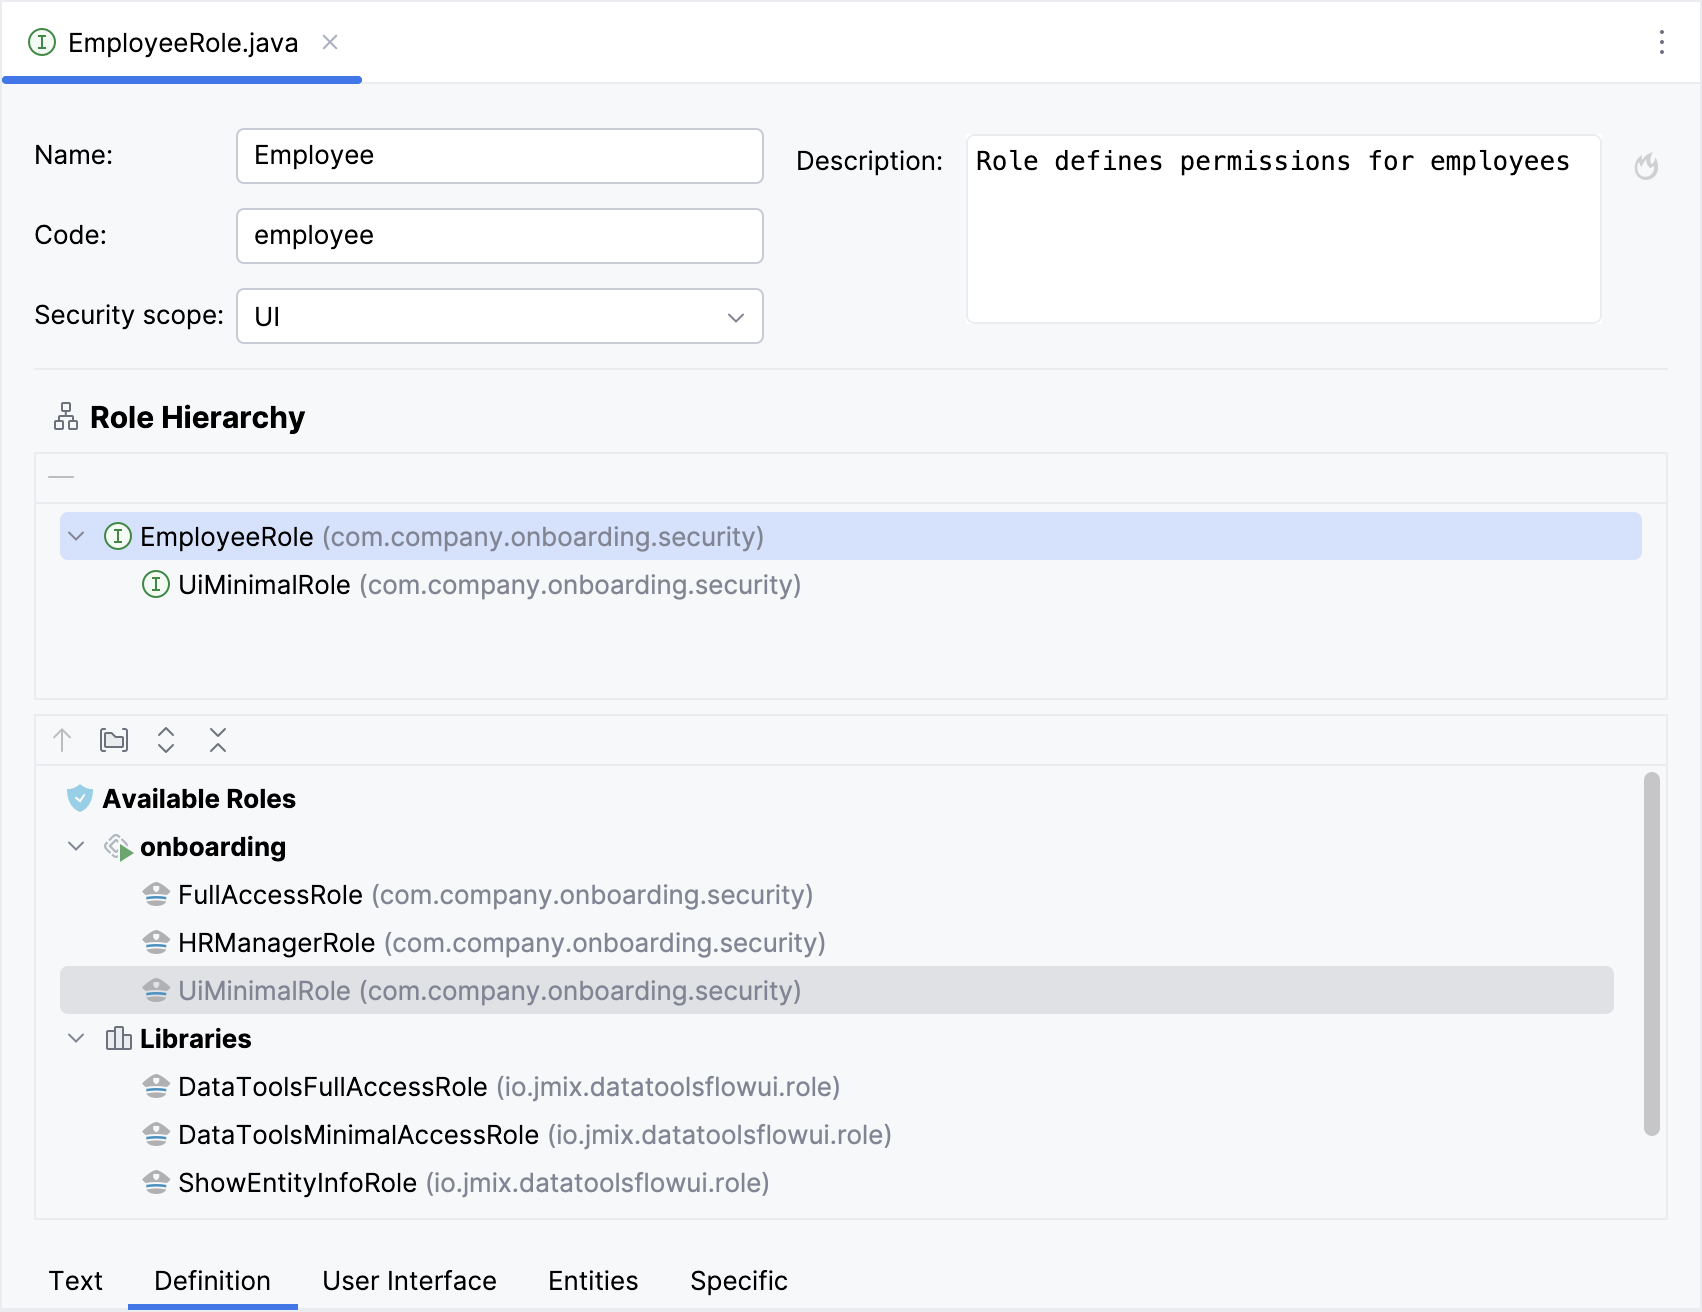
Role Definition
The Definition tab allows you to:
-
Define basic role attributes
-
Manage role hierarchy within the project
|
The role code is used when assigning the role to users. Do not change it after the role has been assigned to users. |
Role Hierarchy
You can view and manage the role hierarchy using the Role Hierarchy panels.
The upper panel directly displays the role hierarchy. The currently selected role is considered the root.
The lower panel contains the toolbar with action buttons and a list of available roles. These include roles defined within the project, as well as roles from linked projects and add-ons.
You can add a role from the available roles list to the hierarchy in the following ways:
-
Double-click the role in the Available Roles list.
-
Use the context menu actions (accessed by right-clicking the role in the Available Roles list).
-
Click the up arrow button located at the top of the Available Roles panel.
The role will be added as a parent to the current role.
To remove a role from the hierarchy, select it and click the minus button or use the actions in the context menu.
User Interface Permissions
The User Interface tab defines permissions for menu items and views.
Permissions are displayed for the selected role:
-
Current role - editable permissions defined in the role itself
-
Ancestor role - read-only display with navigation to role file

The tree on the right displays the structure of the main menu, both project-defined views and inherited views from the framework and add-ons. The All Views group displays all remaining application views that are not directly available through the main menu. You can find the necessary view with the help of the search field located above the tree.
All menu items and views are denied by default. By choosing the item on the list and selecting Allow on the View Permissions panel, you will add permission to open the corresponding menu item or view.
Use the toolbar above the tree to expand or collapse its nodes. The gear button toggles displaying views and menu items that don’t have permissions specified.
The Allow all views checkbox is useful when you want to grant access to all views or deny only a few.
Entity Permissions
The Entities tab defines CRUD permissions for entities and attributes.
Permissions are displayed for the selected role:
-
Current role - editable CRUD permissions
-
Ancestor role - read-only display of CRUD and attribute permissions
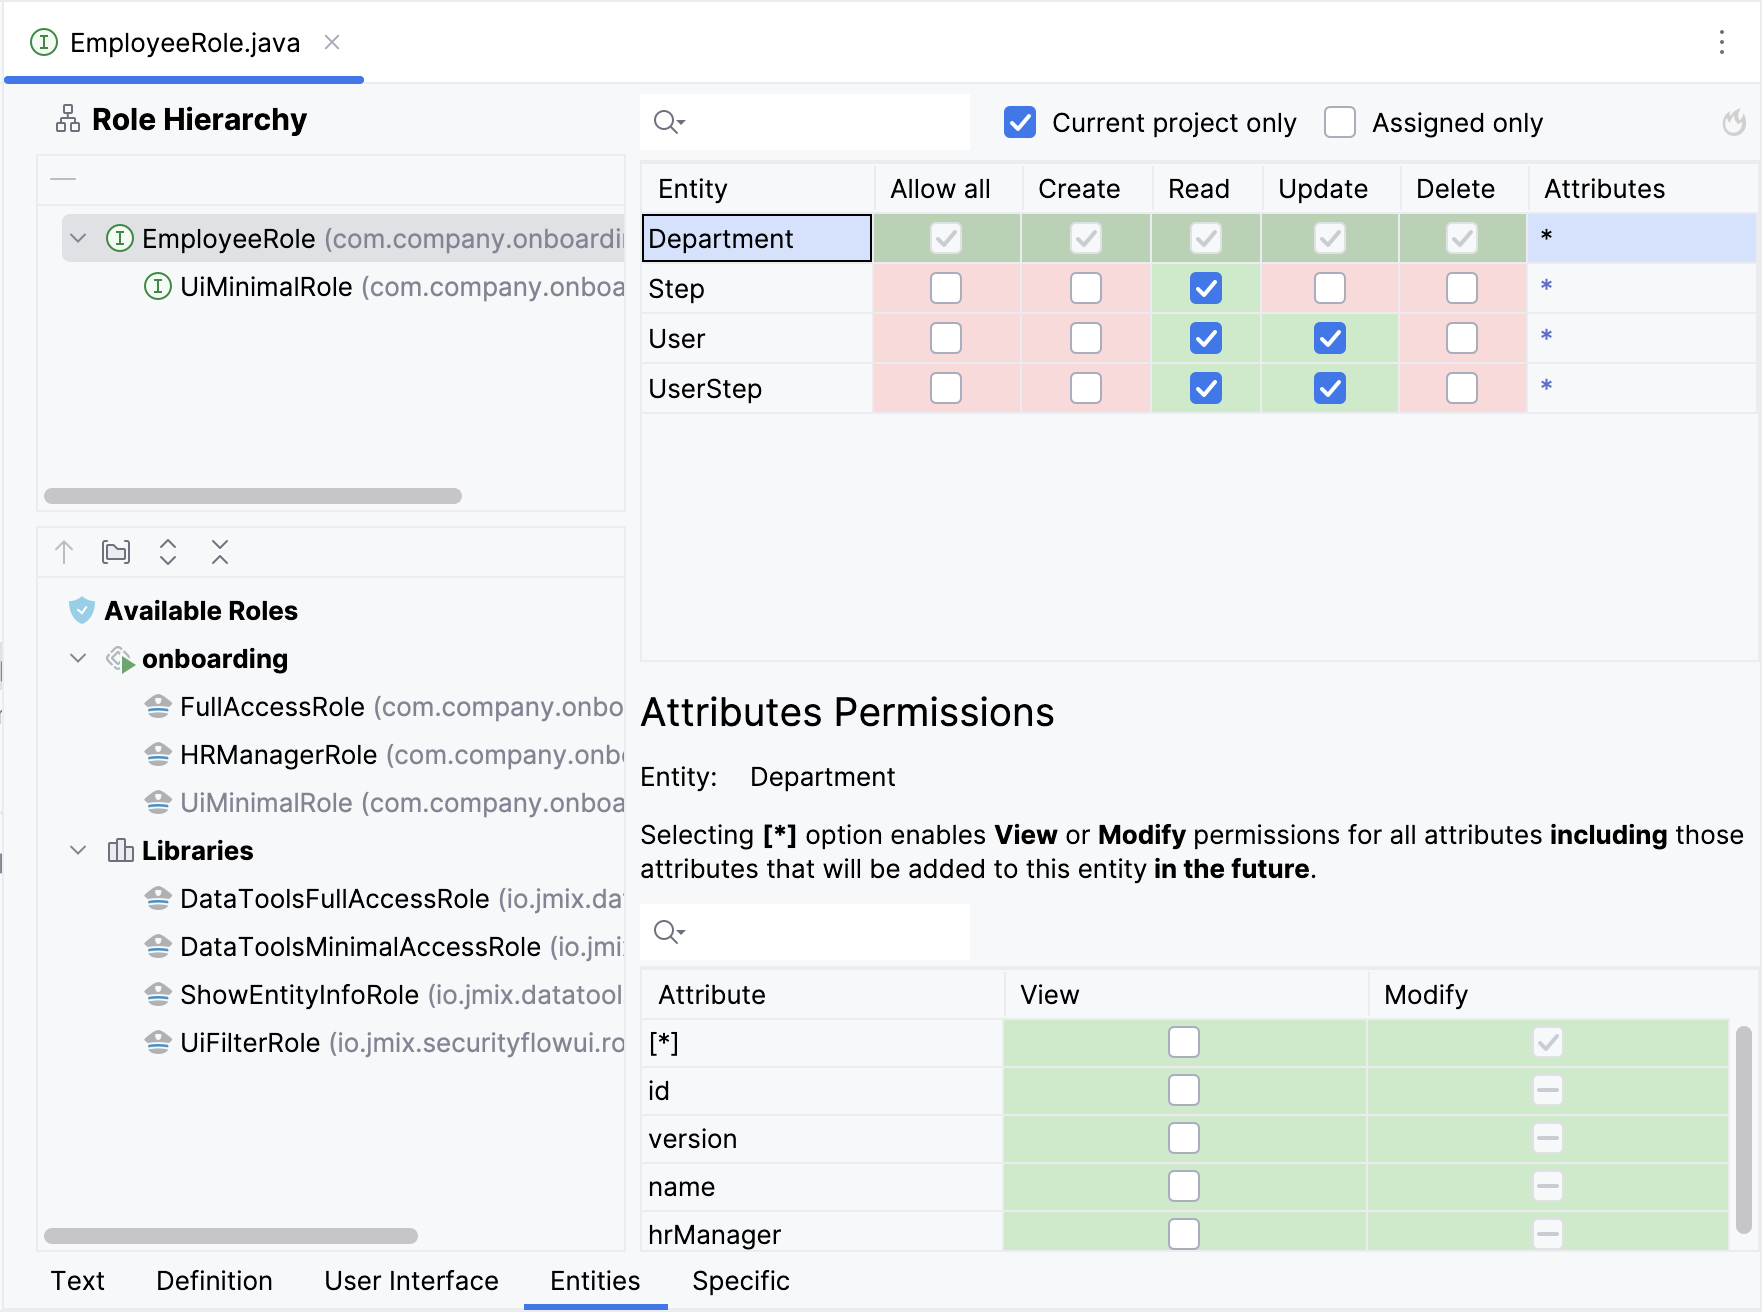
The table in the upper-right displays entities defined in the project, as well as entities inherited from the framework and add-ons. You can filter the entity list by name using the search field above the table.
A toolbar above the entities contains the following actions:
-
Current project only - toggles inherited entities display.
-
Assigned only - toggles entities without permissions.
All entity operations are denied by default. Using checkboxes in the table, you can allow particular operations for the selected entity.
The table below displays attribute permissions for the selected entity. By default, all entity attributes are denied both view and modify access. Select the View and Modify checkboxes to grant the necessary access level for each attribute.
The wildcard [*] option in the attributes' table allows you to mark all attributes as available to View or Modify, including those attributes that will be added to the selected entity in the future.
The Allow all checkbox in the entities' table permits all CRUD operations and allows Modify for all attributes, making the selected entity fully accessible for the current role.
Specific Permissions
The Specific tab defines permissions for various framework mechanisms.
Permissions are displayed for the selected role:
-
Current role - editable permissions defined in the role itself
-
Ancestor role - read-only display with navigation to role file
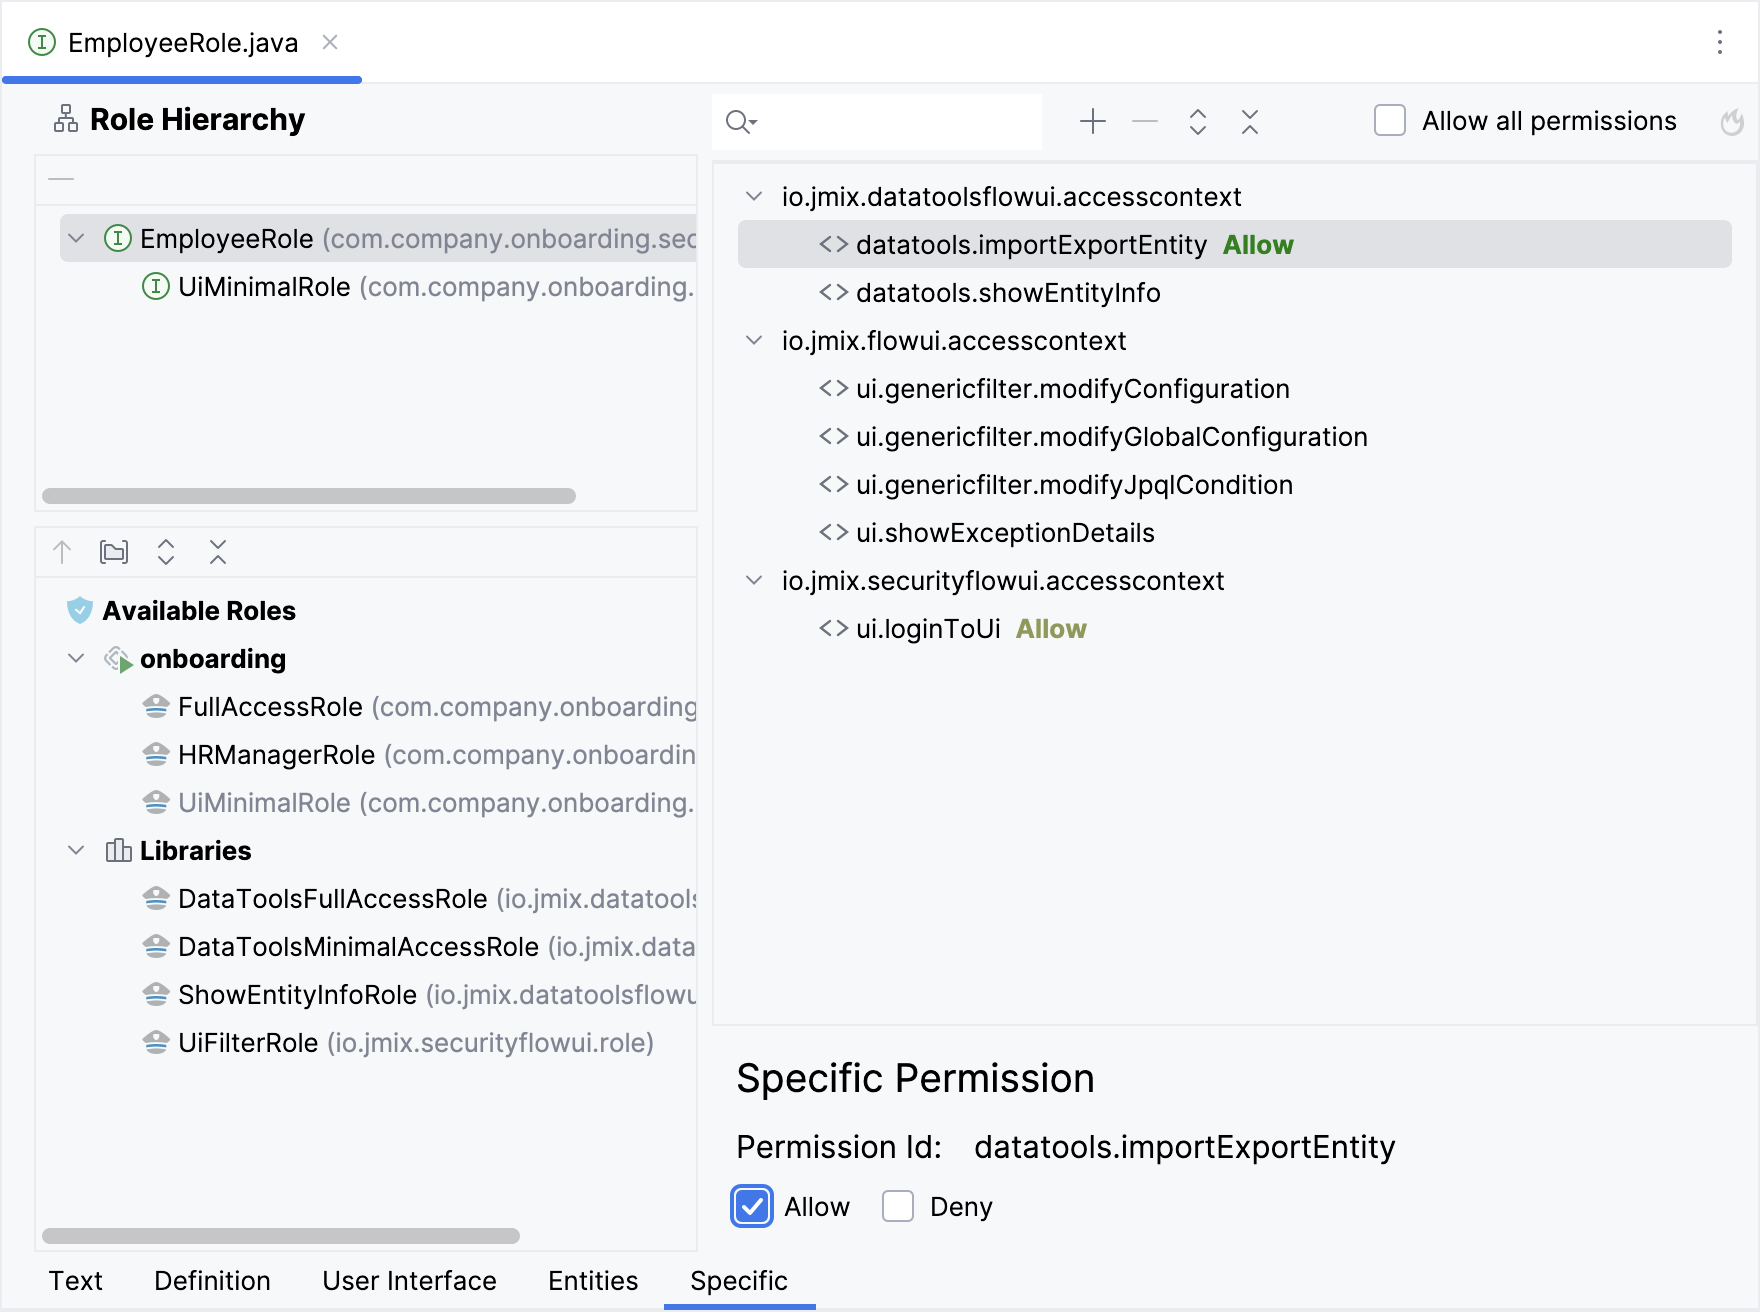
The framework uses specific permissions to restrict access to various mechanisms. In the tree, you can see the permissions inherited from the framework and add-ons.
To add permission, use the plus button in the toolbar above the tree. In the Resource field, you should specify the name of the policy defined in your project. See how to create the specific policy in the Specific policy section.
All specific policies are denied by default. Select the policy in the tree and allow access in the Specific Permission panel.
Row-level Role Wizard
To create a new row-level role, click New → Row-level Role in the Jmix Tool Window.
Enter role parameters in the dialog that appears.
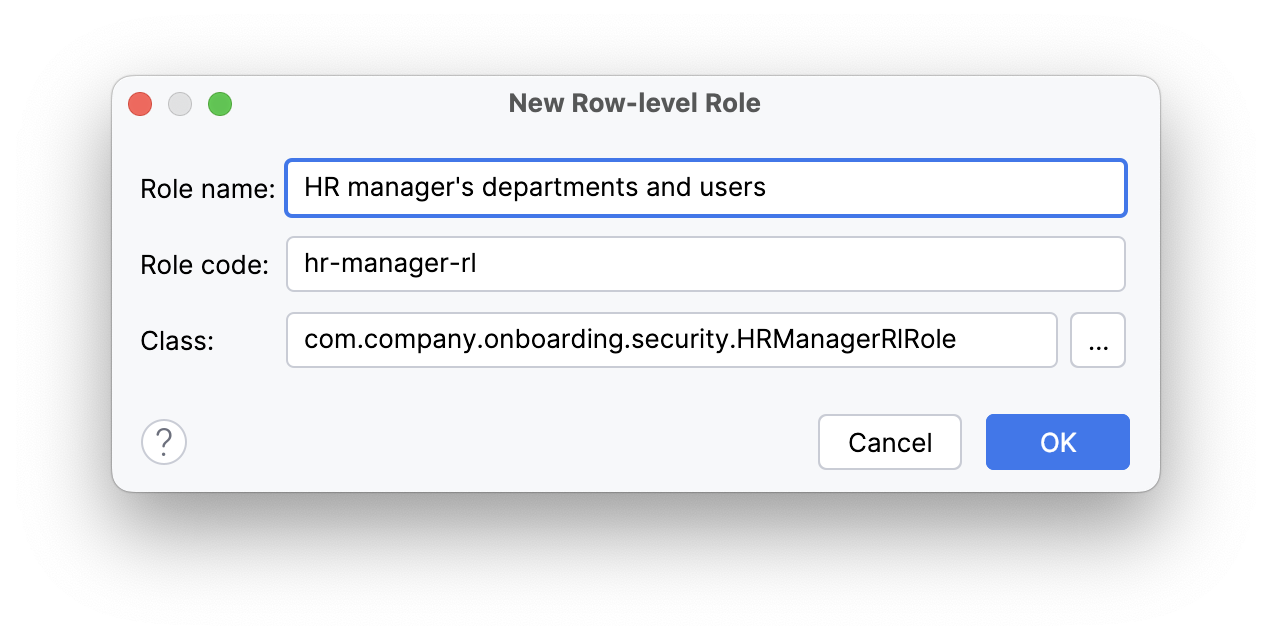
|
Role code is used when assigning the role to users, therefore it should not be changed after the role has been already assigned to some users. |
Studio will create and open an annotated role interface. To add a JPQL policy, click Add Policy → JPQL Policy in the top actions panel:
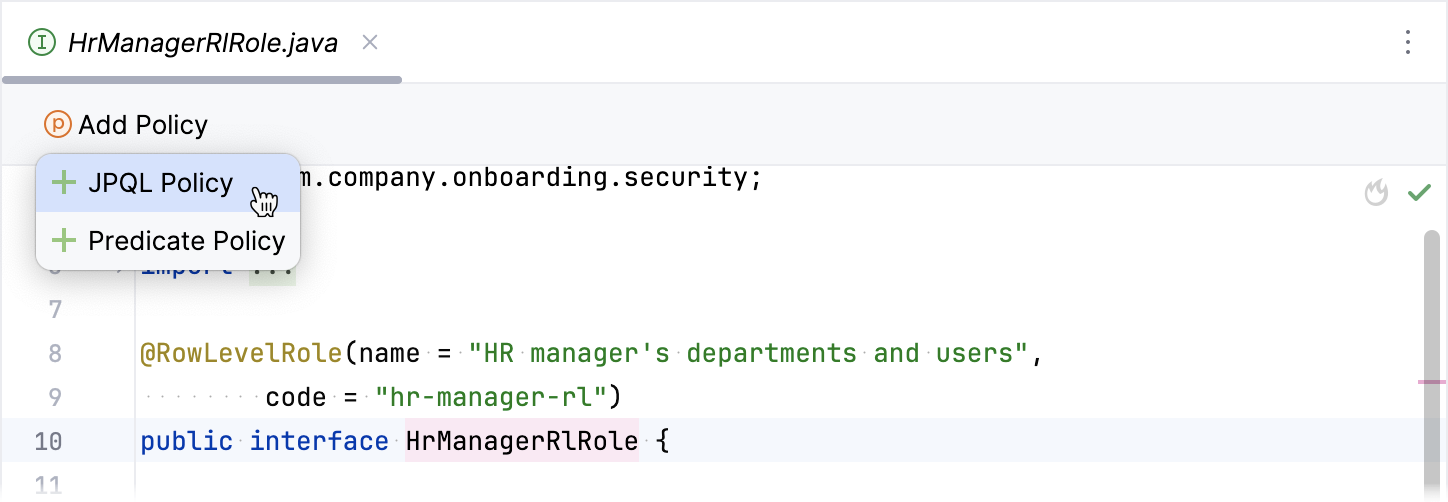
In the Add JPQL Policy dialog, specify the policy parameters:
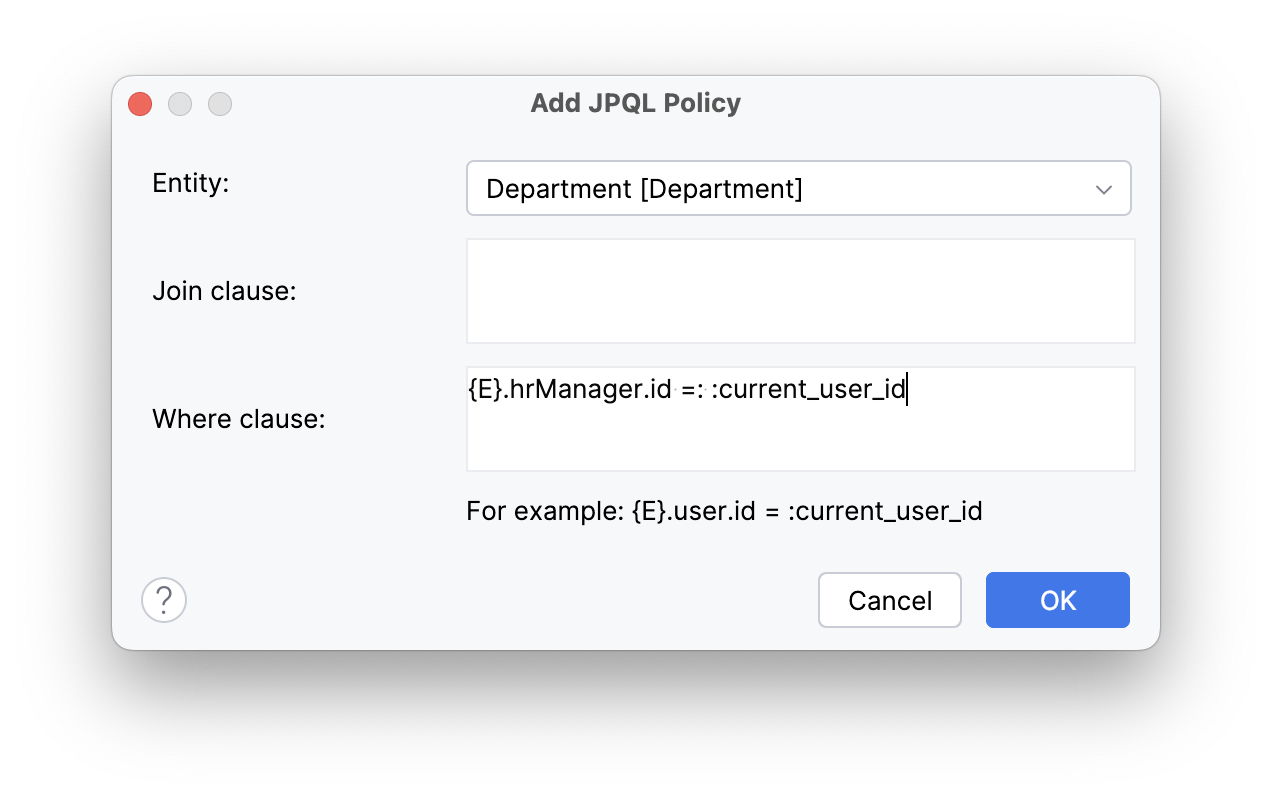
Click OK. A method defining the policy will be added to the role interface.
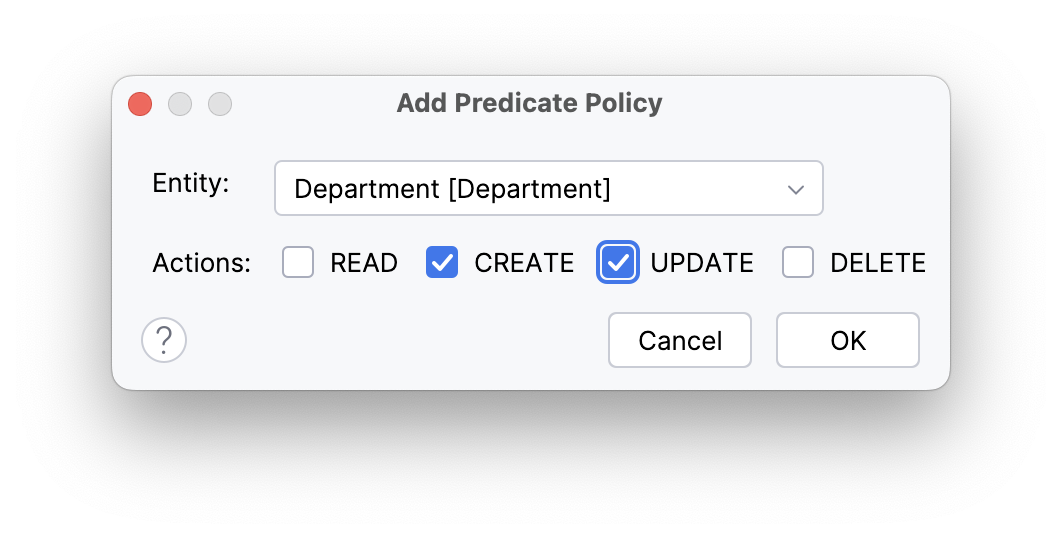
Similarly, to add a predicate policy, click Add Policy → Predicate Policy in the top actions panel. In the Add Predicate Policy dialog, specify an entity and select the actions for which the policy should be applied: